 by
by 
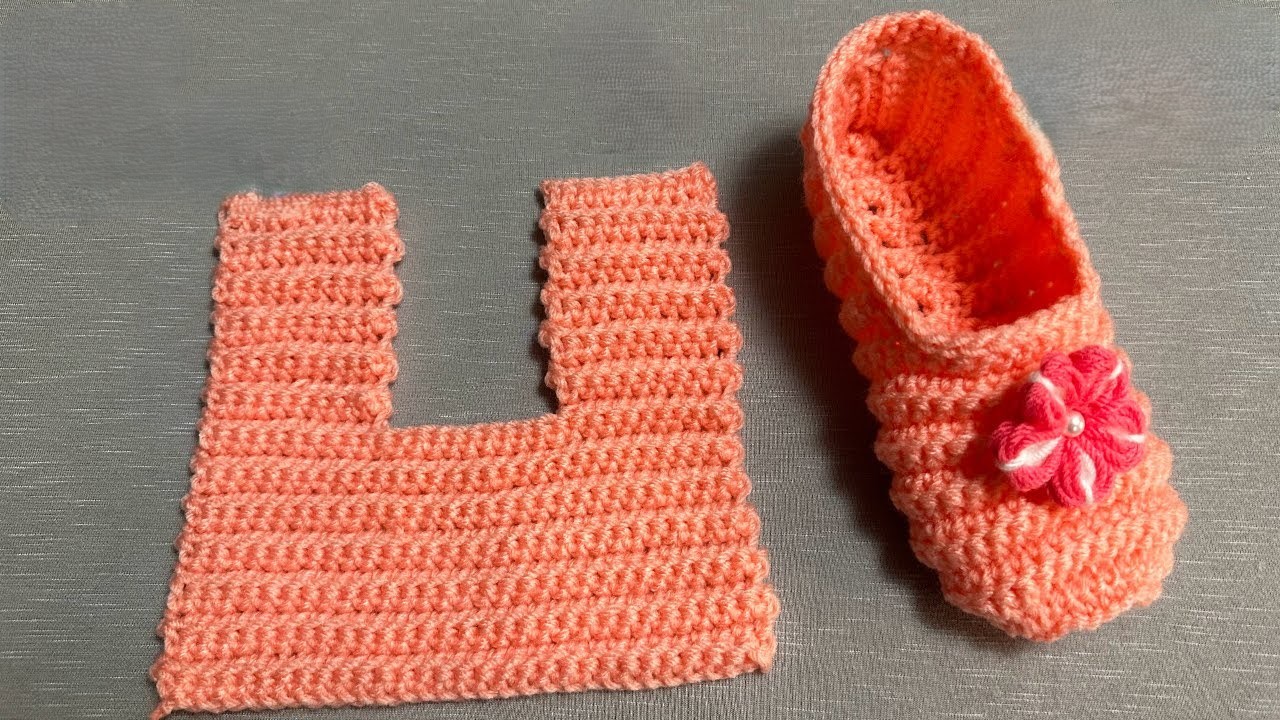
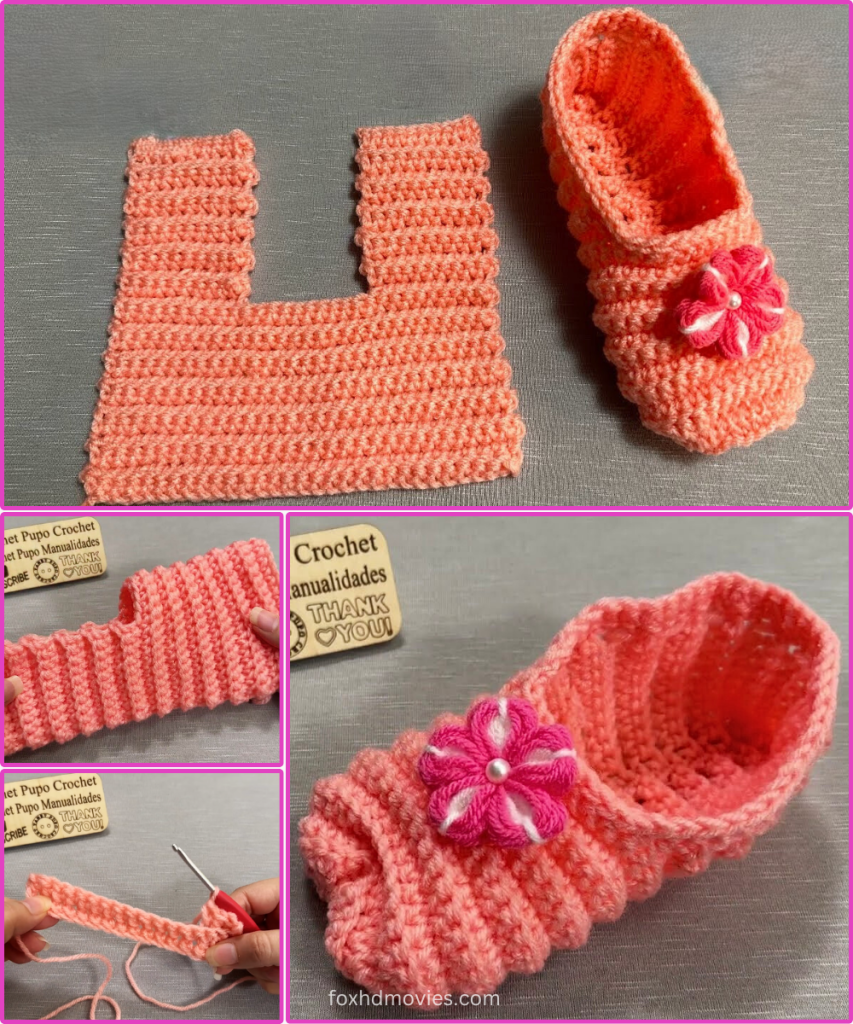
Isn’t it amazing what you can create with a simple crochet rectangle? This slipper design is pure magic! Starting from what looks like a straightforward L-shaped piece of fabric, we’ll transform it into a wonderfully cozy, perfectly fitting slipper with a beautiful textured stitch and a delightful little flower accent.
This “de esto a esto” (from this to this) approach is incredibly satisfying and surprisingly easy. It’s a fantastic project for crocheters of all levels – especially if you love a bit of instant gratification! The ribbed texture adds comfort and warmth, and the flower gives it that extra touch of charm.
Let’s unravel the secret and hook up some slipper magic!
Materials You’ll Need:
- Worsted Weight (Aran/10-ply) Yarn: Approximately 150-200 yards of your main color (e.g., Peach/Light Salmon).
- Tip: A soft acrylic or wool blend will give you the best comfort and drape for slippers.
- Small amount of contrasting yarn for the flower: (e.g., White or a lighter pink).
- Crochet Hook: Size H/5.0mm (or size needed to obtain gauge)
- Yarn Needle: For seaming and weaving in ends.
- Scissors
- Stitch Markers (Optional but Recommended): To mark starting chains or specific points.
Gauge (Don’t Skip This!)
Getting the right gauge is important to ensure your slipper fits your foot size. 14 half double crochet in back loop only (hdc BLO) stitches x 11 rows = 4 inches (10 cm).
Please make a small swatch before you begin. If your swatch is larger, try a smaller hook. If it’s smaller, go up a hook size.
Sizing Notes:
This pattern is written for an average women’s US shoe size 7-8. The finished flat piece, before seaming, will be roughly 9.5-10 inches (24-25 cm) long (from the tip of the “L” leg to the end of the wider base) and about 7.5-8 inches (19-20 cm) wide (at the widest part of the base).
To adjust for other sizes:
- For length: Adjust the starting chain for the initial rectangular panel. More chains for longer feet, fewer for shorter feet.
- For width/height: Adjust the number of rows worked for the main body of the “L” shape. More rows for wider/taller feet, fewer for narrower/shorter feet.
- As a general guide, the “L” shape’s longer side should approximate the length from the tip of your toe to your heel.
Abbreviations (US Terms):
- ch: chain
- sl st: slip stitch
- hdc: half double crochet
- hdc BLO: half double crochet in back loop only (creates the ribbed texture)
- fo: fasten off
- st(s): stitch(es)
Let’s Get Crocheting!
The core of this slipper is a flat, L-shaped panel worked in rows. The ribbed texture is created by working all half double crochets in the back loop only.
Part 1: The Flat L-Shaped Panel (Make 2)
Using your Main Color (e.g., Peach/Light Salmon):
Initial Chain: Ch 35. (This will be the approximate length of your foot, plus a bit for shaping.)
Row 1: Hdc in 3rd ch from hook and in each ch across. Ch 2, turn. (33 hdc)
- The Ch 2 at the beginning of each row counts as your first hdc throughout this pattern.
Row 2: Hdc BLO in each hdc across. Hdc in top of turning ch-2. Ch 2, turn. (33 hdc)
- Continue working hdc BLO for the ribbed texture in all subsequent rows unless otherwise specified.
Rows 3 – 18: Repeat Row 2. (33 hdc per row).
- At the end of Row 18, your piece should be a rectangle. This forms the wider “base” of the L-shape.
Now, we’ll create the “leg” of the L-shape. This forms the top of your foot.
Row 19: Hdc BLO in first 18 hdc (or roughly half the stitches of your row, adjust if your starting chain was different). Ch 2, turn. (18 hdc)
- You are now working on a smaller section of your previous row. The remaining stitches will be left unworked for this part.
Rows 20 – 32: Hdc BLO in each hdc across. Hdc in top of turning ch-2. Ch 2, turn. (18 hdc)
- The number of rows here (32 total rows from the start) determines the depth and fit around your ankle. You’re basically creating a long strap that will become the top of your foot and part of the heel.
Do not fasten off.
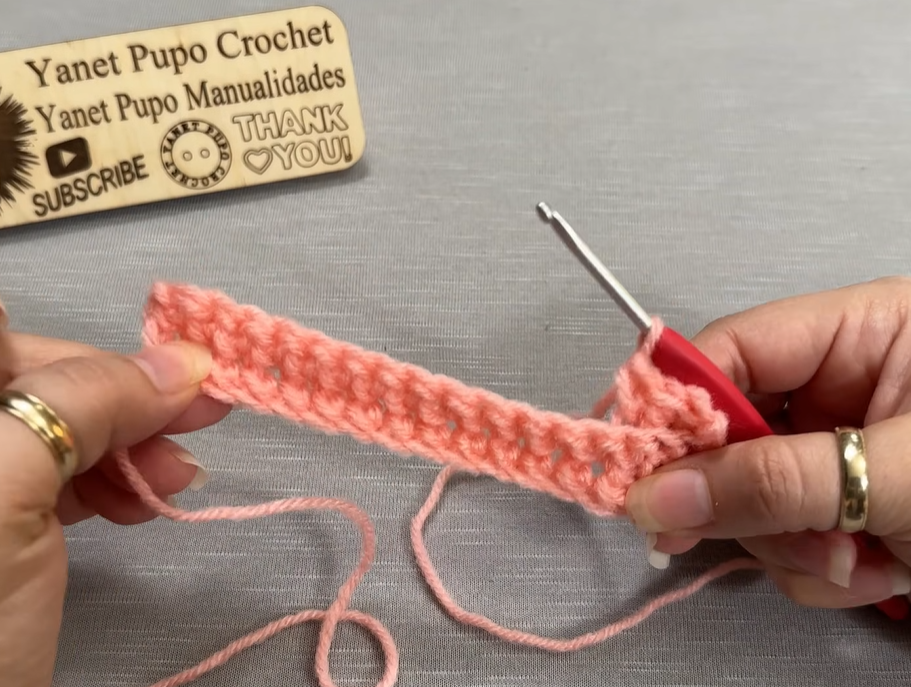
Part 2: Seaming the Slipper
This is where the magic happens! We’ll use simple whip stitch or mattress stitch to bring the shape to life.
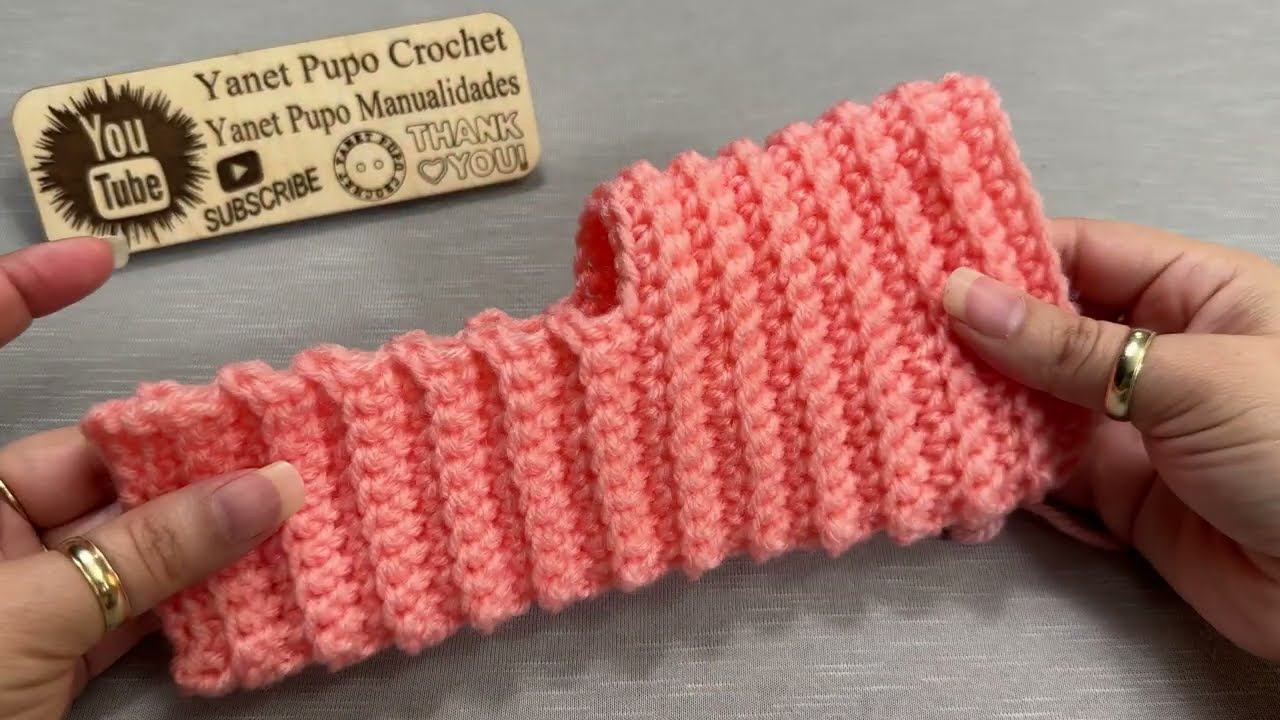
- Fold the “Leg”: Take the “leg” portion of your L-shaped piece. Fold it in half lengthwise, bringing the sides of the leg together. This seam will become the center top of your slipper (from your ankle down to your toes).
- Seam the “Leg”: Using your yarn needle and the working yarn from where you ended, stitch along the raw edge of the “leg” to seam it closed. Go all the way to the corner where the “leg” meets the wider base. Secure with a knot.
- Form the Toe: Now, rotate your piece. The seamed “leg” is now pointing up. The unseamed wider base is below it. The corner where the “leg” meets the base, on the side opposite your working yarn, will become the toe. Carefully bring the two raw edges of the wider base together at the toe point. Begin seaming across the end of the wide base, gathering it slightly as you go, to create the rounded toe shape. Use your yarn needle and working yarn. Stitch firmly until you have a neatly closed and rounded toe.
- Seam the Heel: The remaining unseamed portion of the wider base will form the heel and bottom of the slipper. Continue seaming along the bottom edge, from the toe seam towards the back, until you have formed the entire sole and heel. You’ll simply be stitching the two raw edges of the “L” shape’s base together.
- Secure and Finish: Once you’ve seamed the entire slipper, secure your yarn with a knot on the inside, and weave in all remaining ends neatly.
Repeat all steps for the second slipper.
Part 3: The Little Flower Accent (Make 1 per slipper)
This delicate touch truly elevates the slipper!

Using your contrasting yarn (e.g., White) and main yarn (e.g., Peach/Light Salmon):
Inner Petals (Contrasting Color): Ch 15. Row 1: Sc in 2nd ch from hook, skip 1 ch, 5 dc in next ch, skip 1 ch, sc in next ch; repeat from * to * across. Fasten off, leaving a long tail for sewing.
Outer Petals (Main Color): Ch 20. Row 1: Sc in 2nd ch from hook, skip 1 ch, 5 dc in next ch, skip 1 ch, sc in next ch; repeat from * to * across. Fasten off, leaving a long tail for sewing.
Assembling the Flower:
- Take the smaller (contrasting color) strip. Roll it up tightly from one end to form the center of the flower. Use the tail to stitch the base of the roll to secure it.
- Take the larger (main color) strip. Wrap it around the outside of the smaller rolled piece, positioning the “petals” to overlap slightly. Use the tail to stitch the layers together at the base, forming a full flower. Secure well.
Attaching the Flower: Position the completed flower on the top side of your slipper, near the toe, as shown in the image. Using the tails from the flower, securely sew it onto the slipper. Weave in any remaining ends.
Video tutorial
Your Magic Slippers are Complete!
Try them on! Feel the comfort, admire the unique construction, and bask in the satisfaction of creating something beautiful from a simple flat piece. These make wonderful gifts, too!
I hope you enjoyed this magical transformation pattern! If you crochet these slippers, I’d absolutely love to see them. Share your photos on social media and tag me (if you have an associated platform)!
Happy hooking!