 by
by 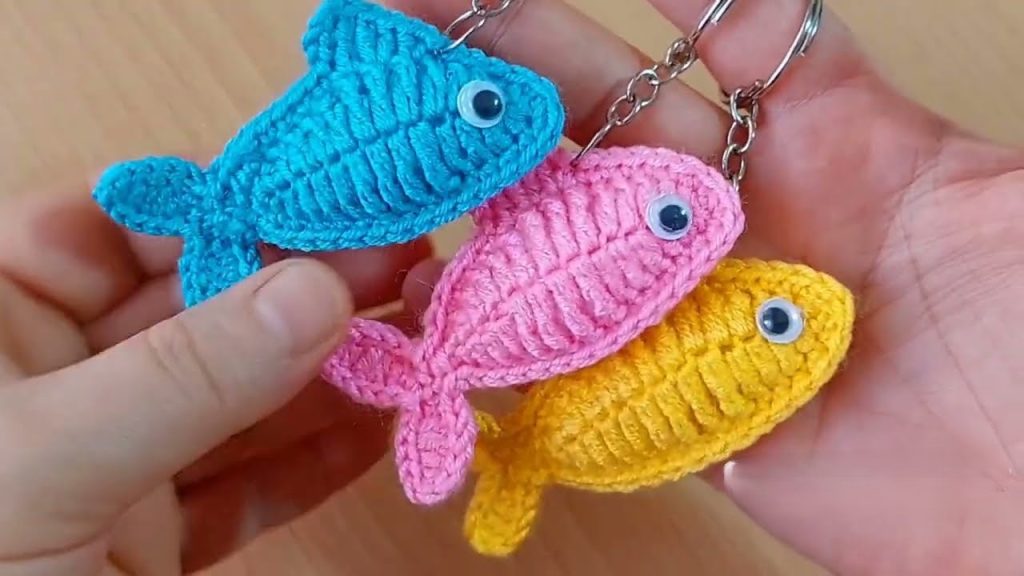
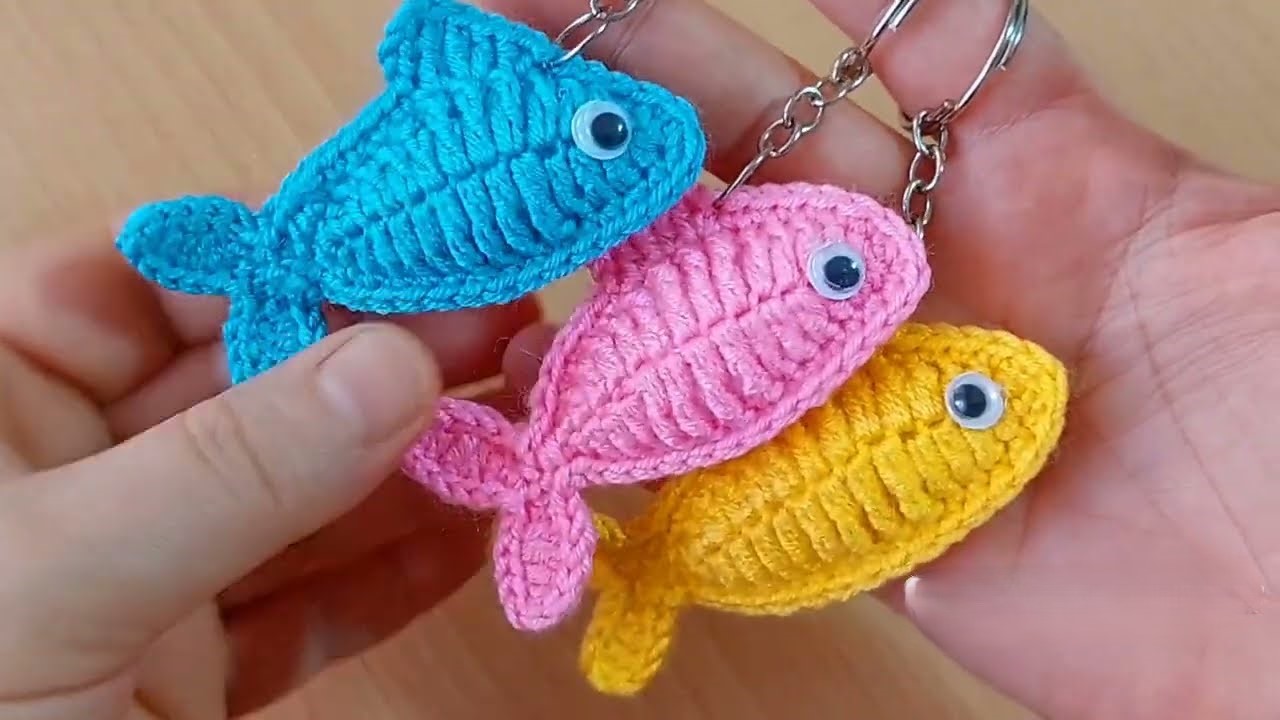
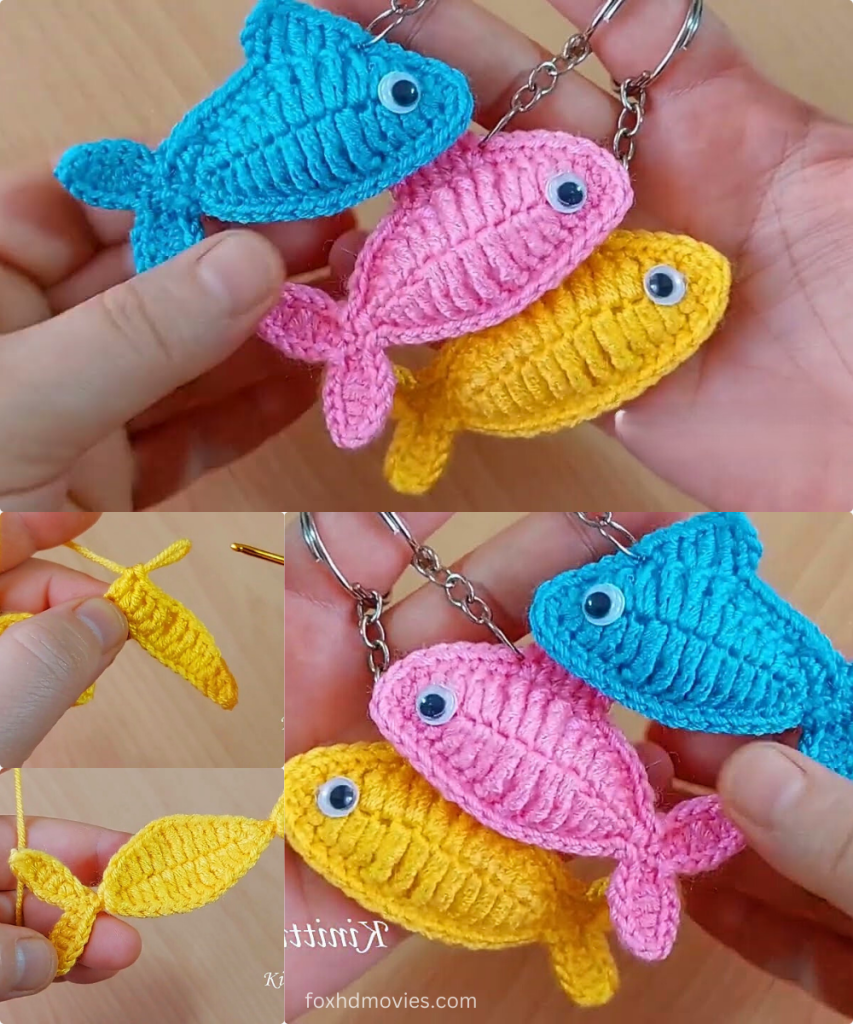
Dive into a super cute and quick crochet project with these delightful fish keychains! With their vibrant colors, charming ribbed texture, and playful googly eyes, these little fish are sure to bring a smile to anyone’s face. They’re perfect for adding a touch of handmade whimsy to your keyring, backpack, or even as a unique party favor!
What I love about this pattern is how simple yet effective it is in creating a recognizable fish shape. The ribbed texture gives them a lovely tactile quality, and they work up so fast, you’ll want to make a whole school of them! This is a fantastic stash-buster project and ideal for crocheters of all levels, even ambitious beginners.
Ready to swim into some fun? Let’s grab our hooks and yarn and make some fin-tastic friends!
Materials You’ll Need:
- DK Weight (Light Worsted / 8-ply) Yarn: Small amounts (approx. 10-15 yards per fish) in various vibrant colors (e.g., bright blue, hot pink, sunny yellow).
- Tip: Acrylic or cotton yarns work well here for durability and stitch definition.
- Crochet Hook: Size C/2.75mm or D/3.25mm (or size needed to obtain a tight fabric that stuffing won’t show through).
- Yarn Needle: For weaving in ends and shaping.
- Scissors
- Googly Eyes: Two small googly eyes (approx. 6mm-8mm) per fish.
- Fabric Glue or Strong Adhesive: For attaching googly eyes.
- Keychain Ring or Small Split Ring: One per fish.
- Polyester Fiberfill: Small amount for stuffing.
Gauge (Not Critical, but Aim for a Tight Fabric!)
Gauge is not critical for the size of these keychains, but aim for a tight fabric so the stuffing doesn’t show through. If your stitches are loose, go down a hook size.
Finished Fish Size (Approximate):
Approximately 3-3.5 inches (7.5-9 cm) long (excluding tail fins) x 1.5 inches (4 cm) tall.
Abbreviations (US Terms):
- ch: chain
- sl st: slip stitch
- sc: single crochet
- inc: increase (2 sc in the same stitch)
- sc2tog: single crochet 2 stitches together (decrease)
- fo: fasten off
- st(s): stitch(es)
- BLO: Back Loop Only (for the ribbed body)
- RS: Right Side
- WS: Wrong Side
Let’s Get Crocheting!
We’ll work the fish body in continuous rounds to create a tube, then flatten and add the fins.
Part 1: The Fish Body (Worked in Continuous Rounds)
Using your chosen yarn color (e.g., Blue):

Round 1: Make a magic ring, ch 1, 6 sc into ring. (6 sc)
- Alternatively, ch 2, 6 sc in 2nd ch from hook.
Round 2: Inc in each sc around. (12 sc)
Round 3: (Sc in next sc, inc in next sc) 6 times. (18 sc)
Round 4: (Sc in next 2 sc, inc in next sc) 6 times. (24 sc)
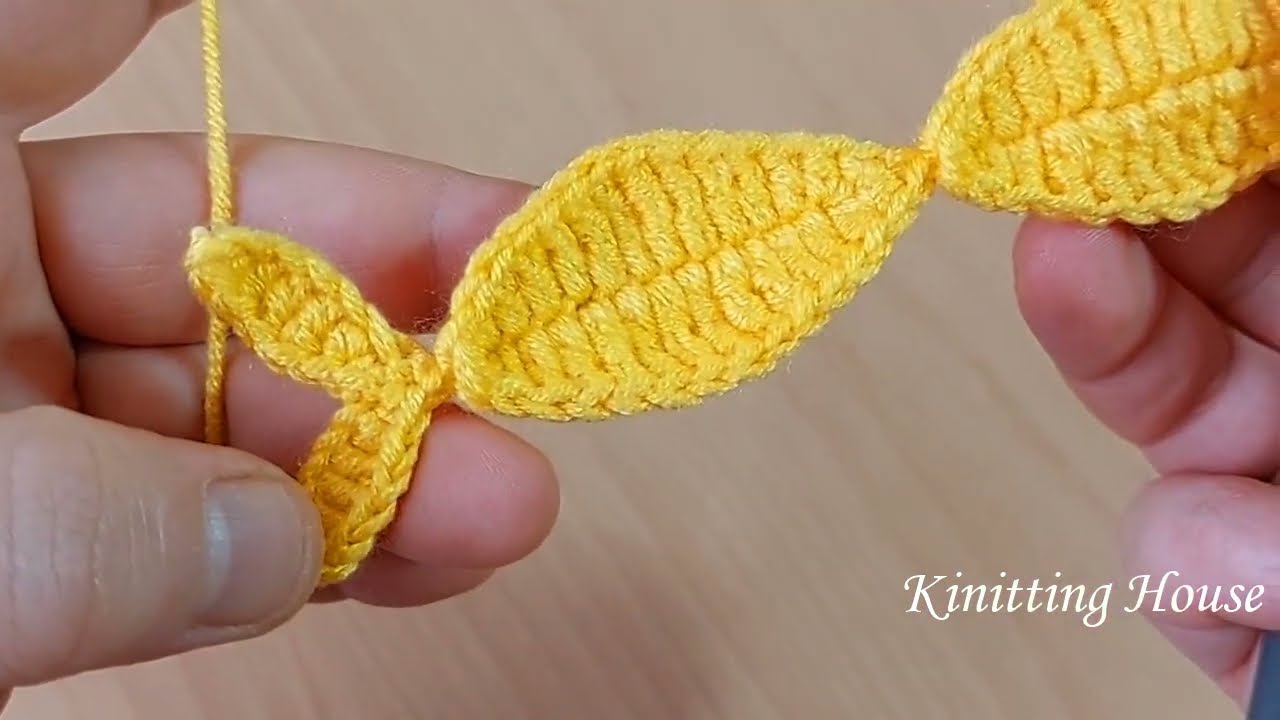
Rounds 5 – 12: Sc in each sc around, working in the back loop only (BLO) for the ribbed effect. (24 sc)
- This will make the body slightly longer and create the horizontal ridges. If you want a longer fish, add a few more BLO rows here.
Round 13: (Sc in next 2 sc, sc2tog) 6 times. (18 sc)
Round 14: (Sc in next sc, sc2tog) 6 times. (12 sc)
Stuff the body firmly with polyester fiberfill.
Round 15: (Sc2tog) 6 times. (6 sc)
Fasten off, leaving a tail. Use the yarn needle to weave the tail through the front loop of the remaining 6 stitches. Pull tight to close the opening. Weave in the tail securely.
Part 2: The Tail Fin
This will be worked directly onto the flattened end of the fish body.
- Flatten the end of the fish body where you just closed it.
- Attach yarn with a sl st to one of the stitches on the side of the flattened opening, near the center.
- Fin 1: Ch 4. Sl st in 2nd ch from hook, sc in next ch, hdc in last ch. Sl st into the next st on the fish body.
- Fin 2: Ch 4. Sl st in 2nd ch from hook, sc in next ch, hdc in last ch. Sl st into the next st on the fish body (this should be the stitch directly opposite where Fin 1 was attached, or move over one stitch for spacing).
- Fasten off, weave in ends securely.
Part 3: The Dorsal Fin (Top Fin – Make 1)
Using the same yarn:
Ch 5.
Row 1: Sc in 2nd ch from hook, hdc in next 2 ch, dc in last ch. (4 sts)
Fasten off, leaving a tail for sewing.
Attach Dorsal Fin: Position the dorsal fin on the top center of the fish body, about 1/3 of the way back from the head. Using your yarn needle, stitch it securely in place. Weave in ends.
Part 4: The Pectoral Fins (Side Fins – Make 2)
Using the same yarn:
Ch 4.
Row 1: Sl st in 2nd ch from hook, sc in next ch, hdc in last ch. (3 sts)
Fasten off, leaving a tail for sewing.
Attach Pectoral Fins: Position one pectoral fin on each side of the fish body, just below the “head” section (where the body started to widen). Stitch securely in place. Weave in ends.

Part 5: Finishing Touches
- Googly Eyes: Using strong fabric glue or adhesive, carefully attach one googly eye to each side of the fish’s head. Allow to dry completely.
- Keychain Attachment: Using your yarn needle, thread the keyring onto the top of the fish’s head, in between stitches, or you can attach it to a small chain loop (ch 5-7, sl st into itself) securely sewn onto the fish’s head.
Video tutorial
Your Fin-tastic Fish Keychains are Complete!
Look at your adorable little fish! They are so full of character and make the perfect handmade accessory or gift for any ocean lover. Play with different colors to create a vibrant collection.
I hope you had a splash crocheting these fun keychains! If you make them, I would absolutely love to see your finished projects. Share your photos on social media and tag me (if you have an associated platform)!
Happy hooking!