 by
by 
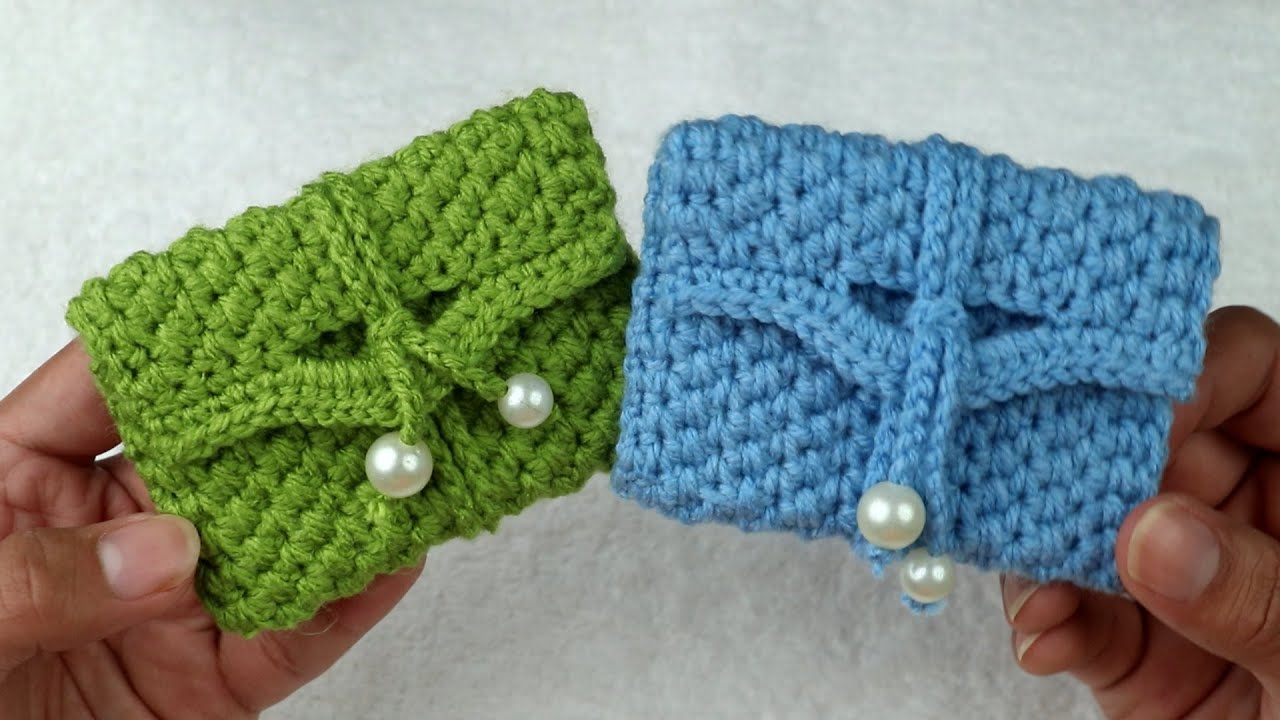
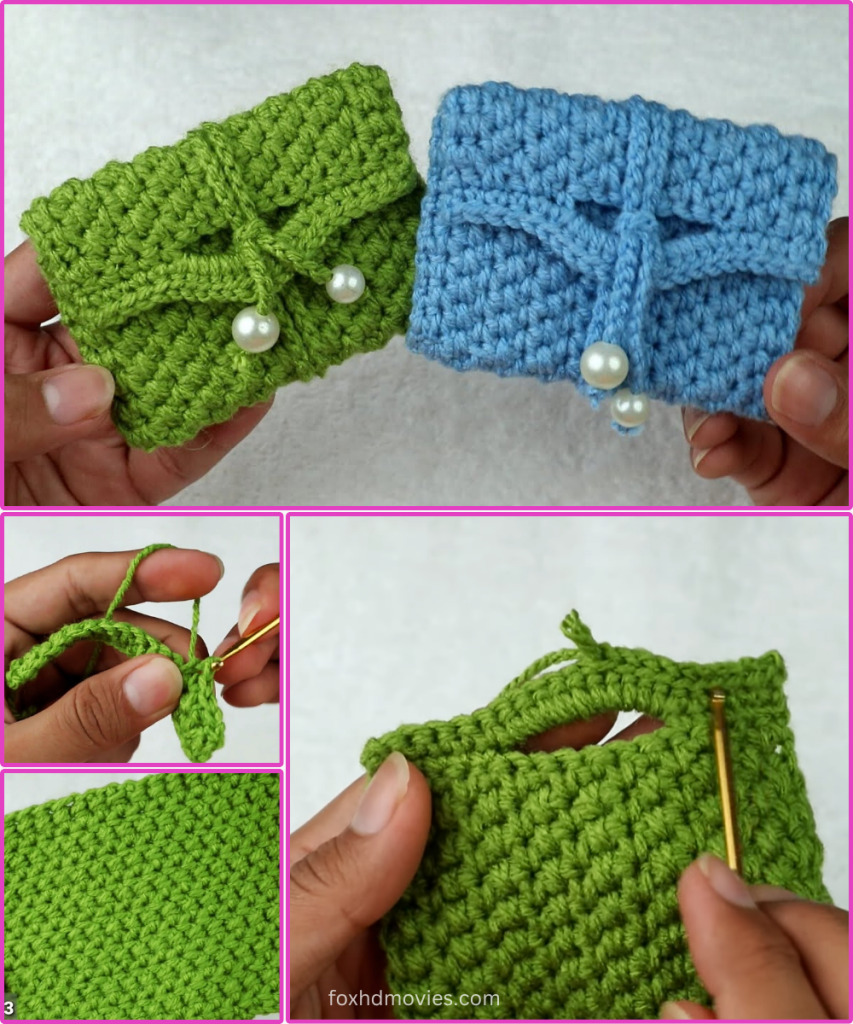
Isn’t it amazing how a few simple stitches can create something so charming and useful? These delightful mini pouches, with their textured flap and elegant pearl closure, are perfect for holding small treasures – a few coins, lip balm, earbuds, or even a tiny gift card. They’re quick to whip up, making them fantastic last-minute gifts or a lovely way to use up those yarn scraps!
What makes these pouches truly special is the combination of the sturdy single crochet fabric, the neat folded flap, and that touch of elegance from the pearl beads. They’re small but mighty in their cuteness! This is a fantastic project for crocheters of all skill levels, including adventurous beginners looking to master basic stitches and seaming.
Ready to add a touch of handmade charm to your everyday? Let’s gather our materials and get hooking!
Materials You’ll Need:
- DK Weight (Light Worsted / 8-ply) Yarn: Approximately 30-40 yards per pouch (e.g., Bright Green, Sky Blue).
- Tip: Cotton or acrylic yarns work well for good stitch definition and durability.
- Crochet Hook: Size G/4.0mm (or size needed to obtain gauge).
- Yarn Needle: For weaving in ends and attaching pearls.
- Scissors
- Pearl Beads: 2 beads per pouch, about 8mm-10mm in diameter, with a hole large enough for your yarn needle to pass through.
- Stitch Marker (Optional): To mark the first stitch of a row.
Gauge (Important for Pouch Size!)
Getting the right gauge ensures your pouch turns out the intended size. 18 single crochet stitches x 20 rows = 4 inches (10 cm).
Please make a small swatch before you begin. If your swatch is larger, try a smaller hook. If it’s smaller, go up a hook size.
Finished Pouch Size (Approximate):
Approximately 3.5 inches (9 cm) wide x 2.5 inches (6.5 cm) tall (when closed).
Abbreviations (US Terms):
- ch: chain
- sc: single crochet
- sl st: slip stitch
- fo: fasten off
- st(s): stitch(es)
Let’s Get Crocheting!
This pouch is worked flat, primarily in single crochet, and then folded and seamed. The flap is an extension of the main body.
Part 1: The Pouch Body (Make 1 per pouch)
We’ll start by chaining the width of our pouch.

Using your chosen yarn color (e.g., Green or Blue):
Ch 17.
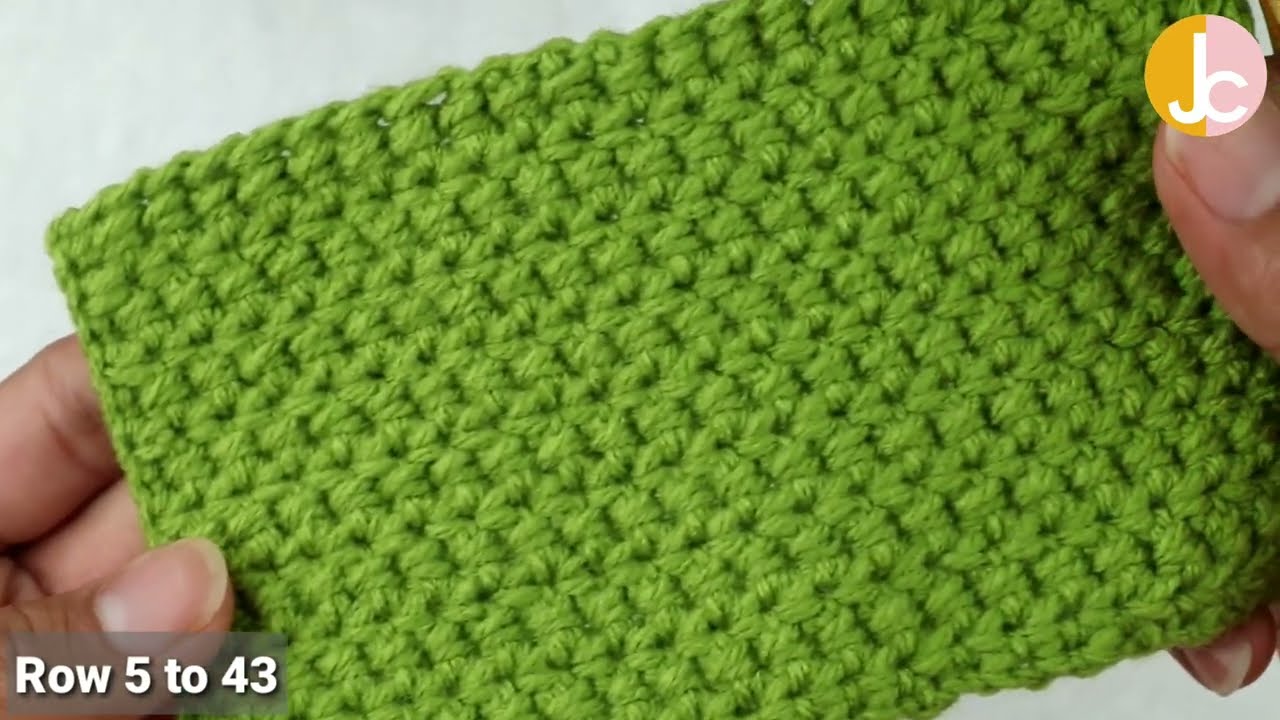
Row 1: Sc in 2nd ch from hook and in each ch across. Ch 1, turn. (16 sc)
Row 2: Sc in each sc across. Ch 1, turn. (16 sc)
Rows 3 – 20: Repeat Row 2. (16 sc per row).
- This creates the main rectangular body of your pouch. This length will form the back, bottom, and front of the pouch.
Now, we’ll create the flap and the strap for the pearl closure.
Row 21 (Flap Start): Sc in each sc across. Ch 1, turn. (16 sc)
Rows 22 – 27: Sc in each sc across. Ch 1, turn. (16 sc)
- This section forms the main part of the top flap.
Row 28 (Strap Start): Sc in first 5 sc. Ch 1, turn. (5 sc)
- We’re now working only on the small strap that will hold the pearls. Leave the remaining 11 stitches unworked for this row.
Rows 29 – 33: Sc in each sc across. Ch 1, turn. (5 sc)
- This creates the length of the strap.
Fasten off, leaving a tail of about 8-10 inches for attaching the pearls and weaving in ends.
Part 2: Assembling Your Pouch
Now, to transform your flat piece into a functional pouch!
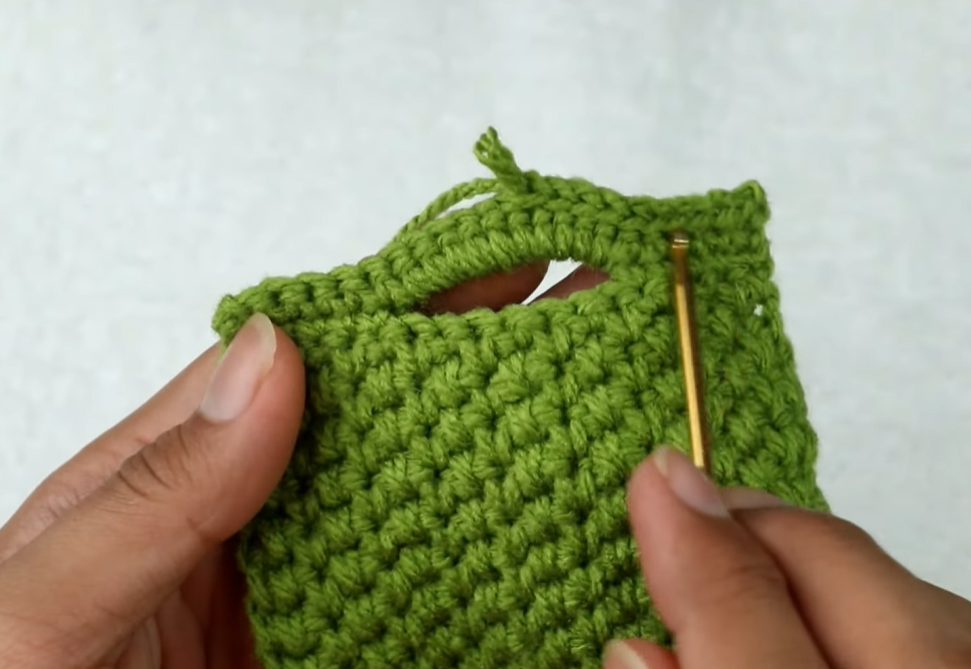
- Fold the Body: Lay your crocheted piece flat. Fold the bottom edge up towards the center, so that the main “pouch” section is formed. The part that was Rows 1-10 will be the back, and Rows 11-20 will be the front.
- Visually, fold it so that the folded edge creates the bottom of your pouch, and the top raw edges align.
- Seam the Sides: Using your yarn needle and a new piece of yarn (about 12-15 inches), whip stitch or mattress stitch up each side of the pouch. Stitch through both layers firmly to create strong seams. Knot securely and weave in ends.
- Fold the Flap: Fold the longer flap section (Rows 21-27) down over the front of the pouch. Ensure it covers the top edge neatly.
- Position the Strap: Take the small strap (Rows 28-33). This strap will wrap around the flap and hold the pearls. The strap should originate from the top edge of the flap, offset slightly from the center (to the right, looking at the image). Lay it across the top of the folded flap.
Part 3: Attaching the Pearls and Securing the Strap
This is the charming finishing touch!
- Attach First Pearl: With your yarn needle, thread the tail from the strap. Thread one pearl onto the tail.
- Loop the Strap: Bring the end of the strap, with the pearl on it, down to the bottom edge of the pouch’s front. It should loop around the flap. Decide where you want the pearl to sit on the front of the pouch.
- Secure Strap End: Stitch the very end of the strap (the 5 stitches from Row 33) securely to the front of the pouch, making sure it’s snug but allows the flap to open. Knot and weave in ends.
- Attach Second Pearl (Optional, for visual balance): This pearl is decorative and isn’t part of the closure. Thread the remaining tail from the strap onto your yarn needle. Find a spot near where the strap originates on the top of the flap, or directly below the first pearl on the front of the pouch. Thread the second pearl onto the yarn and stitch it securely in place. This gives a nice symmetrical look. Knot securely on the inside and weave in all remaining ends.
Video tutorial
Your Charming Mini Pearl Pouch is Complete!
Fill it with your favorite tiny treasures, or gift it to someone special. These pouches are incredibly versatile and just begging for more! Try different color combinations, or experiment with different bead styles.
I hope you enjoyed crocheting this lovely little project! If you make these pouches, I would absolutely love to see them. Share your photos on social media and tag me (if you have an associated platform). Let me know what you’ll put inside yours!
Happy hooking!