 by
by Hello, texture enthusiasts and bag lovers!

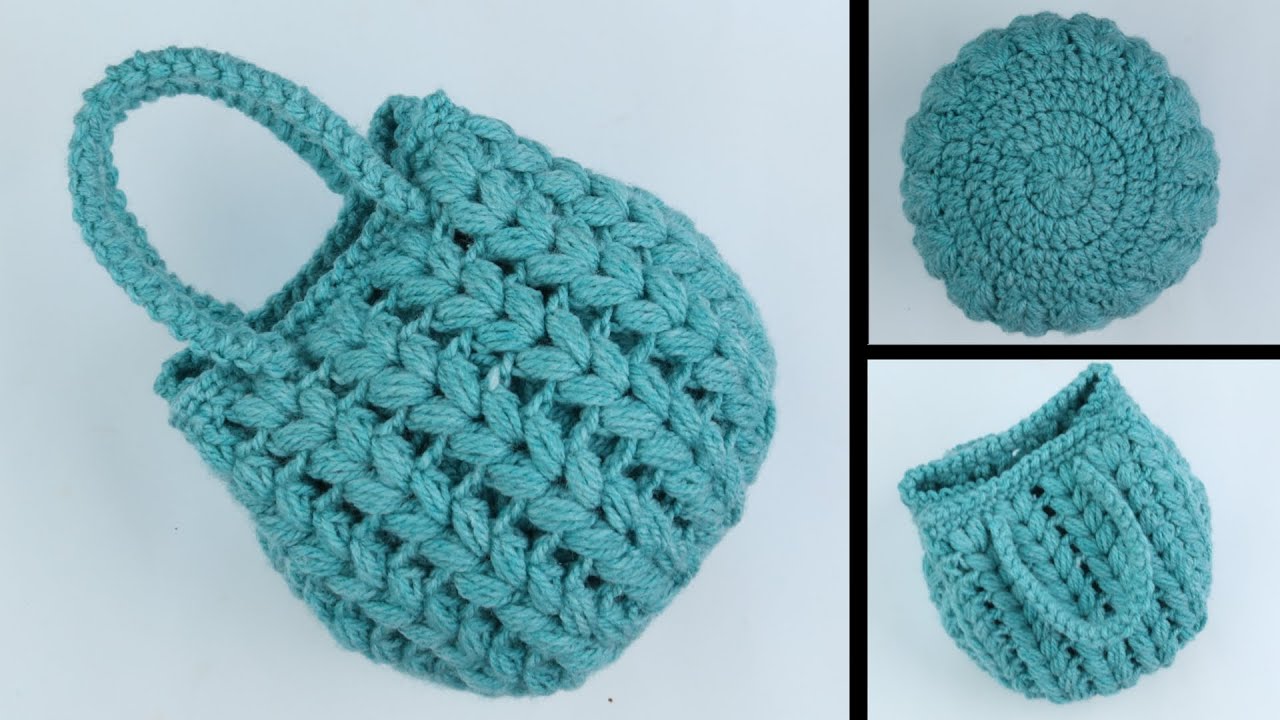
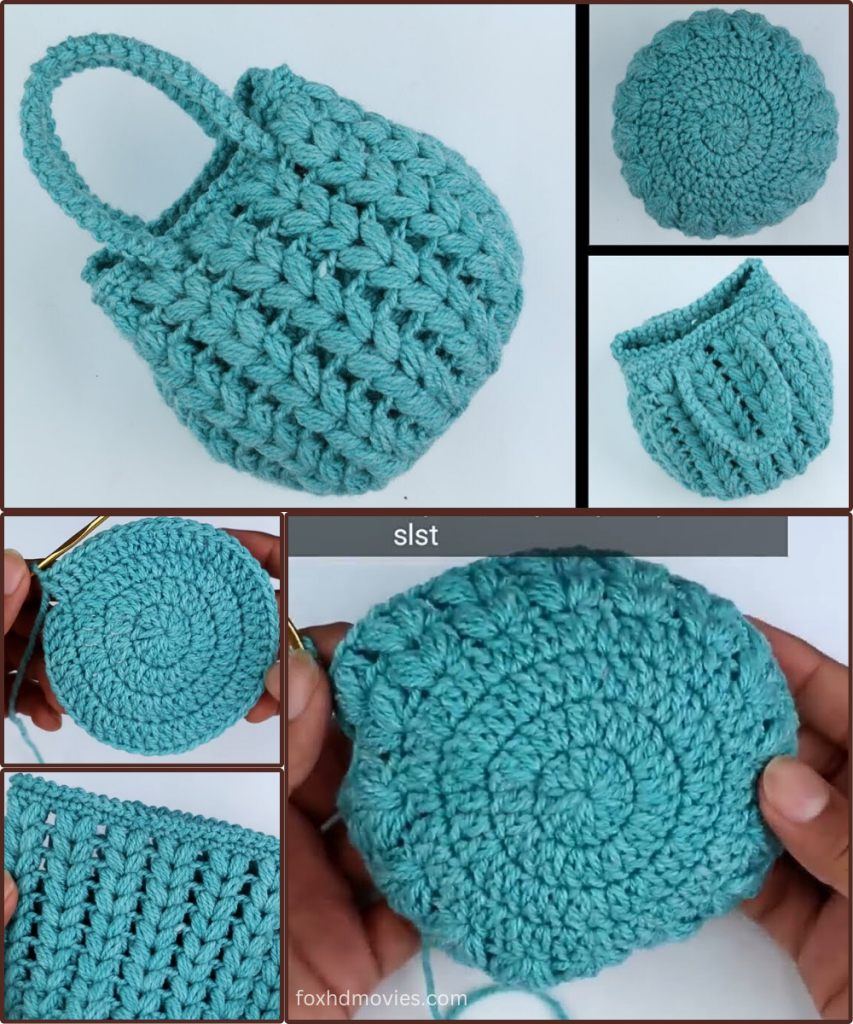
Are you ready to crochet a bag that’s as delightful to touch as it is to look at? Today, we’re diving into creating the Cloud Puff Texture Bag! This adorable little pouch, with its round base and beautifully squishy, dimensional stitches, is perfect for carrying your essentials, as a gift bag, or even as a chic little project bag for your current WIP.
The magic of this bag lies in its unique stitch pattern, which creates a series of soft, raised “puffs” or “beans” that give it an incredibly cozy, almost cloud-like feel. It’s a fantastic project to elevate your basic crochet skills and create something truly unique.
Ready to add a wonderfully tactile accessory to your collection? Let’s gather our yarn and hooks!
What you’ll need:
- Yarn: A medium to chunky weight yarn (Worsted, Aran, or Bulky) will best showcase this stitch. The bag in the image looks like it’s made with a bulky (5) or even super bulky (6) weight yarn in a lovely teal or dusty blue. Choose a yarn that is soft and has good stitch definition.
- Crochet Hook: A hook size appropriate for your chosen yarn. For Bulky yarn, an 8.0mm (L/11) or 9.0mm (M/N/13) hook would likely be suitable. For Worsted/Aran, a 6.0mm (J/10) or 6.5mm (K/10.5) hook. (Use a hook that creates a dense fabric without being too stiff.)
- Scissors
- Tapestry Needle (for weaving in ends)
- Stitch Marker (highly recommended for working in continuous rounds)
Abbreviations (US Terms):
- ch: chain
- st(s): stitch(es)
- sl st: slip stitch
- sc: single crochet
- hdc: half double crochet
- dc: double crochet
- inc: increase (work 2 sts in the same st)
- Puff St: Puff Stitch (Specific instructions below)
- rep: repeat
- {…}: indicates stitches worked in the same stitch/space
- (…): indicates total stitches at the end of the round/row
Understanding the “Cloud Puff” Stitch (Adapted Puff Stitch)
This stitch creates the lovely texture. Here’s how to make it:
Puff Stitch (Puff St): (Yo, insert hook into st, yo, pull up a loop) 3 times into the same stitch (you will have 7 loops on your hook). Yo, pull through all 7 loops on hook. Ch 1 to secure the puff. The ch 1 typically counts as part of the stitch space for the next round, but for this pattern, we will treat it as a securing chain that’s part of the puff itself.
The Cloud Puff Texture Bag Pattern
We’ll start with a flat circular base, then work the body in textured rounds, and finish with a simple handle.
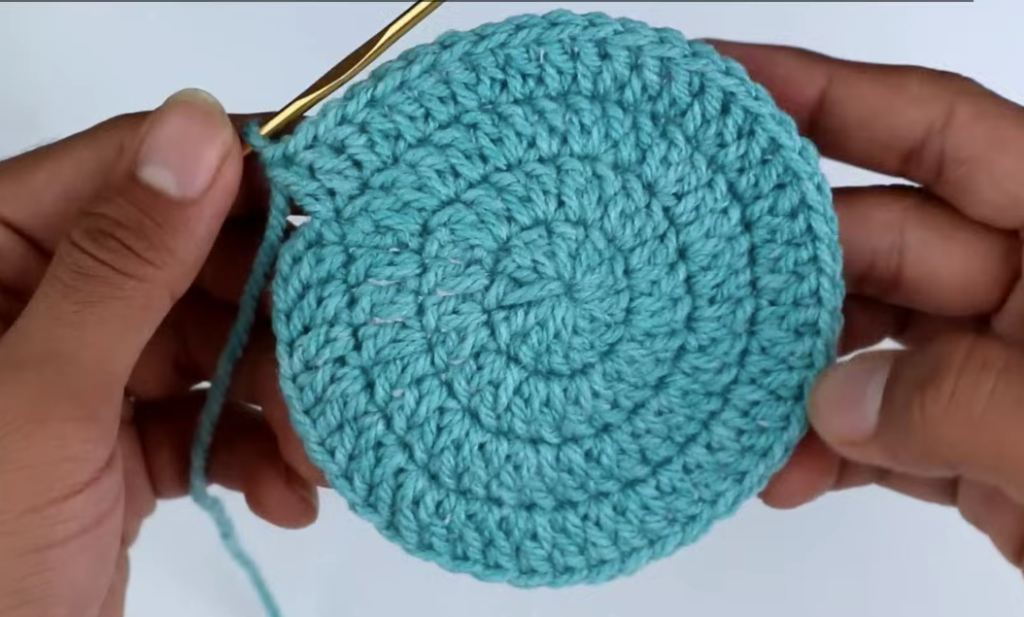
Part 1: The Round Base (Worked in continuous rounds or joined with sl st)

For a sturdy base, work tightly. You can work in continuous rounds using a stitch marker or join with a sl st and ch 1 at the end of each round. I will write for joining for clarity.
- Start with MR: Make a Magic Ring.
- Round 1: Ch 1 (does not count as a st). Work 8 sc into the MR. Sl st to the first sc to join. (8 sc)
- Gently pull tail to close the center hole.
- Round 2: Ch 1. Inc in each st around. Sl st to join. (16 sc)
- Round 3: Ch 1. *Sc in first st, Inc in next st*. Rep from * to * around. Sl st to join. (24 sc)
- Round 4: Ch 1. *Sc in next 2 sts, Inc in next st*. Rep from * to * around. Sl st to join. (32 sc)
- Round 5: Ch 1. *Sc in next 3 sts, Inc in next st*. Rep from * to * around. Sl st to join. (40 sc)
- Check your base size here. It should be roughly 4-5 inches in diameter for a small bag. Add more increase rounds if you want a larger bag (e.g., Round 6: Sc in next 4 sts, Inc in next st, etc.)
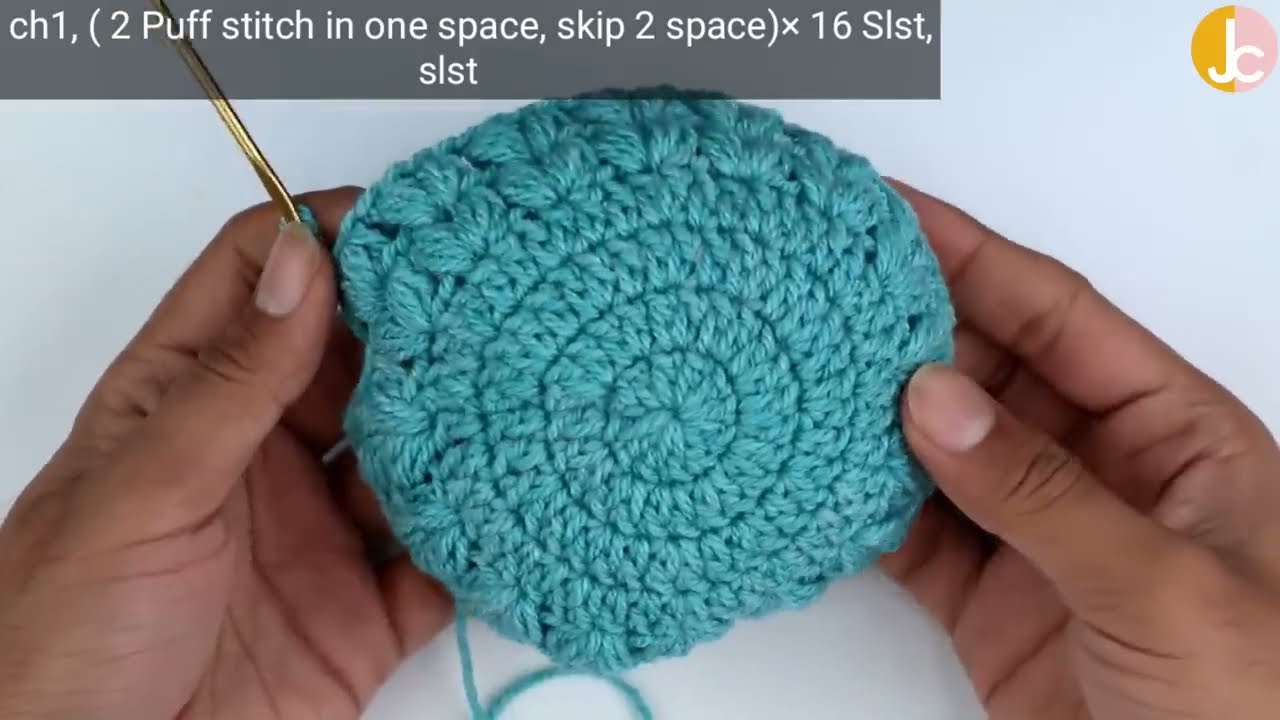
Part 2: The Bag Body (Worked in Rounds with Puff Stitches)
Now for the beautiful texture! We’ll work this section in joined rounds.
- Round 6 (Transition Round): Ch 1 (does not count as a st). Sc in each st around. Sl st to join. (40 sc)
- This round creates a slight transition edge between the base and the textured body.
- Round 7 (First Puff Round): Ch 2 (counts as first leg of puff st, or use an alternative puff st start). Work 1 Puff St in the same st as join. *Sk next st, Work 1 Puff St in next st*. Rep from * to * around. Sl st to the top of the first Puff St to join. (20 Puff Sts)
- You are working a Puff St, skipping a stitch, then working a Puff St in the next. This creates the alternating pattern.
- If your Puff St has a ch 1 to secure, you will be skipping that ch 1 and the next regular stitch before working into the next available stitch.
- Round 8 (Second Puff Round): Ch 2. Work 1 Puff St in the same st as join (working into the top of the first Puff St from the previous round). *Sk next Puff St, Work 1 Puff St in the top of the next Puff St*. Rep from * to * around. Sl st to the top of the first Puff St to join. (20 Puff Sts)
- From now on, you’ll be working your Puff Sts into the tops of the Puff Sts from the previous round, creating the offset, woven look.
- Repeat Round 8: Continue repeating Round 8 until your bag reaches the desired height. The bag in the image appears to have about 8-10 rounds of Puff Stitches.
- For the bag in the image, aim for a height that’s roughly equal to the base diameter before you start the handle.
Part 3: The Top Edge & Handle
- Round (Top Edge – Sc): Ch 1. Sc in each Puff St around. (20 sc) Sl st to join.
- You are working into the tops of the puffs. Aim for one sc per puff stitch.
- Round (Top Edge – Sc continued): Ch 1. Sc in each sc around. Sl st to join. (20 sc)
- This creates a neat, even edge before the handle.
- Handle Foundation: Ch 1. Sc in next 4 sts. Ch 15 (or desired length for handle). Sk next 6 sts. Sc in next 4 sts. Ch 15. Sk next 6 sts. Sl st to the first sc to join.
- Adjust chain length for handle based on your preference. Shorter chains for a small handbag, longer for a shoulder bag.
- Handle Shaping (Sc around chains): Ch 1. Sc in next 4 sts (over the previous sc). Work 15 sc around the chain-15 space (essentially working into the chain stitches). Sc in next 4 sts. Work 15 sc around the next chain-15 space. Sl st to the first sc to join. (38 sc)
- This creates a sturdy, rounded handle.
- Final Handle Round: Ch 1. Sc in each st around the handle circumference. Sl st to join. (38 sc)
- Fasten off.

Finishing:
- Weave in all loose ends securely with your tapestry needle. Double-check the handle connections for extra security.
- Gently block your bag if desired, to help the stitches settle and give it a refined shape.
Video tutorial
Tips for Your Cloud Puff Bag:
- Yarn Choice is Key! The puff stitch really shines with a yarn that has some loft and definition. Avoid very thin or splitty yarns.
- Stitch Marker is Your Friend: Especially in the continuous rounds of the base, a stitch marker will save you headaches.
- Count Your Puffs: It’s easy to lose count, so periodically check that you have the correct number of puff stitches in each round.
- Handle Strength: For a very strong handle, you can work an extra round or two of sc around the handle area (Step 4 and 5) or even insert a piece of rope before the final round of sc.
- Lining (Optional but Recommended): For a more durable and functional bag, consider sewing a fabric lining. This prevents stretching and keeps small items from poking through.
- Customization:
- Size: Adjust the number of increase rounds for the base to make a wider or narrower bag. Adjust the number of puff stitch rounds for a taller or shorter bag.
- Strap: Instead of two small handles, you could create one long strap by chaining a much longer length and attaching it to opposite sides of the bag.
- Closure: Add a magnetic snap, a button, or a drawstring closure to the top edge.
This Cloud Puff Texture Bag is a delightful project that will yield a beautifully unique accessory. Enjoy the wonderful texture as you create it!
Happy Crocheting!