by
by 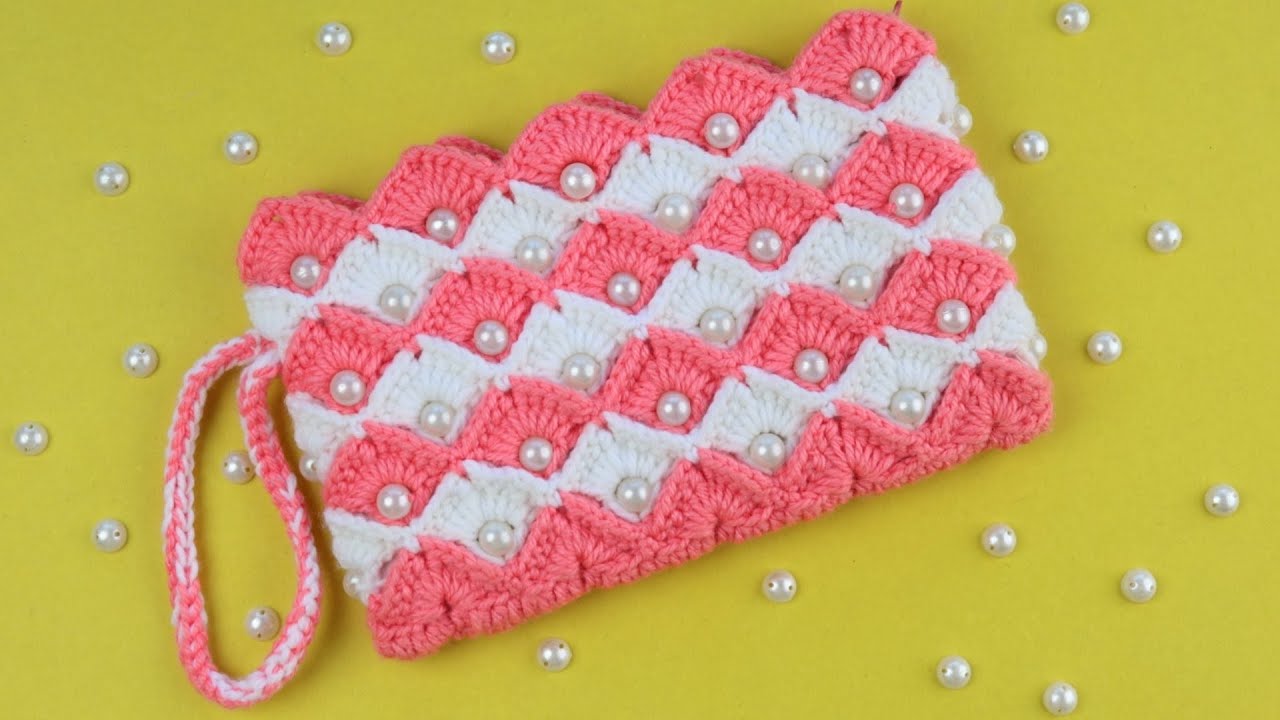
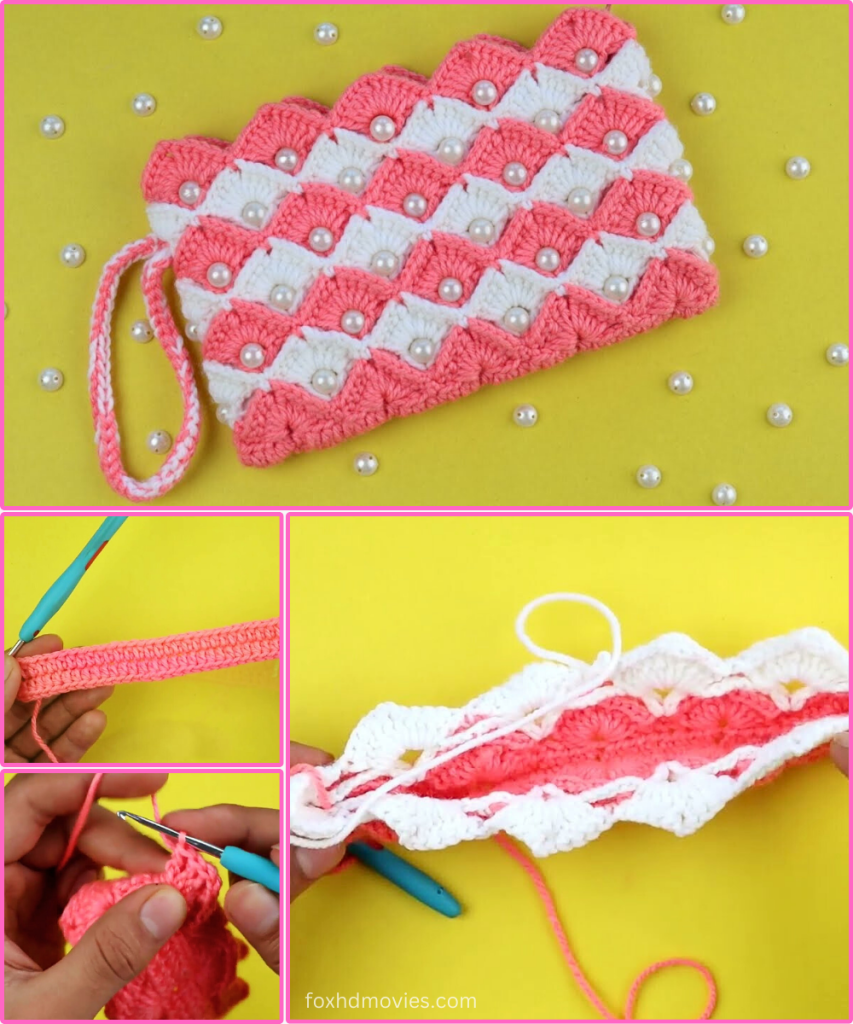
Doesn’t this pouch just radiate charm and elegance? With its delightful scalloped shell stitch pattern and shimmering pearls nestled within each “scale,” this little bag is a true showstopper! It’s perfectly sized for essentials like your phone, keys, lipstick, or as a dazzling coin purse. The two-tone design adds a playful yet sophisticated touch, making it a fantastic accessory or a heartfelt gift.
What makes this pouch truly special is the ingenious way the pearls are integrated into the lovely shell stitch, creating a textured, almost quilted effect. While it might look intricate, the process is surprisingly fun and addictive once you get the rhythm of the shell stitch and bead placement down. This is a wonderful project for intermediate crocheters, or adventurous beginners ready to tackle color changes and bead work!
Ready to add some handmade dazzle to your collection? Let’s gather our materials and hook up some pearly magic!
Materials You’ll Need:
- DK Weight (Light Worsted / 8-ply) Yarn:
- Color A (CA): Approximately 60-80 yards (e.g., Pink).
- Color B (CB): Approximately 60-80 yards (e.g., White).
- Tip: A smooth, non-fuzzy yarn like mercerized cotton or a soft acrylic will work best to highlight the stitch definition and prevent beads from snagging.
- Crochet Hook: Size G/4.0mm (or size needed to obtain gauge).
- Yarn Needle: For weaving in ends and attaching beads.
- Scissors
- Pearl Beads: Approximately 60-70 beads (depending on pouch size and bead diameter), about 6mm-8mm in diameter, with a hole large enough for your yarn needle to pass through.
- Crucial Prep: You will need to pre-string all your beads onto your Color A working yarn BEFORE you start crocheting the rows where beads are placed. It’s much easier than trying to add them as you go.
- Optional: Small magnetic snap closure or a zipper if you prefer a different closure.
Gauge (Important for Pouch Size and Stitch Definition!)
Getting the right gauge is important to ensure your pouch turns out the intended size and the shell stitch looks neat. 1 shell (5 dc) x 3 shell rows = approximately 2 inches (5 cm) wide x 2 inches (5 cm) tall. (Measured on a beaded row).
Please make a small swatch before you begin. If your swatch is larger, try a smaller hook. If it’s smaller, go up a hook size.
Finished Pouch Size (Approximate):
Approximately 8 inches (20 cm) wide x 5 inches (12.5 cm) tall (when flat).
Abbreviations (US Terms):
- ch: chain
- sl st: slip stitch
- sc: single crochet
- dc: double crochet
- fo: fasten off
- st(s): stitch(es)
- sk: skip
- CA: Color A (Pink)
- CB: Color B (White)
- Shell: (2 dc, ch 1, 2 dc) in specified stitch or space.
- Bead Shell (BSh): (2 dc, 1 bead-dc, 2 dc) in specified stitch or space. (See special stitch below).
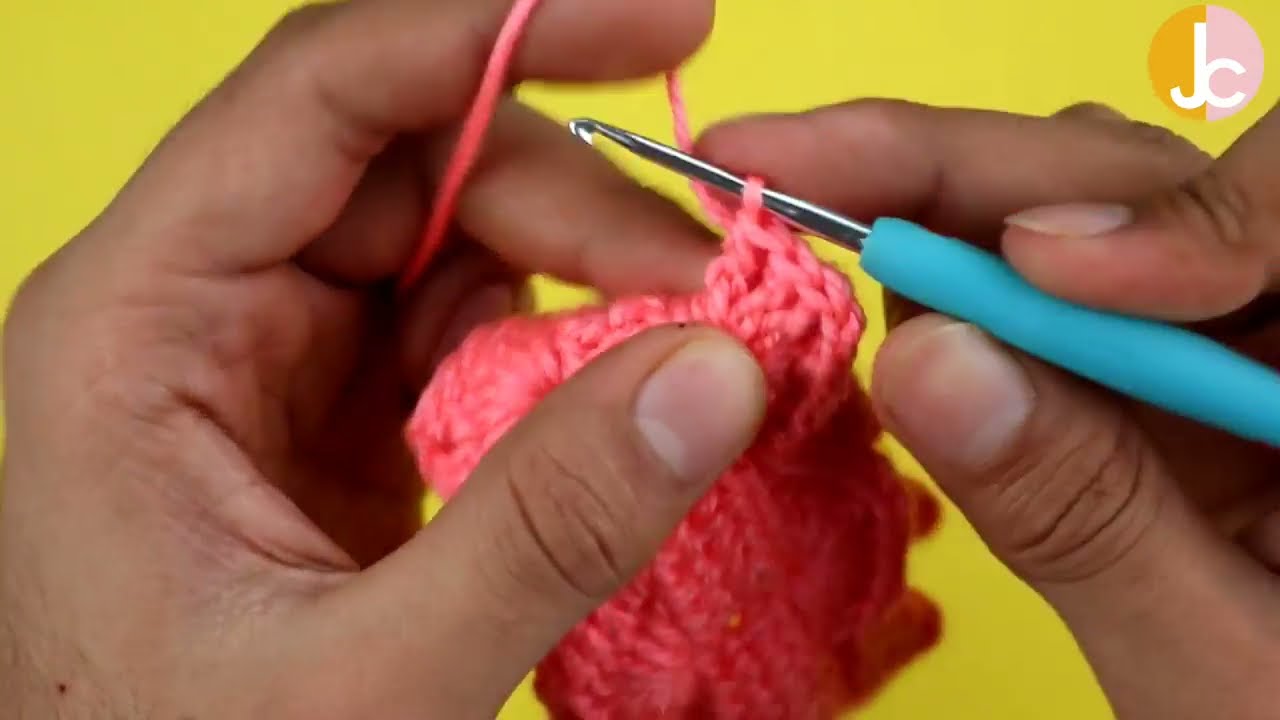
Special Stitch: Bead Double Crochet (Bead-dc or Bdc)
This is the technique for incorporating the beads directly into your shell stitch.
To make a Bead-dc:
- Bring a pre-strung pearl bead right up against your hook.
- Yarn over.
- Insert hook into the specified stitch or space.
- Yarn over and pull up a loop (the bead will sit snugly at the front of your work).
- Yarn over and pull through 2 loops.
- Yarn over and pull through remaining 2 loops to complete the double crochet.
- The bead should now be securely held by the double crochet stitch on the front (RS) of your work.
Pre-Work: Threading Your Beads!
This is the most important step before you start crocheting the beaded rows!
- You MUST thread all your beads onto your working yarn for Color A (Pink) before you begin crocheting. This means cutting a generous length of Color A yarn (e.g., 200-250 yards) and threading all 60-70 beads onto it using a thin yarn needle. Slide them down the yarn away from the ball to give yourself room to work.
Let’s Get Crocheting!
We’ll work this pouch flat in rows, changing colors every row to create the distinct pattern, and then fold and seam.
Part 1: The Pouch Body (Flat Panel)
Using CA (Pink) with pre-strung beads:
Ch 38. (This chain should be a multiple of 6 + 2 for your shell stitch pattern. Adjust for desired width).
Row 1 (CA – Beaded Row – RS): Sc in 2nd ch from hook. Sk 2 ch, (2 dc, 1 Bead-dc, 2 dc) in next ch (this is your first Bead Shell), sk 2 ch, sc in next ch; repeat from * to * across. At end of row, sk 2 ch, (2 dc, 1 Bead-dc, 2 dc) in next ch. Do not turn, drop CA, attach CB. (6 Bead Shells, 5 sc)
Row 2 (CB – Non-Beaded Row – WS): With CB, ch 3 (counts as 1 dc). Turn. 2 dc in same sc (base of ch 3). Sk 2 dc, sc in ch-1 space of next shell, sk 2 dc, 5 dc in next sc; repeat from * to * across, ending with sc in ch-1 space of last shell, sk 2 dc, 3 dc in last sc. Do not turn, drop CB, pick up CA. (6 Shells, 5 sc – note that the beginning and end partial shells make full shells when you stitch into them in the next row)
Row 3 (CA – Beaded Row – RS): With CA, ch 1. Turn. Sc in same st. Sk 2 dc, (2 dc, 1 Bead-dc, 2 dc) in next sc, sk 2 dc, sc in middle dc of next shell; repeat from * to * across, ending with sk 2 dc, (2 dc, 1 Bead-dc, 2 dc) in next sc. Do not turn, drop CA, pick up CB.
Repeat Rows 2 and 3 until your panel measures approximately 10-10.5 inches (25-26 cm) in height, ending on a Row 2 (CB – non-beaded row). This should be about 20-22 rows in total, ensuring you have an even number of rows for folding.
Fasten off both colors, leaving a long tail from CA (about 15-20 inches) for seaming.
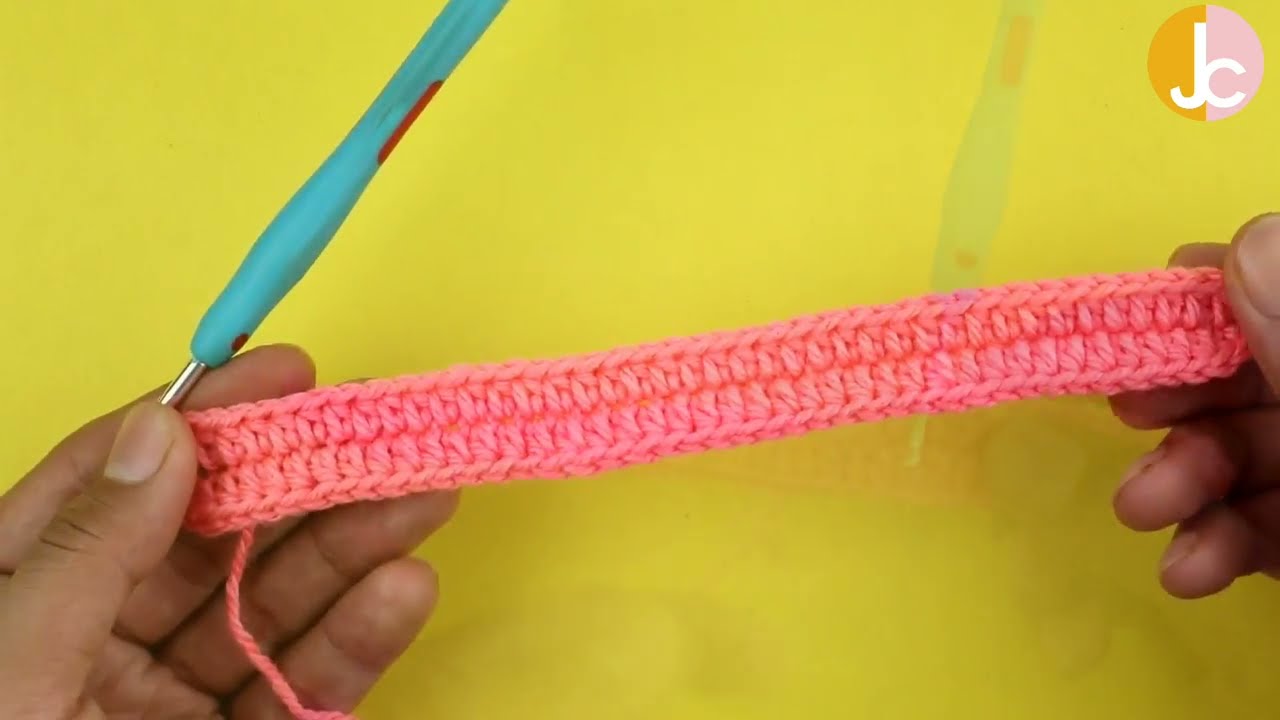
Part 2: The Wrist Strap
Using CA (Pink):
Ch 36.
Row 1: Sc in 2nd ch from hook and in each ch across. (35 sc)
Fasten off, leaving a long tail for attaching.
Part 3: Assembling Your Pouch
Now, to transform your flat panel into a functional pouch!
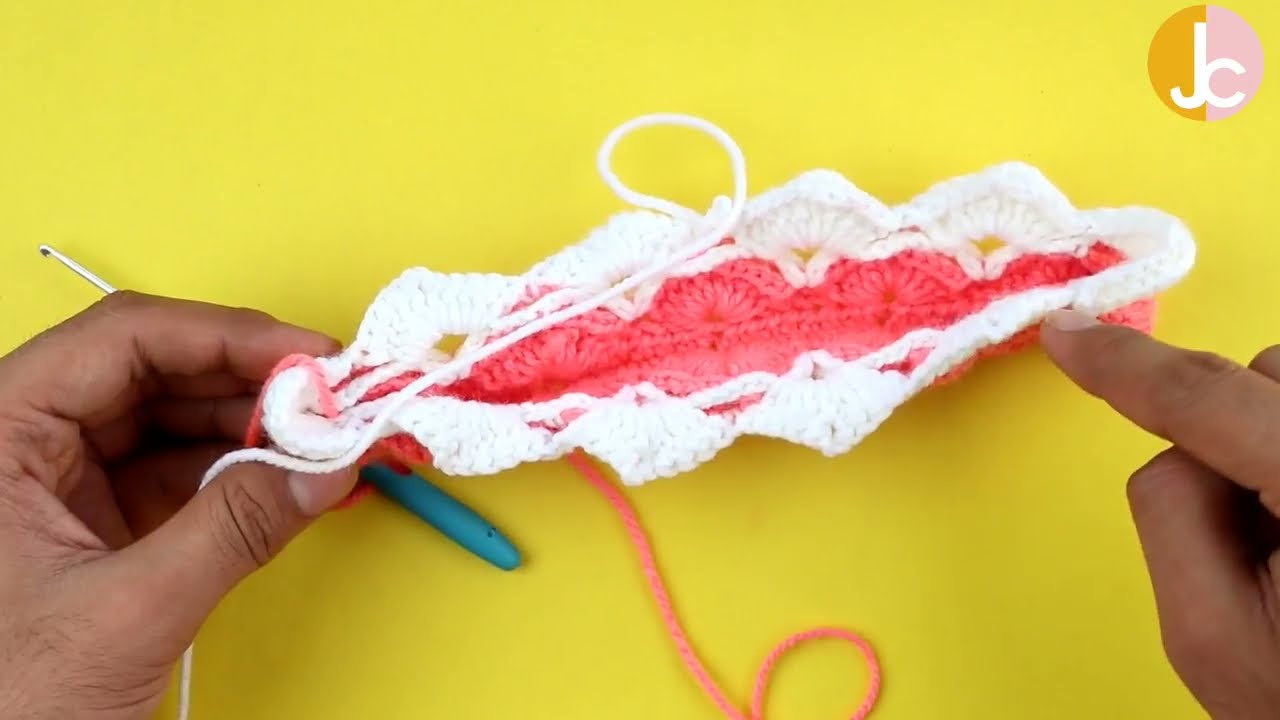
- Fold the Body: Lay your crocheted panel flat with the right side facing up (beads visible). Fold the bottom edge up, so that roughly 5 inches (12.5 cm) of the panel forms the front of the pouch. The top 5 inches will form the back. Align the side edges perfectly.
- Seam the Sides: Using your yarn needle and the long tail from CA, carefully whip stitch or mattress stitch up each side of the pouch. Stitch through both layers firmly, ensuring your seams are neat and strong. Knot securely and weave in ends.
- Attach Wrist Strap: Take the wrist strap. Form it into a loop. Using the tail, securely stitch one end of the strap to the top corner of one side of the pouch (where the two colors meet at the very top edge). Stitch through multiple times to ensure it’s very secure. Weave in the tail.
- Optional Closure: If desired, sew a small magnetic snap closure just inside the top opening of the pouch, centering it. Or, if adding a zipper, follow standard zipper insertion methods.
Video tutorial
Your Shimmering Shell Stitch Pouch is Complete!
Isn’t it absolutely stunning? This pouch is not just a storage solution; it’s a statement piece! The beaded shell stitch creates a luxurious feel, and the two-tone design makes it truly eye-catching.
I hope you enjoyed creating this unique and dazzling accessory! If you make this beautiful pouch, I would absolutely love to see it. Share your photos on social media and tag me (if you have an associated platform)!
Happy hooking and happy beading!