 by
by 
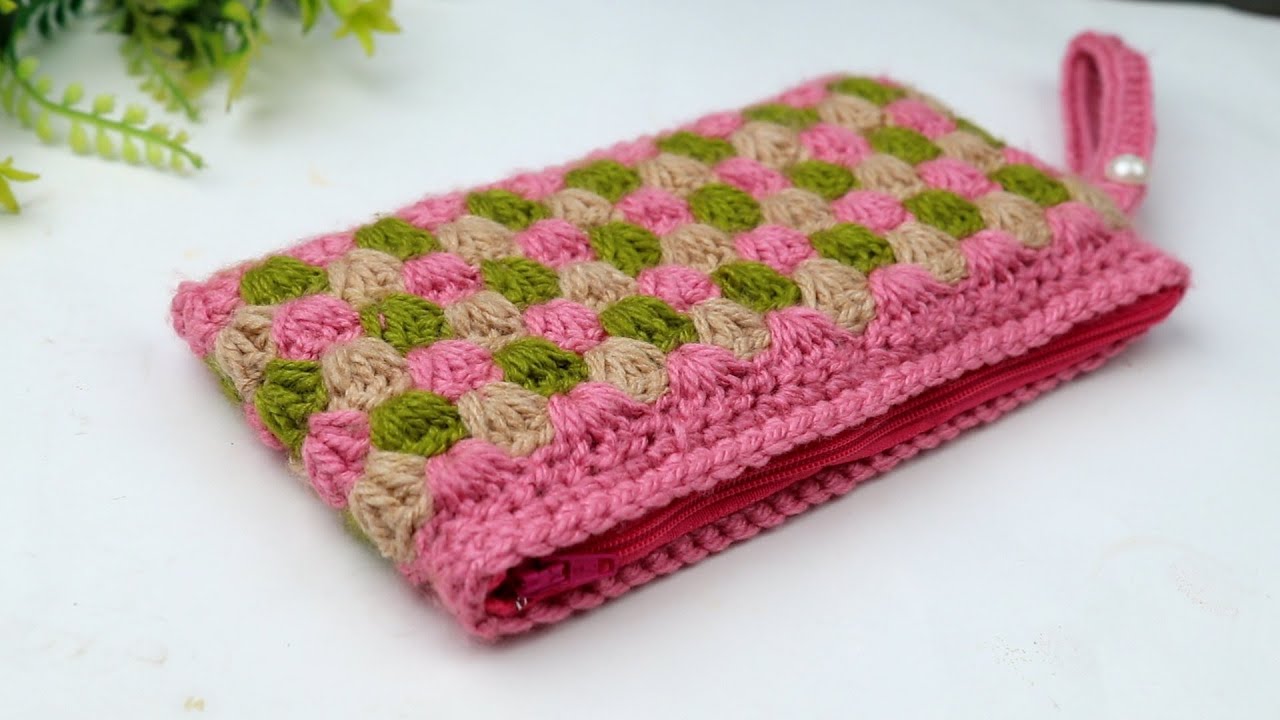
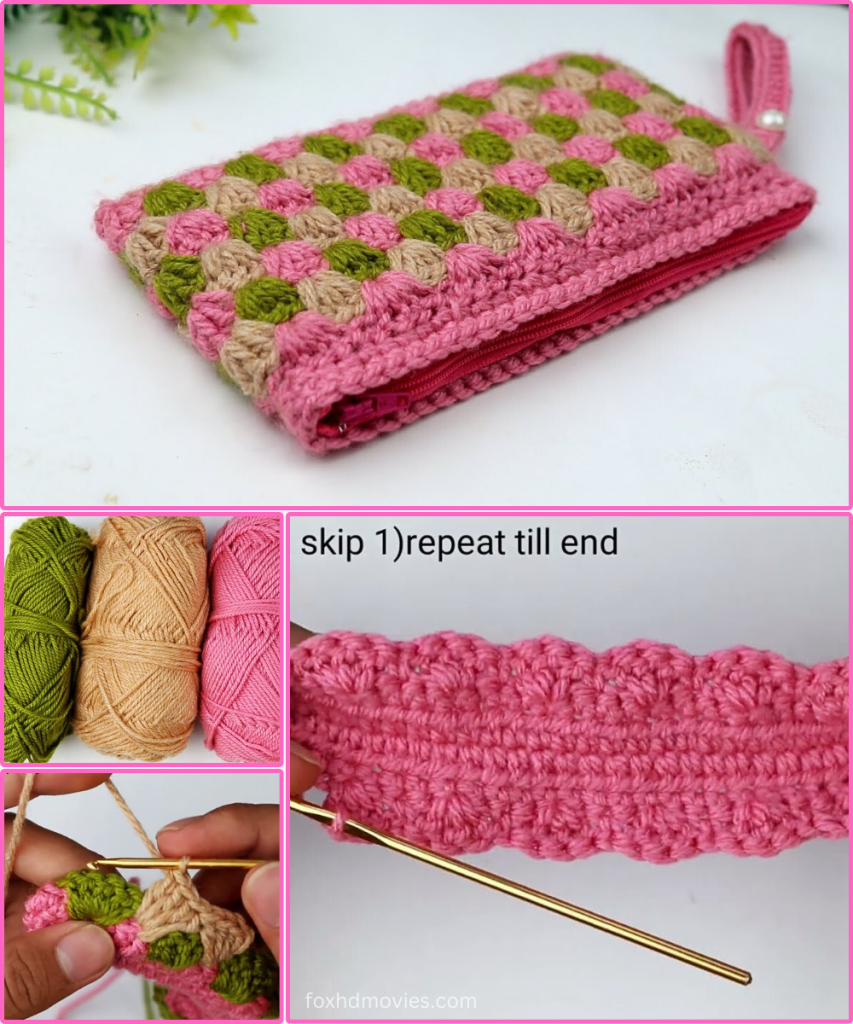
Looking for a fun and fabulous way to organize your bits and bobs? This charming crocheted zipper pouch, featuring a vibrant checkerboard pattern reminiscent of classic granny squares, is just the ticket! It’s the perfect size for your makeup, pens, small craft supplies, or as a chic coin purse. The combination of eye-catching colors and the practical zipper makes this a delightful and functional accessory.
What I love most about this design is how the classic “granny stitch” is adapted to create a continuous, straight checkerboard pattern, rather than traditional individual squares. It’s an ingenious way to get that beloved granny texture with less seaming! This project is wonderfully satisfying for intermediate crocheters, or adventurous beginners ready to master color changes and a repetitive stitch pattern.
Ready to add some handmade cheer to your day? Let’s gather our materials and get hooking!
Materials You’ll Need:
- Worsted Weight (Aran/10-ply) Yarn:
- Color A (CA): Approximately 60-80 yards (e.g., Bright Pink for the border and connecting rows).
- Color B (CB): Approximately 30-40 yards (e.g., Light Green).
- Color C (CC): Approximately 30-40 yards (e.g., Light Beige/Brown).
- Tip: Choose a smooth yarn that doesn’t split easily to make color changes neat.
- Crochet Hook: Size H/5.0mm (or size needed to obtain gauge).
- Yarn Needle: For weaving in ends and attaching the zipper.
- Scissors
- Zipper: One 7-inch (18 cm) zipper that matches your main color (e.g., Pink).
- Optional: Small amount of yarn for a wrist strap (matching CA or contrasting).
Gauge (Important for Pouch Size!)
Getting the right gauge is important for your pouch to be the correct size for the zipper and to ensure the pattern looks consistent. One “granny cluster” (3 dc) x 2 rows = approximately 1.25 inches (3.2 cm) wide x 1 inch (2.5 cm) tall. (Measured in the pattern section).
Please make a small swatch using the granny cluster pattern (ch 3, 3dc in space, repeat) with color changes to check your tension. If your swatch is larger, try a smaller hook. If it’s smaller, go up a hook size.
Finished Pouch Size (Approximate):
Approximately 7 inches (18 cm) wide x 4.5 inches (11.5 cm) tall.
Abbreviations (US Terms):
- ch: chain
- sl st: slip stitch
- sc: single crochet
- dc: double crochet
- fo: fasten off
- st(s): stitch(es)
- sp: space
- CA: Color A (Pink)
- CB: Color B (Light Green)
- CC: Color C (Light Beige/Brown)
- Granny Cluster (GC): 3 dc in the specified space.
Let’s Get Crocheting!
We’ll crochet two identical flat panels first, then seam them together and add the zipper.

Part 1: The Pouch Panel (Make 2 identical panels)
We’ll work in rows, changing colors at the end of each pattern row.
Using CA (Pink):
Ch 32. (This chain should be a multiple of 3 + 2, for 10 Granny Clusters across.)
Row 1 (CA – Foundation Row): Sc in 2nd ch from hook and in each ch across. Ch 1, turn. (31 sc)
- This row creates a stable base for your first row of clusters.
Row 2 (CA): Sc in first sc. Ch 2, sk 2 sc, dc in next sc; repeat from * to * across, ending with sc in last sc. Drop CA, attach CB. (10 dc, 11 sc, 10 ch-2 sps)
- This row sets up the spaces for your first clusters.
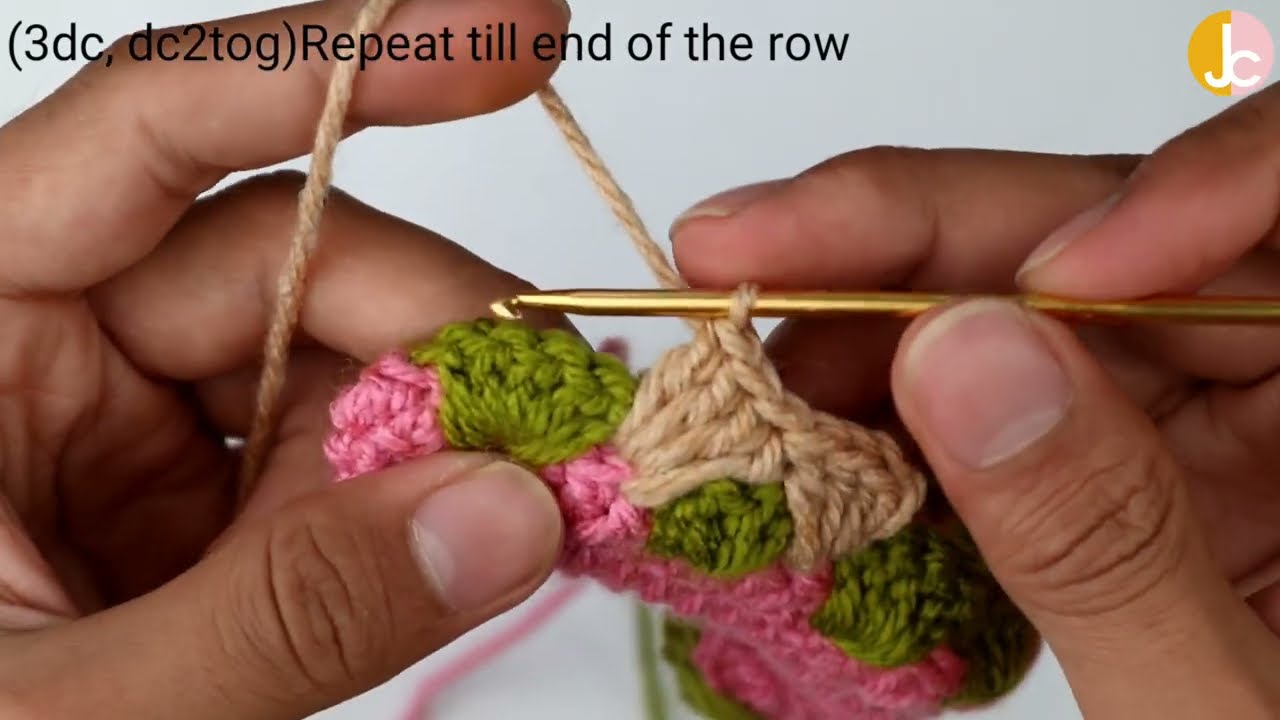
Row 3 (CB – Pattern Row): With CB, ch 3 (counts as 1 dc). Turn. 2 dc in first sc (first GC). Sc in next dc, 3 dc in next ch-2 sp (GC); repeat from * to * across, ending with sc in last dc, 3 dc in last sc. Drop CB, attach CC. (11 GCs, 10 sc)
Row 4 (CC – Pattern Row): With CC, ch 3 (counts as 1 dc). Turn. 2 dc in first sc (first GC). Sc in next dc, 3 dc in next ch-2 sp (GC); repeat from * to * across, ending with sc in last dc, 3 dc in last sc. Drop CC, attach CA. (11 GCs, 10 sc)
Row 5 (CA – Joining Row): With CA, ch 1. Turn. Sc in first dc. Ch 2, sk 2 dc, dc in next sc; repeat from * to * across, ending with sc in last dc. Drop CA, attach CB. (10 dc, 11 sc, 10 ch-2 sps)
- This row creates the “scalloped” base for the next row of clusters, linking the previous two colors.
Repeat Rows 3, 4, and 5 (cycling through CB, CC, CA for your pattern rows) until your panel measures approximately 8.5 – 9 inches (21.5 – 23 cm) tall, ending with a Row 5 (CA – joining row). This should be about 17-19 rows in total, including the initial 2 setup rows.
Final Row (CA – Top Edge): With CA, ch 1. Turn. Sc in first dc. Sc in each st and ch-2 sp across. (31 sc)
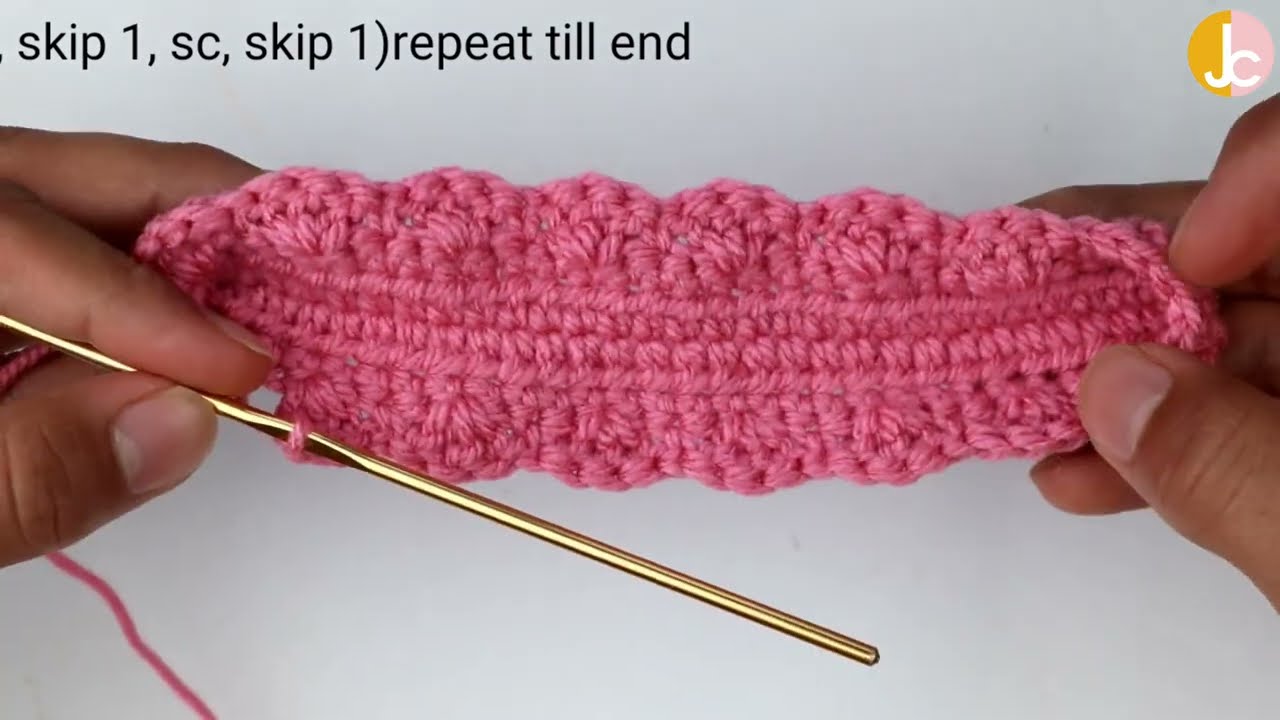
- This creates a flat, sturdy top edge for zipper attachment.
Fasten off, leaving a long tail (about 20 inches) for seaming. Repeat all steps to create a second identical panel.
Part 2: The Wrist Strap (Optional)
Using CA (Pink):
Ch 36.
Row 1: Sc in 2nd ch from hook and in each ch across. (35 sc)
Fasten off, leaving a long tail for attaching.
Part 3: Assembling Your Pouch & Attaching Zipper
- Align Panels: Place the two crocheted panels together, wrong sides facing each other. Make sure all edges are aligned.
- Seam Sides & Bottom: Using your yarn needle and one of the long tails you left, begin seaming along one side, across the bottom, and up the other side. Use a whip stitch or mattress stitch for a neat and sturdy seam. Stitch firmly through both loops of both panels.
- Secure and Weave: Once seamed, knot your yarn securely on the inside of the pouch. Weave in any remaining tails neatly. Turn the pouch right side out.
- Attach Zipper: Open your zipper. Align one side of the zipper tape with the top edge of one side of the pouch opening. Make sure the zipper pull is at one end (this will be the side where your wrist strap will attach if you make one). The zipper teeth should be facing up.
- Pin (Optional but Recommended): Use small sewing pins to hold the zipper in place along the top edge of the pouch.
- Stitch Zipper: Using your yarn needle and a new piece of matching CA yarn (or a strong sewing thread), hand-stitch the zipper tape securely to the top edge of the pouch. Use small, neat stitches that go through the zipper tape and into the top single crochet row of your crochet fabric. Be careful not to stitch through the zipper teeth or too close to them, which could impede the zipper’s function.
- Repeat for Other Side: Once one side is securely attached, close the zipper to help align. Then, attach the other side of the zipper tape to the top edge of the second side of the pouch.
- Secure and Weave: Knot your yarn securely and weave in any remaining tails. Test your zipper!
- Attach Wrist Strap (If made): Form the strap into a loop. Using the tail, securely stitch one end of the strap to the top corner of the pouch, near the zipper’s closed end. Stitch through multiple times to ensure it’s very secure. Weave in the tail.
Video tutorial
Your Vibrant Granny Checkers Pouch is Complete!
Fill it with your essentials and enjoy the delightful splash of color and texture! This pouch is truly a unique piece, showcasing a modern twist on a classic crochet stitch, and it’s even more special because you made it yourself.
I hope you enjoyed creating this beautiful and functional accessory! If you make this checkered pouch, I would absolutely love to see it. Share your photos on social media and tag me (if you have an associated platform)!
Happy hooking!