by
by 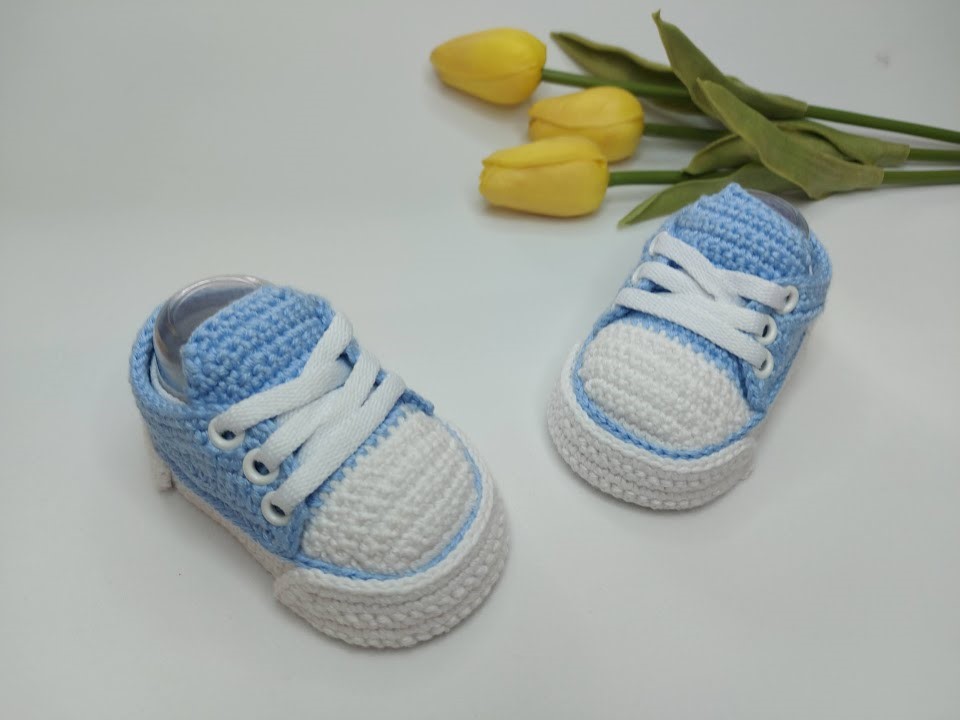
Hello, wonderful crafters and gift-givers!
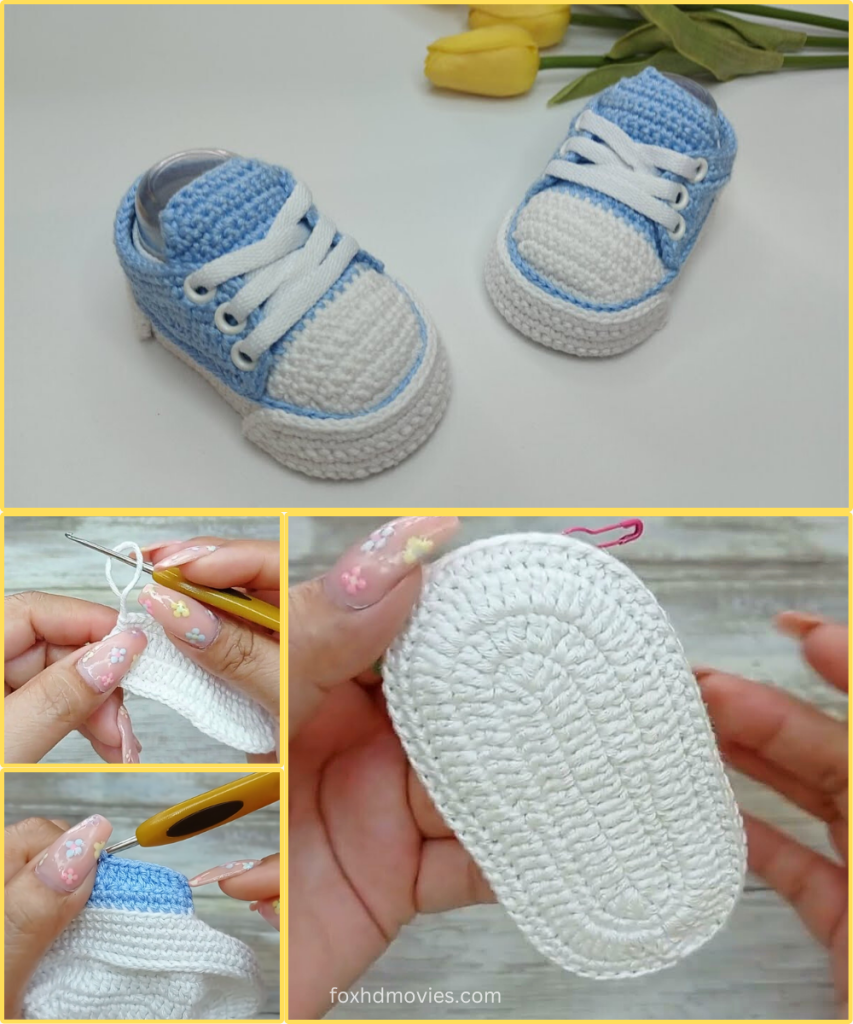
Is there anything cuter than tiny baby feet? Yes, there is: tiny baby feet wrapped in adorable, handmade crocheted sneakers! Today, we’re going to create these charming little booties that look just like classic high-top sneakers, complete with a contrasting toe cap and cute laces.
These booties are perfect for baby showers, newborn photoshoots, or just because you want to make something incredibly sweet for the little one in your life. They use simple stitches and are constructed in a way that gives them that distinct shoe shape.
Ready to stitch up some cuteness? Let’s get started on these tiny kicks!
Pattern Sizing:
This pattern is designed for Newborn to 3 Months (approximately 8-9 cm / 3.25-3.5 inches foot length). If you need a larger size, you can go up a hook size or slightly adjust the number of stitches in the sole, making sure to keep the stitch count even for the sides.
What you’ll need:
- Yarn: I highly recommend using a soft, baby-friendly yarn. A DK (light worsted) or Sport weight yarn is ideal.
- Main Color (MC): (Light Blue in the example image) Approx. 30-40 yards.
- Contrasting Color (CC1): (White in the example image) Approx. 15-20 yards for the toe cap and sole trim.
- Lace Color (CC2): (White in the example image, same as CC1 if desired) A small amount for the laces.
- Crochet Hook: A hook size appropriate for your chosen yarn. For DK/Sport weight, a 3.0mm (D/3) or 3.5mm (E/4) hook works best to create a dense fabric. (The hook used in the image looks like a 3.0mm or 3.5mm for the specified yarn weight).
- Scissors
- Tapestry Needle (for weaving in ends and sewing laces)
- Stitch Marker (highly recommended for working in rounds)
Abbreviations (US Terms):
- ch: chain
- st(s): stitch(es)
- sl st: slip stitch
- sc: single crochet
- hdc: half double crochet
- dc: double crochet
- inc: increase (work 2 sts in the same st)
- dec: decrease (sc2tog – single crochet 2 together, or hdc2tog – half double crochet 2 together, as specified)
- FLO: Front Loop Only
- BLO: Back Loop Only
- rep: repeat
- sk: skip
The Baby Sneaker Bootie Pattern (Make 2)
We’ll start with the sole, then work our way up to the shoe body, toe cap, and finally the laces!
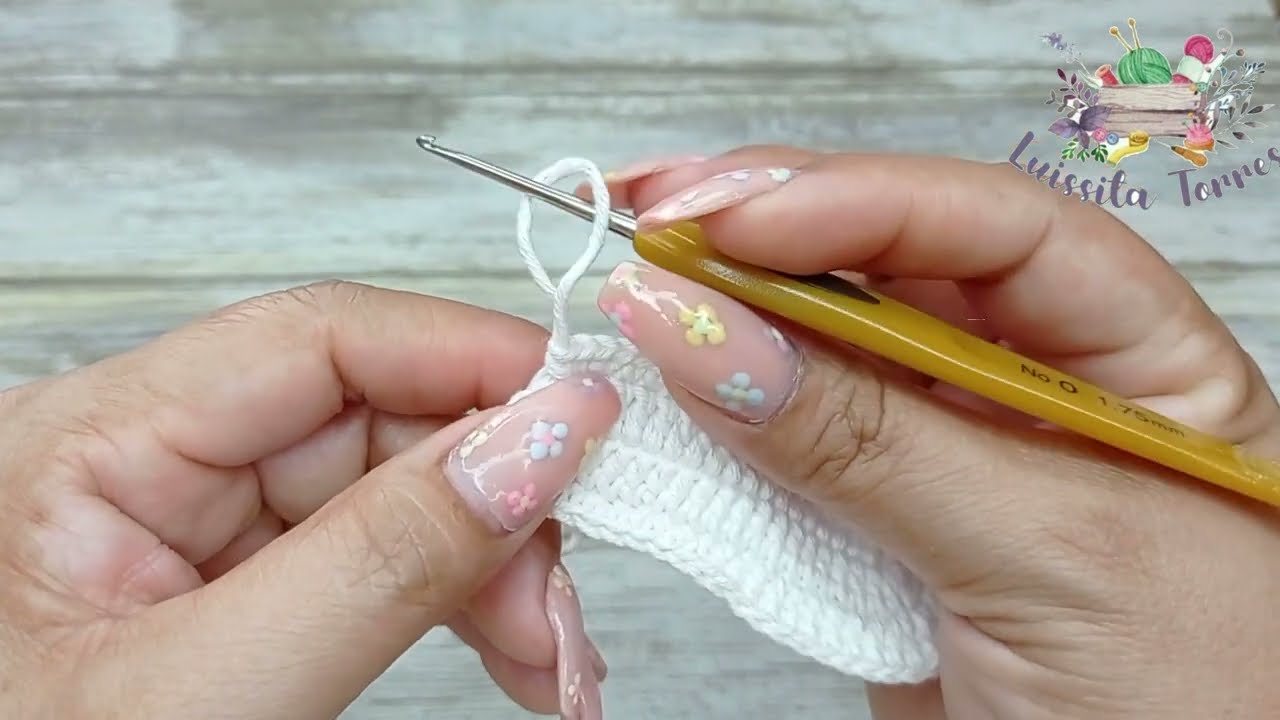
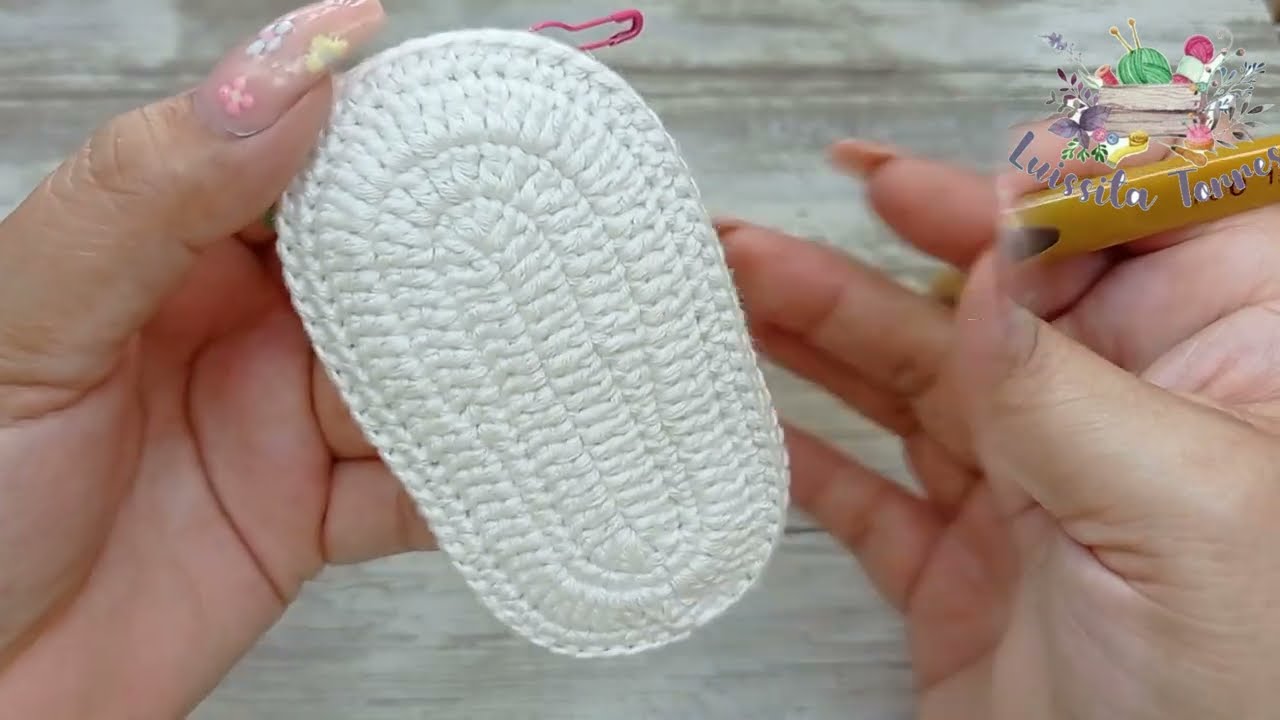
Part 1: The Sole (Start with CC1 – White)
- Ch 11.
- Round 1: Sc in the 2nd ch from hook, sc in next 8 ch, 3 sc in the last ch. (Now working on the opposite side of the chain) Sc in next 8 ch, 2 sc in the last ch (the very first chain you worked into). Sl st to the first sc to join. (22 sc)
- You’ve now created an oval shape.
- Round 2: Ch 1 (does not count as a st). Inc in the same st as join. Sc in next 8 sts. Inc in next 3 sts. Sc in next 8 sts. Inc in last 2 sts. Sl st to the first sc to join. (28 sc)
- Round 3: Ch 1 (does not count as a st). Sc in the same st. Inc in next st. Sc in next 9 sts. Inc in next 2 sts. Sc in next 9 sts. Inc in next st. Sl st to the first sc to join. (32 sc)
- For a slightly more defined sole edge, you can work this final round of the sole in BLO, but it’s optional.
- Fasten off CC1. Weave in ends.
Part 2: Forming the Sides (Switch to MC – Light Blue)
- Attach MC: Join MC with a sl st to any stitch on the sole.
- Round 4: Ch 1 (does not count as a st). Sc in BLO around. Sl st to the first sc to join. (32 sc)
- Working in BLO here creates a nice ridge separating the sole from the body of the shoe.
- Round 5: Ch 1. Sc in each st around. Sl st to the first sc to join. (32 sc)
- Round 6: Ch 1. Sc in each st around. Sl st to the first sc to join. (32 sc)
Part 3: Shaping the Toe (Still MC – Light Blue)
This section begins to close the front of the shoe.
- Round 7: Ch 1. Sc in next 10 sts. (Hdc2tog, hdc in next st) 4 times. Sc in remaining 10 sts. Sl st to the first sc to join. (28 sts)
- The decreases start to curve the toe.
- Round 8: Ch 1. Sc in next 9 sts. (Hdc2tog) 3 times. Sc in remaining 10 sts. Sl st to the first sc to join. (25 sts)
- Another round of decreases to further shape the toe.
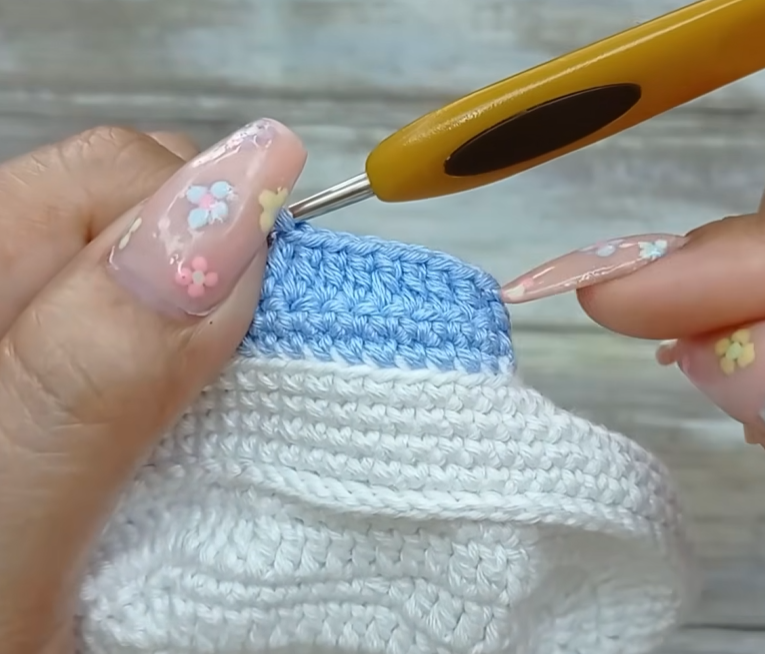
Part 4: The Toe Cap (Switch to CC1 – White)
This creates the classic contrasting toe.
- Attach CC1: Join CC1 with a sl st to the 1st decreased stitch from the previous round (the first hdc2tog).
- Round 9 (Toe Cap): Ch 1. Sc in the same st. Sc in next 6 sts (these are the remaining decreased sts from the previous round, plus some more that curve around the toe). Sl st to the first sc to join. (7 sc)
- This round covers the top-front of the foot.
- Fasten off CC1. Leave a tail for sewing. Using your tapestry needle, neatly sew the bottom edge of this white toe cap piece down to the body of the bootie, aligning it nicely. Weave in ends.
Part 5: The Ankle and Laces Area (Switch back to MC – Light Blue)
Now we work on the ‘collar’ of the shoe where the laces will go. This part is worked in rows, not rounds, to create an opening.
- Re-attach MC: Count back from the sewn edge of your white toe cap to find the unworked stitch that directly aligns with the beginning of the side opening. Join MC with a sl st to that stitch. (It should be approximately the 9th or 10th stitch from the last sc of Round 8, before the first hdc2tog).
- Row 10: Ch 1. Sc in each st around the ankle opening (excluding the toe cap sts you just sewed down). This should be approximately 17-18 sc, depending on your stitch count from Round 8 and where you attached. Turn.
- Count your stitches here for consistency in future rows.
- Row 11-13 (or until desired height): Ch 1. Sc in each sc across. Turn. (Repeat for a total of 3-4 rows, including Row 10, to achieve the height shown in the image).
- The image shows 3 rows after the toe shaping before the final border.
- Final Border: Ch 1. Sc evenly around the entire top edge of the bootie (including down the sides of the lacing opening and along the top edge of the toe cap where it meets the main body). Sl st to the first sc to join.
- This creates a neat finish for the top edge. When working down the sides of the lacing opening, aim for 1 sc per row to keep it flat.
- Fasten off MC. Weave in ends.
Part 6: Adding the Laces (CC2 – White)
- Cut a length of CC2 yarn (about 12-15 inches / 30-38 cm per bootie).
- Thread your tapestry needle with one end of the yarn.
- Lace Holes: Using your tapestry needle, weave the yarn through the fabric to create ‘lace holes.’ In the image, the laces go through small gaps in the sc stitches, resembling eyelets. You can create these by simply piercing the fabric neatly.
- Method 1 (Simple Weave): Start by going under a couple of sc stitches on one side of the lacing opening, pull the yarn through, then cross over and go under a couple of stitches on the opposite side. Work your way up.
- Method 2 (Fake Eyelets): You can use your hook to pull up a very small loop and then sl st into it, creating a tiny ‘eyelet’ effect for the laces to go through, then skip a space and repeat. However, simply weaving through the existing sc fabric is often easiest and looks great.
- Lace it up! Lace up your booties as you would real sneakers, crossing the laces over. Tie a cute little bow at the top.
Finishing:
- Make sure all ends are securely woven in.
- Admire your adorable tiny sneakers!
Video tutorial
Tips for Perfect Tiny Kicks:
- Gauge Matters: For baby items, gauge is important to ensure the booties fit. If your booties are coming out too big or too small, try adjusting your hook size.
- Soft Yarn: Always use a yarn that is soft and gentle on baby’s delicate skin. Look for yarns labeled “baby yarn.”
- Invisible Seams: When joining rounds, try to make your slip stitches as neat as possible to keep the seam from being too noticeable.
- Experiment with Colors: These look amazing in classic white and blue, but imagine them in pink and grey, mint and cream, or even bright rainbow colors!
- Embellish! For an extra touch, you could embroider a tiny star or heart on the side of the bootie before adding the laces.
These little sneaker booties are not just practical; they’re incredibly charming and a heartfelt gift for any new parent. Enjoy making them!
Happy Crocheting!