 by
by Hello, cherished makers!
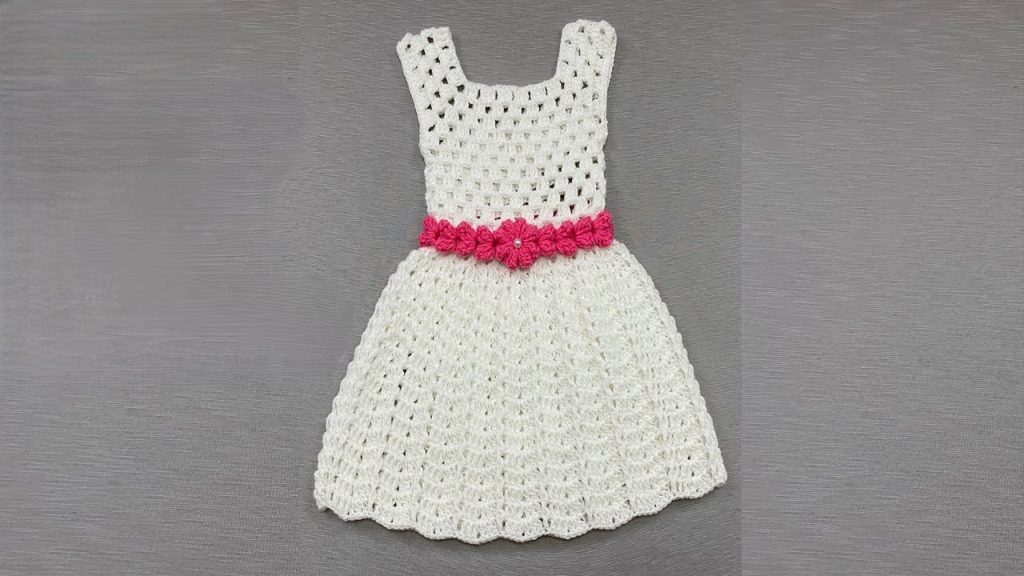
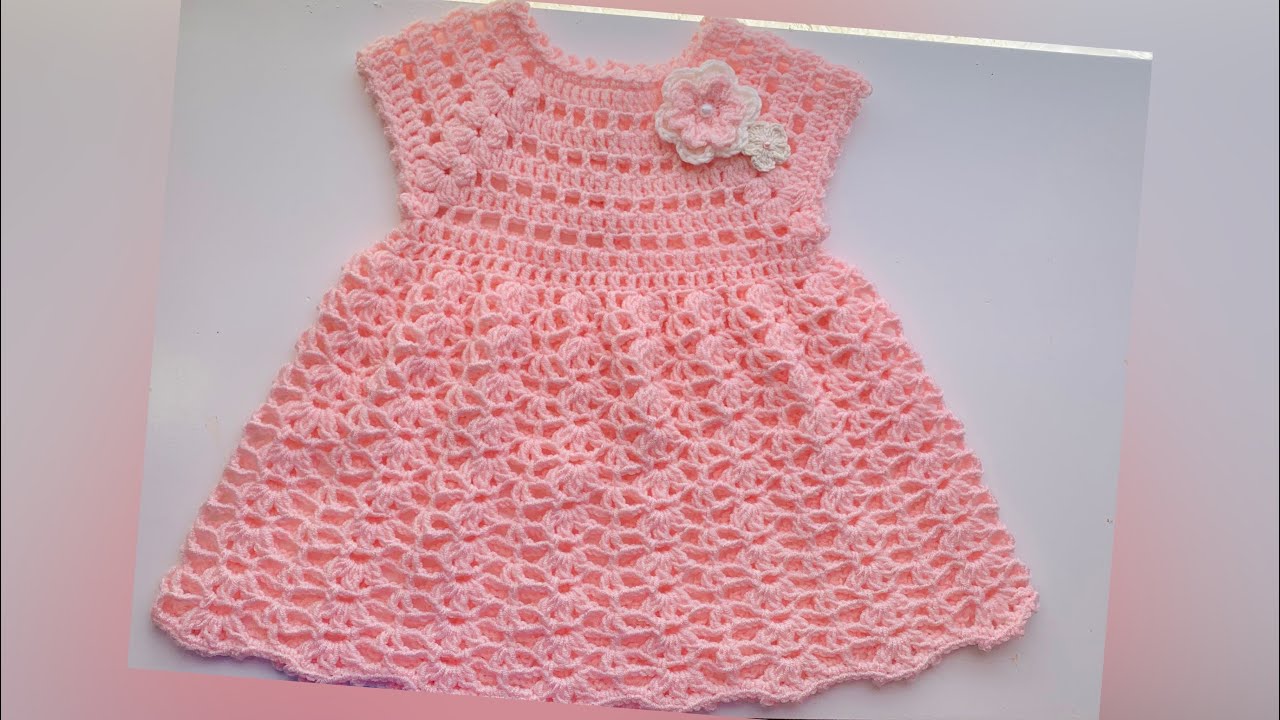
Are you ready to create a truly adorable and timeless piece for the little one in your life? Today, we’re going to crochet this charming Sweet Little Dress, featuring a classic granny-stitch skirt that’s perfect for twirling, a simple top, and a delightful floral belt for that extra touch of sweetness.
This dress is not only incredibly cute but also a joy to make. It combines basic stitches with the beloved granny stripe technique, making it accessible for intermediate crocheters and a fantastic learning project for ambitious beginners. Imagine this dress on a baby for a special occasion, or even scaled down for a favorite doll!
Ready to add a handmade touch of elegance to a tiny wardrobe? Let’s get our hooks and yarn ready!
Pattern Sizing:
This pattern is designed for Newborn to 3 Months (approximately 16-18 inches chest circumference). To adjust size, you can use a larger hook, thicker yarn, or add/subtract multiples of stitches in the initial chain for the yoke, and increase/decrease rounds for length.
What you’ll need:
- Yarn: I highly recommend using a soft, breathable yarn, such as a baby-friendly acrylic or cotton blend in a DK (light worsted) or Sport weight.
- Main Color (MC): (White in the example image) Approx. 150-200 yards (depending on size).
- Accent Color (AC): (Pink in the example image) A small amount for the belt and flowers.
- Crochet Hook: A hook size appropriate for your chosen yarn. For DK/Sport weight, a 3.5mm (E/4) or 4.0mm (G/6) hook works well to create a nice drape. (The hook used in the image appears to be around a 3.5mm).
- Scissors
- Tapestry Needle (for weaving in ends and attaching embellishments)
- Small buttons or snap fasteners (for back closure, optional)
Abbreviations (US Terms):
- ch: chain
- st(s): stitch(es)
- sl st: slip stitch
- sc: single crochet
- hdc: half double crochet
- dc: double crochet
- inc: increase (work 2 sts in the same st)
- dec: decrease (sc2tog – single crochet 2 together, or hdc2tog – half double crochet 2 together, as specified)
- ch-sp: chain space
- sk: skip
- rep: repeat
- {…}: indicates stitches worked in the same stitch/space
- (…): indicates repetition
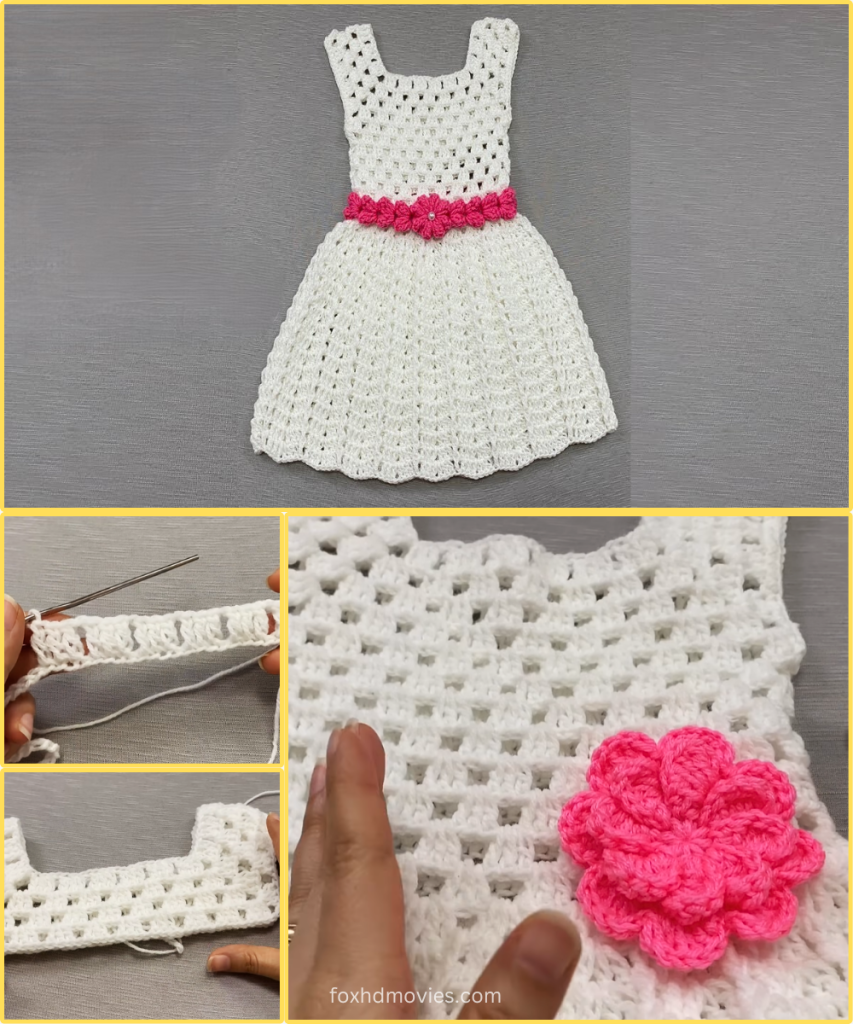
The Sweet Little Dress Pattern
We’ll start by working the yoke (top part) flat, then join to work the body and skirt in rounds.
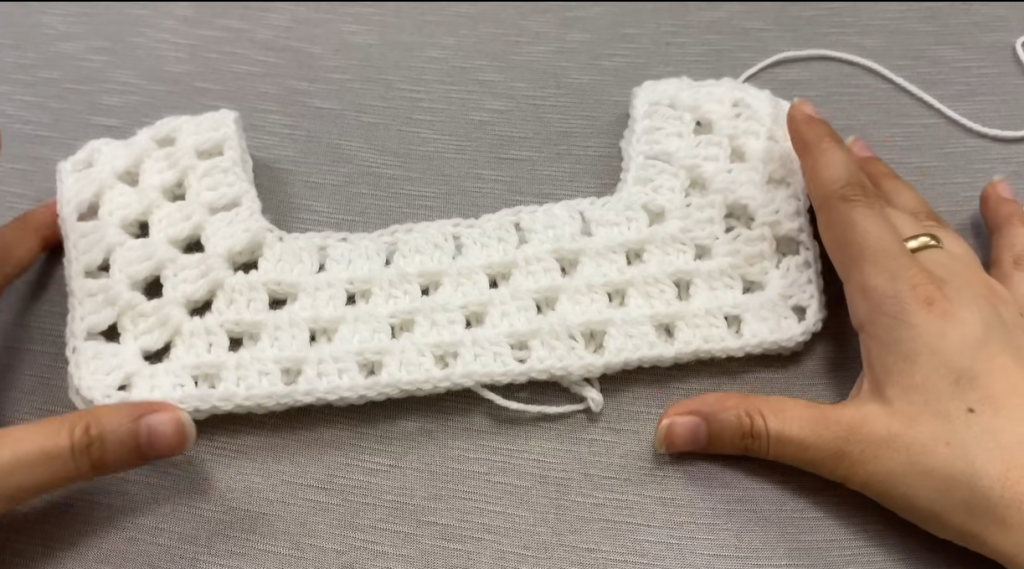
Part 1: The Yoke (Start with MC – White)
The yoke is worked in rows to create a back opening.
- Ch 50.
- Row 1 (Foundation Row): Dc in the 3rd ch from hook (counts as 1st dc) and in each ch across. (48 dc). Turn.
- Row 2 (Divide for Yoke): Ch 2 (does not count as a st).
- Dc in next 7 sts (Right Back Panel).
- Ch 2, sk 8 sts (Armhole).
- Dc in next 16 sts (Front Panel).
- Ch 2, sk 8 sts (Armhole).
- Dc in next 7 sts (Left Back Panel). (30 dc, 2 ch-2 sps). Turn.
- This row creates the openings for the arms and sets up the body.
- Row 3: Ch 2. Dc in next 7 sts. {2 dc, ch 2, 2 dc} in next ch-2 sp (this creates a corner/increase for the armpit). Dc in next 16 sts. {2 dc, ch 2, 2 dc} in next ch-2 sp. Dc in next 7 sts. (46 dc, 2 ch-2 sps). Turn.
- You’re now increasing the width of the main body slightly.
- Row 4: Ch 2. Dc in each dc across, working {2 dc, ch 2, 2 dc} into each ch-2 space. (62 dc, 2 ch-2 sps). Turn.
- The yoke is almost complete, with a slightly squared shape.
- Row 5 (Join for Body): Ch 2. Dc in each dc until you reach the first ch-2 space. {2 dc} in the first ch-2 space. Sc or sl st into the first stitch of the next panel (the front panel) to join these two sections, forming the first armhole. Dc in each dc across the front panel until you reach the next ch-2 space. {2 dc} in this ch-2 space. Sc or sl st into the first stitch of the last panel (left back) to join these two sections, forming the second armhole. Dc in remaining dc to the end of the row. Sl st to first dc of the round to join, effectively closing the yoke into a circle. (Approx. 64-68 dc, depending on your joins).
- This step can be tricky. The goal is to connect the front and back panels under the arms, making a continuous circle for the skirt. Make sure your joins are firm.
Part 2: The Skirt (Still MC – White)
The skirt is worked in rounds using the “granny stripe” technique.
- Round 6: Ch 2 (does not count as a st). 2 dc in the same st as join. Sk next 2 sts. {3 dc} in next st.
- *Ch 1, sk next 2 sts, {3 dc} in next st*. Rep from * to * around. Sl st to the top of the first dc to join. (Approx. 22-23 3-dc clusters, depending on exact stitch count from previous round).
- This establishes your granny clusters.
- Round 7: Sl st into the first ch-1 space. Ch 2. {2 dc} in the same ch-1 space.
- *Ch 1, {3 dc} in next ch-1 space*. Rep from * to * around. Sl st to the top of the first dc to join.
- You are now working your clusters into the chain-1 spaces of the previous round.
- Rounds 8-16 (or desired length): Repeat Round 7.
- Keep repeating Round 7 until the skirt reaches your desired length. The number of clusters will remain the same, but the skirt will gradually widen and lengthen.
- Optional Ruffle/Edging (Final Skirt Round): Sl st into the first ch-1 space. Ch 1. Sc in same ch-1 space.
- *Ch 3, sc in next ch-1 space*. Rep from * to * around. Sl st to the first sc to join.
- This creates a sweet scalloped edge, similar to the image.
- Fasten off MC. Weave in ends.
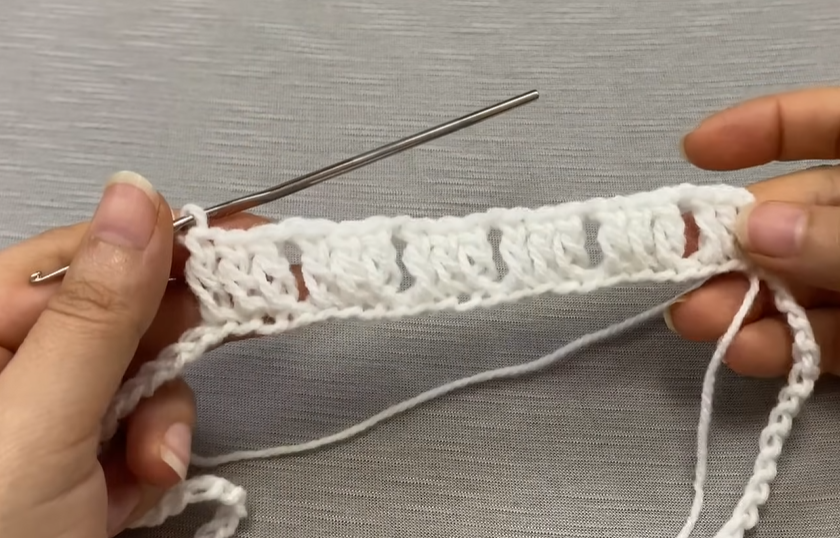
Part 3: Finishing the Yoke & Back Opening (Still MC – White)
- Work single crochet border: Re-attach MC with a sl st to the bottom corner of one of the back opening edges. Ch 1. Work sc evenly up the raw edge of the back opening, around the neck opening, and down the other side of the back opening. Sl st to join or to the first sc.
- Aim for 1 sc per dc row and 1 sc per chain from the initial foundation chain for a neat edge.
- Optional Button Loops: On one side of the back opening (e.g., the right side when looking at the back of the dress), you can create 2-3 button loops. Ch 2-3 (depending on button size), sk a small space, sc in next st. Repeat for desired number of loops. Sew corresponding buttons onto the opposite side of the back opening.
Part 4: The Belt & Flowers (Accent Color – Pink)
A. The Belt:
- Ch a length approximately 2-3 times the width of the dress’s waist (e.g., Ch 60-80).
- Sc in the 2nd ch from hook and in each ch across. Fasten off.
- Weave in ends. This creates a simple tie belt.
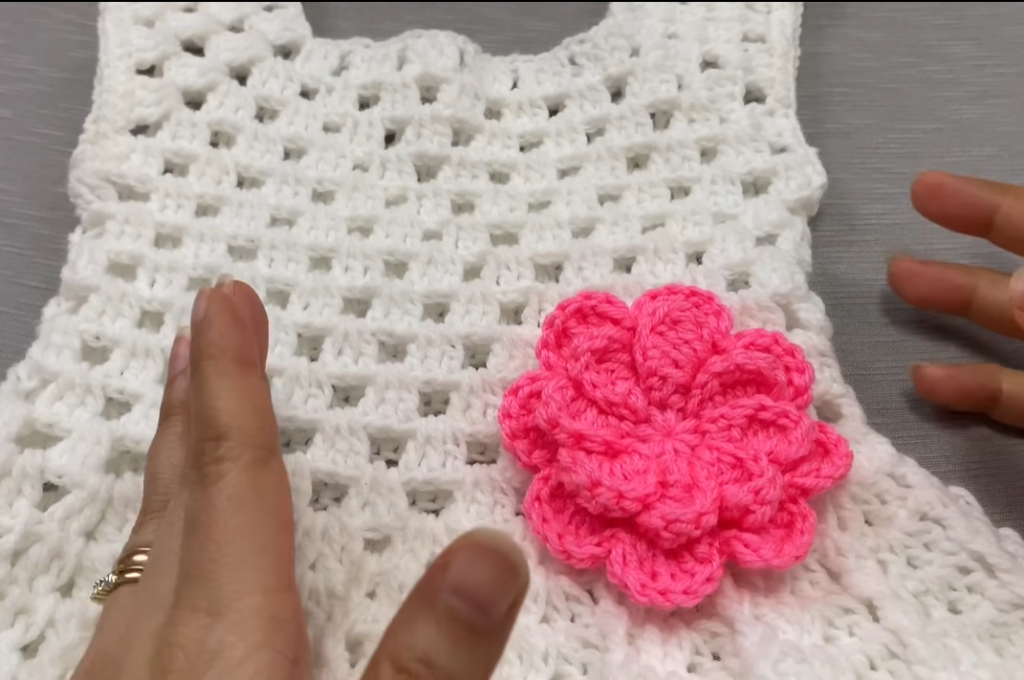
B. Small Flowers (Make 3-5, or desired number):
- Start with MR: Make a Magic Ring.
- Round 1: Ch 1 (does not count as a st). {Sc, ch 2, hdc, ch 2} 5 times into the MR. Sl st to the first sc to join.
- Gently pull the MR tail tight to gather the center and form petals.
- Fasten off AC. Leave a longer tail for sewing.
Assembly:
- Attach Belt: Weave the crocheted belt through the stitches around the waistline of the dress. Tie a simple knot or bow at the back or front.
- Attach Flowers: Using your tapestry needle and the tail from the flowers, sew the flowers securely onto the belt, spacing them evenly across the front as shown in the image.
Finishing:
- Weave in any remaining loose ends.
- Gently block your dress if desired, to help the stitches lay flat and define the shape.
Video tutorial
Tips for Your Sweet Little Dress:
- Gauge Swatch: Especially for garments, always make a small gauge swatch to ensure your tension matches the pattern. This helps guarantee the correct size.
- Softness First: Choose yarns specifically designed for babies – they are usually softer and hypoallergenic.
- Seamless Look: For joining rounds in the skirt, you can often “fake” a continuous join by carefully slip stitching into the beginning ch-space rather than the top of the first dc.
- Customization:
- Length: Add or subtract granny rounds for a longer or shorter skirt.
- Sleeves: You could easily add small puff sleeves or simple dc sleeves to the armholes.
- Edging: Experiment with different edgings for the neck and armholes (e.g., crab stitch, picot stitch).
- Embellishments: Instead of flowers, consider little crocheted bows, hearts, or even tiny pearl beads.
This dress is a labor of love that will surely be cherished. Whether it’s for a special occasion or everyday cuteness, watching a little one wear your handmade creation is pure joy!
Happy Crocheting!