 by
by 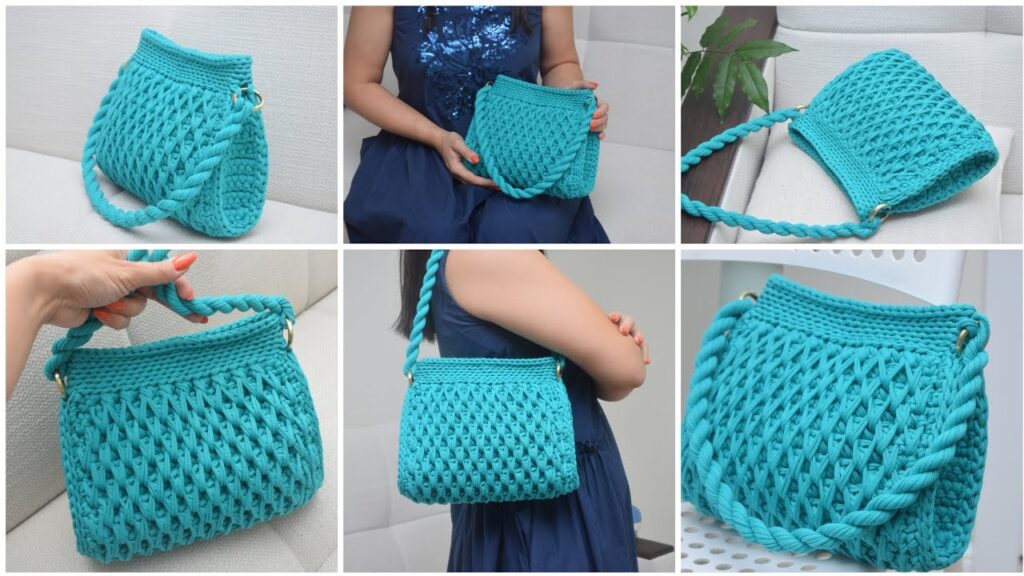
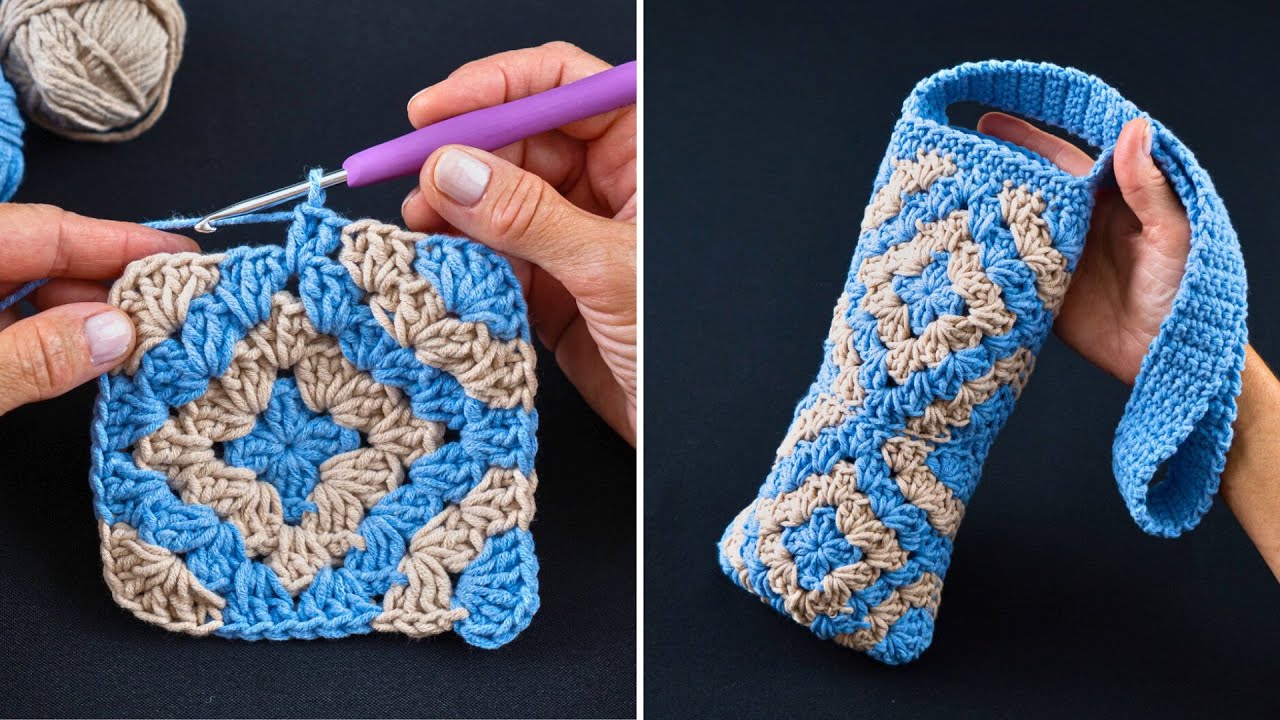
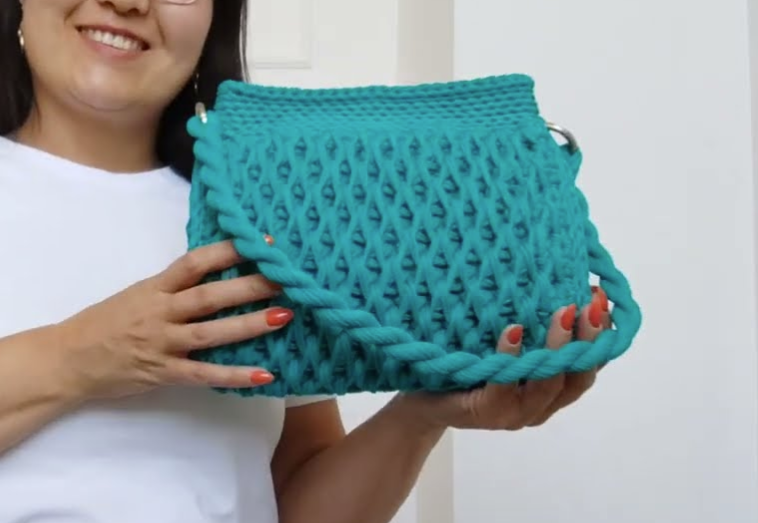
Hello, crochet enthusiasts! Are you ready to dive into a project that’s as beautiful as it is functional? Today, we’re going to create an “Amazing Crochet Handbag” featuring the stunning and textured honeycomb stitch. This stitch not only looks intricate and elegant but also creates a wonderfully firm fabric, making it ideal for bags that need to hold their shape.
The honeycomb stitch, sometimes called the “honeycomb hdc” or variations of it, creates a dense, interlocking pattern reminiscent of a beehive. It’s truly eye-catching and surprisingly fun to work once you get the rhythm down.
For this bag, I recommend a sturdy yarn like cotton, T-shirt yarn, or even a macrame cord to ensure your finished bag is robust and durable. Let’s get our hooks ready and make some magic!
Skill Level: Intermediate

Materials You’ll Need:
- Yarn: Approximately 300-400 grams of a sturdy yarn. Recommended: T-shirt yarn (6-9mm thick), macrame cord (3-5mm), or multiple strands of worsted weight cotton held together. Choose a color that will highlight the texture of the honeycomb stitch (solid colors work best for this).
- Crochet Hook: Appropriate for your chosen yarn (e.g., 6.0mm – 8.0mm for T-shirt yarn; 4.0mm – 5.5mm for cotton/macrame). I used a 7.0mm hook for my T-shirt yarn.
- Stitch Markers: Essential for working in rounds and keeping track of the pattern repeat.
- Yarn Needle: For weaving in ends.
- Scissors
- Optional:
- Bag Handles: Two sturdy D-rings or rectangular rings, or pre-made bag handles.
- Magnetic Snap Closure or Zipper: For securing the bag opening.
- Fabric for Lining: Highly recommended for durability and to prevent stretching.
- Bag Feet: Small metal feet to protect the bottom of your bag.
Gauge: Not critical, but aim for a dense, firm fabric where your stitches are close together to prevent stretching. A 10cm x 10cm swatch of sc might be around 10 sc x 12 rows with T-shirt yarn and a 7.0mm hook.
Finished Size (Approximate): 25-30 cm (10-12 inches) wide, 20-25 cm (8-10 inches) tall (excluding handles), 10-12 cm (4-5 inches) deep.
Abbreviations (US Terms):
- ch: chain
- sl st: slip stitch
- sc: single crochet
- hdc: half double crochet
- inc: increase (2 stitches in the same stitch)
- st(s): stitch(es)
- yo: yarn over
- FPsc: front post single crochet (insert hook from front to back around the post of the specified stitch, yo, pull up a loop, yo, pull through 2 loops)
- BPsc: back post single crochet (insert hook from back to front around the post of the specified stitch, yo, pull up a loop, yo, pull through 2 loops)
- BLO: back loop only
- FO: fasten off
Understanding the Honeycomb Stitch (Front Post/Back Post Single Crochet Version):
This version of the honeycomb stitch creates a rich, textured surface by alternating FPsc and BPsc. It’s often worked in multiples of 2.
- Row/Round 1 (Foundation for texture): Sc in each stitch.
- Row/Round 2: Alternate FPsc and BPsc.
- Row/Round 3: Alternate FPsc and BPsc, but work FPsc into BPsc of previous round, and BPsc into FPsc of previous round. This is crucial for the honeycomb effect!
Let’s Craft Your Honeycomb Handbag!
We’ll start with an oval base, then work the body of the bag in continuous rounds using the honeycomb stitch, and finally add the finishing touches.
Part 1: The Oval Base
The base will provide the sturdy foundation for your bag.

Chain: Ch 21 (adjust length for desired bag width – odd number for easy centering later).
Round 1: Sc in 2nd ch from hook, sc in next 18 ch, 3 sc in last ch. Working down the other side of the chain: sc in next 18 ch, 2 sc in last ch. Do NOT join, continue in a spiral. Place a stitch marker in the first sc of the round. (42 sts)
Round 2: Inc in first sc, sc in next 18 sc, inc in next 3 sc, sc in next 18 sc, inc in next 2 sc. (48 sts)
Round 3: Sc in next st, inc in next st, sc in next 18 sc, (sc in next st, inc in next st) 3 times, sc in next 18 sc, (sc in next st, inc in next st) 2 times. (54 sts)
Round 4: Sc in next 2 sts, inc in next st, sc in next 18 sc, (sc in next 2 sts, inc in next st) 3 times, sc in next 18 sc, (sc in next 2 sts, inc in next st) 2 times. (60 sts)
Round 5 (Creating the crisp edge): Sc in the BLO of each st around. This creates a defined edge for the bag body. (60 sts) Move stitch marker to the first sc of this round.
Part 2: The Bag Body (Honeycomb Stitch)
Now for the beautiful texture! We’ll work in continuous rounds.
Round 1 (Foundation): Sc in each st around. (60 sts) Move stitch marker to the first sc.
Round 2 (Honeycomb Part 1): (FPsc around the next st, BPsc around the next st) around. (60 sts) Move stitch marker. Remember: FPsc means inserting your hook around the post of the stitch from front to back. BPsc means inserting your hook from back to front.
Round 3 (Honeycomb Part 2): (FPsc around the next BPsc of previous round, BPsc around the next FPsc of previous round) around. (60 sts) Move stitch marker. This is the key! You’re working the opposite post stitch into the one below it.
Repeat Round 3 until your bag reaches the desired height (e.g., 20-25 cm), or until you are happy with the look and size. For a standard handbag, this might be 15-20 rounds of the honeycomb pattern.

Part 3: Finishing the Top Edge
Once you’ve reached your desired height:
Last Round (Finishing Row): Sc in each st around. Join with sl st to first sc. (60 sts) FO, weave in end.
Part 4: Handles
There are a few ways to add handles:
Option A: Crocheted Handles (As seen in the picture)
This creates a continuous, sturdy strap.
- Short Handles (as in picture):
- Determine placement for your handles. Fold the bag flat and mark the center points on the front and back. From these points, count out evenly to create a gap for your handle attachment (e.g., skip 10-12 stitches, attach the handle in the next 10-12 stitches).
- Join yarn at one side of where a handle will begin. Ch 40-60 (or desired handle length). Sl st into the corresponding point on the other side of the handle attachment. Repeat for the second handle.
- Strengthening the Handles: Sc along the chain of the handle, then sl st back into the bag. Repeat this process for 2-3 more rows, working into the stitches of the previous row of the handle, to create a sturdy, flat handle.
- Alternatively, you can make a separate long strap (as in the round bag pattern) and sew it to the top edges of the bag.
Option B: Using D-rings/Rectangular Rings with a Crocheted Strap
- Make the Strap: Ch enough chains to reach your desired strap length (e.g., 40-50 cm for hand-held, 100-120 cm for shoulder/cross-body).
- Row 1: Sc in 2nd ch from hook, sc in each ch across.
- Row 2: Ch 1, turn. Sc in each st across.
- Repeat Row 2 for 2-3 more rows, or until your strap is the desired width. FO, leave long tails.
- Attach Rings: Find the side edges of your bag top. Fold a small tab of crochet (about 4-5 sc wide, 3-4 rows tall) and sew it securely to the inside top edge of the bag. Attach a D-ring to this tab. Repeat on the other side.
- Attach Strap to Rings: Thread the ends of your crocheted strap through the D-rings. Fold the ends over and sew them securely to create loops.
Option C: Pre-made Handles
Simply sew your pre-made handles securely to the top edges of the bag according to the handle’s instructions.
Part 5: Lining & Closure (Highly Recommended)
- Lining: Cut a piece of sturdy fabric (cotton canvas works well) to match the dimensions of your bag’s base and height, adding seam allowance. Create a fabric “tube” that fits snugly inside your bag. Hand-stitch or machine-stitch the lining to the top edge of your crocheted bag. This will prevent stretching and keep your belongings secure.
- Closure:
- Magnetic Snap: Sew a magnetic snap closure to the inside top edges of the bag, centered on the front and back.
- Zipper: For a more secure closure, you can sew a zipper directly into the lining of the bag.
Video tutorial
Finishing Touches:
- Weave in all remaining loose ends securely.
- Give your bag a gentle block if needed to help it hold its shape perfectly.
- If using, attach any bag feet to the base.
Congratulations! You now have an amazing, unique, and sturdy honeycomb crochet handbag that you can proudly show off. This bag is a testament to your crochet skills and will surely be a conversation starter.
If you make this bag, I’d absolutely love to see it! Share your photos in the comments below or tag me on social media. Happy crocheting!