by
by 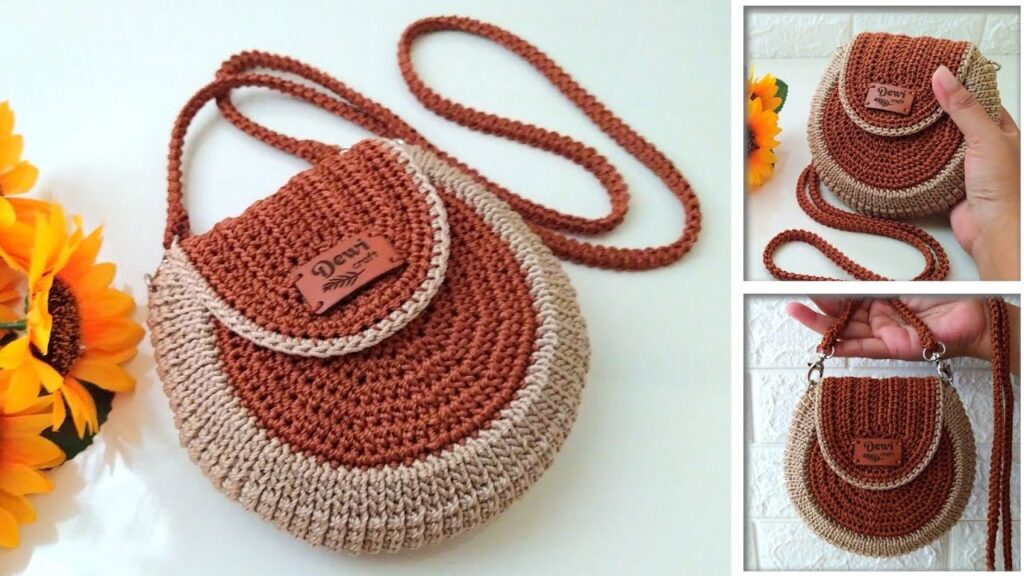
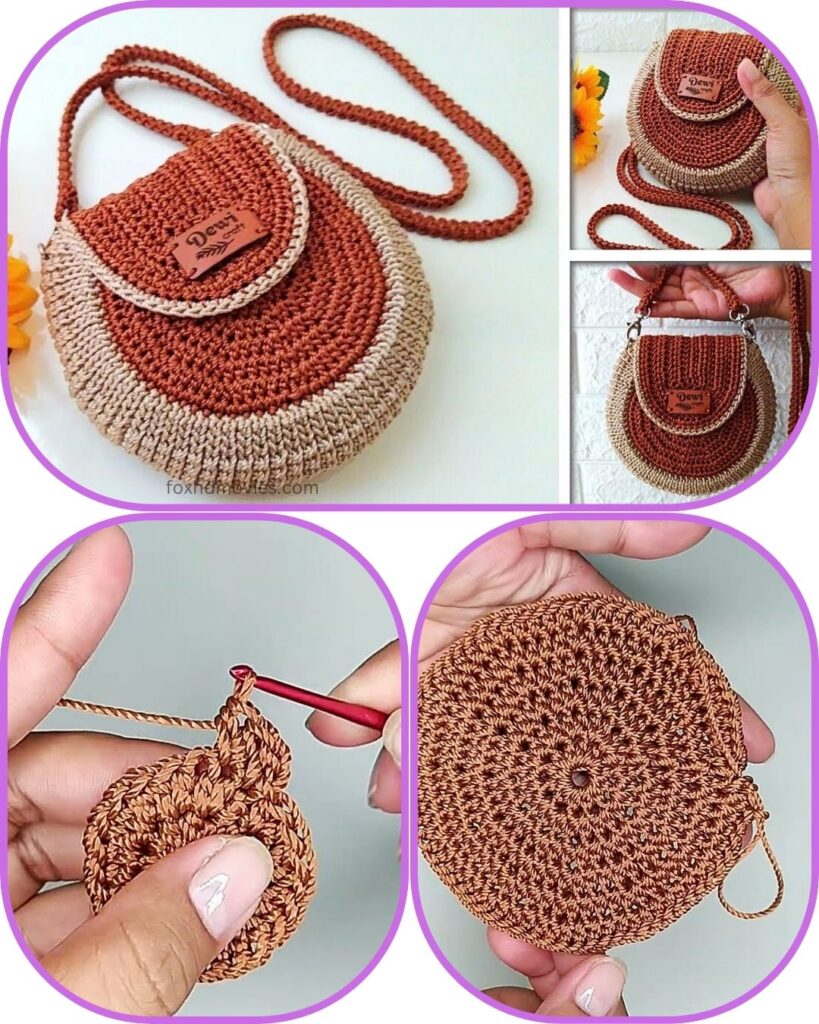
Hello fellow crafters! Are you ready to add a touch of handmade elegance to your wardrobe? This beautiful round crochet bag, with its lovely flap closure and sturdy strap, is the perfect accessory for a casual outing or a stylish everyday carry. The combination of two colors gives it a sophisticated look, and the round shape is both practical and fashionable.
Skill Level: Intermediate
Materials You’ll Need:
- Yarn:
- Color A (Main Bag Color – e.g., Brown/Terracotta): Approximately 200-250 grams of T-shirt yarn, sturdy cotton yarn, or macrame cord (around 3mm-4mm thickness). This will determine the bag’s structure.
- Color B (Contrast/Base Color – e.g., Beige/Natural): Approximately 50-80 grams of the same type and thickness of yarn as Color A.
- Crochet Hook: Appropriate for your yarn choice (e.g., 4.0mm – 5.5mm). A larger hook will result in a looser fabric, a smaller hook in a denser fabric. I used a 5.0mm hook for a sturdy bag.
- Stitch Markers: Very helpful for keeping track of rounds.
- Yarn Needle: For weaving in ends.
- Scissors
- Optional:
- D-rings or O-rings (2): If you want a detachable strap.
- Swivel Clasps (2): If using D-rings/O-rings for a detachable strap.
- Magnetic Snap Closure or Button: For the flap.
- Leather Tag: For decoration (as seen in the picture).
- Fabric for Lining: If you want to line your bag.
Gauge: Not critical, but aim for a firm fabric that holds its shape. A 10cm x 10cm swatch might be around 14 sc x 15 rows with your chosen yarn and hook.
Finished Size: Approximately 20-22 cm (8-8.5 inches) in diameter.
Abbreviations (US Terms):
- ch: chain
- sl st: slip stitch
- sc: single crochet
- hdc: half double crochet
- dc: double crochet
- inc: increase (2 stitches in the same stitch)
- st(s): stitch(es)
- BLO: back loop only
- FLO: front loop only
- FO: fasten off
Pattern Notes:
- This bag is worked in continuous rounds for the base and sides. Use a stitch marker in the first stitch of each round to avoid losing your place.
- The flap is worked in rows.
- The strap can be adjusted to your desired length.
Let’s Create Your Round Crochet Bag!
We’ll start by making two round panels for the front and back, then join them, add the sides, create the flap, and finally the strap.
Part 1: The Round Panels (Make 2 – 1 in Color A, 1 in Color B)
For the bag in the picture, the main body is Color A (brown), and the outer edge of the back panel is Color B (beige). You’ll make one full panel in Color A, and one panel that starts in Color A and finishes in Color B.

Panel 1 (Main Panel – Color A):
Using Color A:
Round 1: Create a magic ring, ch 1, 8 sc into the ring. Pull tight to close. (8 sts) Round 2: Inc in each st around. (16 sts) Round 3: (Sc in next st, inc in next st) around. (24 sts) Round 4: (Sc in next 2 sts, inc in next st) around. (32 sts) Round 5: (Sc in next 3 sts, inc in next st) around. (40 sts) Round 6: (Sc in next 4 sts, inc in next st) around. (48 sts) Round 7: (Sc in next 5 sts, inc in next st) around. (56 sts) Round 8: (Sc in next 6 sts, inc in next st) around. (64 sts) Round 9: (Sc in next 7 sts, inc in next st) around. (72 sts) Round 10: (Sc in next 8 sts, inc in next st) around. (80 sts) Continue increasing in this manner until your circle reaches the desired diameter (e.g., 20-22 cm). Make sure both panels are the same size! The final round will have (Sc in [X] sts, inc in next st) around. Sl st to join, FO, weave in ends.
Panel 2 (Contrast Panel – Color A & B):
Using Color A: Follow Rounds 1-9 (or the second to last round for your desired diameter) as for Panel 1. Do NOT FO.
Switch to Color B:
Last Round (e.g., Round 10 if your bag is 80 sts): Ch 1, (Sc in next 8 sts, inc in next st) around. Join with sl st to first sc. (80 sts) Sl st to join, FO, weave in ends.
Part 2: The Side Band (In Color B)
This band connects the two panels and forms the depth of the bag.
Using Color B:
Ch 7 (or desired width for your bag’s depth – 7 ch creates a band of 6 sc wide). Row 1: Sc in 2nd ch from hook, sc in next 5 ch. (6 sc) Row 2: Ch 1, turn. Sc in each st across. (6 sc) Repeat Row 2 until the band is long enough to go around about 2/3 to 3/4 of your round panels (approximately 50-60 cm, or enough to leave space for the flap at the top). You can test by laying it around one of your completed round panels. FO, leave a long tail for sewing.

Part 3: The Flap (In Color A)
This flap will be attached to the back panel.
Using Color A:
Ch 21 (adjust width to your preference, this creates a flap about 18-20 sc wide). Row 1: Sc in 2nd ch from hook, sc in next 19 ch. (20 sc) Row 2: Ch 1, turn. Sc in each st across. (20 sc) Repeat Row 2 for approximately 10-12 rows (or until it’s a good length to cover the opening of your bag when closed). Shaping the flap (Optional – rounded corners):
- Next Row: Ch 1, turn. Sc2tog, sc in next 16 sts, sc2tog. (18 sc)
- Next Row: Ch 1, turn. Sc2tog, sc in next 14 sts, sc2tog. (16 sc)
- Continue decreasing by 2 stitches per row until you have a nice rounded edge, or until you have about 10-12 stitches left.
- Finishing Edge: Ch 1, then sc evenly around the entire edge of the flap to give it a neat finish. Work 3 sc in each corner for smooth turns. FO, leave a very long tail for sewing onto the back panel.
Part 4: The Strap (In Color A)
You can make a simple sc strap, or a sturdier strap like a i-cord or a braided strap if desired. Here’s a basic sc strap:
Using Color A:
Ch enough chains to reach your desired strap length (e.g., 100-120 cm for a cross-body bag). Make sure it’s not too stretchy. Row 1: Sc in 2nd ch from hook, sc in each ch across. Row 2: Ch 1, turn. Sc in each st across. Repeat Row 2 for 2-3 more rows, or until your strap is the desired width. FO, leave long tails for sewing.

Assembly:
- Attach the Side Band:
- Place your Panel 2 (the one with the Color B edge) face up.
- Align one long edge of your Side Band with the outer edge of Panel 2. Starting from one side of where the flap will be (leave the top portion open for the flap), sc or sl st the side band to the BLO of the last round of Panel 2. This creates a neat seam.
- Work your way around, firmly attaching the side band until you leave a gap at the top for the flap.
- Attach the Main Panel:
- Now, take your Panel 1 (all Color A). Align its outer edge with the remaining unattached long edge of the Side Band.
- Using sc or sl st, join Panel 1 to the BLO of the outer edge of the side band. Work firmly around until you have joined the two panels, leaving the same gap at the top as the first side.
- Weave in all initial ends.
- Attach the Flap:
- Position the Flap over the open section of the bag.
- Using the long tail from the flap, sew it securely to the top back edge of the bag (to the edge of Panel 2, where the side band meets it). Make sure it’s centered and very secure, as this will get a lot of use.
- Attach the Strap:
- If using D-rings/O-rings: Thread the ends of your strap through the D-rings. Fold the ends over and sew them securely to create loops.
- If sewing directly: Determine where you want your strap to attach. The picture shows it attached towards the sides, near the top of the side band/heel of the bag. Sew the ends of the Strap very securely to the top edges of the bag’s side panels. Use multiple strong stitches.
- Add Closure (Optional): Sew a magnetic snap closure to the underside of the flap and the corresponding spot on the front of the bag. Alternatively, sew on a button and create a simple loop with chains on the flap to go over the button.
- Add Leather Tag (Optional): Stitch the leather tag onto the front of the flap, as seen in the picture.
- Add Lining (Optional): If you wish to line your bag, cut a fabric circle for the front and back, and a fabric strip for the side, then sew them together and hand-stitch or machine-stitch the lining into the bag.
Video tutorial
Finishing Touches:
- Give your finished bag a gentle reshaping and press if needed.
- Weave in any remaining loose ends securely.
And there you have it! Your very own stylish and functional round crochet bag. This is a project you can truly make your own with different colors and embellishments. Enjoy showing off your beautiful handmade creation!
If you make this bag, I’d love to see it! Share your photos in the comments below or tag me on social media. Happy crocheting!