by
by 
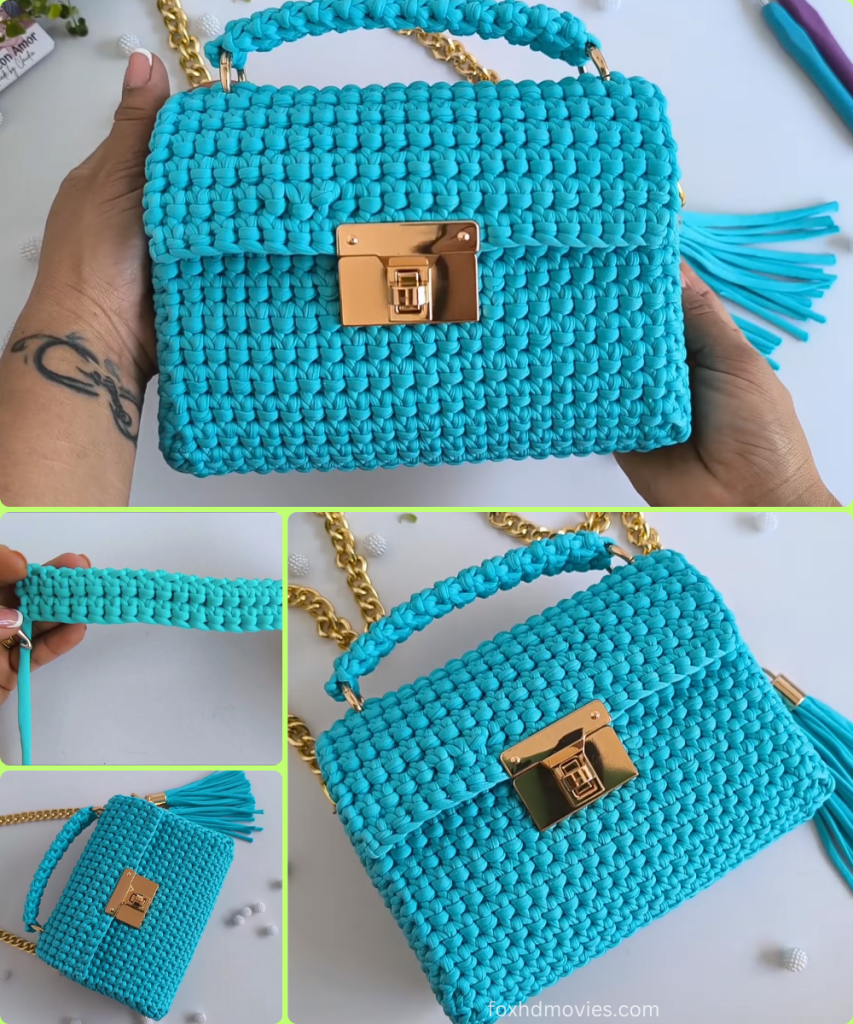
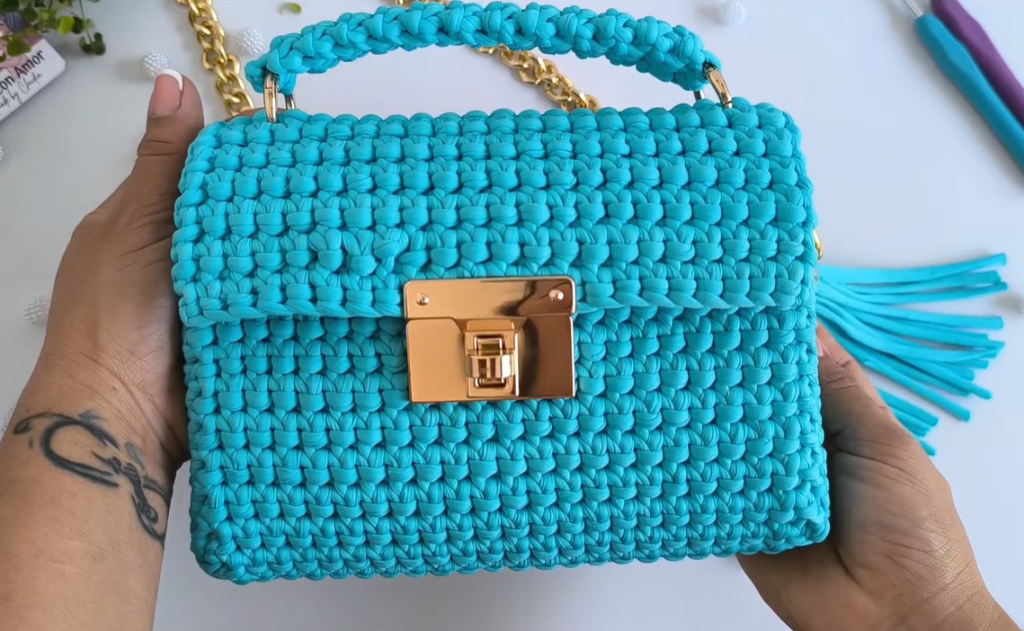
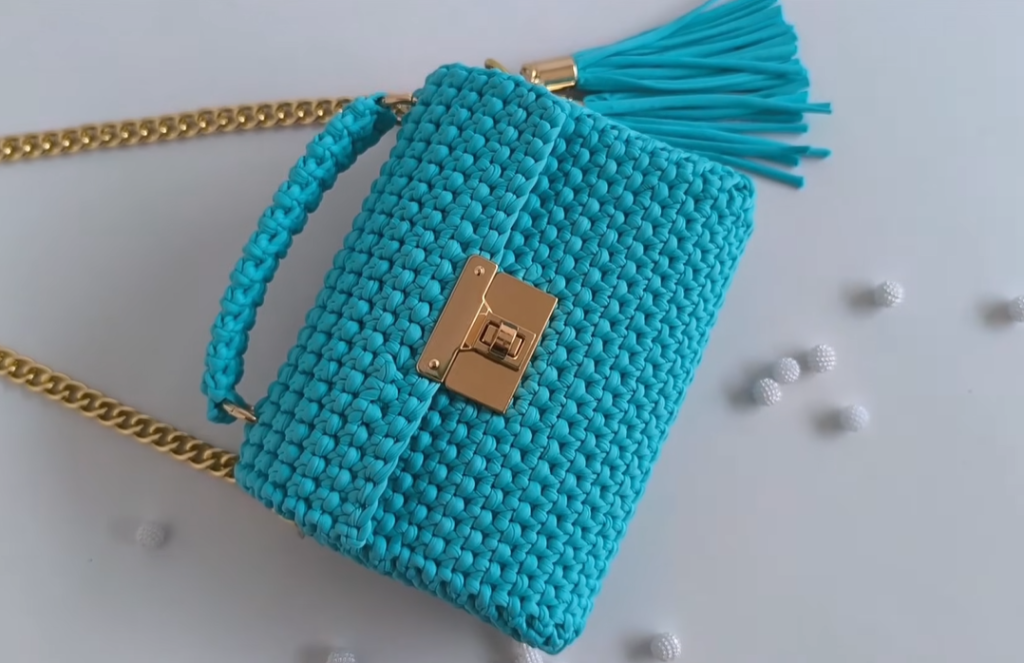
Craft your own stunning and practical bag with this elegant crochet pattern, perfect for adding a touch of handmade sophistication to your daily ensemble! Inspired by a super easy and detailed tutorial, this design utilizes chunky feather trapillo yarn and a unique “double low stitch” to create a spacious accessory that’s both beautiful and functional.
Skill Level: Easy
Finished Size (Approximate):
- Bag Body: Approximately 9 inches (23 cm) long x 8 inches (21 cm) wide (flat)
- Side Panels: Approximately 8 inches (21 cm) long x 2.75 inches (7 cm) wide
- Handle: Adjustable length
- Size can vary based on yarn/cord, hook, and tension.
Materials You’ll Need:
- Yarn/Cord: Approximately 500-700 grams of 2 cm feather trapillo yarn (T-shirt yarn).
- Feather trapillo is a lightweight, flat type of T-shirt yarn. If you cannot find this, you can substitute with regular T-shirt yarn or a very bulky/super bulky weight yarn, but the final weight and drape will differ.
- Crochet Hook: 5.0 mm (H/8) crochet hook.
- Choose a hook size that creates a firm, dense fabric with no gaps when working with your chosen yarn/cord.
- Tapestry Needle: For seaming and weaving in ends. (A sturdy metal needle may be needed for trapillo).
- Scissors
- Stitch Markers: Three stitch markers (or scrap yarn).
- Chain: 100 cm (approx. 39 inches) long decorative chain (e.g., metal, acrylic).
- Clasps/Rings: Various clasps and rings for attaching the chain and handle (e.g., two D-rings or lobster clasps for the chain, one magnetic clasp for closure).
- Bell Caps (Optional): Small bell caps and extra trapillo for decorative tassels.
Gauge (Crucial for Bag Structure!):
Achieving a very firm, dense fabric is crucial for this bag to hold its elegant shape. Work a swatch to ensure your stitches are tight with no visible gaps. If your fabric is too loose, go down a hook size.
Abbreviations (US Crochet Terms):
- ch: chain
- sl st: slip stitch
- sc: single crochet
- st(s): stitch(es)
- FO: Fasten off
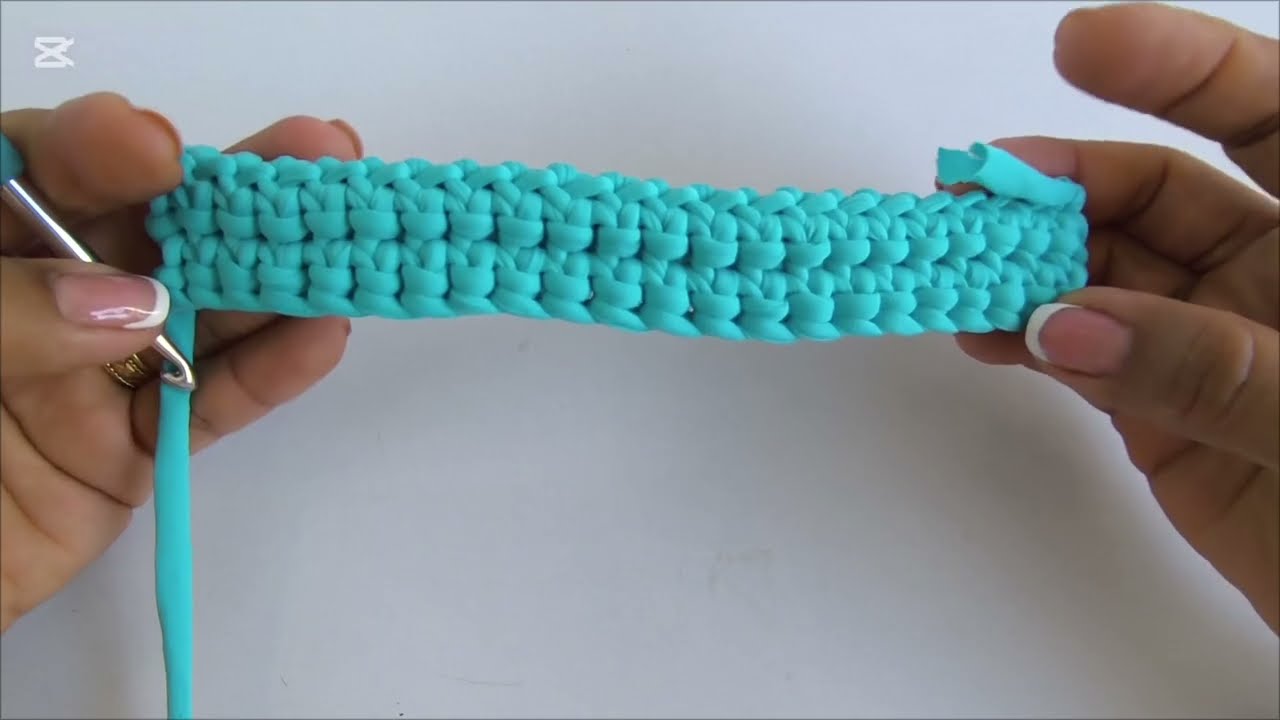
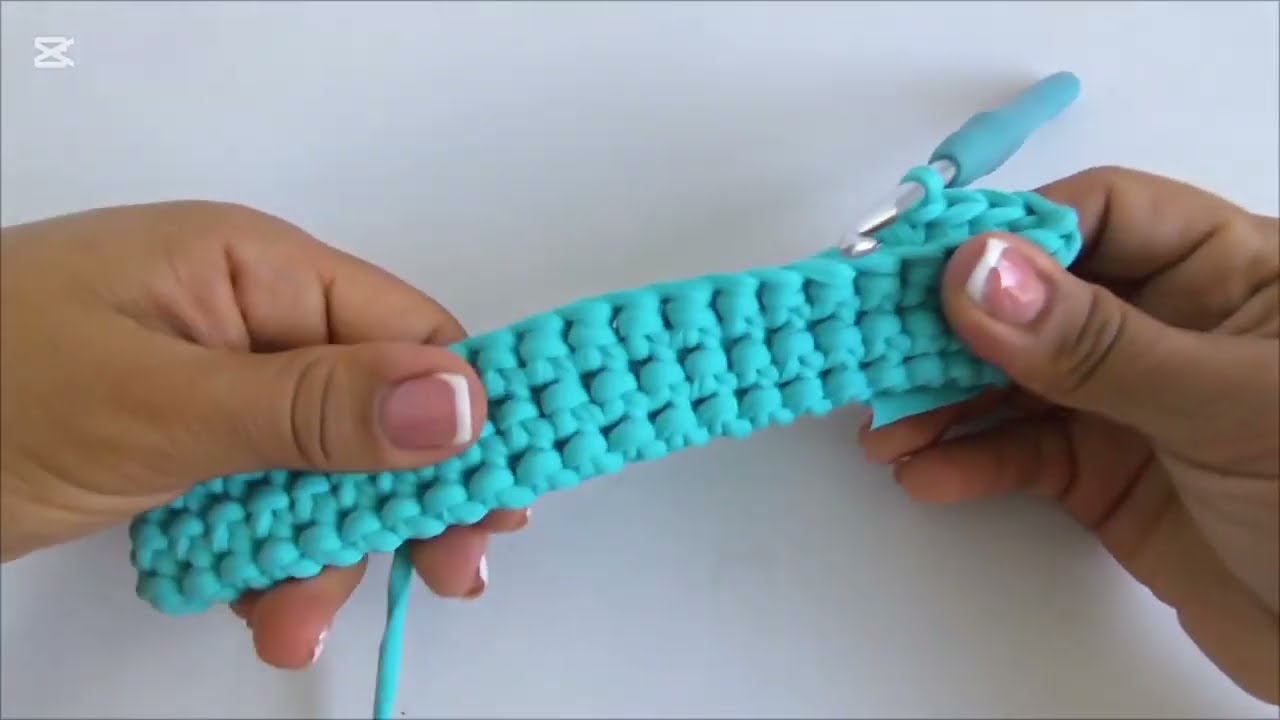
Special Stitch:
- Double Low Stitch (DLS): Insert hook from back to front into the horizontal bar of the previous row’s stitch (the “v” on the back of the sc), yarn over, pull up a loop, yarn over, pull through both loops on hook.
- This stitch creates a beautiful, dense, and slightly textured fabric, similar to Tunisian simple stitch or waistcoat stitch, but worked in rows.
Let’s Crochet Your Elegant & Spacious Bag!
This bag is constructed in several parts: the main body (front/back), two side panels, and the handle.
Part 1: Main Bag Body (Make 2 – Main Yarn Color)
These are identical flat rectangles worked in rows.
- Ch 23.
- Row 1: Sc in 2nd ch from hook and in each ch across. Ch 1, turn. (22 sc)
- Row 2 – 21: Work 1 DLS in each st across. Ch 1, turn. (22 DLS)
- The video works 21 rows. This creates a piece approximately 23 cm long and 19.5 cm wide (9 x 7.7 inches).
FO, leaving a very long tail (approx. 40-50 inches / 100-125 cm) on one of the panels for seaming. Weave in the starting tail on both panels.
Part 2: Side Panels (Make 2 – Main Yarn Color)
These panels will give your bag its depth.
- Ch 7.
- Row 1: Sc in 2nd ch from hook and in each ch across. Ch 1, turn. (6 sc)
- Row 2 – 21: Work 1 DLS in each st across. Ch 1, turn. (6 DLS)
- The video works 21 rows. This creates a piece approximately 21 cm long and 7 cm wide (8.25 x 2.75 inches).
FO, leaving a very long tail (approx. 40-50 inches / 100-125 cm) on one of the panels for seaming.
Part 3: The Handle (Main Yarn Color)
The video shows a crocheted handle made with the DLS.
- Create a Magic Ring (MR).
- Round 1: Ch 1 (does not count as a stitch). Work 3 sc into the MR. Join with a sl st to the first sc. (3 sc)
- Pull the MR tight to close. This forms the starting point of your handle.
- Round 2 – X: Ch 1. Work 1 DLS in each sc around. Do NOT join, continue working in a spiral.
- Continue working DLS in a spiral until the handle reaches your desired length. The video shows a substantial handle. You can adjust the length to be a short hand strap or a longer shoulder strap.
- The DLS worked in a spiral will create a sturdy, rounded cord-like handle.
FO, leaving a long tail for attaching.
Part 4: Assembly
- Attach Side Panels to Main Body:
- Take one main bag body panel and one side panel. Align one long edge of the side panel with one of the long edges of the main bag body panel.
- Using your tapestry needle and the long tail from the side panel (or a new piece of yarn), begin seaming the side panel to the main body. The video uses a sewing method. You can use a whip stitch or mattress stitch for a clean finish.
- Continue seaming along the long side, then around the short bottom edge, and up the other long side of the main panel, following the contours.
- Repeat for the second side panel and the second main bag body panel. This will form the main body of your bag.
- Attach Handle:
- Position your crocheted handle evenly on the top center of the bag opening.
- Using the long tails from the handle and your tapestry needle, securely sew the handle to the bag. Ensure it is firmly attached to withstand weight.
- Attach Magnetic Clasp:
- Determine the center of the bag opening.
- Following the instructions for your magnetic clasp, sew one half to the inside top edge of the front of the bag and the other half to the inside top edge of the back of the bag. Ensure they align perfectly when the bag is closed.
Part 5: Finishing Touches & Embellishments (Optional)
- Weave in all ends: Use your tapestry needle to neatly weave in any remaining loose yarn tails. For trapillo, you might carefully melt the very tip of the yarn with a lighter (briefly!) to prevent fraying and then press it flat to secure, but do this with extreme caution and in a well-ventilated area.
- Decorative Tassels (Borlas):
- Cut several strands of trapillo (e.g., 10-15 strands, 6-8 inches long).
- Fold them in half and loop them through a small bell cap.
- Tie a knot around the top to secure.
- Trim the ends evenly.
- Attach these tassels to the handle or sides of the bag for extra flair.
- Attach Decorative Chain:
- Attach the two carabiner rings to the ends of your 100 cm decorative chain.
- Attach the additional carabiner (or lobster clasp) to one of the carabiner rings on the chain.
- Clip the chain to the top corners of your bag, perhaps to the base of the handle or to small loops you can crochet onto the bag’s side seams. This chain can be used as a decorative element or as a shoulder strap.
Video tutorial
Versatile Uses for Your Elegant Bag:
- Everyday Carryall: Spacious enough for your essentials, a small book, or a tablet.
- Work Bag: A chic option for light work items.
- Shopping Bag: Lightweight and durable for quick trips.
- Gift: A truly impressive and unique handmade gift.
Customization & Tips:
- Yarn Choice: Experiment with different colors of trapillo. If using other yarns, ensure they are sturdy enough to hold the bag’s shape.
- Size Adjustment:
- Larger Bag: Increase the initial chain count and number of rows for all panels.
- Smaller Bag: Decrease the initial chain count and number of rows for all panels.
- Handle Style: You can use pre-made handles (as in the previous pattern) or a simple flat crocheted strap instead of the DLS spiral handle.
- Lining (Optional): For extra durability and to prevent small items from slipping through stitches, you can sew a fabric lining inside the bag.
Enjoy crocheting your own beautiful, easy, and elegant bag! It’s a fantastic way to create a unique and functional accessory that’s sure to turn heads.