 by
by 
There’s nothing quite like a pair of handmade slippers to bring comfort and warmth to your home. And why settle for plain when you can have stylish stripes and contrasting colors? These knitted slippers are not only incredibly cozy but also a fantastic project for knitters looking to practice color changes and simple shaping.
The unique construction creates a sturdy base and a comfortable fit that will make you want to wear them all day long! Let’s dive in and knit up some happiness for your feet.
Skill Level: Advanced Beginner / Intermediate (due to color changes and simple shaping) Yarn Weight: Worsted (Aran) Needle Size: 4.5 mm (US 7) straight or circular needles (or size needed to obtain gauge) Gauge: 20 stitches and 28 rows = 4 inches (10 cm) in Garter Stitch
Materials:
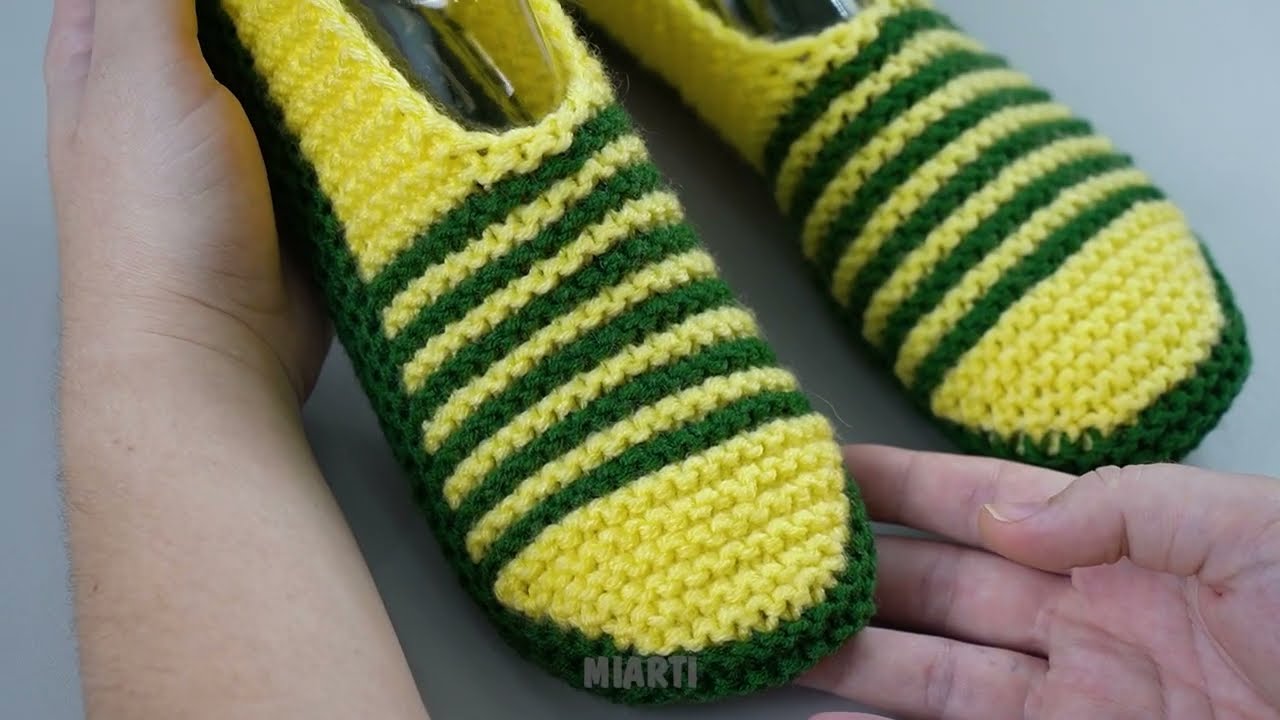
- Color A (Main Color – Yellow in image): Approx. 100-120 yards (90-110 meters) of worsted weight yarn
- Color B (Contrast Color – Green in image): Approx. 80-100 yards (75-90 meters) of worsted weight yarn
- 4.5 mm (US 7) knitting needles
- Tapestry needle for seaming and weaving ends
- Scissors
- Measuring tape
Finished Measurements (approximate, before seaming and blocking): Slipper Length: 9-10 inches (23-25 cm) – easily adjustable Slipper Width (across sole): 4-4.5 inches (10-11.5 cm)
Pattern Notes & Tips:
- Color Changes: When changing colors, carry the unused yarn loosely up the side of your work to avoid cutting and weaving in too many ends. Just make sure not to pull it too tightly, or your edge will pucker.
- Garter Stitch: These slippers are primarily worked in Garter Stitch (knit every row), which provides a lovely texture and density perfect for slippers.
- Adjusting Size: The pattern is written for a women’s medium (US 7-8). To adjust the size, you can change your gauge, needle size, or more simply, add or subtract stitches to the initial cast-on for width, and add or subtract rows for length.
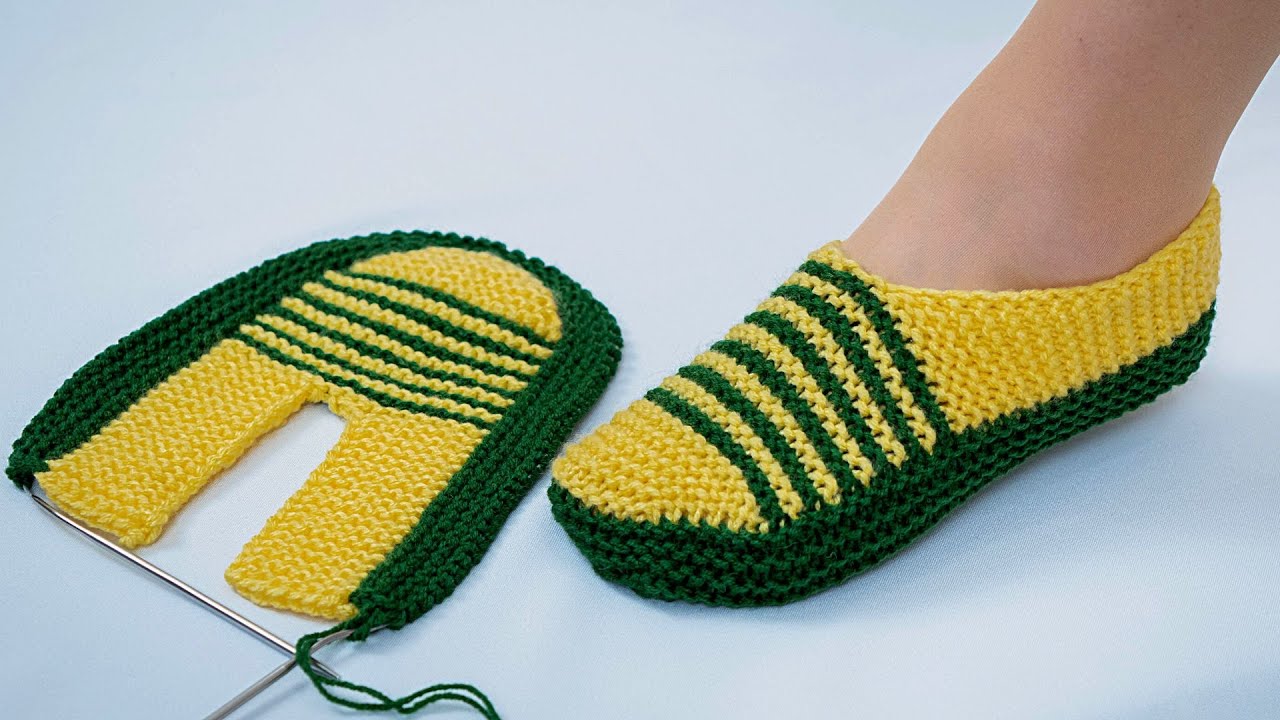
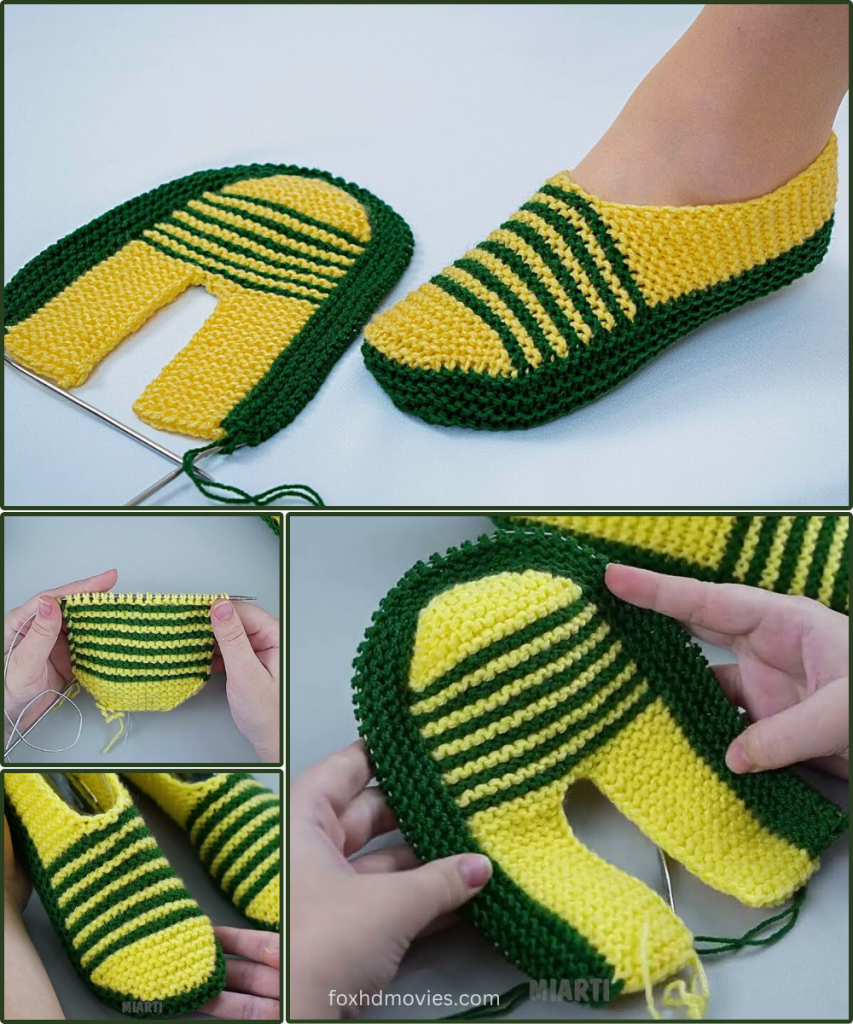
- Reading the “Unfolded” Image: The image shows the slipper “unfolded” on the left, which gives you a good idea of the flat piece before it’s seamed. We’ll be working a variation of this shape.
The Pattern
We’ll start by knitting the central “sole” and top of the slipper in one piece, then add the border.

Part 1: The Main Slipper Body (Sole & Top)
Using Color A (Yellow), cast on 10 stitches.
Row 1 (WS): Knit. Row 2 (RS): K1, M1L (make one left), knit to last stitch, M1R (make one right), K1. (12 stitches)
Repeat Row 1 and Row 2 until you have 20 (22, 24) stitches on your needle. (Adjust this number for wider/narrower feet. This forms the widest part of your sole/instep.)
Now, work in Garter Stitch (knit every row) until your piece measures approximately 8 (9, 10) inches [20 (23, 25) cm] from the cast-on edge, or until the piece is long enough to cover your foot from the heel, across the sole, and up over your toes. You can hold it to your foot to check.
Decrease for the Toe/Heel Curve (This part will form one of the rounded ends):
Row 1 (WS): Knit. Row 2 (RS): K1, K2tog (knit two together), knit to last 3 stitches, SSK (slip, slip, knit), K1. (2 stitches decreased)
Repeat Row 1 and Row 2 until you have 10 stitches remaining.
Bind off all stitches loosely.
You should now have a long, somewhat oval-shaped piece, wider in the middle and narrower at the ends.

Part 2: Adding the Striped Border/Edge
This part will create the sides and bottom “cup” of the slipper, giving it depth.
Pick Up Stitches: With Color B (Green), and with the right side of your main slipper body facing you, pick up and knit stitches evenly all around the entire outer edge of your knitted piece.
- Tip: Aim to pick up roughly 1 stitch for every row along the long edges, and 1 stitch for every stitch along the rounded ends. Be consistent!
- You will likely pick up somewhere between 90-120 stitches, depending on the size of your main piece. Don’t worry too much about the exact count, just ensure it’s even.
Work the Border:
Now, work in Garter Stitch, changing colors every two rows to create the stripes.
- Row 1 (WS): Knit with Color B.
- Row 2 (RS): Knit with Color B.
- Row 3 (WS): Knit with Color A.
- Row 4 (RS): Knit with Color A.
Repeat Rows 1-4 for a total of 6-8 rows (or 3-4 stripes of each color), ending with two rows of Color B. This forms the height of the slipper’s edge.
Bind off all stitches loosely using Color B.
Assembly Time!
This is where your flat piece transforms into a cozy slipper!
- Lay Flat: Lay your knitted piece flat with the right side facing up. It should look like a long oval with the striped border around it.
- Fold and Seam the Heel:
- Fold one of the rounded ends of your main slipper body (the one you decreased at the end of Part 1) towards the center. This will form the heel.
- Bring the two short ends of the striped border together at the center back of the heel.
- Using your tapestry needle and a length of Color B yarn, seam the short ends of the striped border together, continuing this seam up the center back of the main slipper body for about 1-2 inches (2.5-5 cm). This creates the heel cup.
- Seam the Toe:
- Now, find the other rounded end of your main slipper body. This will be the toe.
- Fold the sides of the striped border inwards, so they meet under the toe area.
- Using your tapestry needle and a length of Color B yarn, seam the edges of the striped border together under the toe, closing the opening. You’ll be essentially folding the “excess” border fabric and seaming it down to create the rounded toe shape. You might need to gather or slightly ease the stitches here to make a neat curve.
- Seam the Sides:
- The main slipper body should now be “cupped” by the striped border.
- Using Color B and your tapestry needle, seam the side edges of the striped border to the corresponding edges of the main slipper body, working from the heel seam up to the toe seam. This creates the structured side walls of the slipper.
- Weave in Ends: Securely weave in all loose ends on the inside of your slipper using your tapestry needle.
- Block (Optional but Recommended): Gently wet your slippers and squeeze out excess water. Place them on a slipper block or stuff them with paper/towels to shape them to your foot size. Allow them to dry completely. This will help even out your stitches and give your slippers a professional finish.
Video tutorial
Care:
Hand wash in cool water with a mild detergent. Reshape and lay flat to dry.
You now have a fantastic pair of custom-made, two-tone striped slippers! They’re perfect for keeping your feet toasty and adding a pop of color to your loungewear. Don’t forget to knit a second one to make a pair!
Share your cozy creations with me on social media using #StripedSlippersKnitting – I can’t wait to see your color combinations! Happy knitting!