 by
by 
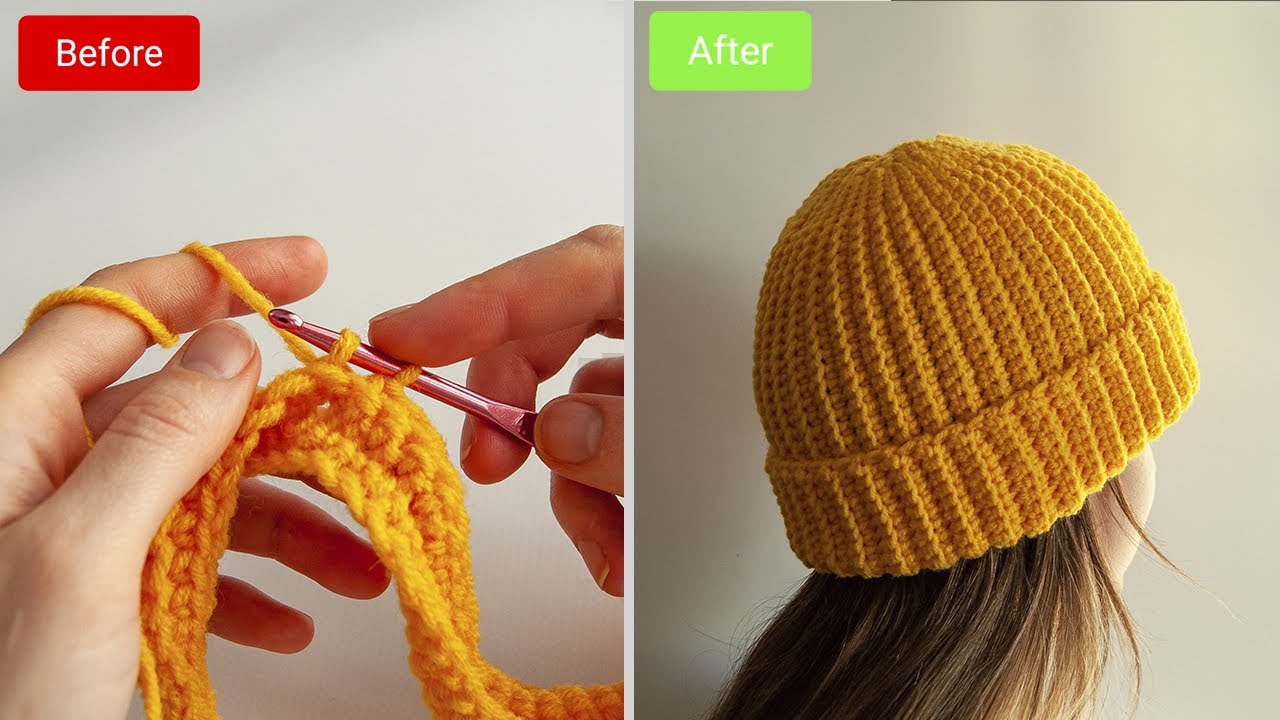
Hello, yarn enthusiasts! As the chill starts to creep into the air, there’s nothing quite as satisfying as a warm, handmade hat. Today, I’m absolutely delighted to share the pattern for this incredibly cozy and stylish Cozy Ribbed Beanie. This hat features a beautiful, stretchy ribbing that not only looks fantastic but also provides extra warmth and a snug fit.
The beauty of this pattern lies in its simplicity and the clever use of back loop only stitches to create that lovely texture. Even if you’re relatively new to crochet, you’ll find this project very achievable, and you’ll love the results!
Skill Level: Easy-Intermediate (basic stitches, working in back loop only, simple shaping)
Materials You’ll Need:
- Yarn: Approximately 150-200 grams of Worsted Weight (Aran/10-ply) yarn. The sample uses a vibrant mustard yellow, but feel free to choose any color that speaks to you! Acrylic or wool blends work wonderfully for warmth and elasticity.
- Crochet Hook: 5.0 mm (H/8) crochet hook. (Adjust hook size if needed to meet gauge.)
- Tapestry Needle: For weaving in ends and seaming.
- Scissors
- Stitch Marker: (Optional, but helpful for rounds)
Gauge:
- 14 stitches (in HDC BLO) x 10 rows (in HDC BLO) = 4 inches (10 cm) (It’s crucial to check your gauge for this hat to ensure the correct size and fit. A slight difference can drastically change the final dimensions!)
Abbreviations (US Terms):
- ch: chain
- sl st: slip stitch
- hdc: half double crochet
- hdc blo: half double crochet in back loop only
- sc: single crochet
- sc blo: single crochet in back loop only
- st(s): stitch(es)
- fo: fasten off
Notes Before You Start:
- This beanie is constructed by crocheting a flat rectangle in rows, then seaming it together and gathering the top.
- Ch 1 at the beginning of rows does NOT count as a stitch.
- The “ribbing” effect is created by working into the back loop only (BLO) of each stitch. This is key!
Pattern Instructions:
Part 1: Creating the Beanie Body (The Ribbed Rectangle)
We will start by chaining the length of the hat, from the brim to the crown, and then work in rows.

Foundation Chain: Ch 55 (for an adult Medium size, with a folded brim).
- To adjust height: For a shorter beanie (no fold), chain fewer stitches (e.g., Ch 45). For a slouchier beanie or a very deep brim, chain more stitches (e.g., Ch 60+).
Row 1: Hdc in the 2nd ch from hook and in each ch across. (54 hdc) Row 2: Ch 1, turn. Hdc blo in each st across. (54 hdc blo)
Repeat Row 2 until your rectangle measures approximately 18-20 inches (45-50 cm) in length, or until it can comfortably wrap around your head with a slight stretch. For an adult Medium, this will be about 45-50 rows.
- Important Fit Tip: The rectangle should be slightly smaller than your head circumference, as the BLO stitches create a very stretchy fabric. Don’t make it too loose at this stage, or the hat will be baggy. Try stretching it around your head or a head-sized object (like a cushion) to check the fit.
Fo, leaving a very long tail (at least 20 inches/50 cm) for seaming and gathering the top.
Part 2: Assembly and Shaping
Now, let’s transform our flat rectangle into a beautifully shaped beanie!

- Seam the Sides: Fold your crocheted rectangle in half lengthwise, with the right sides facing each other. Line up the starting chain edge with the last row worked. Using your tapestry needle and the long tail, whip stitch or mattress stitch the two side edges together. Work neatly to create an invisible seam.
- Gather the Top (Crown): Once the side seam is complete, you’ll have a tube. Keep the seam on the inside (wrong side facing out for now). Thread your tapestry needle with the remaining long tail.
- Work a running stitch (weaving the needle in and out) all the way around the raw edge of the top opening of the tube. Pass the needle through the tops of the stitches of the last row.
- Once you’ve gone all the way around, pull the yarn tail tightly to gather the opening closed. Pull it as tight as you can, forming a small, puckered hole.
- Make several small stitches across the gathered hole to securely close it and prevent it from opening up. Pass the needle through the center of the gathered fabric a few times.
- Weave in the remaining yarn end securely on the inside of the hat.
- Weave in Ends: Weave in any remaining starting tails.
Part 3: The Brim (Optional Fold)
- The ribbed texture created by the BLO stitches naturally lends itself to a folded brim, as shown in the inspiration photo. Simply fold up the bottom edge of the hat to your desired height. The elasticity of the ribbing will hold it in place.
Video tutorial
Finishing Touches:
- Gently block your beanie if desired, to help the stitches settle and achieve an even shape. (Simply wet it, gently squeeze out excess water, shape it, and let it air dry flat).
And there you have it! Your very own Cozy Ribbed Beanie. This hat is so versatile and can be made in any color to match your wardrobe. It’s a fantastic gift idea too!
If you make one, please share your creation with me! Tag me on social media using #CozyRibbedBeanie – I’d love to see your finished hats!
Happy hooking!