 by
by 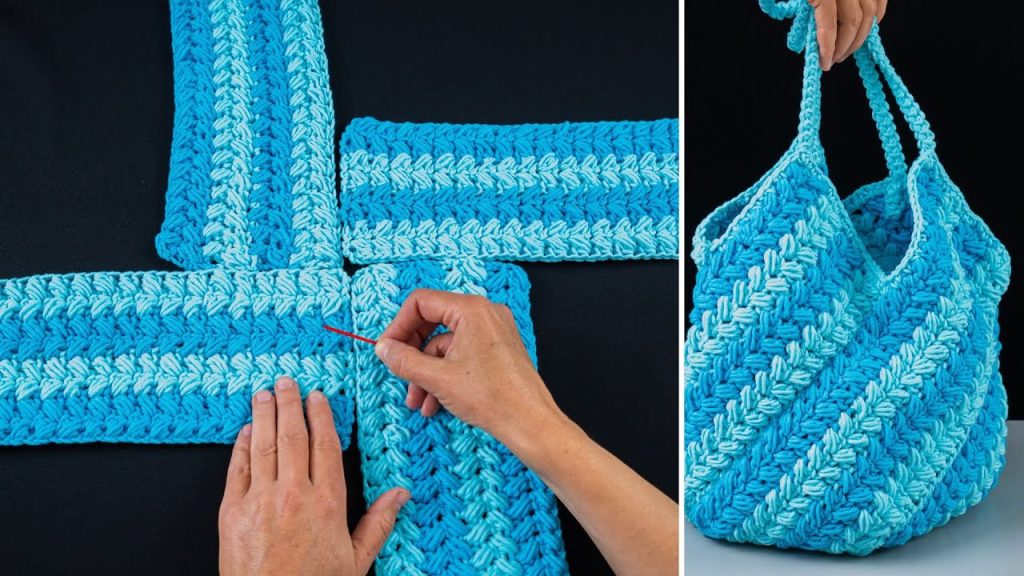
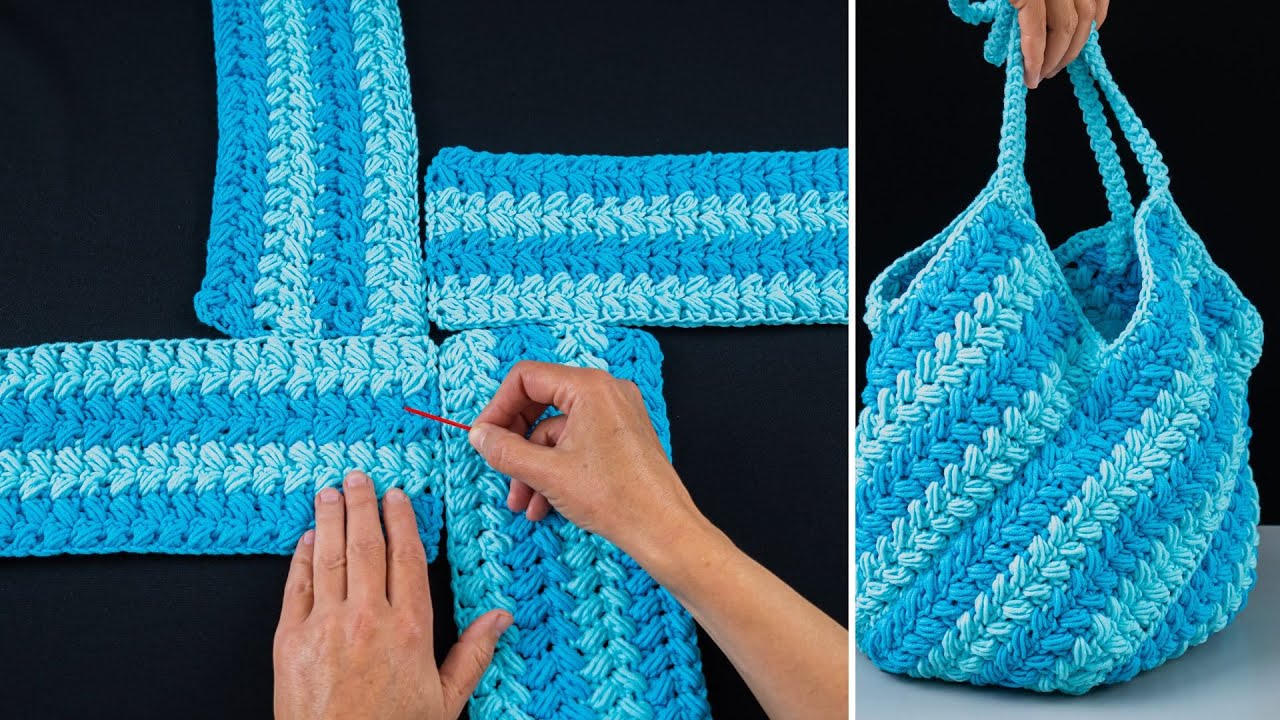
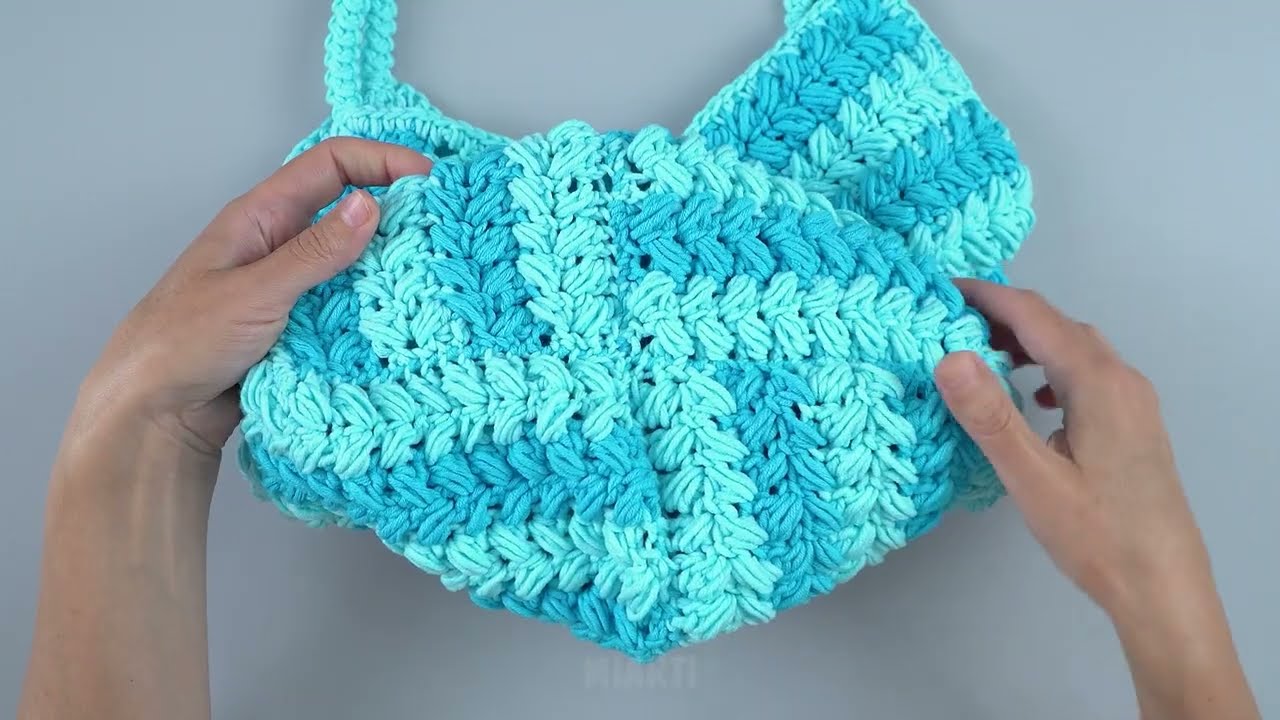
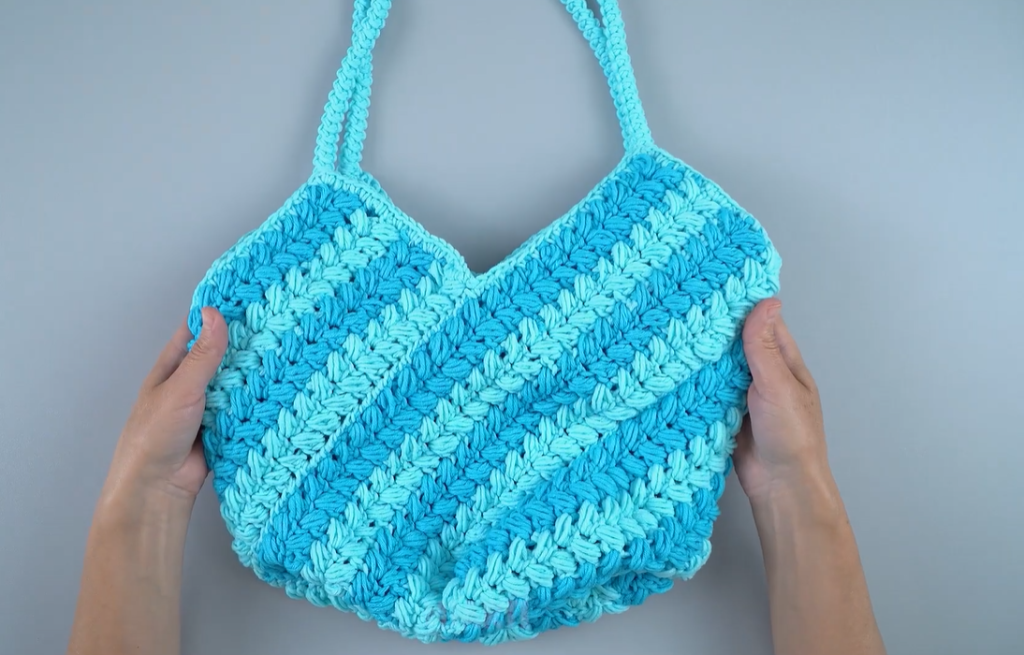
Who doesn’t love a bag that’s not only practical but also a statement piece? Today, we’re going to dive into creating a wonderfully textured and visually striking crochet bag – I’m calling it the “Cross-Stripe Carryall.” Inspired by the intriguing construction and beautiful two-tone stripes in the image you shared, this pattern will guide you through making five individual panels that are then joined together to form a unique and surprisingly spacious basket-style tote.
This bag’s construction might look complex, but it’s really a clever way to build a functional and stylish accessory using simple stitches. The alternating colors and the textured stitch create a dynamic look that’s perfect for carrying your latest craft project, a market haul, or just your everyday essentials with a touch of handmade charm.
Understanding the Construction:
Before we begin, let’s break down how this bag comes together. We’ll be making five rectangular panels:
- Central Panel: This will form the base and two opposing sides of the bag.
- Side Panels (x4): Two panels will attach to the short sides of the central panel, and two more will attach to the long sides, completing the basket shape.
The beauty of this method is the flexibility. You can adjust the length and width of your panels to create a taller, shorter, wider, or narrower bag!
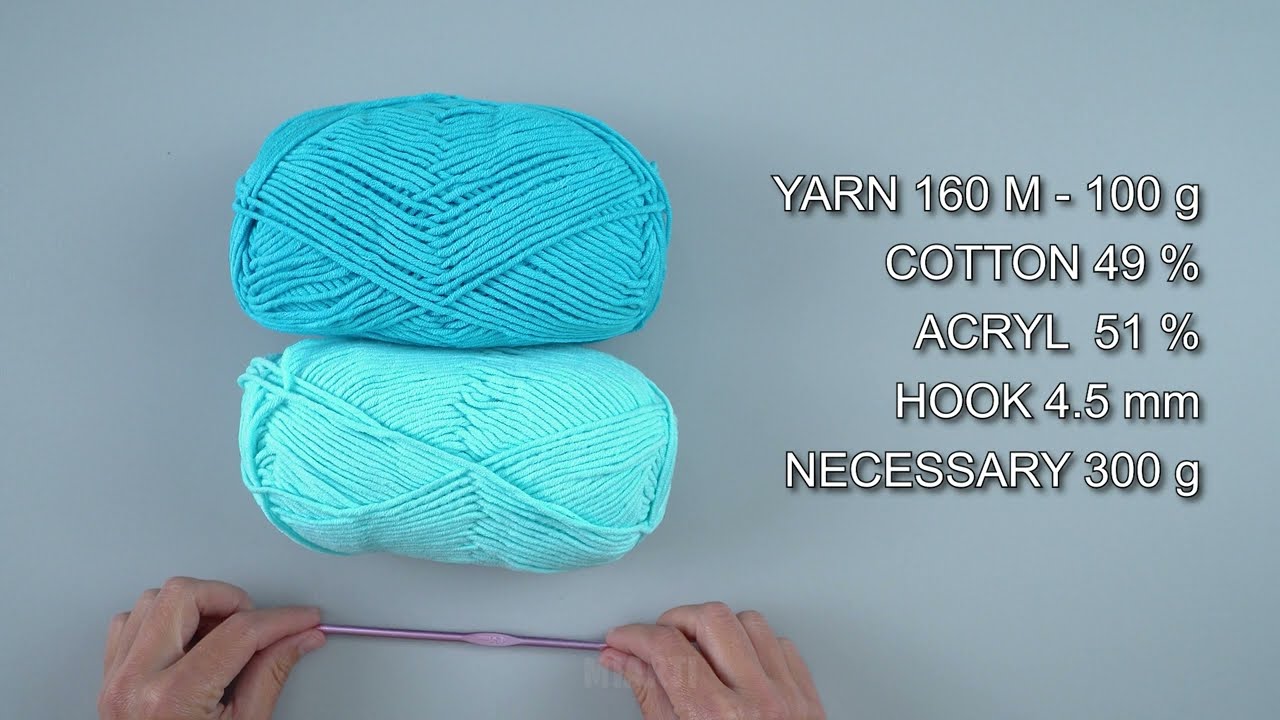
Materials You’ll Need:
Let’s gather our supplies. For that lovely striped effect, we’ll need two colors of yarn!
- Yarn: Approximately 700-800 yards (640-730 meters) total of a worsted weight (Aran/10 ply) cotton or cotton blend yarn. This will be divided between two colors.
- Color A (CA): Approximately 350-400 yards (e.g., the lighter blue in the example image).
- Color B (CB): Approximately 350-400 yards (e.g., the darker blue in the example image).
- Cotton is recommended for bags due to its durability and ability to hold shape. Choose colors that contrast nicely!
- Crochet Hook: 5.5 mm (I/9) or size needed to obtain gauge. A slightly larger hook can give a softer drape suitable for this style, but a firm fabric is still desired.
- Stitch Marker: Helpful for marking the beginning/end of rows or specific stitches.
- Yarn Needle: For weaving in ends and seaming the panels together.
- Scissors: For cutting yarn.
Gauge:
Achieving the correct gauge is important for the overall size and feel of your finished bag. The textured stitch can be a little tricky to measure accurately, so aim for consistency.
- 12 stitches and 10 rows (using the specified stitch pattern) = 4 inches (10 cm)
Take a moment to make a swatch using the stitch pattern described in “The Stitch Pattern” section below. If your swatch is too large, try a smaller hook. If it’s too small, try a larger hook.
Abbreviations:
- ch: chain
- st(s): stitch(es)
- sc: single crochet
- dc: double crochet
- sl st: slip stitch
- FO: fasten off
- CA: Color A
- CB: Color B
- PM: place marker
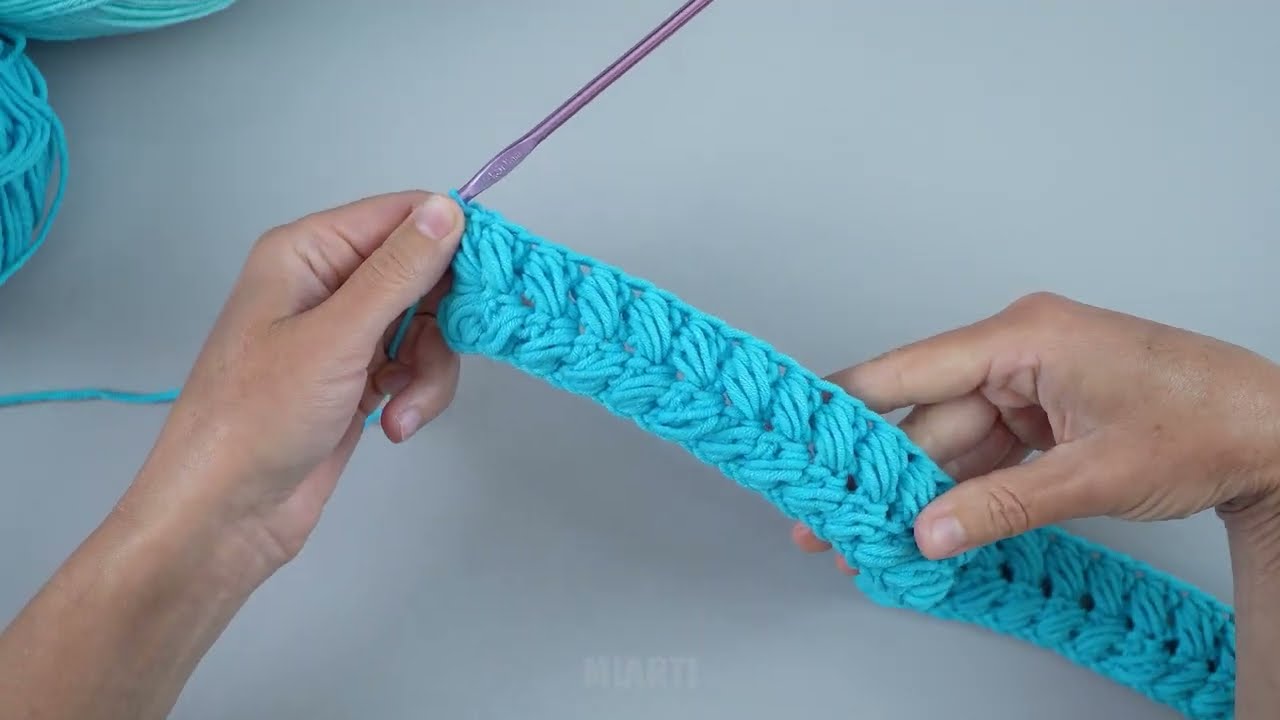
Special Stitch: Half Double Crochet in the 3rd Loop (also known as “Camel Stitch” when worked in the round with hdc)
This is the stitch that gives our bag that wonderful raised, knit-like texture! Instead of inserting your hook into the top two loops of the stitch (the ‘V’), you will insert your hook into the horizontal bar that sits just behind the front and back loops.
- To make a hdc in the 3rd loop: Yarn over, insert hook into the horizontal bar behind the ‘V’ of the previous hdc, yarn over, pull up a loop (3 loops on hook), yarn over, pull through all 3 loops on hook.
Pattern Notes:
- All panels will be worked flat in rows, turning at the end of each row.
- We’ll be alternating between CA and CB every two rows to create the stripes.
- Ch 1 at the beginning of a row does not count as a stitch. Ch 2 at the beginning of a row counts as a hdc.
- When changing colors, complete the last yarn over of the previous row’s last stitch with the new color.
Part 1: Crocheting the Panels
The Stitch Pattern (for all panels):
- Row 1 (CA): Ch 2 (counts as 1st hdc). Hdc in the next st and in each st across. Turn.
- Row 2 (CA): Ch 2 (counts as 1st hdc). Hdc in the 3rd loop of the next st and in the 3rd loop of each st across. Turn. (Remember, you’re working into the 3rd loop of the hdc’s from Row 1).
- Row 3 (CB): Ch 2 (counts as 1st hdc). Hdc in the next st and in each st across. Turn.
- Row 4 (CB): Ch 2 (counts as 1st hdc). Hdc in the 3rd loop of the next st and in the 3rd loop of each st across. Turn.
Repeat Rows 1-4 for the stitch pattern, always changing color every two rows.
1. Central Panel (Makes 1)
This panel forms the base of your bag and two of its sides.
- With CA, ch 37.
- Row 1 (CA): Hdc in the 3rd ch from hook and in each ch across. (35 hdc). Turn.
- Row 2 (CA): Ch 2 (counts as 1st hdc). Hdc in the 3rd loop of the next st and in the 3rd loop of each st across. (35 hdc). Turn.
- Row 3 (CB): Change to CB. Ch 2 (counts as 1st hdc). Hdc in the next st and in each st across. (35 hdc). Turn.
- Row 4 (CB): Ch 2 (counts as 1st hdc). Hdc in the 3rd loop of the next st and in the 3rd loop of each st across. (35 hdc). Turn.
Continue repeating Rows 1-4 of the stitch pattern until you have a total of 40 rows (20 stripes of CA, 20 stripes of CB). The panel should measure approximately 14 inches wide by 16 inches long.
FO, leaving a long tail for seaming.
2. Side Panels (Makes 4)
These panels will form the remaining sides of your bag and give it its basket shape.
- With CA, ch 37.
- Row 1 (CA): Hdc in the 3rd ch from hook and in each ch across. (35 hdc). Turn.
- Row 2 (CA): Ch 2 (counts as 1st hdc). Hdc in the 3rd loop of the next st and in the 3rd loop of each st across. (35 hdc). Turn.
- Row 3 (CB): Change to CB. Ch 2 (counts as 1st hdc). Hdc in the next st and in each st across. (35 hdc). Turn.
- Row 4 (CB): Ch 2 (counts as 1st hdc). Hdc in the 3rd loop of the next st and in the 3rd loop of each st across. (35 hdc). Turn.
Continue repeating Rows 1-4 of the stitch pattern until you have a total of 20 rows (10 stripes of CA, 10 stripes of CB). The panel should measure approximately 14 inches wide by 8 inches long.
FO, leaving a long tail for seaming. Make a total of four identical side panels.
Part 2: Assembling the Bag
Now for the fun part – watching your bag take shape! Lay out your central panel. It’s the longest one. The four shorter side panels will attach to its edges.
- Lay out your Central Panel: Lay the Central Panel flat. Imagine it as a cross, with the central panel being the long vertical arm.
- Attach Side Panels (Short Ends): Take two of your Side Panels. Line up one short end of a Side Panel with one short end of the Central Panel, right sides together. Using your yarn needle and the long tail, seam them together using a whip stitch or mattress stitch. Repeat with the second Side Panel on the other short end of the Central Panel.
- You should now have a long strip with two shorter panels extending from its ends.
- Attach Side Panels (Long Sides): Take the remaining two Side Panels. Now, imagine folding up the sides of your central panel. Line up one long edge of a Side Panel with one long edge of the Central Panel (between the already attached side panels). Seam them together. Repeat with the last Side Panel on the other long edge of the Central Panel.
- At this point, you should have a cross shape with four “arms” extending from the central rectangle.
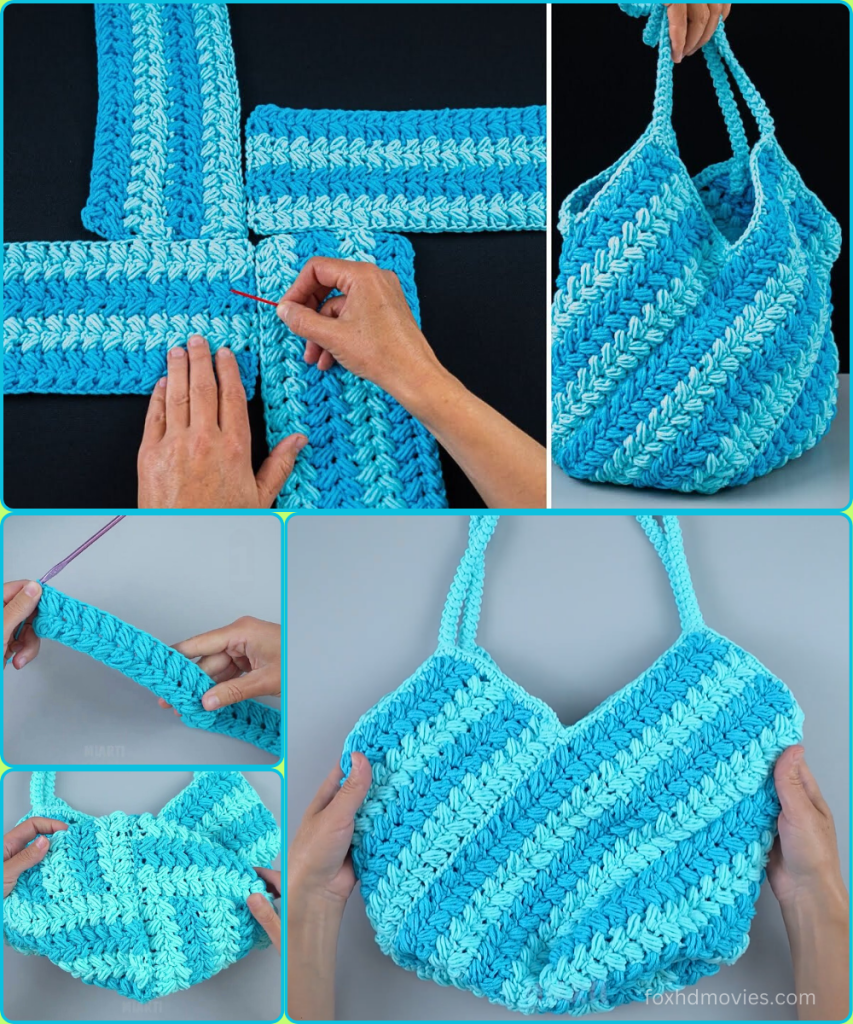
Now it’s time to create the basket!
- Fold and Seam the Sides:
- Pick up the entire piece. The Central Panel will form the base, and the four Side Panels will form the “walls.”
- Fold up one of the Side Panels that you attached to the short end of the Central Panel.
- Take one of the Side Panels that you attached to the long side of the Central Panel. Fold it up so its short end meets the short end of the first folded panel.
- Carefully align the edges and seam these two short ends together. This creates one corner of your bag.
- Repeat this process for all four corners, seaming the short edges of the adjacent side panels together.
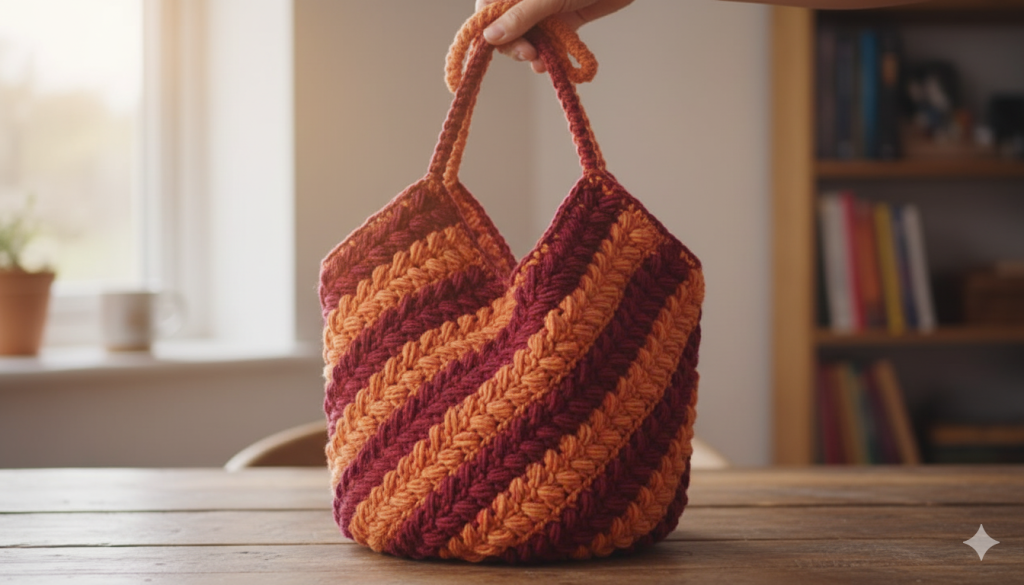
Part 3: Adding the Handles
Now that our basket shape is formed, let’s add the braided handles for carrying. The handles in the inspiration image look like simple braided chains, which are incredibly strong and comfortable.
- Cut Yarn Strands: Decide how long you want your handles to be. A good starting point is about 20-24 inches (50-60 cm) before braiding. You’ll need 6 strands of yarn per handle (3 of CA, 3 of CB), cut to double your desired finished length plus a little extra for knots. So, if you want a 24-inch braided handle, cut 6 strands of yarn each about 48-50 inches long.
- Attach to Bag: Gather the 6 strands for one handle. Find the center top edge of one of the bag’s “openings.” Thread the middle of the 6 strands through a few stitches at the top edge of the bag. Tie a secure knot, creating a loop of 12 strands.
- Braid: Separate these 12 strands into three groups of 4 strands each (you’ll have 2 CA and 2 CB in each group for a nice mixed look). Braid these three groups together tightly.
- Attach Second End: Once you’ve braided to your desired handle length, thread the end of the braid through a few stitches on the opposite side of the same bag opening. Tie another secure knot.
- Repeat: Make a second identical handle for the other opening of your bag.
- Secure Ends: Weave in any remaining yarn tails from the handle knots securely into the braid or the top edge of the bag.
Video tutorial
Here’s an example of the finished product, ready to be used!
Final Touches:
Weave in all remaining yarn tails from your panel seams and color changes. Take your time with this step – a neatly finished bag is a joy forever!
You Did It!
Congratulations! You’ve successfully crocheted your unique “Cross-Stripe Carryall”! This bag is a fantastic project for showcasing your colorwork and stitch skills, resulting in a durable and stylish accessory. It’s truly a testament to how simple panels can come together to create something extraordinary.
How will you use your new basket bag? Share your creations and color choices with us – we love seeing your unique takes on our patterns! Happy Hooking!