by
by Hello, texture-loving crocheters!
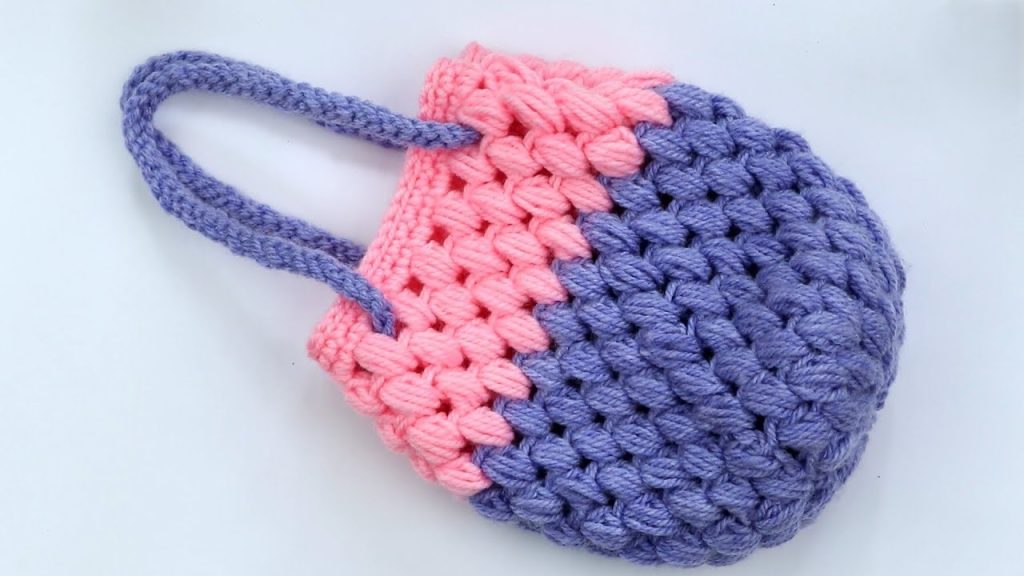
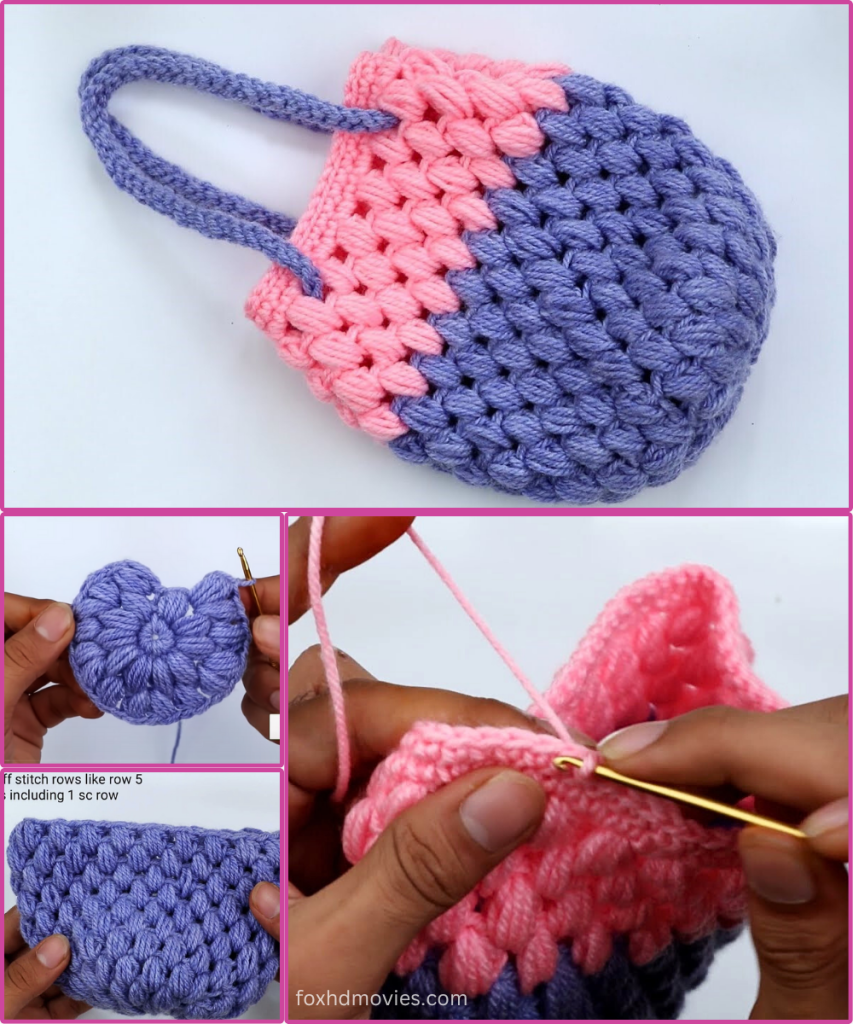
Are you ready to create a truly delightful and tactile accessory? Today, we’re diving into making the “Bobble & Bloom” Drawstring Pouch! This charming little bag, as seen in the image, features the wonderfully squishy bobble stitch in two contrasting colors, a neat round base, and a simple drawstring for closure.
The bobble stitch creates an incredible three-dimensional texture that is not only beautiful but also incredibly satisfying to crochet. This pouch is perfect for holding small treasures, jewelry, makeup, or even as a cute gift bag for special occasions. It’s also a fantastic project for practicing your bobble stitch and working with color changes!
Ready to add a pop of texture and color to your crafting? Let’s grab our yarn and hooks!
What you’ll need:
- Yarn: A Worsted weight (Aran/10-ply) or DK (light worsted) yarn will best showcase the bobble stitch. The bag in the image uses two contrasting colors, like a vibrant pink and a lovely lavender/purple.
- Color A: (Pink in the example image) Approx. 30-40 yards.
- Color B: (Purple/Lavender in the example image) Approx. 30-40 yards.
- Crochet Hook: A hook size appropriate for your chosen yarn. For worsted weight yarn, a 4.5mm (7) or 5.0mm (H/8) hook would work well to ensure the bobbles pop. For DK, a 4.0mm (G/6) hook. (The hook in the image appears to be around a 4.5mm or 5.0mm).
- Scissors
- Tapestry Needle (for weaving in ends and assembling drawstring)
- Stitch Marker (highly recommended for working in continuous rounds for the base)
Abbreviations (US Terms):
- ch: chain
- st(s): stitch(es)
- sl st: slip stitch
- sc: single crochet
- dc: double crochet
- inc: increase (work 2 sts in the same st)
- Bobble St: Bobble Stitch (Specific instructions below)
- rep: repeat
Understanding the Bobble Stitch
This stitch creates the beautiful raised “bubbles” on one side of your fabric. Here’s how to make it (this is a 5-dc Bobble):
Bobble Stitch (Bobble St): (Yo, insert hook into st, yo, pull up a loop, yo, draw through 2 loops) 5 times in the same stitch (you will have 6 loops on your hook). Yo, pull through all 6 loops on hook. Note: We will not add a ch 1 to secure the bobble in this pattern, as we want them to sit close together.
The “Bobble & Bloom” Drawstring Pouch Pattern
We’ll start with a flat circular base, then work the textured body in rounds, and finish with the drawstring casing and drawstring itself.
Part 1: The Round Base (Start with Color A – Pink)
Work in continuous spiral rounds. Use a stitch marker to mark the first stitch of each round.
- Start with MR: Make a Magic Ring.
- Round 1: Ch 1 (does not count as a st). Work 8 sc into the MR. (8 sc)
- Gently pull tail to close the center hole.
- Round 2: Inc in each st around. (16 sc)
- Round 3: *Sc in first st, Inc in next st*. Rep from * to * around. (24 sc)
- Round 4: *Sc in next 2 sts, Inc in next st*. Rep from * to * around. (32 sc)
- Round 5: *Sc in next 3 sts, Inc in next st*. Rep from * to * around. (40 sc)
- Check your base size here. It should be roughly 4-5 inches in diameter. Add more increase rounds if you want a larger pouch (e.g., Round 6: Sc in next 4 sts, Inc in next st, etc.)
- Final Base Round: Sc in each st around. Sl st to the first sc to join. (40 sc)
- Joining with a slip stitch here creates a clear end to the base.
Part 2: The Bag Body (Bobble Stitches & Stripes)
We’ll work this section in joined rounds, changing colors for each bobble round. The bobbles will pop out on the right side of your work.
- Round 7 (First Bobble Round – Color B – Purple):Switch to Color B. Ch 1 (does not count as st).
- Sc in the same st as join.
- *Work 1 Bobble St in the next st, Sc in the next st*. Rep from * to * around. Sl st to the first sc to join. (20 Bobble Sts, 20 Sc)
- The bobbles will be on the outside of the bag. You are creating a pattern of (sc, bobble, sc, bobble…).
- Round 8 (Connecting Round – Color A – Pink):Switch to Color A. Ch 1 (does not count as st). Sc in each st around (working into the sc and the top of each bobble st from the previous round). Sl st to join. (40 sc)
- This round of single crochet provides the foundation for the next round of bobbles.
- Round 9 (Second Bobble Round – Color B – Purple):Switch to Color B. Ch 1.
- Sc in the same st as join.
- *Work 1 Bobble St in the next st, Sc in the next st*. Rep from * to * around. Sl st to join. (20 Bobble Sts, 20 Sc)
- You will be making bobbles into the scs of Round 7, and sc into the bobbles of Round 7, creating an offset pattern.
- Round 10 (Connecting Round – Color A – Pink): Switch to Color A. Ch 1. Sc in each st around. Sl st to join. (40 sc)
- Repeat Rounds 7-10 for your desired height. The bag in the image appears to have 4 rounds of Bobble Stitches (2 purple, 2 pink) on the body. So, you would repeat Rounds 7-10 twice, making a total of 8 rounds for the body.
- After repeating Rounds 7-10 twice, your last round will be a Pink SC connecting round.
Part 3: Drawstring Casing & Finishing
- Round (Drawstring Casing 1 – Color B – Purple):Switch to Color B. Ch 1 (does not count as st).
- Sc in the same st as join.
- *Ch 2, sk next st, sc in next st*. Rep from * to * around. Ch 2, sl st to the first sc to join. (20 sc, 20 ch-2 spaces).
- This creates the eyelets for your drawstring.
- Round (Drawstring Casing 2 – Color B – Purple): Ch 1. Sc in each sc and each ch-2 space around. Sl st to join. (60 sc)
- This closes the casing neatly.
- Fasten off Color B. Weave in ends.
Part 4: The Drawstring
The image suggests a simple braided or chained drawstring.
- Crocheted Drawstring: Using Color A (Pink), Ch a long length (approx. 60-70 inches / 150-180 cm for a good tie). Sl st in the 2nd ch from hook and in each ch across to create a sturdy cord. Fasten off.
- Assembly: Using your tapestry needle, weave the crocheted drawstring through the ch-2 spaces of your drawstring casing (Round 1 of Part 3). Start and end on opposite sides of the bag.
- Knot the ends of your drawstring together, or add beads to the ends before knotting for a finished look.
Finishing:
- Weave in all remaining loose yarn ends securely with your tapestry needle.
- Gently block your pouch if desired, to help the stitches settle and the bobbles pop out evenly.
Video tutorial
Tips for Your “Bobble & Bloom” Pouch:
- Practice Bobbles: If you’re new to bobble stitch, practice a small swatch first to get comfortable. Don’t pull too tightly after pulling through all loops, or your bobbles will flatten.
- Color Changes: When changing colors at the end of a round, complete the very last yarn over of the slip stitch join with the new color. This creates a neater transition.
- Drawstring Alternatives: Instead of a crocheted chain, you could use a length of ribbon, a twisted cord, or even a purchased decorative cord for the drawstring.
- Customization:
- Size: Adjust the number of increase rounds for the base to make a wider or narrower pouch. Adjust the number of bobble rounds for a taller or shorter bag.
- Stripes: Change colors more or less frequently for different stripe patterns.
- Handles: Instead of a drawstring, you could create two small handles like some of the other bag patterns (by chaining spaces and then crocheting over them).
This “Bobble & Bloom” Drawstring Pouch is a wonderful project that combines texture and color to create a truly charming and useful item. Enjoy the tactile joy of the bobble stitch!
Happy Crocheting!