by
by 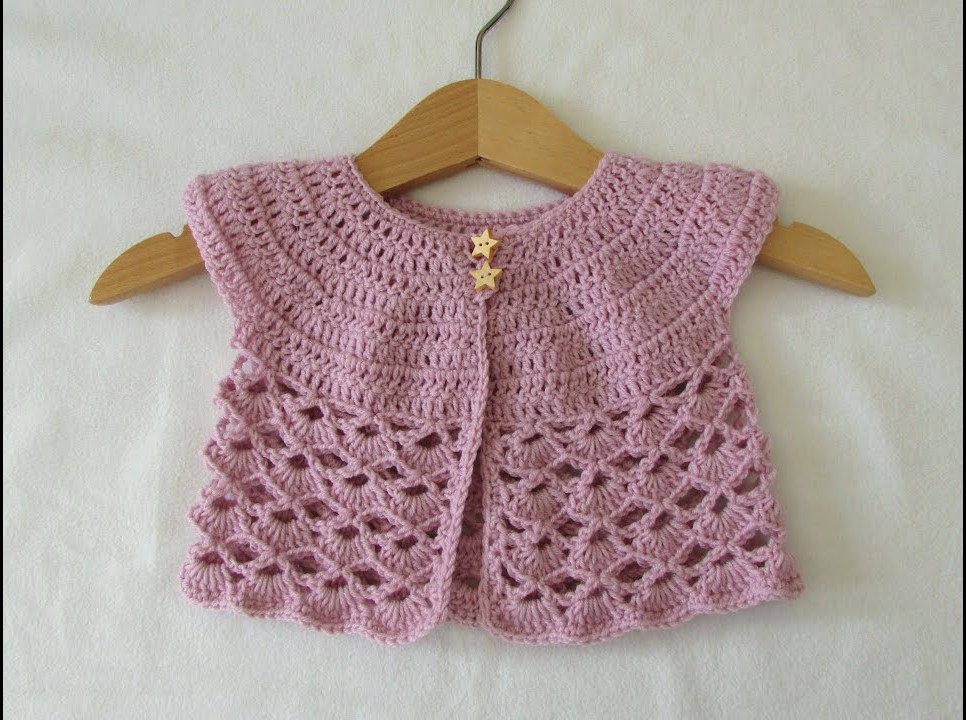
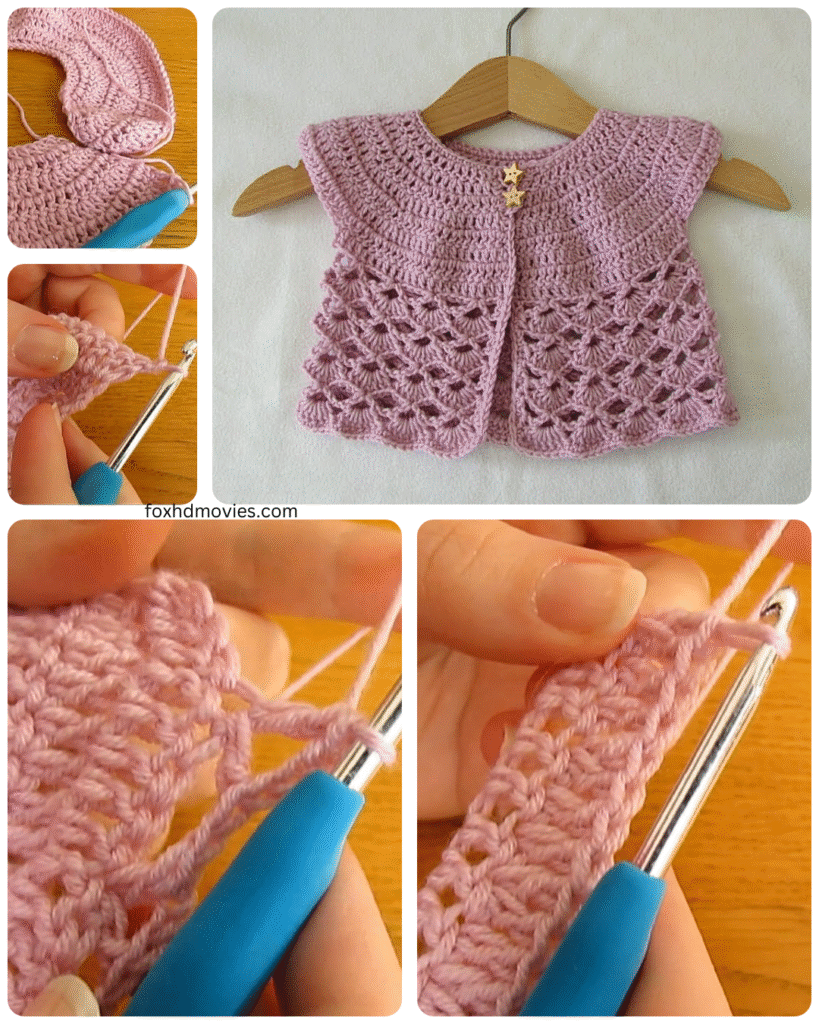
There’s something incredibly special about handmade baby clothes, and a delicate lace cardigan is a classic for a reason! If you’re looking for a project that’s both beautiful and achievable, even if you’re relatively new to crochet or just want a relaxing make, this “Sweet & Simple” lace baby cardigan pattern is perfect for you.
We’ll be using a lovely, easy-to-memorize lace stitch that creates a light, airy fabric – ideal for keeping a little one comfortable. The construction is straightforward, working primarily in one piece to minimize seaming.
Ready to create a cherished piece? Let’s get started!
Skill Level: Easy
Materials:
- Approximately 200-300 yards of DK weight yarn (a soft cotton or acrylic blend is recommended for babies)
- Crochet hook size E/4 (3.5mm) or size needed to obtain gauge
- Stitch markers (optional but helpful)
- Yarn needle for weaving in ends
- Buttons (3-4 small buttons)
- Needle and thread for sewing on buttons
Gauge:
18 stitches and 10 rows in lace pattern = 4 inches (10 cm) It is important to check your gauge to ensure the cardigan will be the correct size.
Abbreviations (US Terms):
- ch: chain
- sc: single crochet
- dc: double crochet
- sk: skip
- sp: space
- st(s): stitch(es)
- rep: repeat
- RS: Right Side
- WS: Wrong Side
Special Stitch:
- Lace Pattern: (Dc, ch 1, dc) in indicated stitch or space.
Notes:
- This cardigan is worked from the top down, back and forth in rows.
- Ch 3 at the beginning of a row counts as a dc.
- Ch 1 at the beginning of a row does NOT count as a stitch.
Video tutorial
Let’s Begin!
Yoke
The yoke is worked in rows, increasing to form the shoulders and armholes.
Ch 49 (for newborn size – see sizing notes below for alternatives).
Row 1 (RS): Dc in 4th ch from hook (counts as 2 dc), dc in next 5 ch, (dc, ch 2, dc) in next ch (first corner), dc in next 9 ch, (dc, ch 2, dc) in next ch (second corner), dc in next 9 ch, (dc, ch 2, dc) in next ch (third corner), dc in next 9 ch, (dc, ch 2, dc) in next ch (fourth corner), dc in next 6 ch, 2 dc in last ch. (57 dc, 4 ch-2 sps)
Row 2 (WS): Ch 3 (counts as dc), turn. Dc in each st to first ch-2 sp, (dc, ch 2, dc) in ch-2 sp (increase corner), dc in each st to next ch-2 sp, (dc, ch 2, dc) in ch-2 sp (increase corner), dc in each st to next ch-2 sp, (dc, ch 2, dc) in ch-2 sp (increase corner), dc in each st to next ch-2 sp, (dc, ch 2, dc) in ch-2 sp (increase corner), dc in each st to end.
Row 3 (RS): Ch 3 (counts as dc), turn. Dc in each st to first ch-2 sp, (dc, ch 2, dc) in ch-2 sp, dc in each st to next ch-2 sp, (dc, ch 2, dc) in ch-2 sp, dc in each st to next ch-2 sp, (dc, ch 2, dc) in ch-2 sp, dc in each st to next ch-2 sp, (dc, ch 2, dc) in ch-2 sp, dc in each st to end.
Repeat Row 2 and 3 until the yoke measures approximately 3.5 (4, 4.5) inches from the beginning, ending with a Row 2 (WS). The number of stitches between the corner spaces will increase with each row.
Divide for Body and Sleeves
Now we will connect the front and back sections and create the armholes.
Next Row (RS): Ch 3 (counts as dc), turn. Dc in each st across the first front section to the ch-2 sp of the first corner, dc in ch-2 sp, ch 2 (creates armhole), sk all sts across the first sleeve section to the ch-2 sp of the next corner, dc in ch-2 sp, dc in each st across the back section to the ch-2 sp of the next corner, dc in ch-2 sp, ch 2 (creates armhole), sk all sts across the second sleeve section to the ch-2 sp of the next corner, dc in ch-2 sp, dc in each st across the second front section to the end.
You have now joined the front and back sections and created the openings for the sleeves.

Body
Now we will work the body of the cardigan in rows, incorporating the lace pattern.
Row 1 (WS): Ch 3 (counts as dc), turn. Dc in each st across, working 2 dc in each of the ch-2 armhole spaces.
Row 2 (RS): Ch 3 (counts as dc), turn. Dc in next st, sk next st, (dc, ch 1, dc) in next st, rep from * across to last 3 sts, sk next st, dc in last 2 sts.
Row 3 (WS): Ch 3 (counts as dc), turn. Dc in next st, work (dc, ch 1, dc) in ch-1 sp of previous row’s lace pattern, rep from * across to last 2 sts, dc in last 2 sts.
Repeat Row 2 and 3 for the body of the cardigan until it measures approximately 6 (7, 8) inches from the underarm, or desired length. End with a Row 3 (WS).
Edging
Work a simple edging around the entire perimeter of the cardigan (bottom, up the front, around the neck, and down the other front).
Next Row (RS): Ch 1, turn. Work sc evenly spaced all the way around the outer edge of the cardigan. Place 3 sc in each corner to help it lay flat. Join with a slip stitch to the first sc.
Fasten off and weave in ends.
Sleeves
Join yarn with a slip stitch in the center of one of the armhole chain spaces.
Round 1: Ch 3 (counts as dc), work dc evenly around the armhole opening, working 2 dc in the ch-2 space where you joined. Join with a slip stitch to the top of the beginning ch 3.
Round 2: Ch 3 (counts as dc), sk next st, (dc, ch 1, dc) in next st, rep from * around, join with a slip stitch to the top of the beginning ch 3.
Round 3: Ch 3 (counts as dc), work (dc, ch 1, dc) in ch-1 sp of previous round’s lace pattern, rep from * around, join with a slip stitch to the top of the beginning ch 3.
Repeat Round 2 and 3 for the sleeve until it measures approximately 5 (6, 7) inches from the underarm, or desired length.
Cuff:
Next Round: Ch 1, work sc in each st and ch-1 sp around. Join with a slip stitch to the first sc. Fasten off and weave in ends.
Repeat for the second sleeve.
Finishing
- Weave in all remaining loose ends.
- Block your cardigan gently according to your yarn’s recommendations. This will help the lace pattern open up beautifully.
- Sew buttons evenly spaced along one of the front edges. You can use the spaces in the lace pattern on the opposite front edge as buttonholes, or create small chain loops if preferred.
Sizing Notes:
This pattern is written for Newborn size. To adjust for larger sizes, you will need to:
- Start with a longer initial chain for the yoke. The general rule for top-down yokes is to chain enough to roughly match the upper chest circumference, plus a little ease and stitches for the corners.
- Work more increase rows in the yoke before dividing for the body and sleeves.
- Work more rows for the body and sleeves to achieve the desired length.
Here are approximate starting chain counts and yoke depths for common sizes (these are estimates and may vary based on your gauge and yarn):
- 0-3 Months: Ch 53, Yoke Depth ~4 inches
- 3-6 Months: Ch 57, Yoke Depth ~4.5 inches
- 6-12 Months: Ch 61, Yoke Depth ~5 inches
For larger sizes, you will also need more yarn.
And there you have it! A sweet and simple lace crochet baby cardigan. This pattern is designed to be enjoyable to make and lovely to behold. It’s perfect for a baby shower gift or just because.
Happy Crocheting!