by
by 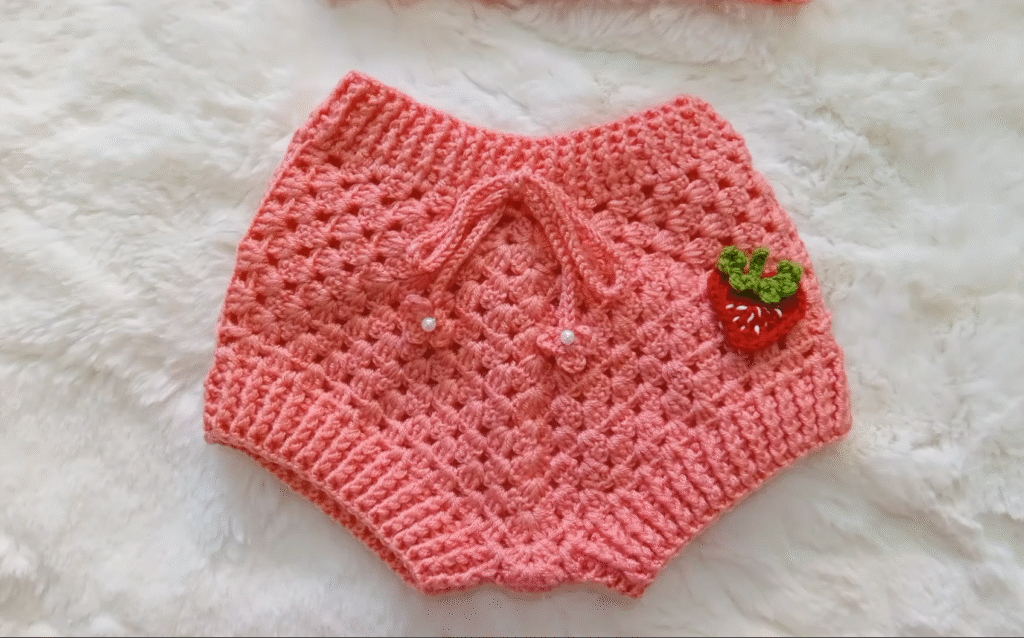
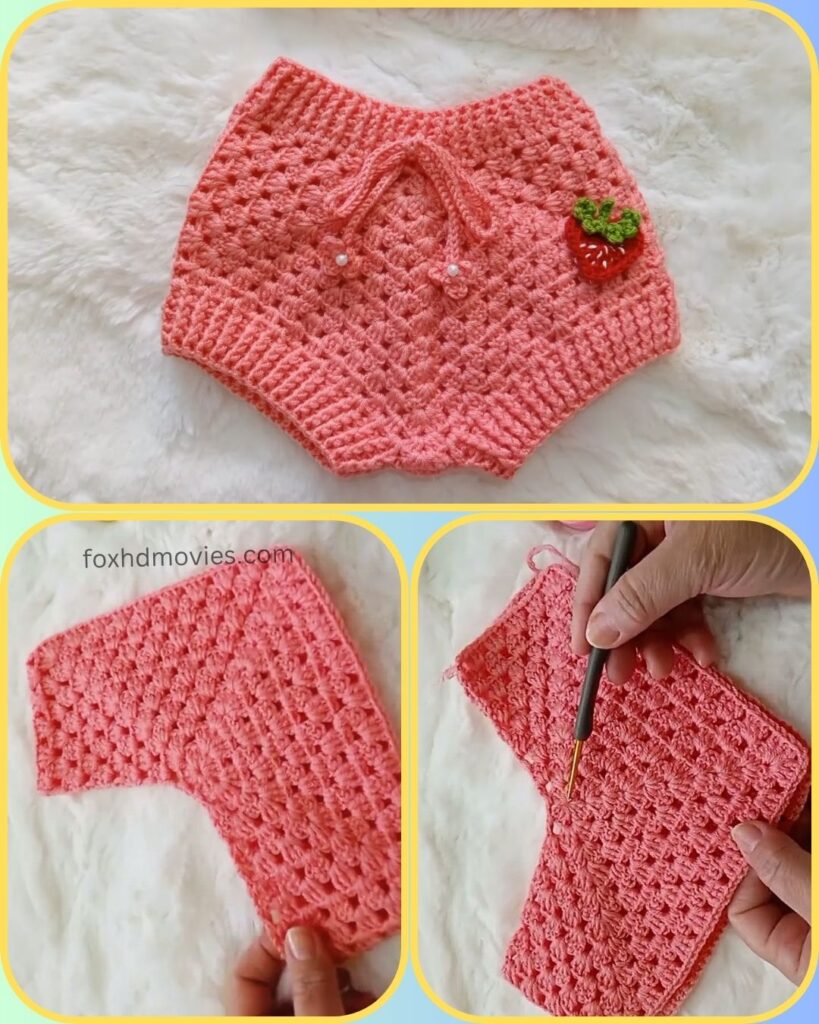
Hello, crochet enthusiasts! To go along with our “Sweet Strawberry Top,” or simply as a charming stand-alone piece, today we’re making these absolutely adorable “Sweet Strawberry Bloomers”! These comfortable little diaper covers feature a lovely textured stitch, ribbed waist and leg openings, and, of course, the cutest strawberry accent. They’re perfect for keeping those little bottoms covered in style!
This pattern is designed for an average 6-12 month size, but I’ll provide notes on how to adjust it for other sizes.
Skill Level: Intermediate
Materials You’ll Need:
- Yarn:
- DK weight (Light Worsted / #3) yarn in Peach/Light Pink (approx. 100-150 yards)
- Small amounts of Red and Green yarn for the strawberry applique
- Crochet Hook: 4.0 mm (G/6) or size needed to obtain gauge
- Tapestry Needle
- Scissors
- Stitch Markers (helpful!)
- Optional: A few small beads for the drawstring if desired.
Gauge: Working in the pattern stitch (dc, ch 1, sk 1, dc): 16 stitches x 10 rows = 4 inches (10 cm)
Abbreviations (US Terms):
- ch: chain
- sl st: slip stitch
- sc: single crochet
- hdc: half double crochet
- dc: double crochet
- sk: skip
- st(s): stitch(es)
- sp: space
- rep: repeat
- FPhdc: Front Post Half Double Crochet
- BPhdc: Back Post Half Double Crochet
Pattern Notes:
- Ch 2 at the beginning of a round counts as a hdc.
- Ch 3 at the beginning of a round counts as a dc.
- The bloomers are worked from the top down, then the leg openings are added.
- Join rounds with a sl st to the top of the beginning ch unless otherwise specified.
- Remember to check your gauge! This is crucial for getting the correct sizing.
The Bloomers (Peach/Light Pink Yarn)
Start with Peach/Light Pink Yarn.

Ch 72 (or chain an even number that measures roughly 16-18 inches when stretched slightly, for waist circumference). Sl st to the first ch to form a ring, being careful not to twist the chain.
Round 1 (Waistband Ribbing): Ch 2 (counts as hdc), hdc in each ch around. Join with sl st to top of beg ch-2. (72 hdc)
Round 2: Ch 2, FPhdc around next hdc, BPhdc around next hdc. Rep from * around. Join with sl st. (72 hdc)
Round 3: Repeat Round 2.
Round 4 (Drawstring Eyelets): Ch 2, hdc in next st. Ch 1, sk 1 st, hdc in next 2 sts. Rep from * around. Join with sl st.
Round 5: Ch 2, hdc in next st. Hdc in ch-1 sp, hdc in next 2 hdc. Rep from * around. Join with sl st. (72 hdc)
Round 6 (Pattern Stitch – Body): Ch 3 (counts as dc), dc in next st. Ch 1, sk 1 st, dc in next 2 sts. Rep from * around. Join with sl st to top of beg ch-3.
Round 7: Ch 3, dc in next st. Dc in ch-1 sp, dc in next 2 dc. Rep from * around. Join with sl st. (72 dc)
Round 8 (Increase for Hip/Bottom): Ch 3, dc in next 5 sts. 2 dc in next st, dc in next 5 sts. Rep from * around. Join with sl st. (approx. 84 dc)
Round 9 (Pattern Stitch): Ch 3, dc in next st. Ch 1, sk 1 st, dc in next 2 sts. Rep from * around. Join with sl st.

Round 10: Ch 3, dc in next st. Dc in ch-1 sp, dc in next 2 dc. Rep from * around. Join with sl st.
Round 11 (Increase): Ch 3, dc in next 6 sts. 2 dc in next st, dc in next 6 sts. Rep from * around. Join with sl st. (approx. 96 dc)
Round 12 – 14: Repeat Rounds 9-10-11, OR simply continue the pattern stitch (alternating Round 9 and 10) without further increases if desired, until the bloomers reach the approximate length from waist to crotch. For a 6-12 month size, you’ll want approximately 7-8 inches from the top of the waistband to the bottom center of the bloomers before splitting for legs.
Splitting for Legs:
Round 15: Fold your work flat to find the center front and center back. Ch 3 (counts as dc), dc in next st. Continue the pattern stitch for half of the stitches (approx. 48 stitches for one leg opening). Sl st to join, creating the first leg opening. (48 sts)
Round 16 (Leg 1): Ch 3 (counts as dc), dc in next st. Continue the pattern stitch around the first leg opening. Join with sl st. Round 17 – 19: Repeat Round 16. Continue until leg opening reaches desired length (about 2-3 inches).
Leg Edging (Ribbing): Round 20: Ch 2, FPhdc around next st, BPhdc around next st. Rep from * around. Join with sl st. Round 21: Repeat Round 20. Fasten off, leaving a tail for sewing in.
Repeat Rounds 15-21 for the second leg opening.
Drawstring (Peach/Light Pink Yarn)
Ch 100 (or desired length for tying a bow). Row 1: Sl st in 2nd ch from hook and in each ch across. Fasten off. Weave the drawstring through the eyelet holes created in Round 4 of the waistband. Add optional small beads to the ends of the drawstring, securing with a knot.

Strawberry Applique
Strawberry (Red Yarn): Round 1: Ch 2, 6 sc in 2nd ch from hook. Sl st to first sc. (6 sc) Round 2: Ch 1, 2 sc in each st around. Sl st to first sc. (12 sc) Round 3: Ch 1, sc in next st, 2 sc in next st. Rep from * around. Sl st to first sc. (18 sc) Round 4: Ch 1, sc in each st around. Sl st to first sc. (18 sc) Round 5: Ch 1, sc in next st, sc2tog. Rep from * around. Sl st to first sc. (12 sc) Fasten off, leaving a tail for sewing. Cinch the top opening closed with the tail.
Leaves (Green Yarn): Ch 5. Sl st in 2nd ch from hook, sc in next ch, hdc in next ch, dc in next ch. Ch 3, sl st to same st as last dc. Ch 4, dc in same st, hdc in next ch, sc in next ch, sl st in next ch. Sl st into base. Fasten off.
Assembly: Sew the green leaves to the top of the red strawberry. Using a tapestry needle and a small amount of white or yellow yarn, embroider tiny “seeds” onto the red part of the strawberry if desired.
Video tutorial
Finishing:
- Weave in all ends neatly using your tapestry needle.
- Attach Strawberry: Sew the finished strawberry applique securely to one side of the front of the bloomers.
- Block your bloomers gently if desired to help them lay nicely and open up the stitches.
Your adorable Sweet Strawberry Bloomers are now complete! They’re perfect for pairing with the matching top or any other cute baby outfit.
I’d love to see your finished bloomers! Share your creations on social media using the hashtag #SweetStrawberryBloomers so I can admire your work!
Happy Crocheting!