by
by 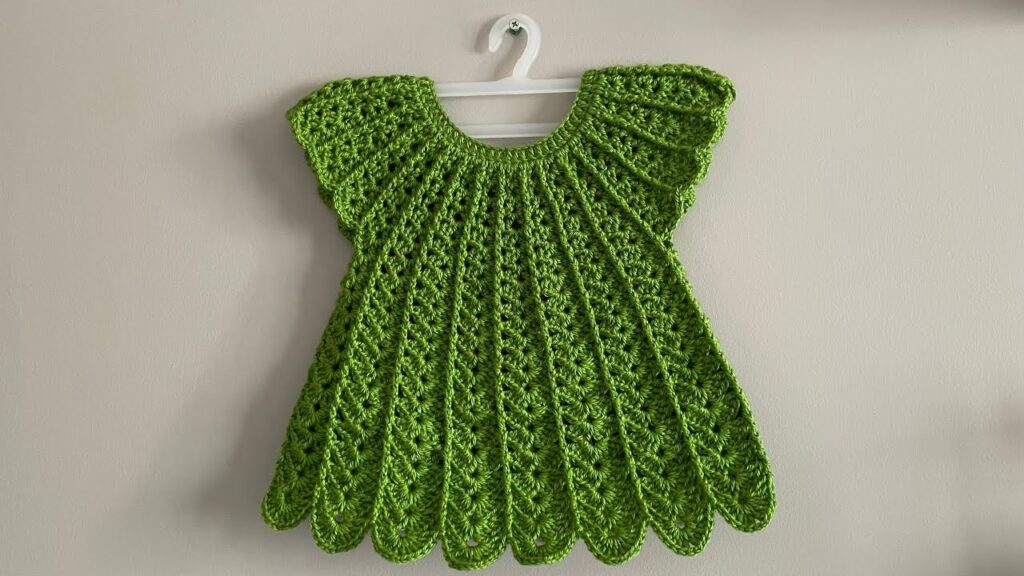
Imagine your little one looking absolutely delightful in this charming handmade crochet dress! This design features a graceful rounded yoke with a beautiful fan-like stitch, which then seamlessly transitions into a flared skirt with the same elegant texture, finishing with a playful scalloped hem. This dress is perfect for photos, special occasions, or just adding a touch of handmade charm to everyday wear.
This pattern is suitable for intermediate crocheters, or adventurous beginners comfortable with basic stitches and shaping.
Yarn:
- DK (Double Knit) or Light Worsted Weight yarn in a vibrant green, as pictured. Choose a soft, baby-friendly yarn that is machine washable for easy care.
Hook:
- 3.5 mm (US E/4) crochet hook (adjust hook size if necessary to achieve gauge and desired fabric).
Notions:
- Tapestry needle for weaving in ends
- Scissors
- Small buttons (2-3, for the back closure)
Gauge (Crucial for Sizing!):
- For the Yoke (DC/Shells): A section of the fan stitch (likely 5 DC in one stitch/space) should measure approximately 1 inch (2.5 cm) wide, and 2 rows of the fan stitch should measure about 0.75 inches (2 cm) tall.
- Please check your gauge before starting. Adjust hook size if needed. Achieving the correct gauge is vital for the dress to fit the intended size.
Finished Measurements (Approximate for 6-12 Months):
- Chest Circumference: 19-20 inches (48-51 cm)
- Dress Length (from shoulder to hem): 15-16 inches (38-41 cm)
- To adjust size, refer to a standard baby size chart and adjust initial chain/yoke increases and skirt length accordingly.
Abbreviations (US Crochet Terms):
- Ch: Chain
- Sl St: Slip Stitch
- SC: Single Crochet
- HDC: Half Double Crochet
- DC: Double Crochet
- Tr: Treble Crochet (or Triple Crochet)
- St(s): Stitch(es)
- Sk: Skip
- Sp: Space
- FO: Fasten Off
- Yo: Yarn Over
- Shell (Fan Stitch): 5 DC in the same stitch/space.
Pattern Instructions:
Part 1: The Rounded Yoke (Main Color – Green)
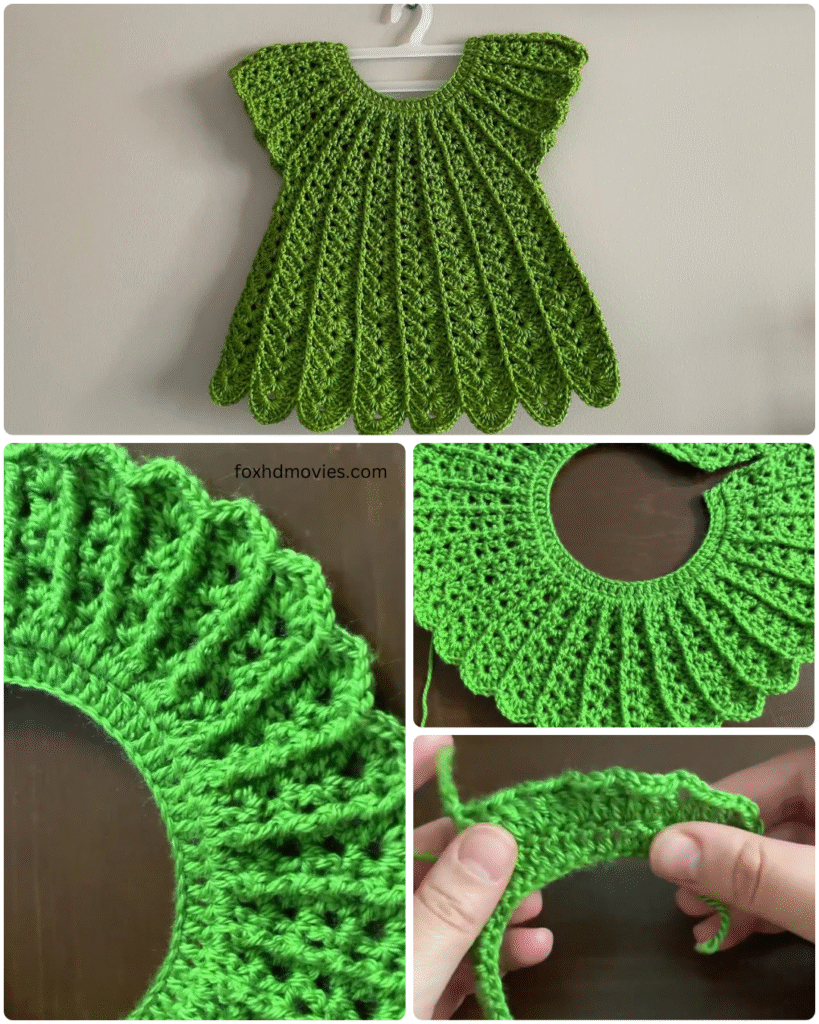
The yoke is worked in rows, from the top down, increasing to form a rounded shape for the neckline and upper bodice. A small opening will be left at the back for buttons. The yoke appears to be made of a solid DC base with a final round of fan stitch before joining.

- Ch 68. (This forms the initial neck opening. Adjust for different sizes; more chains for larger, fewer for smaller, always an even number.)
- Row 1 (RS): DC in 4th Ch from hook (counts as 1st DC). DC in next 8 Ch. [2 DC in next Ch, DC in next 3 Ch]. Repeat from * to * 5 more times. 2 DC in next Ch. DC in remaining 8 Ch. (You will have increased stitches evenly across the row, creating a slight curve.) Ch 3 (counts as 1st DC), turn.
- Row 2 (WS): DC in each DC across. Ch 3, turn.
- Row 3 (RS – Increase Row): DC in first 2 DC. [2 DC in next DC, DC in next 4 DC]. Repeat from * to * around, adjusting the last few stitches as needed for evenness. Ch 3, turn.
- Row 4 (WS): DC in each DC across. Ch 3, turn.
- You should have a good flat circle shape that’s wide enough for the chest/armholes (approx. 4-4.5 inches from top to bottom edge of yoke when measured flat).
Fan Stitch on Yoke & Joining for the Body:
- Row 5 (RS – Fan Stitch & Joining Round): Ch 1 (does not count as a stitch). SC in first DC. Sk 2 DC, Shell (5 DC) in next DC, Sk 2 DC, SC in next DC. Repeat from * to * across the row. When you reach the end of the row, Sl St to the first SC of the row to join and form a continuous round.
- This round creates the fan stitch detail seen on the yoke. Ensure your stitch count at the end of Row 4 is a multiple of 6 (for Sk 2, 5 DC, Sk 2, 1 SC) for even shell placement. You may need to adjust the last few skips/stitches slightly.
- You have now joined the back opening to form the body of the dress.
- Count your total stitches now; this will be the stitch count for the top of your skirt. It should be approximately 100-120 stitches (number of SC + 5 DC per shell).

Part 2: The Skirt (Main Color – Green)
The skirt continues the fan stitch pattern.
- Round 1 (Skirt – Starting from SC of previous round): Ch 3 (counts as 1st DC). 4 DC in the same SC (first Shell made). SC in the center DC of the next shell from the previous round, Shell (5 DC) in the next SC. Repeat from * to * around. Sl St to top of beginning Ch 3.
- This pattern continues the fan stitch by alternating shells in SCs and SCs in shells, creating the lovely texture and flare.
- Round 2: Sl St into the center DC of the first Shell. Ch 1. SC in the same center DC. Shell (5 DC) in the next SC (which was the SC from the previous round). Repeat from * to * around. Sl St to first SC.
- Round 3: Sl St into the center DC of the first Shell. Ch 3. 4 DC in the same center DC (first Shell made). SC in the next SC (which was the SC from the previous round). Repeat from * to * around. Sl St to top of beginning Ch 3.
- You are alternating where the shells and SCs are placed to create the continuous fan pattern.
- Repeat Rounds 2 and 3 until the skirt measures approximately 14-15 inches (35-38 cm) from the yoke join, or desired length for a 6-12 month baby.
- To make the skirt flare more for larger sizes, you can occasionally add an extra DC to some shells (e.g., 6 DC instead of 5 DC) every few rounds, or change to a larger hook for the skirt section.

Scalloped Bottom Edge (Main Color – Green): The skirt has a very defined scalloped edge, which is simply the continuation of the shell pattern.
- Ensure your last round is a “Shell” round (like Round 3). No special border is needed beyond ending on a shell round. FO.
Video tutorial
Finishing Your Dress:
- Weave in all loose ends neatly with your tapestry needle.
- Back Closure:
- Button Band: Along one side of the back opening (where you joined the yoke), Ch 1 and SC evenly up the edge. On the other side, Ch 1 and SC evenly up the edge, creating 2-3 Ch-2 spaces evenly spaced for buttonholes as you go.
- Sew 2-3 small buttons onto the opposite side of the back opening to align with your buttonholes.
- Armhole Edging (Optional but Recommended): Join yarn to one armhole. Ch 1. SC evenly around the armhole opening. Sl St to first SC. Repeat for the second armhole.
- Block (Optional but Recommended): Gently wet the dress, reshape it to the correct measurements, and pin it to a foam board or towel. Allow it to air dry completely. This will even out your stitches and give the dress a beautiful drape and professional finish.
Congratulations! You’ve just created a stunning handmade crochet dress perfect for a precious little one. This dress is sure to be cherished for years to come.
Happy crocheting!