by
by 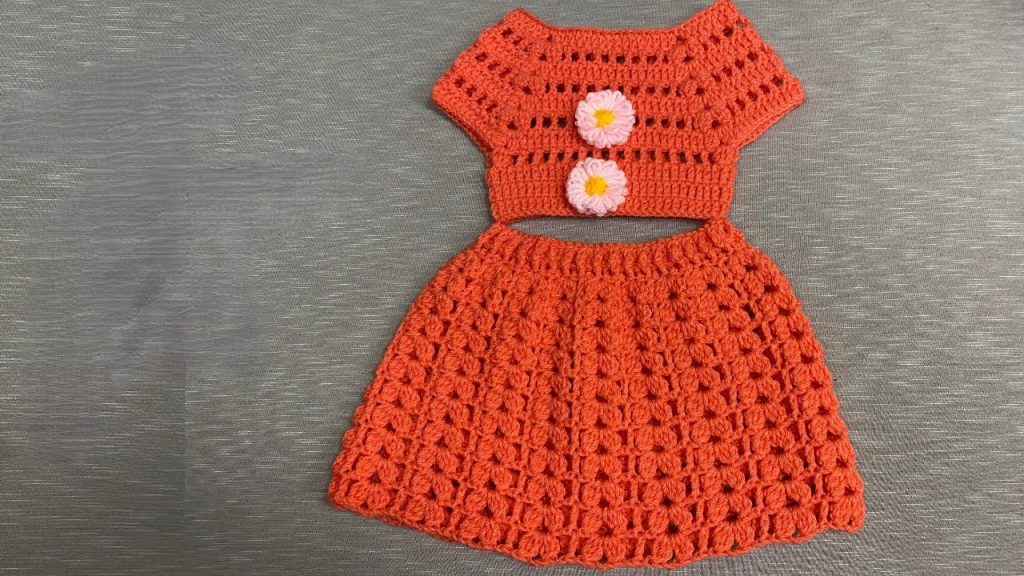
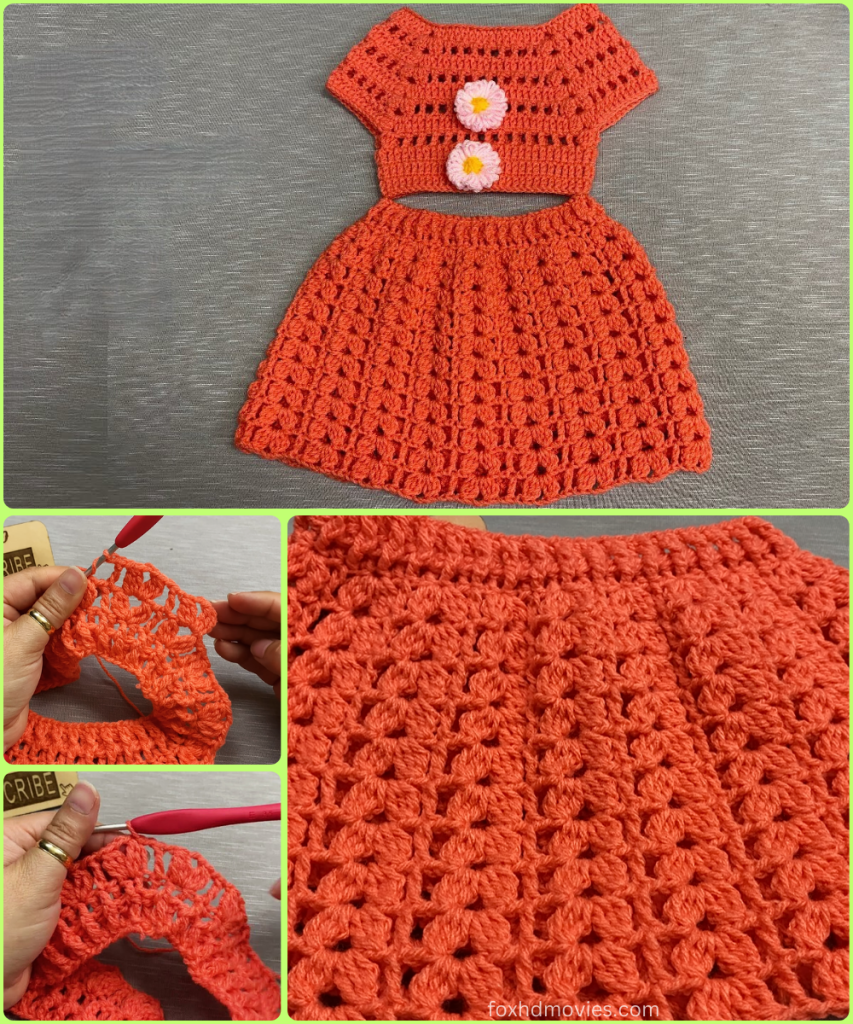
Welcome the sunshine with this adorable two-piece crochet set for a special little girl! Featuring a simple, comfortable top adorned with cheerful daisy appliques and a matching, airy skirt with an elasticized waist, this outfit is perfect for warm weather adventures. The open stitch pattern works up quickly and creates a light and breezy feel that little ones will love.
Let’s grab our hooks and create this delightful and easy-to-wear set!
Skill Level: Easy to Intermediate
Materials You’ll Need:
- Yarn: Approximately 300-350 yards of sport (size 2) or DK (size 3) weight yarn in your main color (e.g., the orange shown). A soft, washable yarn like cotton or acrylic blend is recommended.
- Small amounts of white and yellow yarn for the daisy appliques.
- A crochet hook appropriate for your yarn. A size G/6 (4.0mm) hook is a good starting point.
- Scissors
- Yarn needle for weaving in ends
- Stitch markers
- 1/2 inch wide elastic for the skirt waistband
Key Stitches and Abbreviations:
- ch: chain
- st(s): stitch(es)
- sl st: slip stitch
- sc: single crochet
- dc: double crochet
- tr: treble crochet
- sk: skip
- sp: space
Pattern Instructions:
Part 1: The Top
The top is worked in rows, creating two separate pieces (front and back) that are then joined at the shoulders and sides.

Back Panel:
- Row 1: ch 60 (or adjust for desired width), dc in the 3rd ch from hook and in each ch across. (58 dc)
- Row 2: ch 3 (counts as dc), dc in each st across. Turn.
- Repeat Row 2 until your piece reaches the desired length from the shoulders to just above the waist.
- Shape Armholes: At the beginning of the next two rows, sl st across the first 3 sts (or decrease as desired) to shape the armhole. Continue in dc across the remaining sts.
- Continue in dc until the armhole reaches the desired depth. Fasten off.
Front Panel:
- Work the front panel the same as the back panel until the armholes are shaped and reach the same depth.
- Shape Neckline (Optional): For a slightly wider neckline, in the last few rows, you can decrease stitches in the center of the front panel.

Joining the Top:
- Place the front and back panels wrong sides together.
- Sew or crochet the shoulder seams together for about 2-3 inches.
- Sew or crochet the side seams together, leaving openings for the armholes.
Edging the Top:
- Work a round of single crochet around the neckline, armholes, and bottom edge for a neat finish.
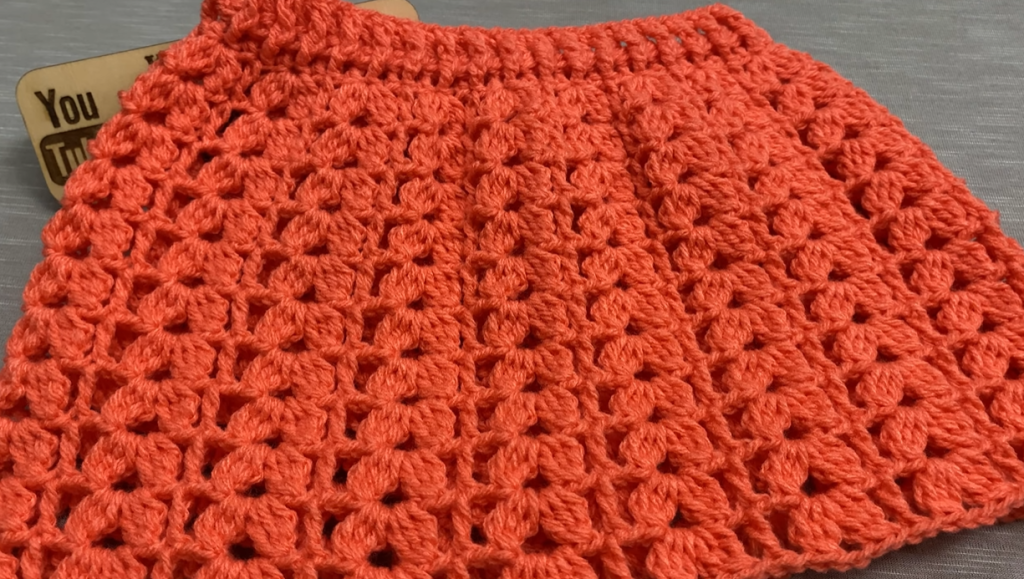
Part 2: The Skirt
The skirt is worked in rounds from the waistband down.
- Waistband: ch 80 (or adjust for baby’s waist circumference), sl st to the first ch to form a ring.
- Rnd 1: ch 3 (counts as dc), dc in each ch around. Join with sl st.
- Rnd 2-4: Repeat Rnd 1 to create a wider waistband.
- Row 5 (Creating Loops for Elastic): ch 1, sc in first st. ch 2, sk 1 st, sc in next st. Repeat from * around. Join with sl st.
- Rnd 6: ch 3 (counts as dc), dc in each st and ch-2 sp around. Join with sl st.
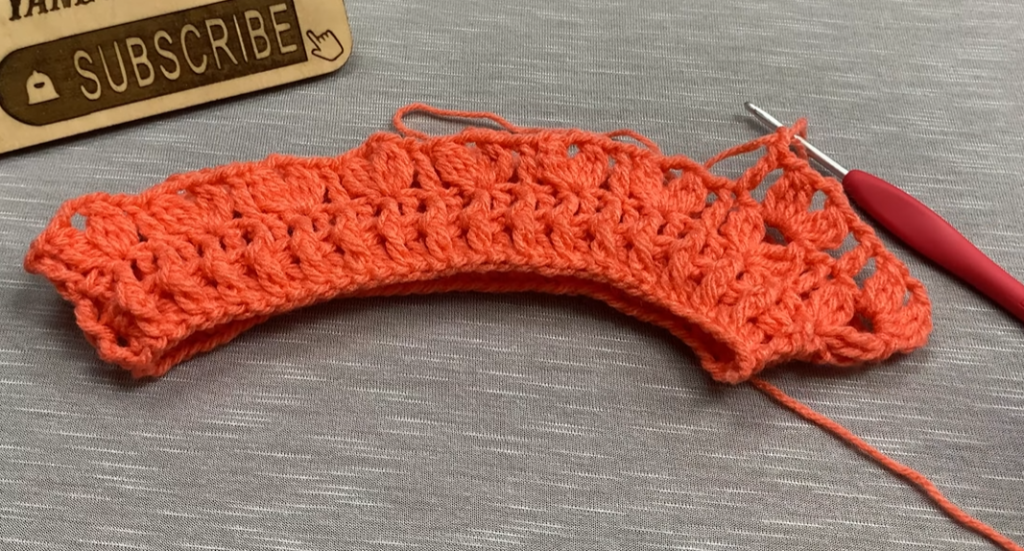
- Rnd 7 (Open Stitch Pattern): ch 3, dc in next st. ch 2, sk 2 sts, dc in next 2 sts. Repeat from * around. Join with sl st.
- Rnd 8: ch 3, dc in next st. ch 2, sk the ch-2 sp, dc in next 2 sts. Repeat from * around. Join with sl st.
- Repeat Rounds 7 and 8 until the skirt reaches the desired length.
- Hem: Work a round of single crochet or a simple picot edge for the hem. Fasten off.
Insert Elastic:
- Cut a piece of elastic to fit the baby’s waist.
- Thread the elastic through the loops created in Row 5 of the waistband.
- Overlap the ends of the elastic by about 1 inch and sew them securely together.
- Close the opening in the waistband by sewing the edges together.
Part 3: The Daisy Appliques (Make 2)
Using white and yellow yarn:
- Center (Yellow): ch 3, sl st to form a ring. ch 1, 6 sc in ring. Join with sl st. Fasten off yellow.
- Petals (White): Join white yarn to any sc of the center ring. ch 3, tr in same st, ch 3, sl st in same st. Repeat from * 5 more times to create 6 petals. Fasten off white.
Attaching the Daisies:
- Sew the daisy appliques to the front of the top as desired (as shown in the image).
Finishing Touches:
- Weave in all loose ends securely with your yarn needle.
- Gently block the finished top and skirt if desired.
You’re Done!
Video tutorial
Congratulations! You’ve just crocheted a sweet and summery daisy set for a little girl. The simple stitches and cheerful embellishments make this a delightful outfit for warm days.
Share your finished set with me on social media using #SunnyDaisySet – I’d love to see your color choices! Happy crocheting!