 by
by 
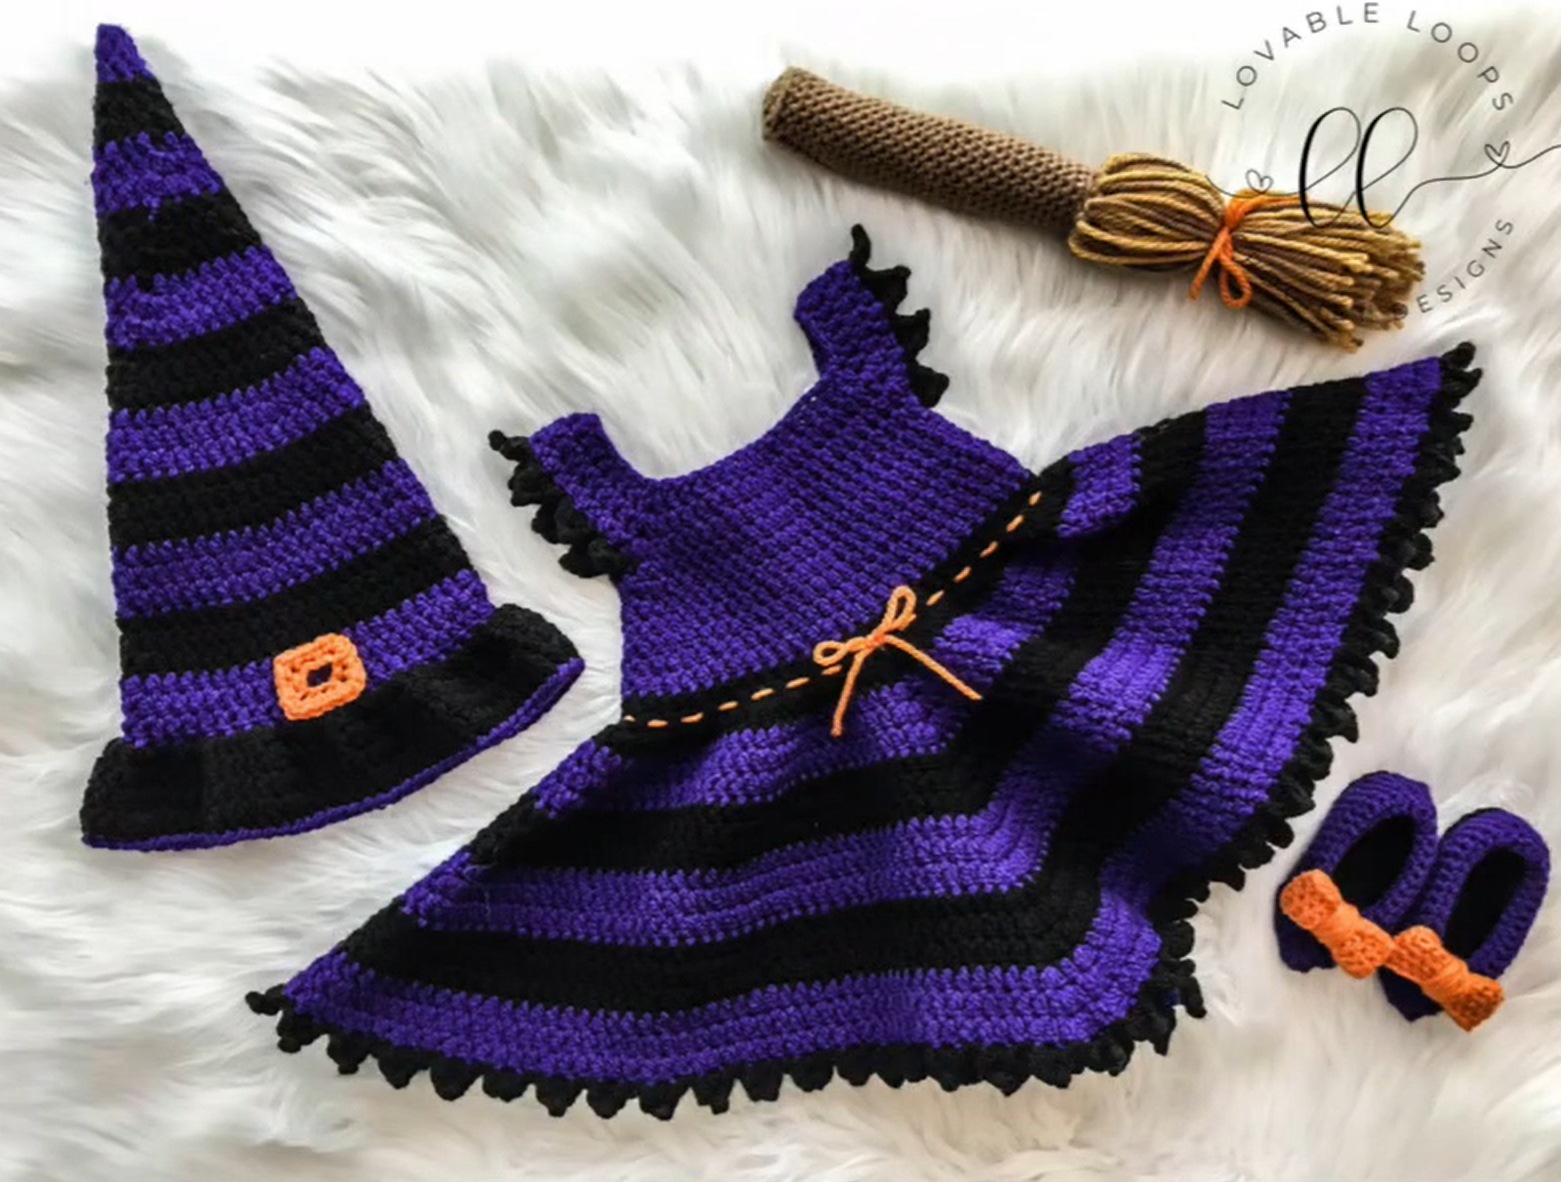
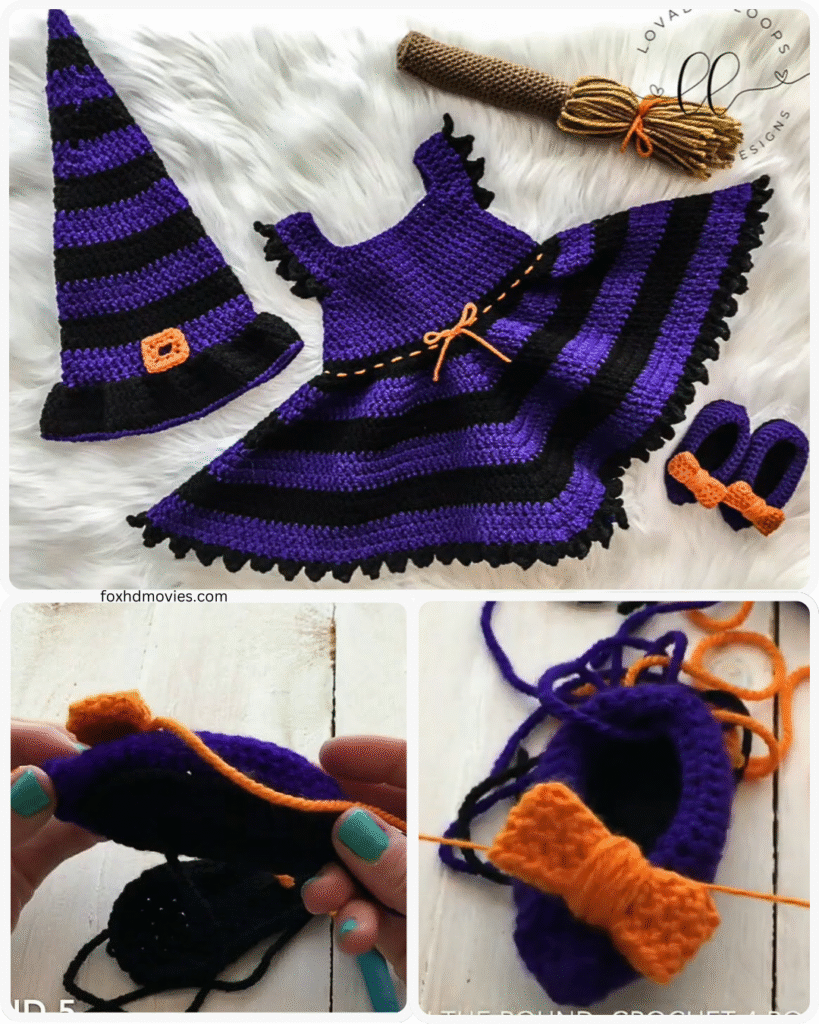
Get ready to add a touch of whimsical magic to a little one’s wardrobe with these adorable crocheted baby witch shoes! Perfect for Halloween, themed photoshoots, or just adding a bit of playful charm any day of the year, these booties are a fun and relatively quick project for crocheters of all levels.
Crocheted baby shoes are always a popular project, and adding a pointy toe transforms a simple bootie into something enchanting. Imagine tiny feet ready to embark on magical adventures (or just look incredibly cute!).
This pattern is designed to be beginner-friendly, using basic stitches and straightforward construction. So, grab your hook and yarn, and let’s conjure up some tiny, magical footwear!
Materials You’ll Need:
- Worsted weight yarn in your desired color (Black is classic, but don’t be afraid to get creative with purples, greens, or even stripes!). A small amount of a contrasting color for a buckle or accent is also fun.
- Crochet hook appropriate for your yarn weight (check your yarn label for a recommendation, likely around 3.75mm to 4.5mm).
- Yarn needle for weaving in ends and assembly.
- Scissors.
- Optional: Small buttons or ribbon for decoration.
Abbreviations (US Crochet Terms):
- ch: chain
- st(s): stitch(es)
- sl st: slip stitch
- sc: single crochet
- hdc: half double crochet
- dc: double crochet
- inc: increase (work 2 sts 1 in the same st)
- dec: decrease (single crochet 2 together)
- BLO: back loop only
Skill Level: Beginner
Gauge: Gauge is not critical for this project, but aim for a fabric that is dense enough to hold its shape without being too stiff.
Video tutorial
Let’s Get Crocheting!
This pattern is for a baby size approximately 0-3 months. You can adjust the size by using a different hook size or yarn weight, or by adding/removing rounds in the sole and body of the shoe.
Sole (Make 2)
We’ll start by creating the sole of the shoe.
Chain 9 (or desired length for the sole of your chosen size). Round 1: Sc in the 2nd ch from the hook and in the next 6 ch, 3 sc in the last ch. Now working on the other side of the starting chain, sc in the next 6 ch, 2 sc in the last ch. Join with a sl st to the first sc. (18 sts) Round 2: Ch 1 (does not count as a st), inc in the first st, sc in the next 6 sts, inc in the next 3 sts, sc in the next 6 sts, inc in the next 2 sts. Join with a sl st to the first sc. (24 sts) Round 3: Ch 1, sc in the first st, inc in the next st, sc in the next 6 sts, (sc in the next st, inc in the next st) 3 times, sc in the next 6 sts, (sc in the next st, inc in the next st) 2 times. Join with a sl st to the first sc. (30 sts)
You can add more increase rounds here if you need a larger sole. Ensure the increases are placed at the curves of the oval to maintain the sole shape.
Body of the Shoe
Now we’ll build up the sides of the shoe.
Round 4: Ch 1, sc in the BLO around. Join with a sl st to the first sc. (30 sts) – This creates a defined edge for the sole. Rounds 5-7: Ch 1, sc in each st around. Join with a sl st to the first sc. (30 sts) – Or continue for more rounds depending on how high you want the shoe.
Shaping the Toe
This is where the magic happens and we create the pointy witch toe!
Round 8: Ch 1, sc in the first 8 sts, hdc in the next 2 sts, dc in the next 2 sts, hdc in the next 2 sts, sc in the remaining sts. Join with a sl st to the first sc. Round 9: Ch 1, sc in the first 7 sts, hdc in the next st, dc in the next st, dec (using dc), dc in the next st, hdc in the next st, sc in the remaining sts. Join with a sl st to the first sc. Round 10: Ch 1, sc in the first 6 sts, hdc in the next st, dec (using hdc), sc in the next st, dec (using hdc), hdc in the next st, sc in the remaining sts. Join with a sl st to the first sc. Round 11: Ch 1, sc in the first 5 sts, dec (using sc), sc in the next 3 sts, dec (using sc), sc in the remaining sts. Join with a sl st to the first sc. Round 12: Ch 1, sc in the first 4 sts, dec (using sc), sc in the next st, dec (using sc), sc in the remaining sts. Join with a sl st to the first sc.
You should now have a nice pointy toe taking shape. Fasten off and weave in your end.
Creating the Ankle Strap (Optional)
If you’d like an ankle strap, here’s how to make a simple one.
Chain 15 (or desired length for the strap). Row 1: Sc in the 2nd ch from the hook and in each ch across. (14 sc) Fasten off, leaving a long tail for sewing.
Assembly
- Weave in all your loose ends on both the shoe body and the strap.
- Position the strap on the sides of the shoe, towards the back of the ankle opening. Sew the ends of the strap securely to the inside of the shoe. You can sew a button on one side and create a small loop with yarn on the other for a closure, or simply sew both ends down if the strap is just for decoration.
- Repeat for the second shoe.
Personalize Your Witchy Wonders!
- Add a small crocheted star or buckle shape to the front of the shoe for extra detail.
- Experiment with different color combinations.
- For a more structured toe, you can lightly stuff the tip before closing.
- Add a ribbon tie instead of a crocheted strap.
Voila! You’ve crocheted a pair of enchanting baby witch shoes. These make a fantastic gift and are sure to bring smiles. Share your finished creations – we’d love to see your magical little booties!