by
by 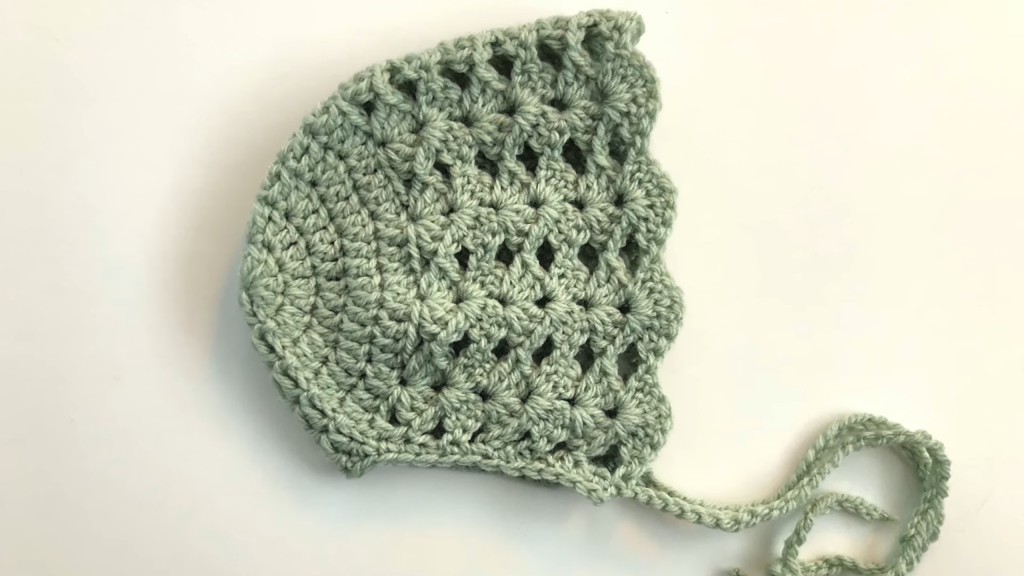
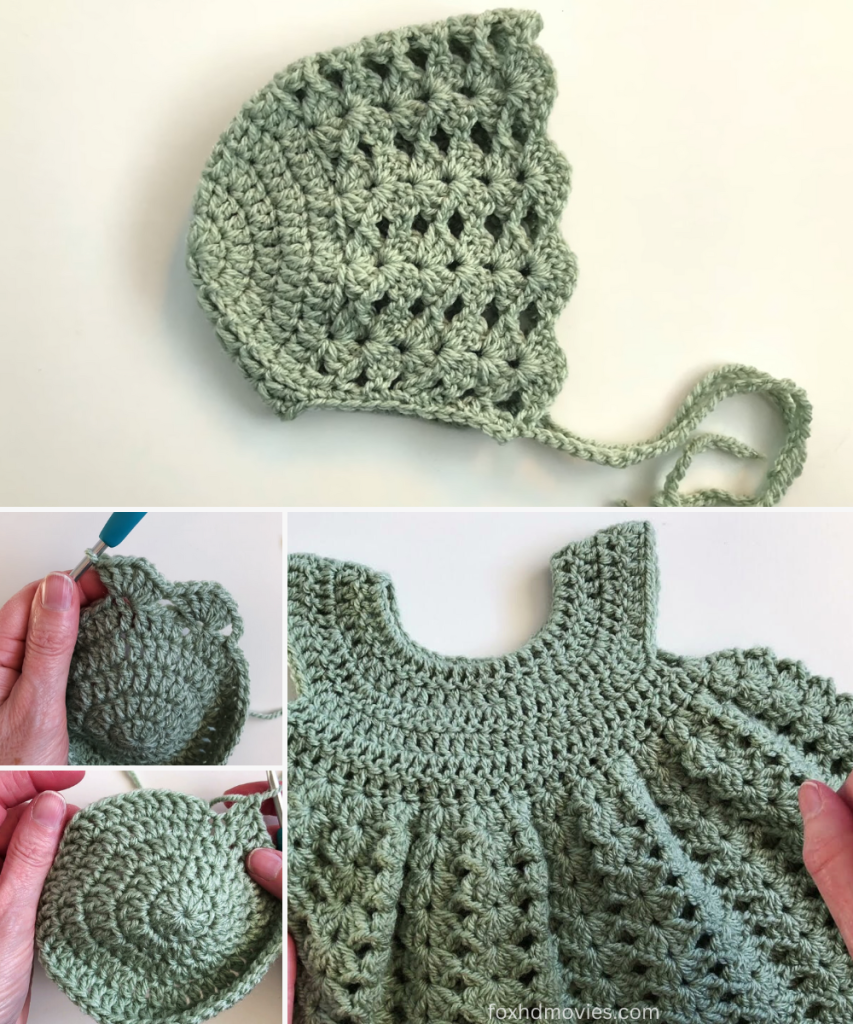
This pattern creates a charming and breathable bonnet perfect for babies.
Finished Size (Approximate):
- Head Circumference: 13-14 inches (33-35.5 cm)
- Depth (from crown to bottom edge): 5.5-6 inches (14-15 cm)
- Suitable for: Newborn to 3 Months (adjustments for larger sizes included below)
Skill Level: Easy to Intermediate
Materials:
- Yarn: DK weight (Light Worsted / 8 ply) baby yarn in a solid color (e.g., Sage Green in image). Approximately 80-100 yards.
- Recommended: Soft acrylic, cotton blend, or merino wool baby yarn for comfort.
- Crochet Hook: G/6 (4.0 mm) or size needed to obtain gauge (the hook in the image appears to be similar in size).
- Tapestry Needle: For weaving in ends.
- Scissors
- Stitch Markers (optional but helpful for marking start of rounds)
Gauge (Important!): Working in dc: 16 dc and 9 rows = 4 inches (10 cm) For the shell pattern, aim for a fabric that is slightly open but not too loose. Always check your gauge! Adjust your hook size if necessary to ensure your bonnet turns out the correct size.
Abbreviations (US Terms):
- ch: chain
- sl st: slip stitch
- sc: single crochet
- dc: double crochet
- shell: (2 dc, ch 1, 2 dc) in specified stitch or space
- sk: skip
- sp: space
- ch-sp: chain space
- FO: Fasten off
- Rnd: Round
- Row: Row
Pattern Notes:
- The bonnet is worked from the crown downwards, first in continuous rounds to form the top, then in rows to create the back and sides, leaving the face opening.
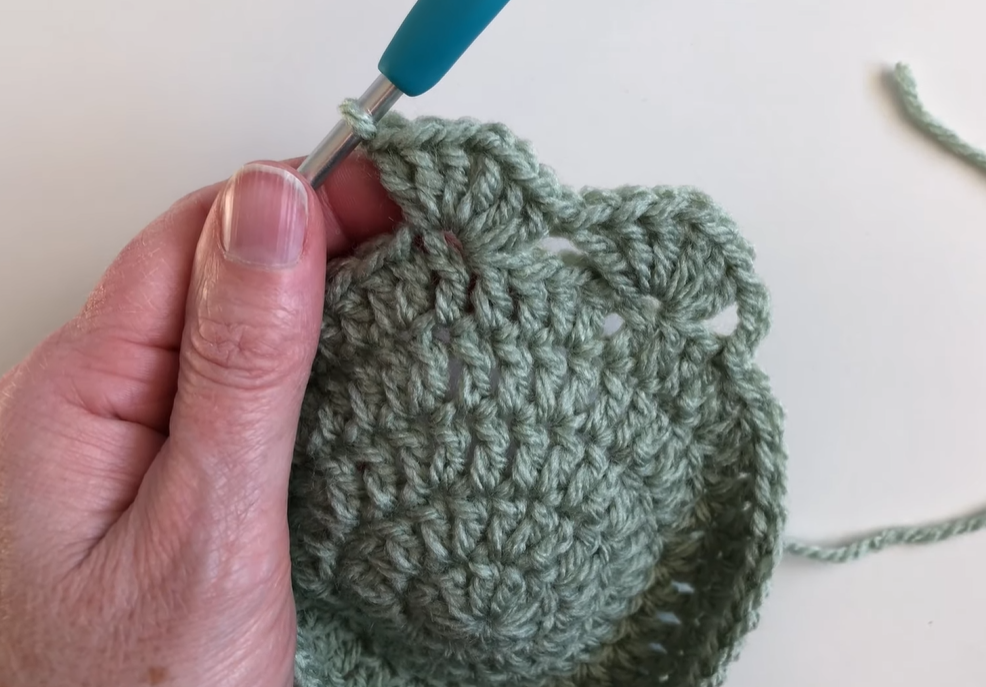
- The main stitch pattern is a variation of the shell stitch, which naturally creates the scalloped edge.
- Ch 3 at the beginning of a round/row counts as a dc.
- Ch 1 at the beginning of a sc row does not count as a stitch.
Part 1: Bonnet Crown (Worked in Rounds)
Start with a Magic Ring (preferred for a neat center) or Ch 4, sl st to first ch to form a ring.

Rnd 1: Ch 3 (counts as 1st dc). 11 dc into the ring. Join with a sl st to the top of the beginning ch 3. (12 dc)
Rnd 2: Ch 3. Dc in same st. (2 dc in each st around). Join with a sl st to the top of the beginning ch 3. (24 dc)
Rnd 3: Ch 3. Dc in same st. Dc in next st. (2 dc in next st, dc in next st) around. Join with a sl st to the top of the beginning ch 3. (36 dc)
Rnd 4: Ch 3. Dc in same st. Dc in next 2 sts. (2 dc in next st, dc in next 2 sts) around. Join with a sl st to the top of the beginning ch 3. (48 dc)
Rnd 5: Ch 3. Dc in same st. Dc in next 3 sts. (2 dc in next st, dc in next 3 sts) around. Join with a sl st to the top of the beginning ch 3. (60 dc)
Rnd 6: Ch 3. Dc in same st. Dc in next 4 sts. (2 dc in next st, dc in next 4 sts) around. Join with a sl st to the top of the beginning ch 3. (72 dc)
The diameter of your flat circle should be approximately 4.5-5 inches at this point. Adjust by adding or subtracting an increase round here if needed to achieve the correct crown size for your desired age range.
Part 2: Bonnet Body (Worked in Rows – Shell Pattern)
Now we will start working in rows to create the back and sides of the bonnet, leaving an opening for the face.
Row 1: Ch 3 (counts as 1st dc), turn. Dc in next 47 sts. Leave remaining 24 sts unworked (this creates the front opening of the bonnet). (48 dc)
Row 2 (Shell Pattern): Ch 3 (counts as 1st dc), turn. Dc in first st. Sk 2 sts, shell in next st (this means 2 dc, ch 1, 2 dc in the same stitch). Repeat from * to * until you have 3 sts remaining. Sk 2 sts, 2 dc in last st. (You should have 8 shell stitches with a starting and ending 2 dc. The pattern will naturally create the scalloped edge at the sides of the face opening.)
Row 3: Ch 3 (counts as 1st dc), turn. Dc in first st. Shell in the ch-1 sp of the next shell. Repeat from * to * across to the last shell. 2 dc in the last dc of the row (the top of the beginning ch 3 from the previous row). (This continues the shell pattern and keeps the side edges straight).
Row 4 – Row 7 (or until desired depth): Repeat Row 3. Continue these rows until the bonnet reaches the desired depth from the crown to the bottom edge, covering the ears and back of the head. The image suggests about 6-7 rows of the shell pattern.
FO, weave in ends.
Part 3: Bonnet Edging & Ties
Edging (Around Face Opening):

- Reattach Yarn: Attach yarn with a sl st to the bottom corner of the face opening (where you stopped working in rows).
- Row 1: Ch 1, sc evenly around the entire face opening. Make sure to work sc stitches into the sides of the shell stitches and chain spaces to create a neat edge. Aim for approximately 2 sc per dc row end and 1 sc per shell ch-1 sp. The goal is a clean, flat edge. This row helps to stabilize the edge before adding the final border/tie.
Ties:
- Tie 1 (Left Side): At the end of the sc row (at the bottom right corner of the bonnet opening if looking at it from the front), Ch 40 (or desired length for a tie). Sc in 2nd ch from hook and in each ch across. Sl st back into the corner of the bonnet to secure. FO.
- Tie 2 (Right Side): Reattach yarn with a sl st to the opposite bottom corner of the face opening (bottom left corner from the front). Ch 40. Sc in 2nd ch from hook and in each ch across. Sl st back into the corner of the bonnet to secure. FO.
Part 4: Finishing
- Weave in all ends: Use your tapestry needle to neatly weave in any remaining loose yarn tails.
- Block (Optional but Recommended): Gently steam or wet block your bonnet to help the stitches settle and enhance the shape and definition of the shell pattern. Pin it to shape and let it dry completely.
Video tutorial
Sizing Adjustments:
- For a smaller size (e.g., Preemie/Newborn):
- Reduce the number of increase rounds in Part 1 (e.g., stop at Rnd 4 or 5).
- Reduce the initial dc count in Row 1 of Part 2 (e.g., dc in next 42-45 sts).
- Reduce the number of shell rows in Part 2.
- Shorten the ties.
- For a larger size (e.g., 3-6 Months or 6-12 Months):
- Add more increase rounds to Part 1. For example, for 3-6 months, you might add a Rnd 7 (ch 3, dc in same st, dc in next 5 sts, [2 dc in next st, dc in next 5 sts] around, join – 84 dc). For 6-12 months, continue to Rnd 8 (96 dc).
- Adjust the starting dc count for Row 1 of Part 2 to match the circumference needed for the back of the head, leaving enough stitches for the face opening. (e.g., for 84 dc total, you might dc in 56 sts leaving 28 for opening. For 96 dc total, you might dc in 64 sts leaving 32 for opening).
- Adjust the number of shell repeats in Row 2 to match your new stitch count. Make sure the total stitches are divisible by 6 + 2 (for the starting/ending 2 dc), or by 6 if you adjust the starting/ending for perfect shell count.
- Add more shell rows in Part 2 to increase the depth of the bonnet.
- Lengthen the ties.
General Sizing Tip: To check crown size, measure the diameter of your flat circle (the crown) after your increase rounds.
- Newborn: ~4.5-5 inches (11.5-12.5 cm) diameter
- 0-3 months: ~5-5.5 inches (12.5-14 cm) diameter
- 3-6 months: ~5.5-6 inches (14-15 cm) diameter
- 6-12 months: ~6-6.5 inches (15-16.5 cm) diameter
I hope this detailed pattern allows you to create a beautiful baby bonnet just like the one in the image! Please let me know if you have any questions or need further clarification.