 by
by 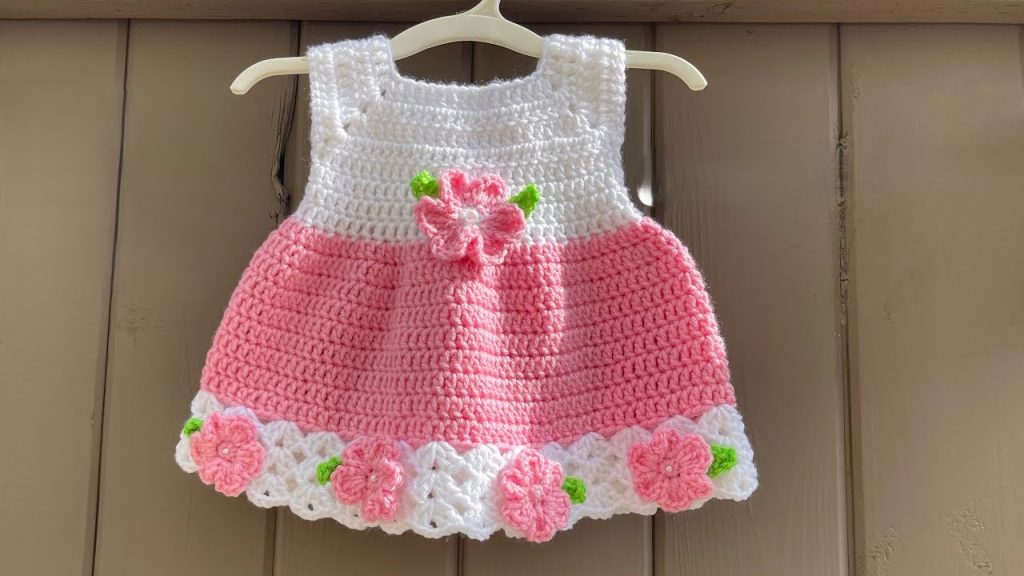
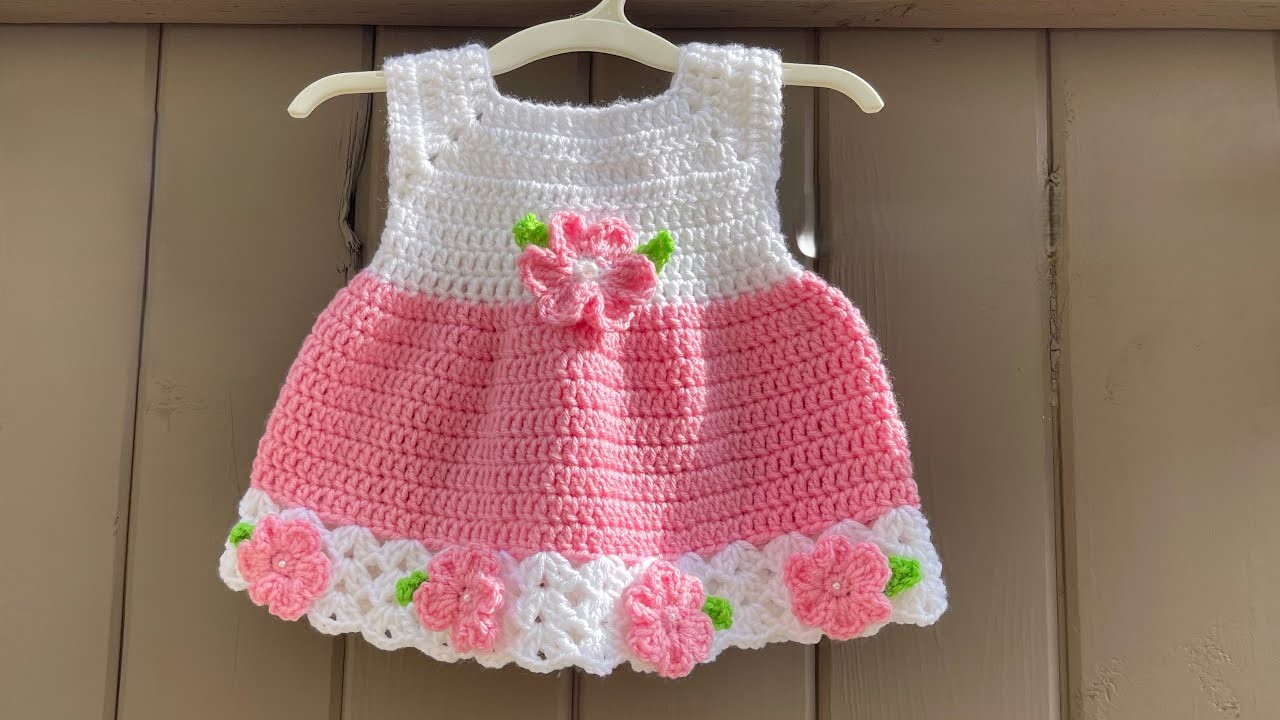
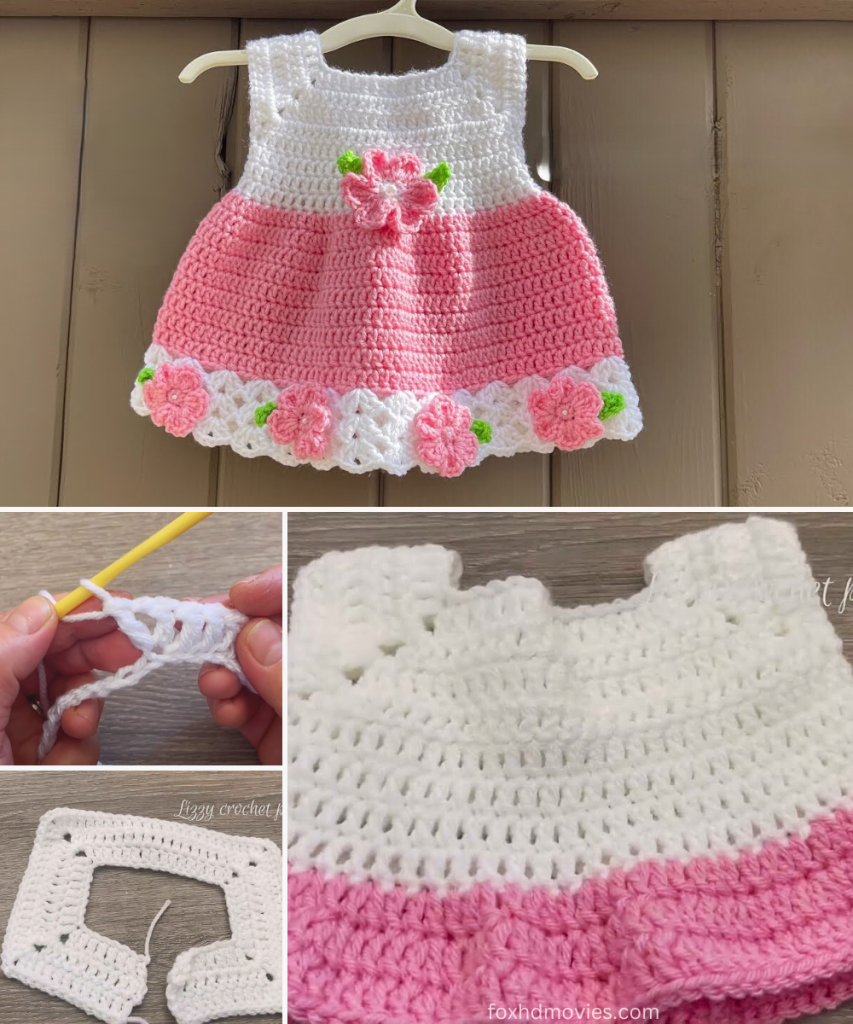
Finished Measurements (Approximate):
- Chest Circumference: 17 inches (43 cm)
- Dress Length (from shoulder): 13 inches (33 cm)
Skill Level: Easy to Intermediate
Materials:
- Yarn: DK weight (Light Worsted / 8 ply) yarn
- Color A: White (approx. 100-120 yards)
- Color B: Pink (approx. 150-180 yards)
- Color C: Green (small amount for flower centers, approx. 5-10 yards)
- Recommended: Soft acrylic or cotton blend baby yarn.
- Crochet Hook: E/4 (3.5 mm) or size needed to obtain gauge
- Tapestry Needle: For weaving in ends and sewing flowers
- Scissors
- Stitch Markers (optional but recommended for yoke increases)
- Small pearl beads (optional): For the center of the flowers.
Gauge (Important!): 5 double crochet (dc) stitches and 3 rows = 1 inch (2.5 cm) Always check your gauge! Adjust your hook size if necessary to ensure your dress turns out the correct size.
Abbreviations (US Terms):
- ch: chain
- sl st: slip stitch
- sc: single crochet
- hdc: half double crochet
- dc: double crochet
- inc: increase (work 2 dc in same stitch)
- sk: skip
- sp: space
- ch-sp: chain space
- FO: Fasten off
- RS: Right Side
- WS: Wrong Side
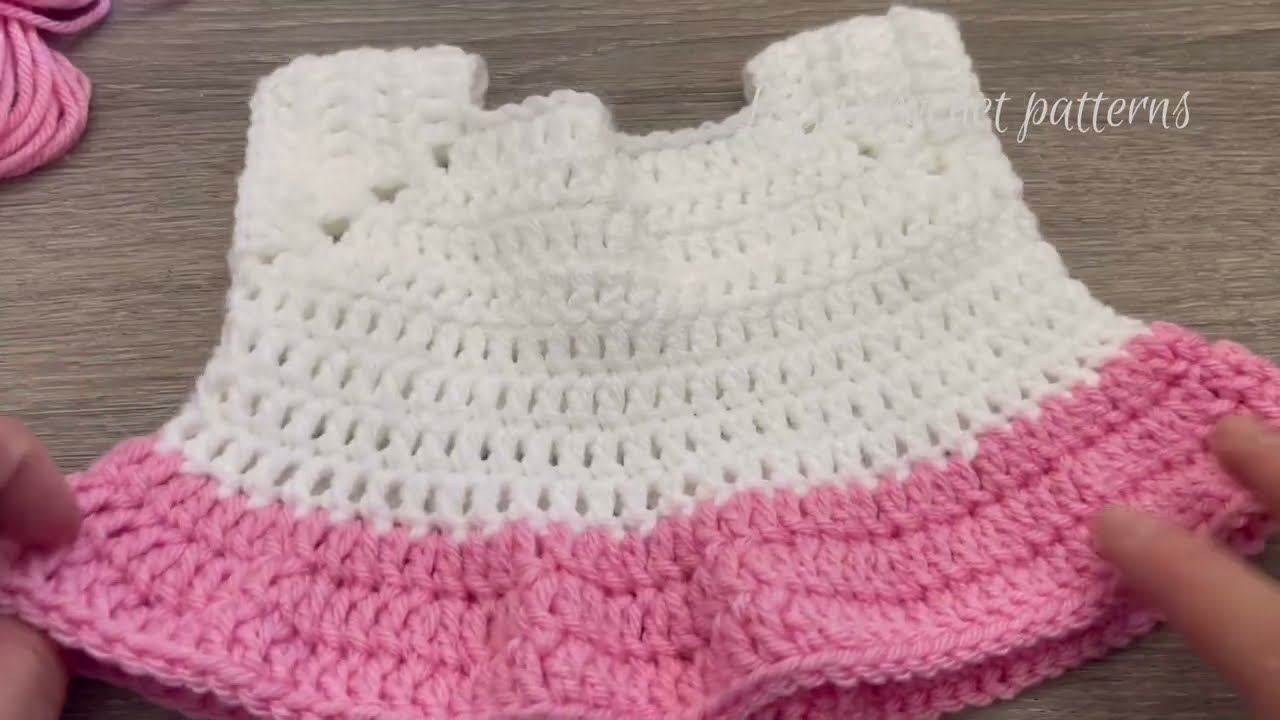
Part 1: Yoke (Color A – White)
The yoke is worked flat, then joined.
Row 1 (RS): With Color A, Ch 52. Dc in 4th ch from hook (counts as 1st dc) and in each ch across. (50 dc) Row 2 (WS): Ch 3 (counts as 1st dc), turn. Dc in each dc across. (50 dc)
Yoke Shaping (Increases):
Row 3 (RS): Ch 3 (counts as 1st dc), turn. Dc in first 6 sts. (2 dc, ch 2, 2 dc) in next st (shoulder increase). Dc in next 10 sts. (2 dc, ch 2, 2 dc) in next st (shoulder increase). Dc in next 14 sts. (2 dc, ch 2, 2 dc) in next st (shoulder increase). Dc in next 10 sts. (2 dc, ch 2, 2 dc) in next st (shoulder increase). Dc in last 7 sts. (66 dc + 4 ch-2 sps)
Row 4 (WS): Ch 3, turn. Dc in each dc to first ch-2 sp. (2 dc, ch 2, 2 dc) in ch-2 sp. Dc in each dc to next ch-2 sp. (2 dc, ch 2, 2 dc) in ch-2 sp. Repeat from * to * 3 more times. Dc in each dc to end. (82 dc + 4 ch-2 sps)
Row 5 (RS): Ch 3, turn. Dc in each dc to first ch-2 sp. (2 dc, ch 2, 2 dc) in ch-2 sp. Dc in each dc to next ch-2 sp. (2 dc, ch 2, 2 dc) in ch-2 sp. Repeat from * to * 3 more times. Dc in each dc to end. (98 dc + 4 ch-2 sps)
Forming Armholes:
Row 6 (WS): Ch 3, turn. Dc in each dc to first ch-2 sp. Sk first ch-2 sp and all stitches up to next ch-2 sp (this forms first armhole). Dc in next ch-2 sp. Dc in each dc to next ch-2 sp. Sk next ch-2 sp and all stitches up to next ch-2 sp (this forms second armhole). Dc in next ch-2 sp. Dc in each dc to end. (50 dc total: 15 for front, 10 for each sleeve, 15 for back, but now only 15 + 20 + 15 = 50 for the body) You now have a tube shape for the body of the dress.
Joining for Skirt:
Rnd 7: Ch 3 (counts as 1st dc). Dc in each dc around. Join with a sl st to the top of the beginning ch 3. (50 dc) Rnd 8: Ch 3, dc in each dc around. Join with a sl st to the top of the beginning ch 3. (50 dc) At the end of Rnd 8, change to Color B (Pink) on the last yarn over of the sl st join.
Part 2: Skirt (Color B – Pink)
The skirt is worked in rounds, with increases to create the flare.

Rnd 9 (Increase Rnd): With Color B, Ch 3 (counts as 1st dc). Dc in next st. Inc in next st, dc in next 2 sts. Repeat from * to * around. End with Inc in last st. Join with a sl st to the top of the beginning ch 3. (66 dc) Rnd 10 – Rnd 14: Ch 3, dc in each dc around. Join with a sl st to the top of the beginning ch 3. (66 dc)
Rnd 15 (Increase Rnd): Ch 3, dc in next 2 sts. Inc in next st, dc in next 3 sts. Repeat from * to * around. End with Inc in last st. Join with a sl st to the top of the beginning ch 3. (82 dc) Rnd 16 – Rnd 20: Ch 3, dc in each dc around. Join with a sl st to the top of the beginning ch 3. (82 dc) At the end of Rnd 20, change to Color A (White) on the last yarn over of the sl st join.
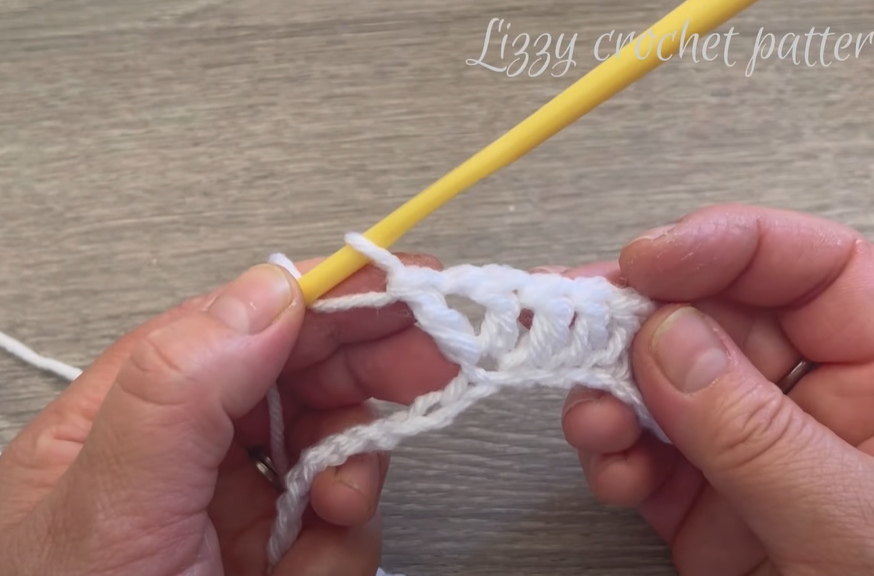
Part 3: Bottom Border (Color A – White)
This border features an openwork design.
Rnd 21: With Color A, Ch 1, sc in first st. Ch 3, sk 3 sts, (dc, ch 1, dc, ch 1, dc) in next st. Ch 3, sk 3 sts, sc in next st. Repeat from * to * around. End with ch 3, sk 3 sts, (dc, ch 1, dc, ch 1, dc) in next st. Join with a sl st to first sc. Ensure your stitch count allows for the repeat. You may need to slightly adjust the “sk 3 sts” to “sk 2 sts” or “sk 4 sts” in a few places to make it work out evenly depending on your final dc count from the previous section. The key is to have the sc roughly evenly spaced with the dc clusters between.
Rnd 22: Ch 3 (counts as 1st dc). 2 dc in first ch-3 sp. Sc in first ch-1 sp of dc cluster. Ch 3, sc in next ch-1 sp of dc cluster. 3 dc in next ch-3 sp. Sc in first ch-1 sp of dc cluster. Ch 3, sc in next ch-1 sp of dc cluster. 3 dc in next ch-3 sp. Repeat from * to * around. Join with a sl st to the top of the beginning ch 3. FO, weave in ends.
Part 4: Flower Embellishments
Large Flower (Make 1 – Pink for petals, Green for center)
Petals (Pink): Rnd 1: Create a magic ring. Ch 1, 10 hdc into ring. Join with sl st to first hdc. (10 hdc) Rnd 2 (Petals): [Ch 2, 3 dc in same st, ch 2, sl st in same st]. Repeat from * to * in each of the next 9 hdc. You should have 10 petals. Sl st to join. FO, leave long tail for sewing.
Center (Green): Create a magic ring. Ch 1, 6 sc into ring. Join with sl st to first sc. FO, leave long tail for sewing.
Small Flower (Make 5 – Pink for petals, Green for center)
Petals (Pink): Rnd 1: Create a magic ring. Ch 1, 5 sc into ring. Join with sl st to first sc. (5 sc) Rnd 2 (Petals): [Ch 2, 2 dc in same st, ch 2, sl st in same st]. Repeat from * to * in each of the next 4 sc. You should have 5 petals. Sl st to join. FO, leave long tail for sewing.
Center (Green): Create a magic ring. Ch 1, 4 sc into ring. Join with sl st to first sc. FO, leave long tail for sewing.
Part 5: Assembly & Finishing
- Weave in all ends: Use your tapestry needle to neatly weave in any loose yarn tails.
- Assemble Large Flower:
- Place the green center on top of the pink petals of the large flower.
- Using the green yarn tail and tapestry needle, sew the center securely onto the pink petals.
- Sew a small pearl bead (optional) to the center of the green part.
- Assemble Small Flowers:
- Repeat the assembly process for the 5 small flowers.
- Attach Flowers to Dress:
- Large Flower: Position the large flower centrally where the white yoke meets the pink skirt. Using the pink yarn tail (or sewing thread), sew it securely in place.
- Small Flowers: Evenly space and sew the 5 small flowers onto the white bottom border of the dress, centered above the dc clusters.
Video tutorial
Optional: Back Opening for Easier Dressing
If you prefer an opening at the back of the yoke for easier dressing, do not join Row 6 to form a tube. Instead, continue working in rows for Rnd 7 and 8, turning at the end of each row. You’ll then join the ends of Rnd 8 to form a tube for the skirt, leaving the back opening. You can add buttons and button loops (ch 2, sk 1 st, sc in next st) or snaps to the back opening.
Sizing Adjustments:
- For a smaller size (e.g., Newborn):
- Reduce the starting chain for Row 1 of the yoke (e.g., Ch 46).
- Adjust the number of dc stitches between the increase corners in the yoke shaping rows.
- Reduce the number of stitches when forming armholes (Row 6).
- Reduce the number of dc stitches for the starting skirt rounds.
- Reduce the number of increase rounds and/or the total number of body rows.
- For a larger size (e.g., 3-6 months):
- Increase the starting chain for Row 1 of the yoke (e.g., Ch 58 or 60).
- Add an extra increase row (e.g., Row 6) to the yoke, or increase the number of stitches between the increase corners.
- Increase the number of dc stitches when forming armholes (Row 6).
- Increase the number of dc stitches for the starting skirt rounds.
- Add more increase rounds and/or more body rows to the skirt section.
- Make flowers slightly larger if desired.
General Sizing Tip: The yoke size is crucial. Measure the chest circumference of the baby you’re making it for, or use a baby dress you know fits. The finished circumference of your Yoke (after Rnd 8, before increases for the skirt) should be slightly larger than the baby’s actual chest measurement to allow for comfort and growth.
Enjoy creating this lovely baby dress!