by
by 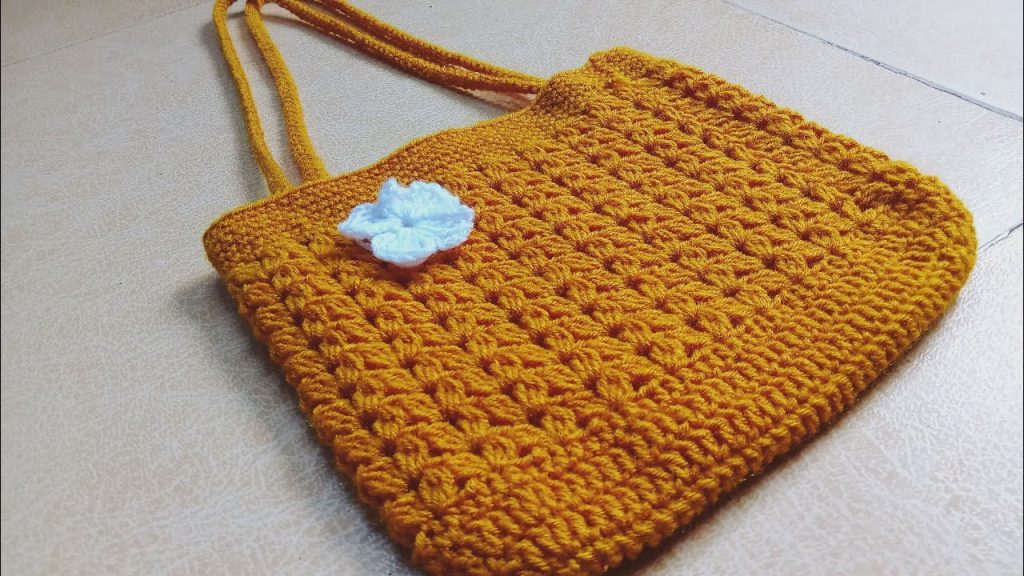
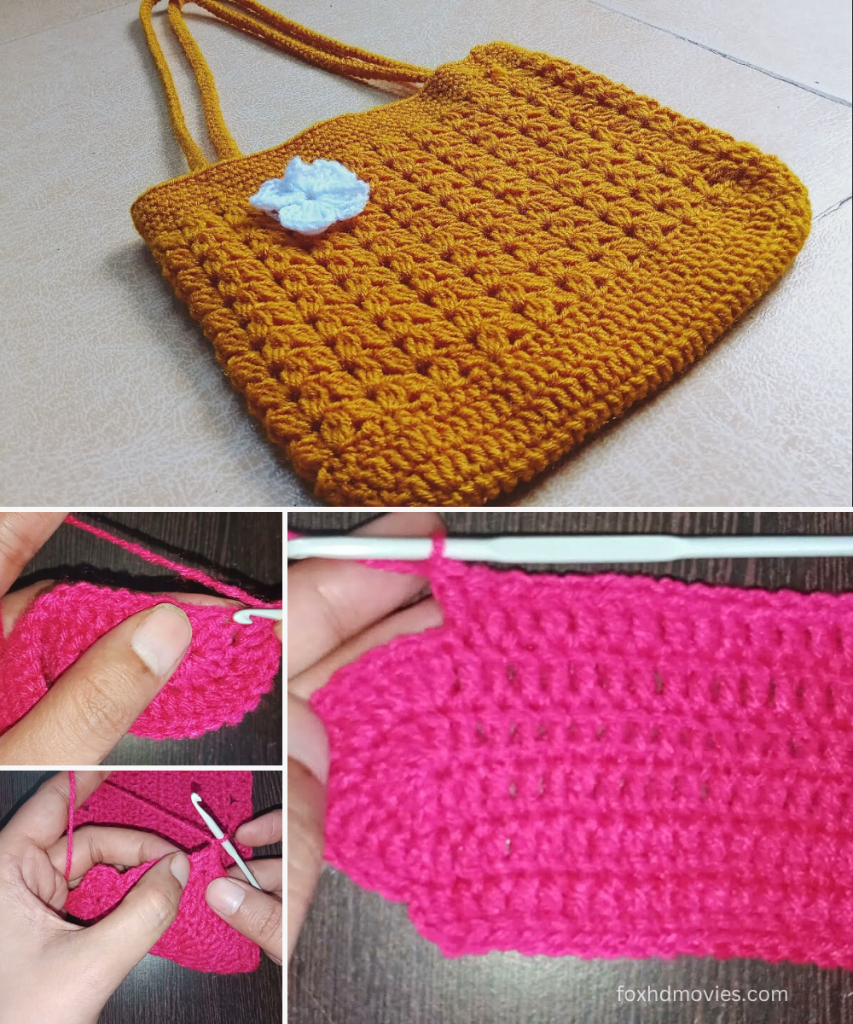
This pattern creates a medium-sized tote bag with a lovely textured fabric, perfect for everyday use. The bag is worked in rounds, starting from the base.
Approximate Finished Size:
- Width: 10-12 inches (25-30 cm)
- Height (without straps): 9-11 inches (23-28 cm)
- Strap Length: Approx. 20 inches (50 cm) each
Materials:
- Yarn: Worsted Weight (Category 4) Cotton or Cotton Blend yarn.
- Main Color (MC): Mustard Yellow (approx. 300-400 yards / 275-365 meters)
- White (for flower): Small amount
- Crochet Hook: 4.5mm (7) or 5.0mm (H/8) hook (adjust to achieve desired gauge and fabric density).
- Yarn Needle: For weaving in ends and sewing on the applique.
- Scissors
- Stitch Markers (optional but recommended)
Gauge: Working in the textured stitch (details below), 13 stitches (based on dc count) x 8 rows = 4 inches (10 cm).
- It’s important to check your gauge. Adjust your hook size if necessary to achieve the desired fabric consistency.
Abbreviations (US Terms):
- ch: chain
- sl st: slip stitch
- sc: single crochet
- dc: double crochet
- sk: skip
- sp: space
- st(s): stitch(es)
- F.O.: Fasten Off
- V-Stitch (V-st): (
dc,ch 1,dc) in the same stitch/space. - Puff Stitch (PS): [Yarn over, insert hook into stitch, yarn over, pull up a loop] 3 times in the same stitch (7 loops on hook), yarn over, pull through all 7 loops on hook.
Ch 1to secure.
Pattern Instructions: The Bag
The bag is worked in rounds, starting with an oval base.
Part 1: Base of the Bag (Oval)
Start with Main Color (MC).

Foundation Chain: Ch 35.
Round 1: Sc in the 2nd ch from the hook. Sc in the next 32 chs. (33 sc). Work 3 sc in the last ch. (This turns the corner). Now working on the other side of the foundation chain, sc in the next 32 chs. Work 2 sc in the last ch (same ch as first sc). Sl st to the first sc to join. (70 sc total).
Round 2: Ch 1 (does not count as a stitch). Sc in the first sc. Sc in the next 32 sts. Inc in the next 3 sts. Sc in the next 32 sts. Inc in the next 2 sts. Sl st to the first sc. (76 sc total).
Round 3: Ch 1. Sc in the first sc. Sc in the next 32 sts. (Sc in next st, inc) 3 times. Sc in the next 32 sts. (Sc in next st, inc) 2 times. Sl st to the first sc. (81 sc total – adjust as needed to maintain flat oval, focus on even increases around the curves). * Continue sc rounds with increases only at the curved ends (approx. 2-3 increases per curve) until your base measures approximately 10-12 inches (25-30 cm) long and 3-4 inches (7.5-10 cm) wide. The total stitch count will increase with each round. For a typical tote, 4-5 base rounds should be enough. Let’s aim for a final count of 84 stitches for the body for ease of pattern repeat.
* **Adjusted Base Final Round (Example targeting 84 stitches):** Ensure your last base round ends with a multiple of 3 (for the V-stitch pattern). If your last stitch count is 81, you can `inc` in 3 stitches around the final round to reach 84.
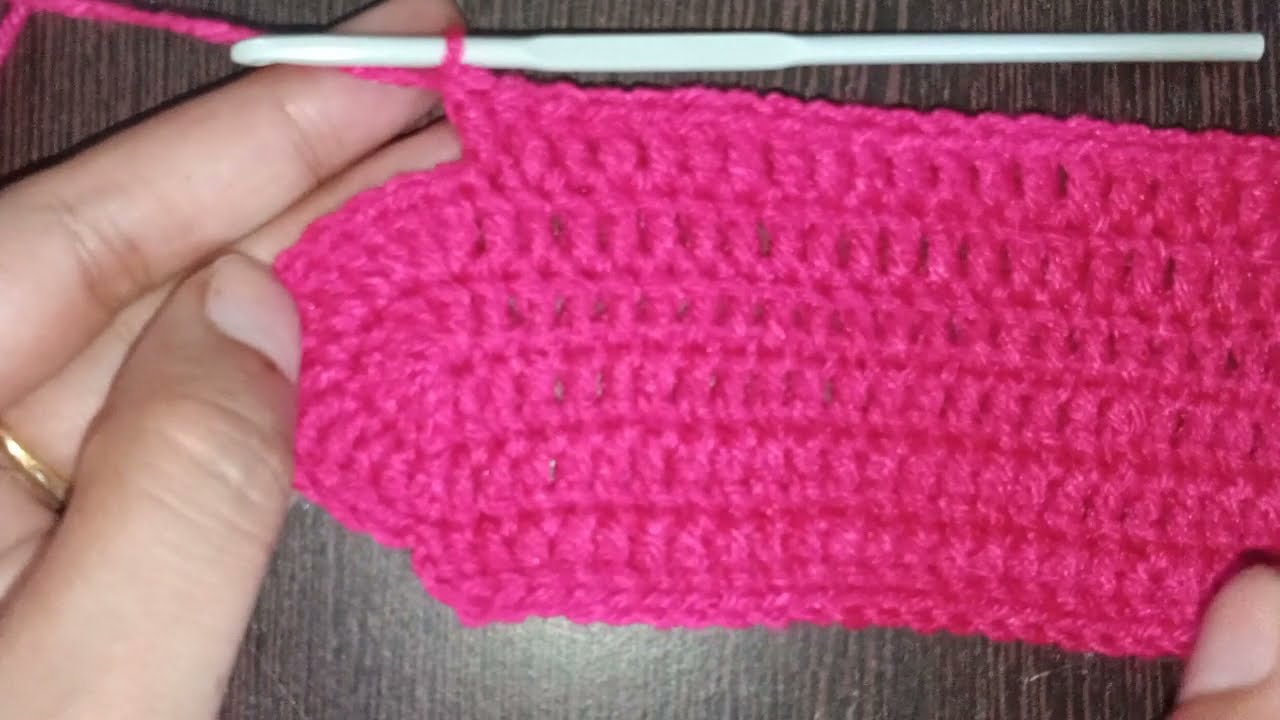
Part 2: Body of the Bag (Textured Stitch)
This pattern uses a variation of the V-stitch and puff stitch to create the texture.

Round 1 (Set up for body): Ch 3 (counts as first dc). Dc in each st around. Sl st to the top of the beginning ch 3. (84 dc) * This round creates a strong base for the body and may be worked in BLO to give a defined edge if desired.
Round 2 (Textured Stitch – V-Stitch Base): Ch 3 (counts as first dc). Dc in the same st. Sk 2 sts. (Dc in next st, ch 1, dc in the same st – this is your V-stitch), sk 2 sts. Repeat from * to * around. Sl st to the top of the beginning ch 3. (28 V-stitches)
Round 3 (Textured Stitch – Puff Stitch Layer): Ch 1 (does not count as a stitch). Work a Puff Stitch in the ch 1 sp of the first V-stitch from the previous round. Puff Stitch in the ch 1 sp of the next V-stitch. Repeat from * to * around. Sl st to the top of the first Puff Stitch. (28 Puff Stitches)
Round 4 (Textured Stitch – V-Stitch Base): Ch 3 (counts as first dc). Dc in the same st (this is into the top of the first Puff Stitch). Sk the ch 1 sp of the Puff Stitch. (Dc in the top of the next Puff Stitch, ch 1, dc in the same Puff Stitch), sk the ch 1 sp of the Puff Stitch. Repeat from * to * around. Sl st to the top of the beginning ch 3. (28 V-stitches)
Repeat Rounds 3 and 4 for the body of the bag until it reaches your desired height (approx. 9-11 inches / 23-28 cm). The image suggests about 10-12 sets of these two rows.
- End with a Round 4 (V-stitch row) before moving to the top edge.
Part 3: Top Edge of the Bag
Round 1 (Scalloped Edge): Ch 1. Sc in the first dc. Ch 2. Sc in the second dc of the V-stitch from the previous round. (Sc in the first dc of the next V-stitch, ch 2, sc in the second dc of the next V-stitch). Repeat from * to * around. Sl st to the first sc. (56 sc and 28 ch 2 spaces) * This creates the slightly ruffled top edge seen in the image.
Finishing the Bag Body: F.O. Weave in ends.
Part 4: Straps (Make 2)
Using Main Color (MC).
Row 1: Ch 80 (or desired length for strap. 80 chains makes approx. 20 inches / 50 cm). Row 2: Sc in the 2nd ch from the hook. Sc in each ch across. (79 sc) F.O., leaving a long tail for sewing.
Assembly:
- Place the bag flat. Determine where you want to attach the straps – typically centered on each side, about 1.5-2 inches in from the side seams (or corners of the base).
- Pin the ends of one strap to the inside top edge of the bag, making sure it’s not twisted. Sew securely using your yarn needle. Repeat for the second strap on the opposite side.
- Weave in all remaining ends.
Pattern Instructions: The Flower Applique
This flower is a simple layered or puff-stitch style flower.
Part A: Flower Center (White Yarn)
Round 1: Make a magic ring. Ch 1 (does not count as a stitch), work 6 sc into the ring. Sl st to the first sc to join. (6 sc) F.O., leaving a long tail for sewing onto the bag.
Part B: Flower Petals (White Yarn)
Round 1: Make a magic ring. Ch 1 (does not count as a stitch), work 8 sc into the ring. Sl st to the first sc to join. (8 sc)
Round 2 (Petals): (Ch 2, 3 dc into the same stitch, ch 2, sl st into the same stitch). Sl st into the next sc of Round 1. Repeat from * to * around for 8 petals. * Ensure each petal is worked into its own sc from Round 1, with a sl st in between to move to the next stitch.
Finishing the Flower: F.O., leaving a long tail for sewing the flower onto the bag. Weave in the starting tail.
Video tutorial
Final Assembly:
- Place the finished white flower applique onto the front of the crocheted bag, as desired (typically off-center slightly).
- Using the tail from the flower, securely sew the entire flower applique onto the bag.
- Weave in any remaining loose ends.
Your beautiful textured tote bag is now ready to use!