by
by 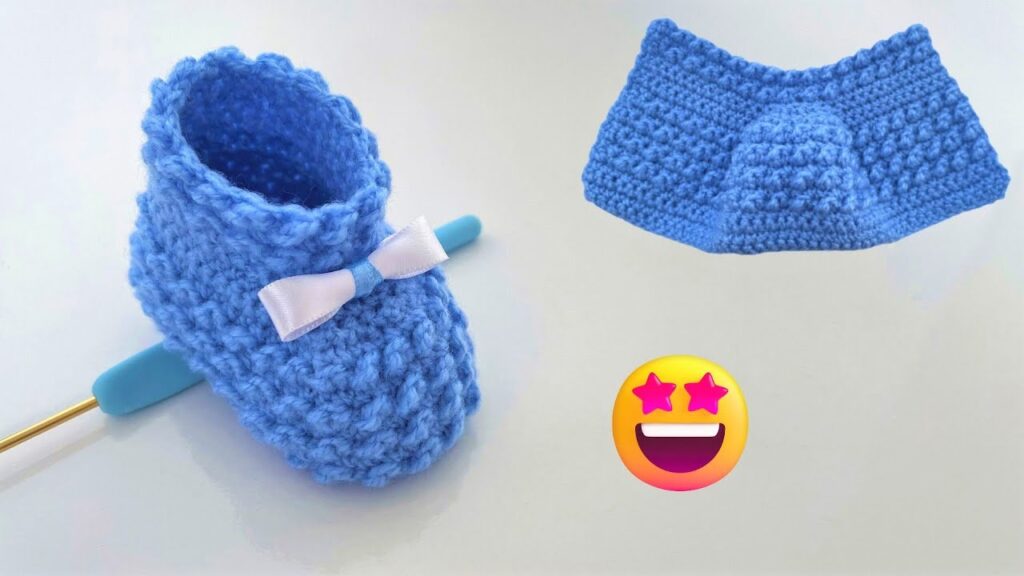
Oh, these little booties are just too cute! Featuring a wonderful textured stitch that gives them a cozy, squishy feel and a sweet scalloped cuff, these handmade treasures are perfect for keeping tiny toes warm. The design is simple yet elegant, making them a fantastic project for a baby shower gift or for your own precious bundle.
This pattern is suitable for intermediate crocheters, or confident beginners who are ready to try a new textured stitch and are comfortable with basic seaming.
Yarn:
- DK (Double Knit) or Light Worsted Weight yarn in your favorite baby-friendly color (e.g., a lovely blue, as pictured). Choose a soft, machine-washable yarn like acrylic or a cotton blend for comfort and easy care.
Hook:
- 3.5 mm (US E/4) crochet hook (adjust hook size if necessary to achieve desired fabric and tension).
Notions:
- Tapestry needle for seaming and weaving in ends
- Scissors
- Small ribbon bow (as pictured) or other small embellishment (e.g., a tiny button)
Gauge (Important for Sizing!):
- 16 SC and 18 rows = 4 inches (10 cm) in single crochet. (The textured stitch will have a slightly different gauge, but aiming for this SC gauge will give you a good starting point for size).
- Always make a small swatch to check your gauge, as it’s crucial for the finished size of the booties!
Size:
- Newborn to 3 months (approximately 3.5 – 4 inches / 9-10 cm sole length when finished).
- To adjust for larger sizes, you will need to increase the starting chain for the sole and add more rows for both the sole and the upper sections. The pattern for the textured stitch needs an even number of stitches per repeat.
Abbreviations (US Crochet Terms):
- Ch: Chain
- Sl St: Slip Stitch
- SC: Single Crochet
- HDC: Half Double Crochet
- DC: Double Crochet
- St(s): Stitch(es)
- FO: Fasten Off
- BLO: Back Loop Only (insert hook only into the back loop of the stitch)
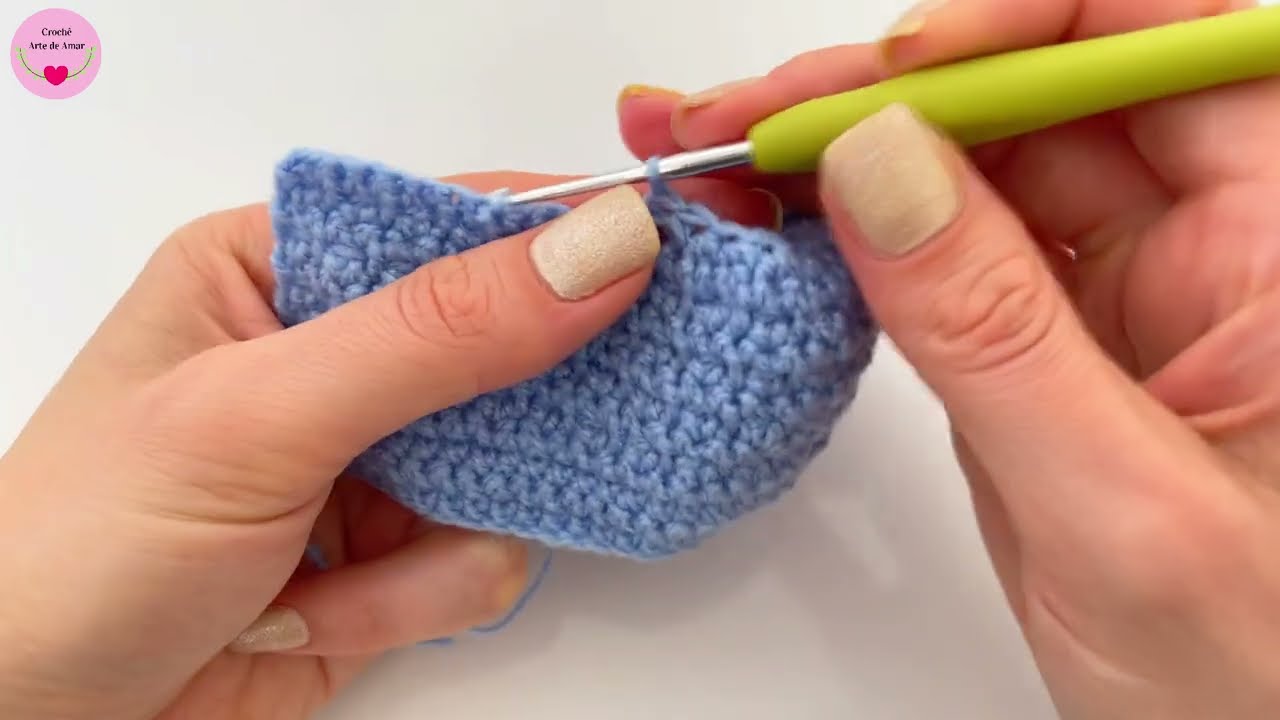
- Puff St (Puff Stitch): [Yo, insert hook into st, Yo, pull up a loop] 3 times in the same stitch (7 loops on hook). Yo, pull through all 7 loops on hook. Ch 1 to secure. (The Ch 1 does NOT count as a stitch unless specified by pattern; here it is just to close the puff).
Pattern Instructions:
These booties are worked flat in one piece, then folded and seamed.

Part 1: The Sole & Lower Body (Main Color – Blue)
- Ch 27.
- Row 1 (RS): SC in 2nd Ch from hook. SC in next 24 Ch. 3 SC in last Ch. (Work around the end of the chain). Now working along the other side of the starting chain: SC in next 24 Ch. 2 SC in the very last Ch (this is the same ch as your very first SC). Sl St to first SC to join. (54 SC)
- You’ve now created an oval shape for the sole.
- Row 2: Ch 1 (does not count as a stitch). SC in each SC around. Sl St to first SC. (54 SC)
- Row 3: Ch 1. SC in BLO in each SC around. Sl St to first SC. (54 SC)
- Working in the BLO creates a distinct ridge, separating the sole from the body of the slipper.
Part 2: The Textured Upper (Main Color – Blue)
Now we’ll introduce the textured stitch (Puff Stitch). This section is worked in rounds.
- Round 4: Ch 1 (does not count as a stitch). SC in first stitch. Puff St in next stitch, SC in next stitch. Repeat from * to * around. Sl St to first SC. (You should have 27 Puff Stitches and 27 SC).
- Round 5: Ch 1. SC in each SC and each Puff St (working into the top of the Puff St, just under the Ch-1 closure). Sl St to first SC. (54 SC)
- Round 6: Ch 1. SC in first stitch. Puff St in next stitch, SC in next stitch. Repeat from * to * around. Sl St to first SC. (27 Puff St and 27 SC)
- You are essentially alternating rows of SC and rows of Puff Stitch/SC pairs.
Continue working in this pattern for the upper:
- Round 7: Ch 1. SC in each SC and each Puff St around. Sl St to first SC. (54 SC)
- Round 8: Ch 1. SC in first stitch. Puff St in next stitch, SC in next stitch. Repeat from * to * around. Sl St to first SC. (27 Puff St and 27 SC)
- You should have 3 rows of Puff Stitches (Rounds 4, 6, 8) with SC rows in between. This forms the main body of the slipper.
Part 3: Shaping the Toe (Main Color – Blue)
Now we will start decreasing to form the toe. This section will be worked back and forth in rows, not in a continuous round.
- Row 9 (RS): Ch 1. SC in first 18 stitches. (Do NOT Sl St to join). Turn. (18 SC)
- You are now working only on the front section of the slipper, over the top of the foot.
- Row 10 (WS): Ch 1. SC in first 17 stitches. Sk last SC. Turn. (17 SC)
- Row 11 (RS): Ch 1. SC in first 16 stitches. Sk last SC. Turn. (16 SC)
- Row 12 (WS): Ch 1. SC in first 15 stitches. Sk last SC. Turn. (15 SC)
- Row 13 (RS): Ch 1. SC in first 14 stitches. Sk last SC. Turn. (14 SC)
- Row 14 (WS): Ch 1. SC in first 13 stitches. Sk last SC. Turn. (13 SC)
- Row 15 (RS): Ch 1. SC in first 12 stitches. Sk last SC. Turn. (12 SC)
- This completes the toe shaping. You should have 12 stitches on your hook.
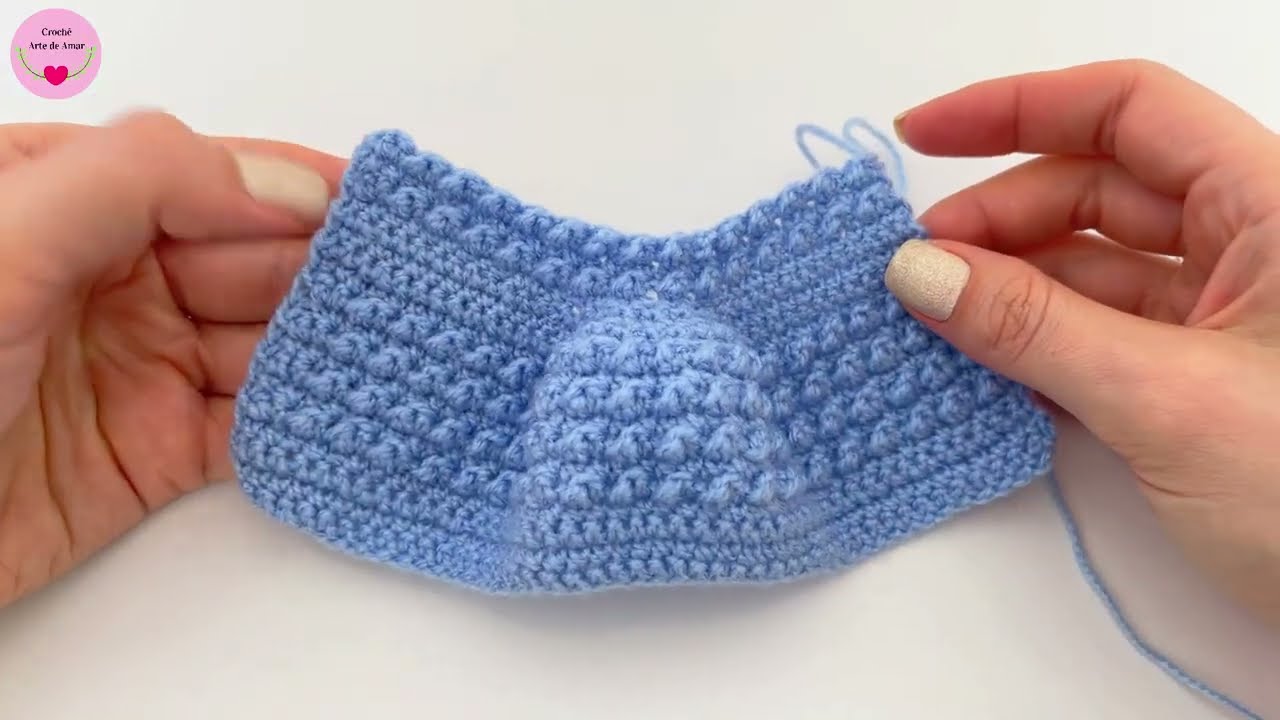
Part 4: The Ankle Cuff (Main Color – Blue)
This section forms the top edge of the bootie.
- Row 16 – Row 20: Ch 1. SC in each of the 12 stitches. Turn. (12 SC)
- You are creating a straight section that will become the back opening of the ankle.
- Row 21 (Scalloped Edge): Ch 1. Sk 1 SC, 5 DC in next SC, Sk 1 SC, Sl St in next SC. Repeat from * to * across the row. You should end with a Sl St in the last SC. FO, leaving a long tail for sewing.
- You will create 3 shell scallops along the top edge.
Video tutorial
Finishing Your Bootie:
- Weave in all initial loose ends.
- Seaming:
- Lay your crocheted piece flat with the RS facing you. The side with the decreases is the toe. The long straight section (Rounds 1-3) is the sole.
- Fold: Fold the piece so the two long side edges meet, and the scalloped edge (Row 21) forms the top opening.
- Toe Seam: Starting from the toe end (where you finished Row 15), whip stitch or mattress stitch the edges together for about 1.5 – 2 inches (4-5 cm). This forms the front of the slipper.
- Heel Seam: Now, looking at the back/ankle opening, bring the two short ends of the flat piece together (where you finished Row 20). Seam these two edges closed to form the back heel seam.
- Sole Seam: Finally, you’ll have a seam running along the bottom of the foot where the original starting chain meets the side of the worked fabric. Carefully seam this section closed.
- Attach Embellishment: Tie a small ribbon bow and stitch it securely onto the top of the slipper, just above the toe (as pictured).
- Make a Second Bootie: Repeat all steps to create a matching pair!
And there you have it! Adorable, cozy, and handmade baby booties with a lovely texture. These make wonderful gifts and are a joy to crochet.
Happy crocheting!