 by
by 
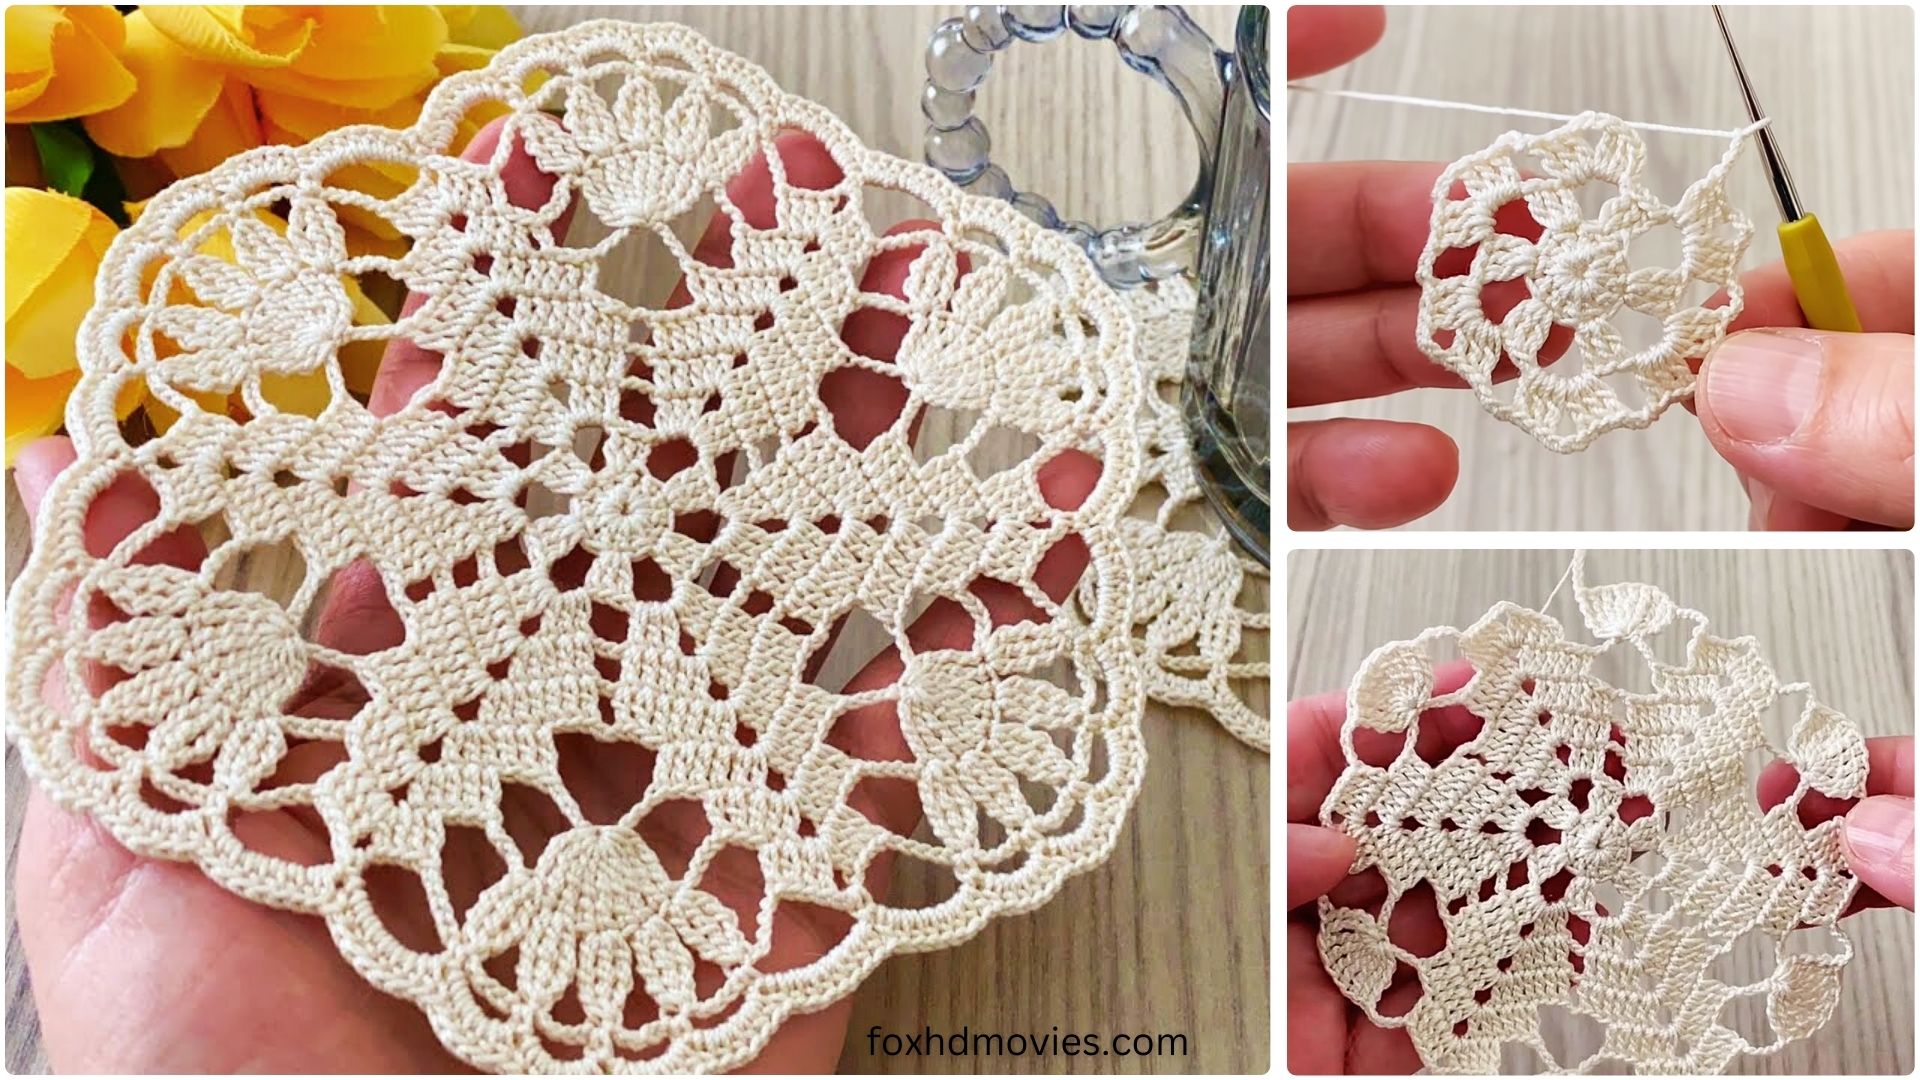
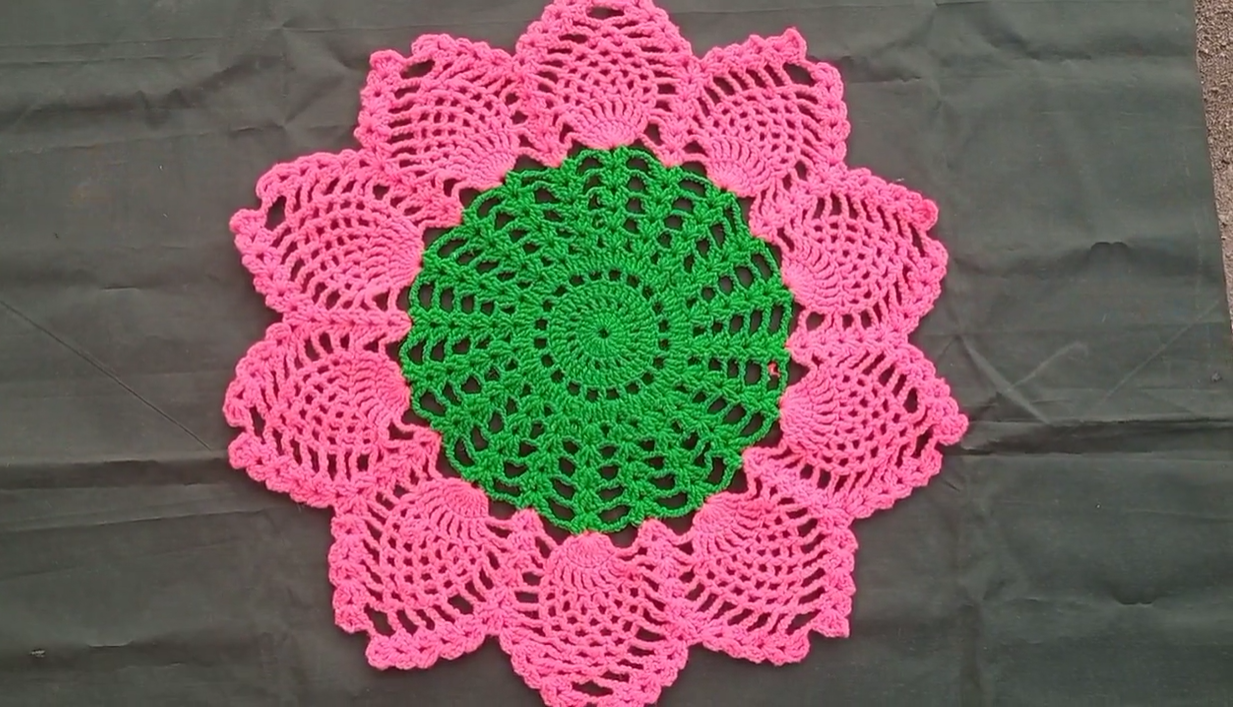
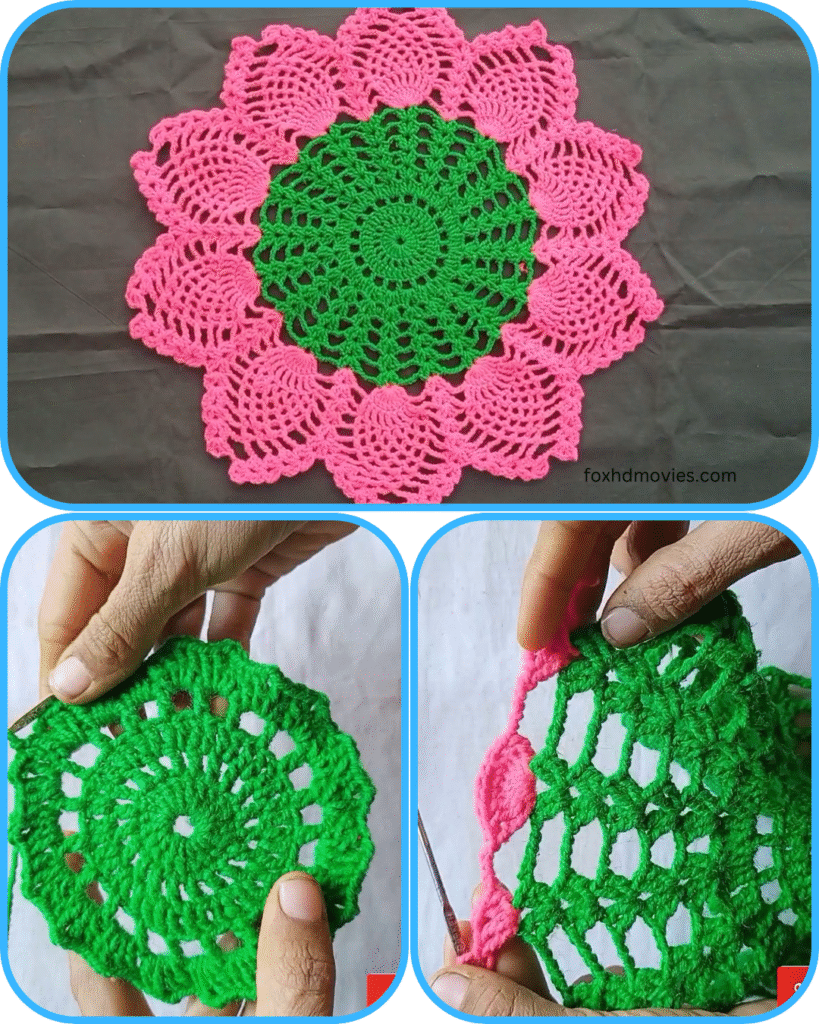
Add a touch of vibrant, handmade charm to your home with this gorgeous two-tone floral crochet mat! Featuring a dense, colorful center surrounded by a striking border of overlapping petals, this piece is a delightful blend of simplicity and elegance. It’s perfect as a placemat, a decorative doily, or a traditional thalposh.
The combination of the solid green center and the bold pink petals in your photo creates a truly eye-catching effect, making it a fantastic project for showcasing contrasting colors.
What You’ll Need:
- Yarn:
- Worsted weight (Category 4) or DK weight (Category 3) yarn is ideal for this project, offering a nice balance of drape and durability. Cotton or acrylic blends work well.
- Choose two contrasting colors: one for the center (e.g., Green) and one for the petals/border (e.g., Pink).
- Yardage: Approximately 100-150 yards for the main color, and 150-250 yards for the border color, depending on your desired final size.
- Crochet Hook:
- Appropriate size for your yarn (e.g., 4.0mm (G) or 5.0mm (H) for worsted weight). Always check your yarn label for recommendations.
- Scissors
- Yarn Needle (for weaving in ends)
- Stitch Markers (helpful for marking repeat sections if you tend to lose your place)
Abbreviations (US Terms):
- ch: chain
- sl st: slip stitch
- sc: single crochet
- hdc: half double crochet
- dc: double crochet
- tr: treble crochet (yarn over 2 times)
- dtr: double treble crochet (yarn over 3 times) – used for the tall stitches in the petals
- st(s): stitch(es)
- sp: space
- yo: yarn over
- MR: magic ring (or magic circle)
- sk: skip
- FO: fasten off
Let’s Get Started!
Difficulty: Intermediate (requires familiarity with basic stitches, taller stitches, and working increases to maintain a flat circle).
Notes:
- The beginning chains usually do NOT count as a stitch unless specified.
- Join each round with a slip stitch to the first stitch of the round (not the starting chain) unless directed otherwise.
- Maintain consistent tension to ensure your piece lies flat. If it begins to ruffle, you may be increasing too much; if it begins to cup (bowl), you may need more increases or a larger hook. The pattern aims for a flat circle.
- Color Change Tip: When changing colors, work the final yarn over of the slip stitch join with the new color to create a seamless transition.

Pattern for a Floral Placemat/Thalposh:
(Part 1: The Solid Center – Using your Center Color, e.g., Green)
Round 1: (Center Ring)
- Start with a Magic Ring (MR).
- Ch 2 (does not count as st). Work 12 dc into the MR.
- Pull MR tight to close. Sl st to the top of the first dc to join. (12 dc)
Round 2:
- Ch 2. Work 2 dc in each st around.
- Sl st to the top of the first dc to join. (24 dc)
Round 3:
- Ch 2. (1 dc in next st, 2 dc in next st) Repeat from * to * around.
- Sl st to the top of the first dc to join. (36 dc)
Round 4:
- Ch 2. (1 dc in next 2 sts, 2 dc in next st) Repeat from * to * around.
- Sl st to the top of the first dc to join. (48 dc)
Round 5:
- Ch 2. (1 dc in next 3 sts, 2 dc in next st) Repeat from * to * around.
- Sl st to the top of the first dc to join. (60 dc)
Round 6:
- Ch 2. (1 dc in next 4 sts, 2 dc in next st) Repeat from * to * around.
- Sl st to the top of the first dc to join. (72 dc)
(Continue in this manner until your green center is the desired size. The image shows approximately 7-8 rounds for the green center. For the next round, if you were to continue the pattern, it would be “1 dc in next 5 sts, 2 dc in next st” for a total of 84 dc.)
Round [X – your final center color round]:
- Ch 2. (1 dc in next [X-2] sts, 2 dc in next st) Repeat from * to * around.
- Sl st to the top of the first dc to join.
- FO center color, leaving a short tail to weave in.

(Part 2: The Petal Border – Using your Petal Color, e.g., Pink)
(The image shows approximately 10 petals. You’ll need to figure out the stitch count from your last green round that is divisible by 10. If your last green round had 84 stitches, you might need to adjust slightly or aim for 12 petals if your last round was 72 dc.)
Let’s assume your last green round was 72 dc (Round 6). We will aim for 9 petals, as 72 is divisible by 8 (72/8=9) to make the petals distinct. If you have 84 stitches, it’s divisible by 7 (84/7=12) for 12 petals. The picture seems to show around 10-12 petals. Let’s aim for 12 petals, meaning our last green round should have 84 stitches.
If your last green round ended with 72 stitches (Round 6 above):
- Round 7 (Green): Ch 2. (1 dc in next 5 sts, 2 dc in next st) Repeat from * to * around. Sl st to join. (84 dc). FO Green.
Now, attach your border color (Pink):
Round 1 (Pink – Base for Petals):
- Attach pink yarn with a sl st to any dc of the previous (green) round.
- Ch 1 (does not count as st). Sc in the same st. Sc in each of the next 6 sts. (Total 7 sc).
- Sk 7 sts. Sc in next 7 sts. Repeat from * to * around. This will create gaps for the petals. (72 sc, 12 skips)
- Sl st to the first sc to join.
Round 2 (Pink – Building the Petals):
- Ch 1 (does not count as st). Sc in the same st. Sc in next 2 sc. (3 sc total)
- In the gap (the skipped 7 sts from the previous round), work the following sequence for the petal:
- (dc, tr, dtr, tr, dc) – all in the center of the skipped space.
- Sc in the next 3 sc (this will be the middle of the 7 sc group from the previous round).
- Repeat from * to * around.
- After the last petal, sl st to the first sc to join.
(The image shows the petals covering the “sc” parts of the previous round. We need to create a floating petal that covers the gap.)

Let’s refine the petal placement for a more accurate look:
Revised Petal Border (Pink) – Assuming your last green round had 84 dc (12 groups of 7 stitches each):
Round 1 (Pink – Starting Petals):
- Attach pink yarn with a sl st in any stitch.
- Ch 1, sc in the same st. (You’ll work into this sc later).
- [Petal Sequence]: Work (dc, tr, dtr, tr, dc) all into the next stitch. This creates the base of a pointed petal.
- Sk 5 sts.
- Sc in the next st.
- Repeat from * to * around 11 more times (total 12 petals). The last sc should be in the stitch just before your starting ch 1.
- Sl st to the initial sc to join. (12 sc, 12 petals)
Round 2 (Pink – Defining Petals and Creating Lacey Outer Edge):
- Ch 1 (does not count as st). Sc in the first sc (from previous round).
- Work 1 sc in each of the dc and tr stitches of the petal (total 5 sc across the petal).
- At the peak of the petal (the dtr from previous round), work (sc, ch 3, sc).
- Work 1 sc in each of the remaining tr and dc stitches of the petal (total 5 sc across the petal).
- Ch 3, sk the sc from the previous round (this creates the openwork between petals).
- Sc in the next sc.
- Repeat from * to * around, ensuring your last ch 3 connects back to the beginning.
- Sl st to the first sc to join.
Round 3 (Pink – Final Border Detail):
- Sl st into the ch-3 space (at the petal peak).
- Ch 1. In the same ch-3 space, work (sc, ch 3, sc). (This makes a picot-like point).
- Work 1 sc in each of the next few sc stitches along the side of the petal until you reach the next ch-3 space.
- In the ch-3 space (between the petals), work (sc, ch 3, sc).
- Repeat steps 2-4 around.
- Sl st to the first sc to join.
- FO, leaving a short tail.
Video tutorial
Finishing Up!
- Weave in all ends: Use your yarn needle to neatly weave in all starting and ending tails. For multi-color projects, this is especially important for a clean and professional look.
- Blocking (Highly Recommended): Lay your finished piece flat. Gently stretch and shape it, ensuring all the petals are defined and lie nicely. Pin it down using rust-proof pins if needed. Mist it lightly with water (for cotton) or use a steam iron (hovering, not touching the yarn directly for acrylics) and let it dry completely in shape. Blocking will significantly enhance the appearance and flatness of your mat!
You now have a beautiful, vibrant, floral-inspired mat ready to brighten up your space! Enjoy your lovely handmade creation.