 by
by 
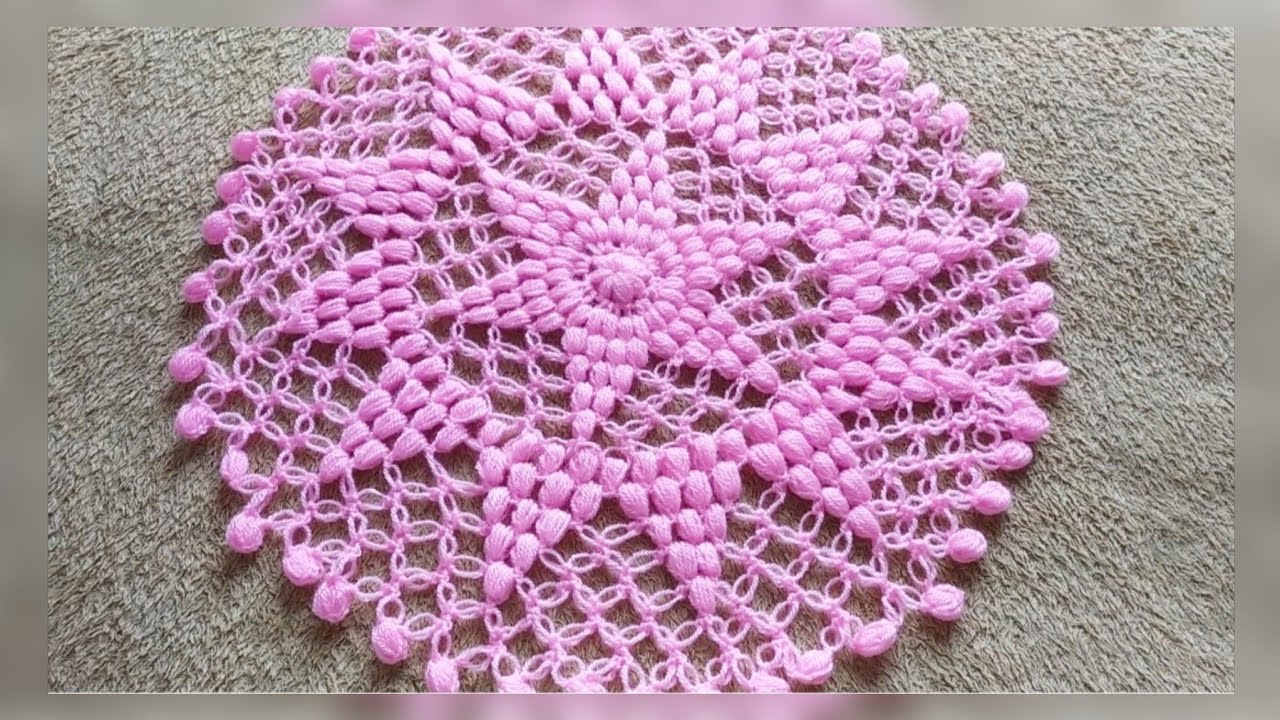
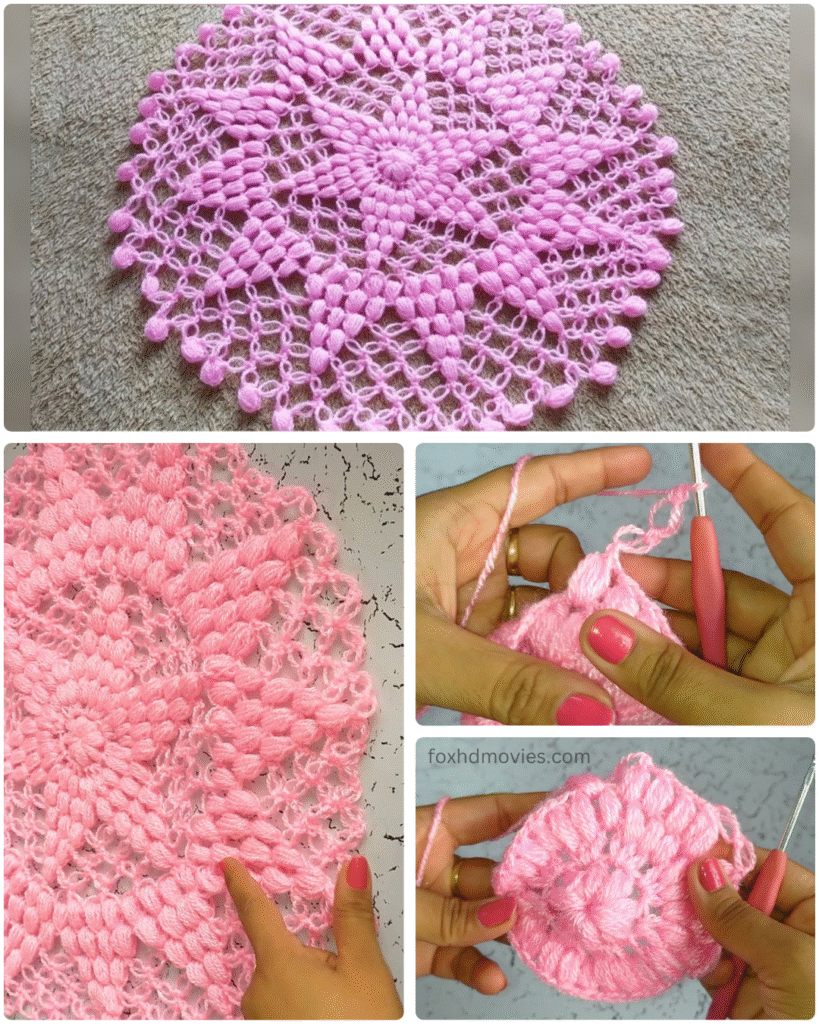
Ready to add a vibrant pop of color and rich texture to your home decor? This stunning circular doily features a captivating design with radiating popcorn stitch “petals” and a beautiful lacy backdrop. It’s a fantastic project for intermediate crocheters looking to expand their skills, and the finished piece makes a wonderful statement on any table or surface.
The sample is shown in a lively hot pink, but imagine this in any color that matches your style!
Finished Size: Approximately 12-14 inches in diameter (adjust hook and yarn for different sizes).
Materials You’ll Need:
- Yarn: Worsted weight cotton or acrylic yarn in your favorite color. Approximately 200-250 yards. (The sample uses a vibrant pink.)
- Hook: 4.0 mm (G/6) crochet hook (or size needed to obtain desired gauge and drape).
- Scissors
- Yarn Needle for weaving in ends.
Stitches Used (US Terms):
- ch: chain
- sl st: slip stitch
- sc: single crochet
- dc: double crochet
- tr: treble crochet (yarn over twice, insert hook, yarn over, pull up loop, [yarn over, pull through 2 loops] 3 times)
- ch-sp: chain space
- Popcorn Stitch (PC): Work 5 dc in the same stitch. Remove hook from the last dc, insert hook into the top of the first dc of the group, pick up the loop of the 5th dc and pull it through the first dc. Ch 1 to secure.
Pattern Notes:
- The ch 3 at the beginning of a round counts as a dc.
- The ch 1 to secure a popcorn stitch does not count as a stitch unless specified.
- Join each round with a sl st to the first stitch of the round (or top of beginning chain).
Pattern Instructions
Center Ring
Round 1: Ch 4, join with a sl st to form a ring.
Round 2: Ch 3 (counts as 1 dc), 11 dc into the ring. Join with a sl st to the top of initial ch 3. (12 dc)
Round 3: Ch 3 (counts as 1 dc). PC in next dc, ch 1. Repeat from * 10 more times. PC in the last dc. Join with a sl st to the top of initial ch 3. (12 Popcorn Stitches, 11 ch-1 spaces, plus initial ch 3) * Note: For the first Popcorn of the round, you might just do a regular PC in the same stitch as the join, then ch 1, etc., or start with ch 3 and then PC in the next stitch.

Round 4: Ch 1, sc in the first ch-1 space. Ch 3, sc in the next ch-1 space. Repeat from * around. Join with a sl st to the first sc. (12 ch-3 spaces)
Round 5: Sl st into the first ch-3 space. Ch 3 (counts as 1 dc), (1 dc, ch 2, 2 dc) in the same ch-3 space (this creates a corner/petal start). Ch 1, skip next sc, (2 dc, ch 2, 2 dc) in next ch-3 space. Repeat from * around. Ch 1, join with a sl st to the top of initial ch 3. (12 “Shells” with ch-2 spaces)
Building the Petals and Lace
Round 6: Sl st into the first dc, then into the ch-2 space. Ch 3 (counts as 1 dc), 4 dc in the same ch-2 space. Ch 3, skip the next 2 dc, skip the ch-1 space, skip the next 2 dc. 5 dc in the next ch-2 space. Repeat from * around. Ch 3, join with a sl st to the top of initial ch 3. (12 groups of 5 dc, 12 ch-3 spaces)
Round 7: Ch 1, sc in the first dc. PC in the next dc. Sc in the next 3 dc. Ch 3, sc in the first dc of the next 5-dc group. PC in the next dc. Sc in the next 3 dc. Repeat from * around. Ch 3, join with a sl st to the first sc.
Round 8: Ch 1, sc in the first sc (before the PC). Sc in the top of the PC. Sc in the next 3 sc. Ch 3, sc in the sc before the PC, sc in the top of the PC, sc in the next 3 sc. Repeat from * around. Ch 3, join with a sl st to the first sc.
Round 9: Ch 1, sc in the first 2 sc. Ch 5, skip the next 3 sc, sc in the next 2 sc. Ch 5, skip the next ch-3 space, sc in the next 2 sc. Repeat from * around, adjusting the last part to join neatly. Join with a sl st to the first sc. * Alternative for Round 9, closer to image: Ch 1, sc in first sc. *Ch 5, skip 4 stitches, sc in next stitch. (This will be the first sc of the next group of 5 sc from R8). Repeat from * around, aiming for an even number of ch-5 spaces. * Let’s try a different approach from Round 6 onwards to get the prominent popcorns.

Revised Petal Section (More accurate to image)
Round 6: Sl st into the first ch-2 space. Ch 3 (counts as 1 dc), 4 dc in the same ch-2 space. Ch 2, skip the ch-1 space. In the next ch-2 space, (PC, ch 1, PC, ch 1, PC). (This creates a cluster of 3 popcorns). Ch 2, skip the ch-1 space. 5 dc in the next ch-2 space. Repeat from * around, alternating 5 dc groups and 3-popcorn clusters. Join with a sl st to the top of initial ch 3.
Round 7: Ch 1, sc in first dc. PC in next dc. Sc in next 3 dc. Ch 2, sc in top of first PC of the cluster. Ch 2, sc in top of second PC. Ch 2, sc in top of third PC. Ch 2, sc in first dc of next 5-dc group. PC in next dc. Sc in next 3 dc. Repeat from * around. Join with a sl st to first sc.
Round 8: Ch 1, sc in first sc, sc in top of PC, sc in next 3 sc. Ch 2, sc in next sc (the one after ch 2 space). Ch 2, sc in next sc. Ch 2, sc in next sc. Ch 2, sc in next sc. Sc in top of PC, sc in next 3 sc. Repeat from * around. Join with a sl st to first sc.
(This pattern is complex to deconstruct perfectly from an image, as stitch counts need to be precise. The following rounds will attempt to create the honeycomb-like lattice and bobble border.)

Lattice and Bobble Border
Round 9: Ch 1, sc in first sc. Ch 5, skip 5 sc, sc in next sc. Repeat from * around, ensuring your stitch count allows for an even number of ch-5 spaces. Join with a sl st to first sc. * Note: This round aims to create the large archways for the lattice.
Round 10: Sl st into first ch-5 space. Ch 3 (counts as 1 dc), 4 dc in same ch-5 space. Ch 1, 5 dc in next ch-5 space. Repeat from * around. Ch 1, join with a sl st to top of initial ch 3.
Round 11: Ch 1, sc in first dc. Ch 3, skip 2 dc, sc in next 2 dc (or 1 dc, depending on spacing). Ch 3, sc in next ch-1 space. Ch 3, sc in next 2 dc (or 1 dc). Repeat from * around. Join with a sl st to first sc. * This round is starting the honeycomb.
Round 12: Sl st into first ch-3 space. Ch 3 (counts as 1 dc), 2 dc in same ch-3 space. 3 dc in next ch-3 space. Repeat from * around. Join with a sl st to top of initial ch 3. * This creates a dense row of dc groups.
Round 13: Ch 1, sc in first dc. Ch 4, skip 3 dc, sc in next dc. Repeat from * around. Join with a sl st to first sc. * Creates larger arches for the final border.
Round 14 (Bobble Edging): Sl st into first ch-4 space. Ch 1. Work a Bobble Stitch (yarn over, insert hook, pull up loop, yarn over, pull through 2 loops; repeat 4 more times in the same stitch/space – 5 loops on hook, yarn over, pull through all 5 loops) in the ch-4 space. Ch 3, work a Bobble Stitch in the same ch-4 space. Work a Bobble Stitch in the next ch-4 space. Repeat from * around, ensuring an even distribution of bobbles around the edge. Ch 3, join with a sl st to the top of the first Bobble Stitch.
Video tutorial
Finishing:
Fasten off and weave in all loose ends securely with your yarn needle. Blocking is highly recommended to open up the lace pattern and ensure your doily lays flat. Gently dampen the doily, carefully stretch it to shape, emphasizing the points and curves, and pin it to a foam board or towel. Let it air dry completely.
Enjoy your beautiful and richly textured new crochet doily! We’d love to see your finished creations – share them in the comments below or tag us on social media! Happy crocheting!