by
by 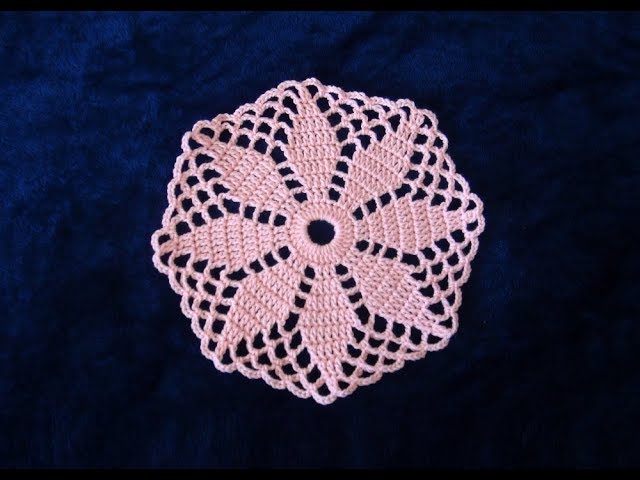
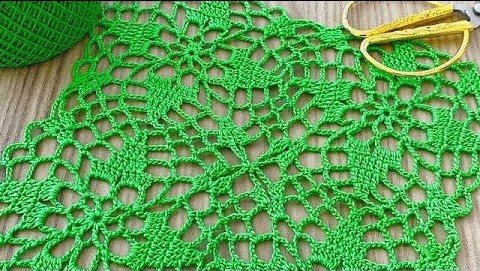
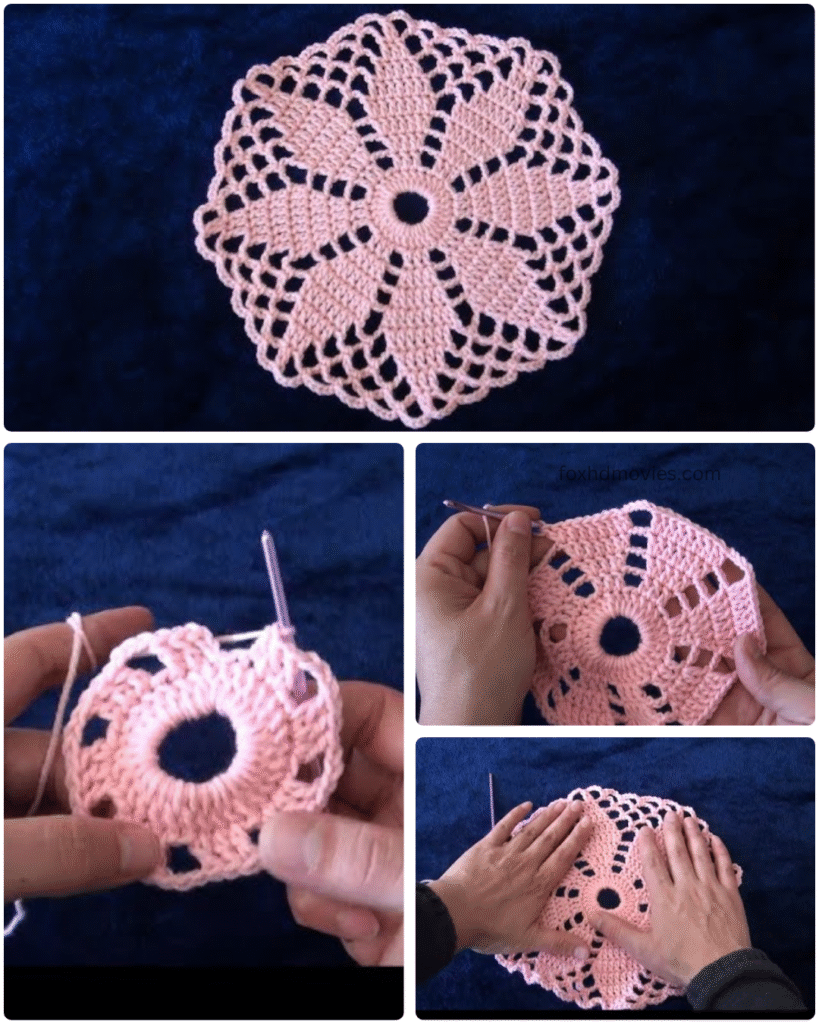
Add a touch of delicate charm to your home with this beautiful circular doily featuring a lovely radiating petal design! This pattern is a great project for crocheters looking to create a sweet and simple decorative piece. It’s perfect for a coaster, a small mat under a candle, or as a thoughtful handmade gift.
This doily is shown in a soft peach/pink, but would look equally beautiful in crisp white, cream, or any pastel shade that complements your decor.
Finished Size: Approximately 6-8 inches in diameter (adjust hook and yarn for different sizes).
Materials You’ll Need:
- Yarn: DK (Light Worsted) weight cotton yarn in your chosen color. Approximately 50-75 yards.
- Hook: 3.0 mm (D/3) or 3.5 mm (E/4) crochet hook (or size needed to obtain desired gauge and drape).
- Scissors
- Yarn Needle for weaving in ends.
Stitches Used (US Terms):
- ch: chain
- sl st: slip stitch
- sc: single crochet
- dc: double crochet
- tr: treble crochet (yarn over twice, insert hook, yarn over, pull up loop, [yarn over, pull through 2 loops] 3 times)
- dtr: double treble crochet (yarn over three times, insert hook, pull up loop, [yarn over, pull through 2 loops] 4 times)
- ch-sp: chain space
Pattern Notes:
- The ch 3 at the beginning of a round counts as a dc.
- Join each round with a sl st to the top of the initial ch 3 (or first stitch of the round).
- Numbers in parentheses
()at the end of a round indicate the total stitch count for that round.
Pattern Instructions
Center Ring
Round 1: Ch 4, join with a sl st to form a ring.
Round 2: Ch 3 (counts as 1 dc), 11 dc into the ring. Join with a sl st to the top of initial ch 3. (12 dc)

Petal Foundation
Round 3: Ch 1, sc in the first dc. Ch 2, skip next dc, sc in next dc. Repeat from * around. Ch 2, join with a sl st to the first sc. (6 sc, 6 ch-2 spaces)
Building the Petals
Round 4: Sl st into the first ch-2 space. Ch 3 (counts as 1 dc), 2 dc in the same ch-2 space. Ch 2, 3 dc in the next ch-2 space. Repeat from * around. Ch 2, join with a sl st to the top of initial ch 3. (6 groups of 3 dc, 6 ch-2 spaces)
Round 5: Ch 3 (counts as 1 dc), dc in next 2 dc. Ch 2, 3 dc in next ch-2 space. Dc in next 3 dc. Repeat from * around. Ch 2, join with a sl st to the top of initial ch 3. (Still 6 groups of dc, 6 ch-2 spaces, with increasing dc in each group)
Round 6: Ch 3 (counts as 1 dc), dc in next 2 dc, 2 dc in next dc. Ch 2, 2 dc in next dc, dc in next 3 dc, 2 dc in next dc. Repeat from * around. Ch 2, join with a sl st to the top of initial ch 3. (At this point, you should be forming segments that look like the base of the petals. Each segment should have more dc’s on either side of the ch-2 space.)

Round 7: Sl st into the ch-2 space. Ch 3 (counts as 1 dc), 6 dc in the same ch-2 space. Ch 3, skip to the next ch-2 space, 7 dc in the ch-2 space. Repeat from * around. Ch 3, join with a sl st to the top of initial ch 3. (6 groups of 7 dc, 6 ch-3 spaces)
Round 8: Ch 1, sc in the first dc. Sc in next 6 dc. Ch 4, sc in the first dc of the next 7-dc group. Sc in next 6 dc. Repeat from * around. Ch 4, join with a sl st to the first sc. (6 groups of 7 sc, 6 ch-4 spaces)
Lace Edging
Round 9: Sl st into the first 3 sc (to center of group). Ch 1, sc in same sc. Ch 5, sc in the center of the next 7-sc group. Ch 5, sc in the center of the next 7-sc group. Repeat from * around. Ch 5, join with a sl st to the first sc. (You should have 12 ch-5 spaces around the round.)
Round 10: Sl st into the first ch-5 space. Ch 3 (counts as 1 dc), 4 dc in the same ch-5 space. Ch 1, 5 dc in the next ch-5 space. Repeat from * around. Ch 1, join with a sl st to the top of initial ch 3.

Round 11: Ch 1, sc in the first dc. Ch 3, skip 2 dc, sc in next 2 dc. Ch 3, sc in next ch-1 space. Ch 3, sc in next 2 dc. Repeat from * around. Ch 3, join with a sl st to the first sc. (This round creates the small diamond shapes between the large petal segments.)
Round 12: Sl st into the first ch-3 space. Ch 3 (counts as 1 dc), (dc, ch 2, 2 dc) in the same ch-3 space. Ch 1, skip next sc, (2 dc, ch 2, 2 dc) in next ch-3 space. Repeat from * around. Ch 1, join with a sl st to the top of initial ch 3.
Round 13 (Final Edging – Picot Points): Sl st into the ch-2 space of the first shell. Ch 1, sc in the ch-2 space. Ch 5, sc in the ch-2 space of the next shell. Repeat from * around. Ch 5, join with a sl st to the first sc. (This creates the large arches for the final points.)
Round 14: Sl st into the first ch-5 space. Ch 1, sc in the same ch-5 space. [Tr, ch 3, sl st in 3rd ch from hook (picot), Tr, ch 3, Picot, Tr, ch 3, Picot, Tr, sc] in the same ch-5 space. Repeat from * around. Join with a sl st to the first sc. (This creates the prominent points with picots.)
Video tutorial
Finishing:
Fasten off and weave in all loose ends securely with your yarn needle. Blocking is highly recommended! Gently dampen your doily, lay it flat on a clean surface, and carefully stretch it to shape, emphasizing the points of the border and opening up the lace. Pin it down if necessary and let it air dry completely. Blocking will give your doily a crisp, professional finish and enhance the beauty of the lace.
Enjoy your beautiful new crochet doily! We’d love to see your finished creations – share them in the comments below or tag us on social media! Happy crocheting!