by
by 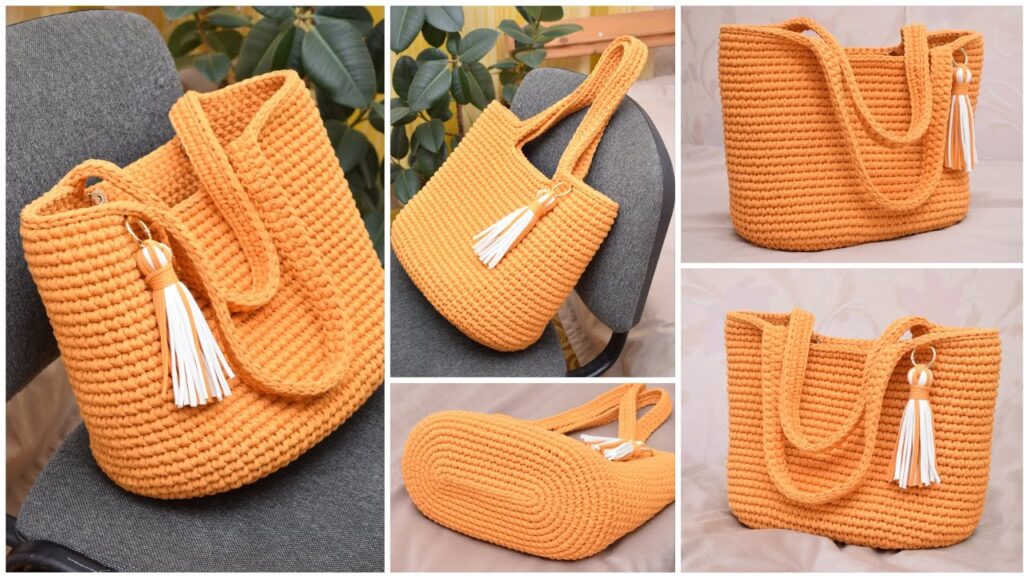
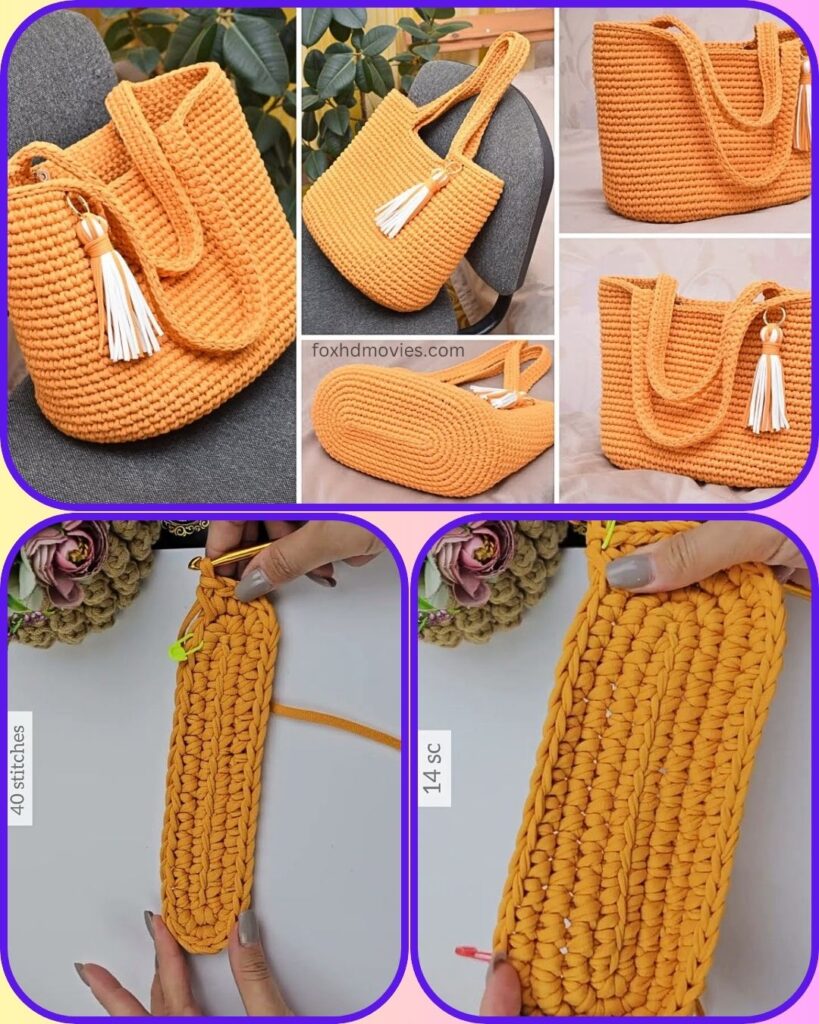
Looking for a stylish, durable, and surprisingly quick crochet project? This gorgeous t-shirt yarn tote bag is just the ticket! Its modern design, featuring a sturdy oval base and beautifully integrated handles, makes it perfect for everyday use – from market trips to beach outings. The knit-like texture, achieved with a special stitch, gives it a high-end look, and the tassel adds a playful touch.
This pattern will guide you through creating this fabulous tote. T-shirt yarn is wonderfully chunky and works up fast, making this a very satisfying make!
What You’ll Need:
- Yarn: T-Shirt Yarn (typically a super bulky, category 6 or 7 yarn). You’ll likely need 1-2 large spools/skeins (approx. 100-150 yards/meters per spool, depending on the brand and thickness). The bag in the picture uses a lovely orange.
- Crochet Hook: A large crochet hook suitable for your t-shirt yarn. This is often between 8.00 mm (L/11) and 12.00 mm (P/16). Check your yarn label for recommendations, but t-shirt yarn often benefits from a slightly larger hook than you might expect to keep the stitches from being too tight.
- Scissors
- Stitch Marker (highly recommended for working in continuous rounds)
- Optional: Contrasting color t-shirt yarn or embroidery floss for the tassel.
Stitches & Abbreviations (US Terminology):
- ch: chain
- sl st: slip stitch
- sc: single crochet
- hdc: half double crochet (may be used for strap reinforcement, primarily sc and Wst)
- Wst (Waistcoat Stitch / Center Single Crochet): Insert hook into the center of the ‘V’ of the stitch from the previous round (not under the two top loops as in a standard sc). Yarn over and pull up a loop, yarn over and pull through both loops on hook. It’s crucial to work this stitch loosely to make it easier to insert the hook.
- st(s): stitch(es)
- rep: repeat
- inc: increase (work 2 stitches in the same stitch)
- pm: place marker
Let’s Get Crocheting!
Part 1: The Oval Base
This bag features a sturdy oval base worked in continuous rounds of single crochet. Use a stitch marker in the first stitch of each round and move it up as you work.
- Start: Ch 15 (or your desired base length – this will be the central chain of your oval).
- Round 1: Sc in the 2nd ch from hook and in the next 12 chs. Work 3 sc in the last ch (this is the first curve). Now, working on the opposite side of the foundation chain, sc in the next 12 chs. Work 2 sc in the last ch (which was the first ch you skipped – this completes the second curve with the initial sc already there as part of the 3sc group for the other side, effectively giving you 3sc in this end too). Do not join; we are working in a spiral. (30 sts) PM in the first sc made.
- Round 2: Inc in the first st (2 sc in the first st). Sc in the next 12 sts. Inc in each of the next 3 sts (around the curve). Sc in the next 12 sts. Inc in each of the last 2 sts. (36 sts)
- Round 3: Sc in the first st, inc in the next st. Sc in the next 12 sts. (Sc in next st, inc in next st) rep 3 times. Sc in the next 12 sts. (Sc in next st, inc in next st) rep 2 times. (42 sts)
- Round 4: Sc in the first 2 sts, inc in the next st. Sc in the next 12 sts. (Sc in next 2 sts, inc in next st) rep 3 times. Sc in the next 12 sts. (Sc in next 2 sts, inc in next st) rep 2 times. (48 sts)
- Round 5: Sc in the first 3 sts, inc in the next st. Sc in the next 12 sts. (Sc in next 3 sts, inc in next st) rep 3 times. Sc in the next 12 sts. (Sc in next 3 sts, inc in next st) rep 2 times. (54 sts)

Continue increasing in this manner (adding one more sc between increases at each end and along the curved sections) until your base is the desired width. For example, the bag in the photo seems to have a base about 6-7 rounds wide. For the last round of the base, you can switch to sl st in each stitch around for a very neat edge before starting the body, or just proceed to the body.
Part 2: The Bag Body – Knit-Look Texture!
Now we switch to the Waistcoat Stitch (Wst) for that beautiful, dense texture. Remember to keep your tension loose with Wst.
- Round 1 of Body (Transition if needed): If your last base round was sc, work this round in sc in the back loop only (BLO) all around. This helps create a defined edge for the bag to stand. If you ended with sl st, you can work this first Wst round into those slip stitches. (Stitch count remains the same as your final base round).
- Round 2 onwards: Wst in each st around. Work in continuous rounds, moving your stitch marker up.
Continue working Wst rounds until the bag body reaches your desired height, stopping about 2-3 inches below the final desired height to allow for the handle formation. The bag in the image has a generous height.

Part 3: Creating the Handle Openings & Finishing the Top
We’ll create the handle openings in one round, then build them up.
- Determine Handle Placement: Lay your bag flat. Decide how wide you want your handles and how many stitches you want for the sides of the bag between the handles. For a bag with approx. 50-70 stitches around, you might have:
- 10-15 stitches for the front section
- Chain 12-18 (for the handle opening), skip 12-18 stitches
- 10-15 stitches for the side/back section
- Chain 12-18 (for the second handle opening), skip 12-18 stitches
- Ensure the skipped stitches and the worked stitches add up to your total stitch count. Adjust based on your bag’s circumference and desired handle length/opening size.
- Handle Opening Round:
- Wst in each st until you reach the first point where a handle should start.
- Ch the number of stitches you decided for your handle opening (e.g., ch 15), skip the same number of stitches on the bag body.
- Wst in the next set of stitches (the side/back of the bag).
- Ch the same number of stitches as before for the second handle opening, skip the same number of stitches.
- Wst in any remaining stitches until you reach your stitch marker.
- Working the Handles & Top Edge:
- Next Round: Wst in each Wst from the previous round. When you reach a ch-space for the handle, work sc stitches evenly around the chain (e.g., if you chained 15, work 15-18 sc around the chain itself, not into the individual chains, to make it sturdy). Repeat for the second handle.
- Subsequent Rounds (e.g., 2-4 more rounds): Work Wst in each Wst and in each sc around the handle sections. This builds up the height of the handles and the top rim of the bag simultaneously.
- Final Round: For a neat finish, you can work a round of sl st in each stitch around the entire top edge, including the handles.

Fasten off and weave in all ends securely using your fingers or a large yarn needle (t-shirt yarn can be bulky to weave).
Part 4: The Tassel (Optional)
The bag in the picture features a lovely two-toned tassel.
- Make the Tassel:
- Take your main color (orange) and your contrasting color (white) t-shirt yarn.
- Cut several strands of each color to your desired tassel length (e.g., 8-10 inches long – remember they will be folded in half). The more strands, the fuller the tassel.
- Lay the strands together, mixed or with colors grouped as you like.
- Take another short piece of t-shirt yarn and tie it tightly around the middle of your bundle of strands.
- Fold the bundle in half at the tie.
- Take another piece of t-shirt yarn (you can use one of the tassel colors or a third color) and wrap it tightly around the folded bundle, about an inch down from the fold, to create the tassel head. Secure the ends of this wrapping yarn.
- Trim the bottom ends of the tassel so they are even.
- Attach the Tassel: Use the ties from the top of the tassel (or add a new loop) to attach it to one of the handle bases or the side of the bag, as seen in the picture.
Video tutorial
Finishing Touches:
- Double-check all ends are woven in securely.
- T-shirt yarn bags can sometimes benefit from a little shaping by hand.
And there you have it – your very own fashionable and functional T-Shirt Yarn Tote Bag! It’s perfect for carrying your essentials in style.
Happy Crocheting!