 by
by 
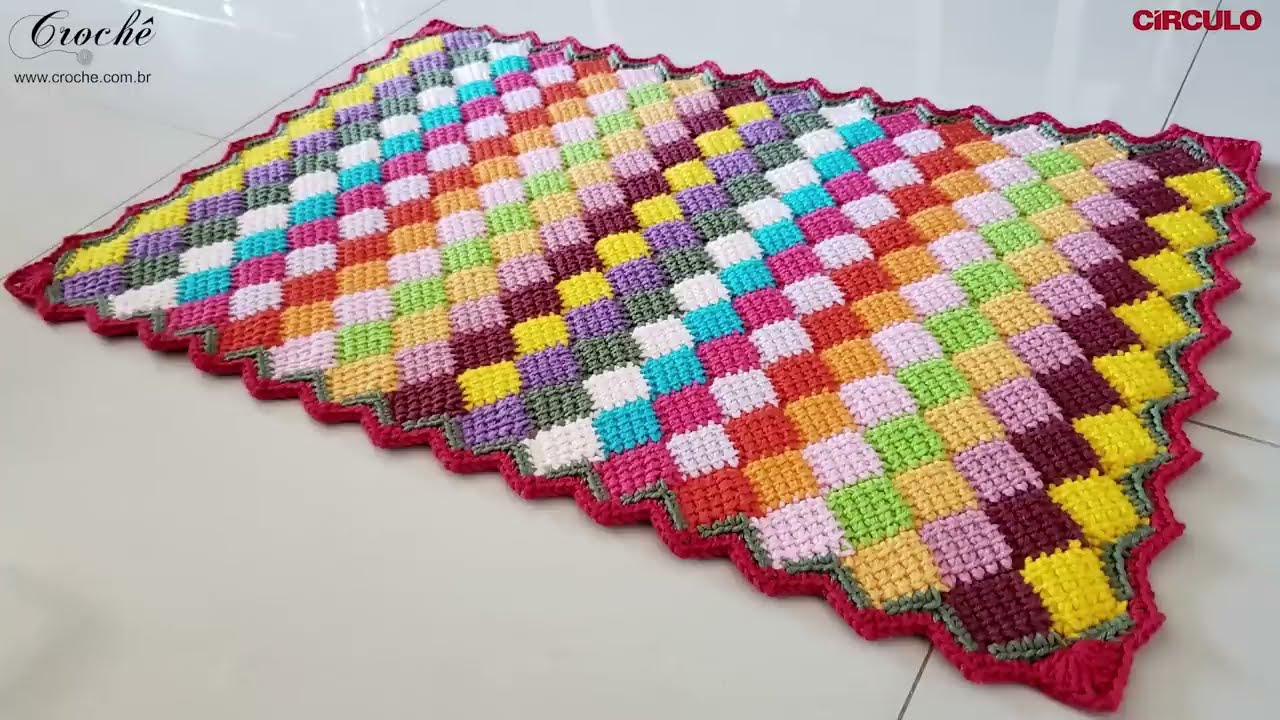
a crocheted carpet using the Entrelac stitch! That’s a fantastic project that will result in a truly unique and textured piece. The Entrelac stitch, with its woven appearance, adds a wonderful dimension to a larger project like a carpet. Here’s a detailed pattern to guide you through the process:
Skill Level: Intermediate (familiarity with basic crochet stitches and some concentration required for the Entrelac technique)

Materials:
- Bulky weight yarn (the amount will depend on the desired size of your carpet. Estimate generously, perhaps starting with 1000-1500 yards. Consider using a durable yarn that can withstand some wear.)
- Crochet hook size K/10.5 (6.5 mm) or the size recommended for your yarn. You might want to go slightly smaller for a denser fabric.
- Scissors
- Yarn needle for weaving in ends
- Stitch markers (highly recommended)
- Measuring tape
Gauge:
Gauge is less critical for a carpet, but it will affect the final size and yarn usage. To get an idea, crochet a 4-inch square in Entrelac and see how many stitches and rows it takes.
Sizing:
This pattern is written to guide you through the Entrelac technique. The final size of your carpet is easily adjustable by changing the number of initial triangles and the number of rows (tiers) you work.
Abbreviations:
- ch = chain
- sl st = slip stitch
- sc = single crochet
- hdc = half double crochet
- dc = double crochet
- tr = treble crochet
- fpdc = front post double crochet
- bpdc = back post double crochet
- st(s) = stitch(es)
- rep = repeat
- RS = right side
- WS = wrong side
Understanding the Entrelac Stitch:
The Entrelac technique involves working a series of interconnected geometric shapes, typically triangles and rectangles, in rows (tiers). Each shape is worked off the side of the previous shape, creating a woven or braided appearance.
Pattern:
Part 1: Initial Triangles
These triangles form the foundation row of your carpet. The number of initial triangles will determine the width of your carpet.
- Foundation Chain: Chain a multiple of 6 (or any multiple you prefer for the width of your triangles) plus 1. For a moderately sized carpet, you might start with ch 37 (6 x 6 + 1).
- Triangle 1: Starting in the second ch from the hook, sc in the next 6 chs. Ch 1, turn.
- Row 2 (WS): Sc2tog, sc in the next 2 sts, sc2tog. Ch 1, turn. (4 sc)
- Row 3 (RS): Sc2tog, sc2tog. Ch 1, turn. (2 sc)
- Row 4 (WS): Sc2tog. Fasten off. (1 sc) You have completed your first initial triangle.
- Triangle 2: Skip the next 6 chs on your foundation chain. Join yarn with a sl st in the next ch. Ch 1, sc in the same ch and the next 5 chs. Ch 1, turn.
- Rows 2-4: Repeat Rows 2-4 of Triangle 1. Fasten off. You have completed your second initial triangle.
- Repeat: Continue repeating Steps 6-7 across the foundation chain until you have the desired number of initial triangles. You will have one stitch remaining at the end of the foundation chain, which you will not work into.

Part 2: Right-Leaning Triangles
These triangles are worked along the top edge of the initial triangles.
- Row 1 (RS): Join yarn with a sl st in the top right corner of the first initial triangle. Ch 6. Starting in the second ch from the hook, sc in the next 5 chs. Ch 1, turn.
- Row 2 (WS): Sc in the first 5 sts. Sl st into the side edge of the next initial triangle (working 2-3 sl sts down the edge to secure). Ch 1, turn.
- Row 3 (RS): Skip the sl sts, sc in the first 5 sts. Ch 1, turn.
- Row 4 (WS): Sc2tog, sc in the next st, sc2tog. Sl st into the side edge of the same initial triangle (a few sts down). Ch 1, turn. (3 sc)
- Row 5 (RS): Sc2tog, sc in the next st. Ch 1, turn. (2 sc)
- Row 6 (WS): Sc2tog. Sl st into the side edge of the same initial triangle. Fasten off. (1 sc) You have completed your first right-leaning triangle.
- Repeat: Join yarn at the top right corner of the next initial triangle and repeat Steps 1-6. Continue across all initial triangles.

Part 3: Upward Rectangles
These rectangles are worked along the top edge of the right-leaning triangles.
- Row 1 (RS): Join yarn with a sl st in the top left corner of the first right-leaning triangle. Ch 6. Starting in the second ch from the hook, sc in the next 5 chs. Ch 1, turn.
- Row 2 (WS): Sc in the first 5 sts. Sl st into the side edge of the next right-leaning triangle (working 2-3 sl sts down the edge to secure). Ch 1, turn.
- Rows 3 onwards: Repeat Row 2 until the rectangle reaches the desired height (typically the same height as your initial triangles). Fasten off. You have completed your first upward rectangle.
- Repeat: Join yarn at the top left corner of the next right-leaning triangle and repeat Steps 1-3. Continue across all right-leaning triangles.
Part 4: Left-Leaning Triangles
These triangles are worked along the top edge of the upward rectangles, sloping in the opposite direction of the right-leaning triangles.
- Row 1 (WS): Join yarn with a sl st in the top right corner of the first upward rectangle. Ch 1, sc in the same st and the next 4 sts (working across the top of the rectangle). Ch 1, turn. (6 sc)
- Row 2 (RS): Sc in the first 5 sts, sc2tog (working the last st of the triangle into the side edge of the previous upward rectangle). Ch 1, turn. (5 sc)
- Row 3 (WS): Sc in the first 4 sts, sc2tog (working the last st into the side edge). Ch 1, turn. (4 sc)
- Row 4 (RS): Sc in the first 3 sts, sc2tog (working the last st into the side edge). Ch 1, turn. (3 sc)
- Row 5 (WS): Sc in the first 2 sts, sc2tog (working the last st into the side edge). Ch 1, turn. (2 sc)
- Row 6 (RS): Sc2tog (working the last st into the side edge). Fasten off. (1 sc) You have completed your first left-leaning triangle.
- Repeat: Join yarn at the top right corner of the next upward rectangle and repeat Steps 1-6. Continue across all upward rectangles.
Continuing the Carpet:
To make your carpet larger, you will repeat the sequence of Right-Leaning Triangles, Upward Rectangles, and Left-Leaning Triangles for as many tiers as you desire.
- After completing a row of left-leaning triangles, you will begin the next tier with a row of right-leaning triangles worked along the top edge of the left-leaning triangles.
- Ensure you are always joining your yarn securely at the beginning of each new shape.
- Use stitch markers to help you identify the edges of the shapes and where to join new sections.
Finishing:
- Once your carpet reaches the desired size, weave in all loose ends securely.
- You can optionally add a border around the entire carpet using single crochet, half double crochet, or any other stitch you prefer for a neat edge.
Video tutorial
Tips for Success:
- Keep your tension consistent throughout the project to ensure a uniform look.
- Don’t be afraid to use stitch markers! They are invaluable for keeping track of your starting and ending points, especially when you’re new to Entrelac.
- Refer to visual resources: Watching video tutorials on the Entrelac stitch can be extremely helpful in understanding the construction of the shapes.
- Practice the individual shapes: Before starting the carpet, try working a small swatch of Entrelac to get comfortable with the technique.
- Consider yarn thickness: Using a consistent yarn weight and hook size will contribute to a cohesive look.
- Blocking (optional): Once finished, you can gently block your carpet to help the stitches lay flat and even out any minor inconsistencies.