by
by 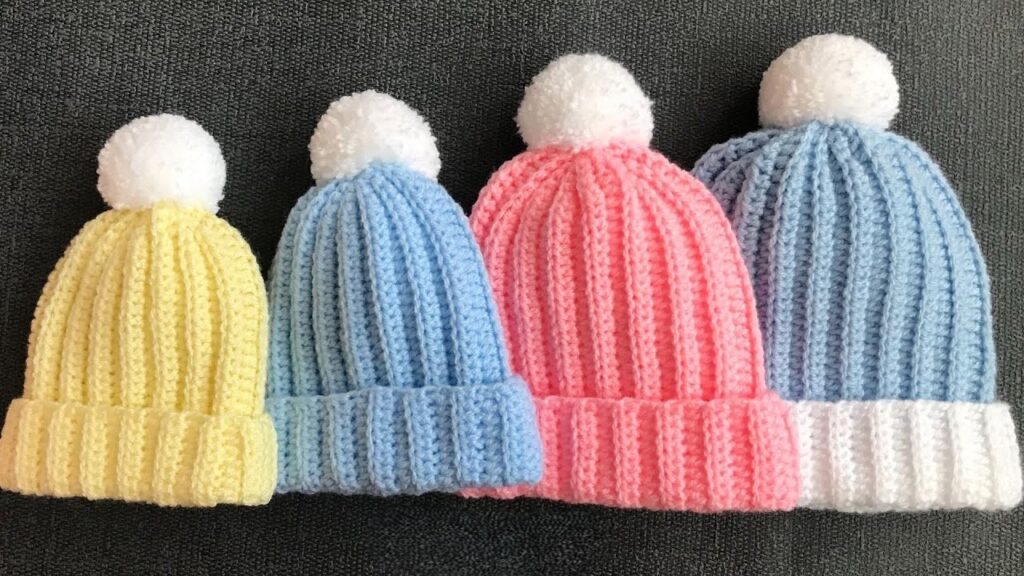
Hey fellow yarn lovers!
Looking for a project that’s quick, satisfying, and produces adorable results? Whether you need a last-minute baby shower gift, want to make hats for charity, or just feel like crocheting something sweet in an evening, this Easy & Fast Crochet Baby Hat pattern is perfect for you!
Using just basic stitches and working in the round, you can create a soft, cozy beanie for the little ones in no time. This pattern is super beginner-friendly, so if you’re new to crochet, this is a great first garment project!
Let’s grab our hooks and get started!
Skill Level: Beginner
Stitches Used:
- Ch: Chain
- Sl St: Slip Stitch
- DC: Double Crochet
Materials You’ll Need:
- Approximately 50-80 yards of Worsted Weight (Aran) yarn. Choose something soft and washable, like acrylic or a cotton blend. (Amounts vary slightly by size).
- Crochet Hook size H/8 (5.0 mm) – or hook needed to obtain gauge.
- Scissors
- Tapestry needle (for weaving in ends)
- Optional: Stitch marker, pom pom maker or faux fur pom pom
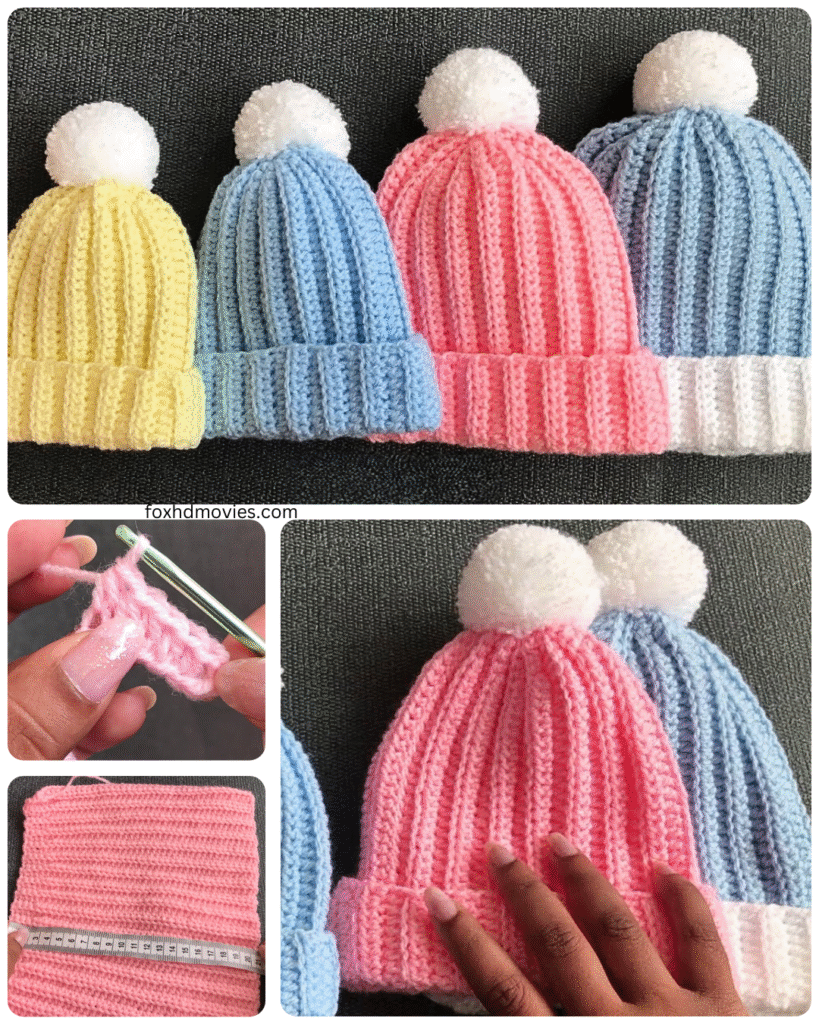
Gauge: Getting the correct gauge is important for sizing! After Round 3 of the pattern, your circle should measure approximately:
- Newborn: 2.5 inches in diameter
- 3-6 Months: 3 inches in diameter
- 6-12 Months: 3.5 inches in diameter
If your circle is too small, try a larger hook. If it’s too large, try a smaller hook.
Pattern Notes:
- This hat is worked in the round from the top down.
- The chain 2 at the beginning of each round does not count as a stitch unless otherwise specified (it acts as a turning chain).
- Join each round with a Sl St to the top of the first DC.
- Move a stitch marker up each round to keep track of the beginning if needed.
Video tutorial
Let’s Get Crocheting!
This pattern provides instructions for three common baby sizes: Newborn, 3-6 Months, and 6-12 Months.
Starting the Hat (All Sizes):
You can start with a Magic Ring or a Chain loop.
- Option 1: Magic Ring (Recommended for a tighter hole)
- Create a magic ring.
- Ch 2 (does not count as a stitch).
- Work 10 DC into the magic ring.
- Pull the tail tight to close the ring.
- Join with a Sl St to the top of the first DC. (10 DC)
- Option 2: Chain Loop (Easier for beginners)
- Ch 4, join with a Sl St to the first chain to form a ring.
- Ch 2 (does not count as a stitch).
- Work 10 DC into the center of the ring.
- Join with a Sl St to the top of the first DC. (10 DC)

Increasing for the Crown (Follow instructions for your desired size):
Newborn Size:
- Round 2: Ch 2. 2 DC in each stitch around. Join with a Sl St. (20 DC)
- Round 3: Ch 2. DC in the first stitch, 2 DC in the next stitch. Repeat from * to * around. Join with a Sl St. (30 DC)
- Check Gauge: Your circle should measure approximately 2.5 inches in diameter.
- Round 4: Ch 2. DC in the next 2 stitches, 2 DC in the next stitch. Repeat from * to * around. Join with a Sl St. (40 DC)
- Crown is complete for Newborn size.
3-6 Months Size:
- Round 2: Ch 2. 2 DC in each stitch around. Join with a Sl St. (20 DC)
- Round 3: Ch 2. DC in the first stitch, 2 DC in the next stitch. Repeat from * to * around. Join with a Sl St. (30 DC)
- Check Gauge: Your circle should measure approximately 3 inches in diameter.
- Round 4: Ch 2. DC in the next 2 stitches, 2 DC in the next stitch. Repeat from * to * around. Join with a Sl St. (40 DC)
- Round 5: Ch 2. DC in the next 3 stitches, 2 DC in the next stitch. Repeat from * to * around. Join with a Sl St. (50 DC)
- Crown is complete for 3-6 Months size.

6-12 Months Size:
- Round 2: Ch 2. 2 DC in each stitch around. Join with a Sl St. (20 DC)
- Round 3: Ch 2. DC in the first stitch, 2 DC in the next stitch. Repeat from * to * around. Join with a Sl St. (30 DC)
- Check Gauge: Your circle should measure approximately 3.5 inches in diameter.
- Round 4: Ch 2. DC in the next 2 stitches, 2 DC in the next stitch. Repeat from * to * around. Join with a Sl St. (40 DC)
- Round 5: Ch 2. DC in the next 3 stitches, 2 DC in the next stitch. Repeat from * to * around. Join with a Sl St. (50 DC)
- Round 6: Ch 2. DC in the next 4 stitches, 2 DC in the next stitch. Repeat from * to * around. Join with a Sl St. (60 DC)
- Crown is complete for 6-12 Months size.
Body of the Hat (Working Straight Down):
Now that your crown is the correct size, you will stop increasing and work straight down to create the body of the hat.
- For all sizes: Ch 2. DC in each stitch around. Join with a Sl St. (You will have the same number of stitches as your last increase round).
- Repeat this round until the hat measures approximately the following length from the top center of the hat:
- Newborn: 5.5 – 6 inches
- 3-6 Months: 6.5 – 7 inches
- 6-12 Months: 7 – 7.5 inches

Finishing:
- After completing the last round, Sl St to join.
- Fasten off, leaving a tail about 6 inches long.
- Weave in the starting tail securely on the inside of the hat, especially if you used the magic ring.
- Thread the finishing tail onto your tapestry needle. Weave the tail through the stitches on the inside of the hat for a few inches to secure it, then trim the excess yarn.
Optional Embellishments:
- Add a fluffy pom pom to the top!
- Embroider a simple design or initial onto the hat.
- Add a small applique.
- Use different colors for stripes! Just join your new color at the beginning of a round.