by
by 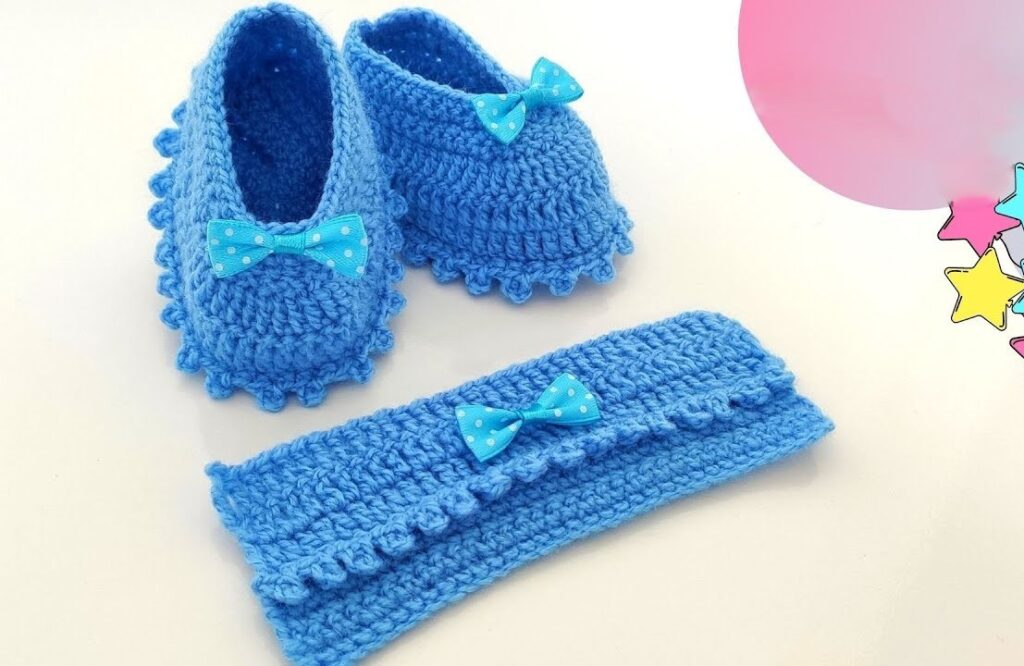
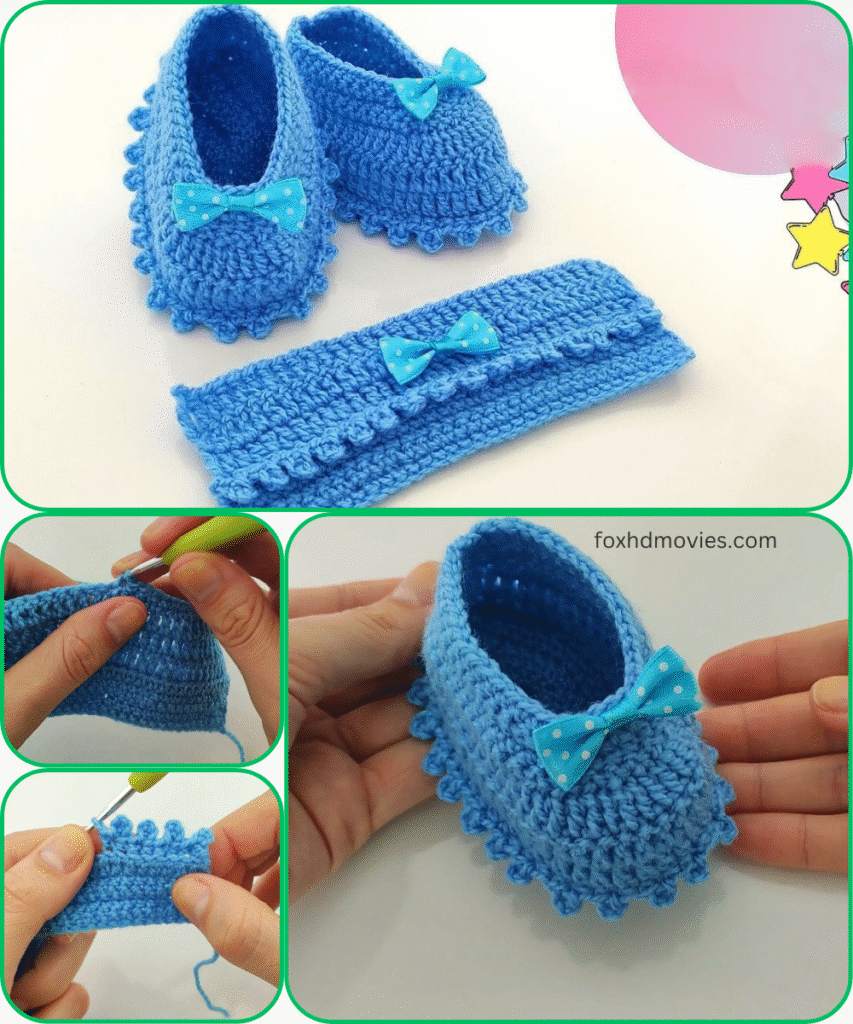
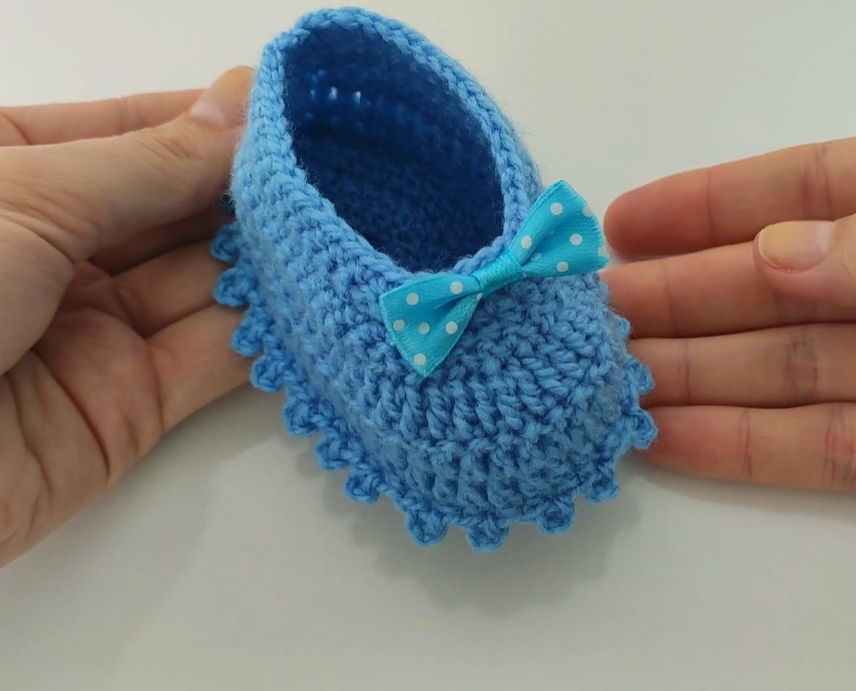
Create a precious pair of booties for a special little one with this easy-to-follow crochet pattern! These charming blue baby shoes feature a cozy construction, a beautifully shaped toe, and a delightful scalloped edge around the opening. A sweet polka dot ribbon bow adds the perfect finishing touch.
This pattern is designed for a 0-3 month size, working in simple half double crochet stitches, making it a rewarding project for crocheters from intermediate beginners onwards.
Skill Level:
Easy to Intermediate
Materials:
- Yarn: DK weight (Light Worsted / #3) baby yarn (approx. 30-50g per pair). The example uses a vibrant blue.
- Hook: 3.5 mm (E/4) crochet hook
- Scissors
- Yarn needle (for weaving in ends)
- Stitch markers (optional, but helpful for keeping track of rounds)
- 2 small blue polka dot ribbon bows (approx. 3-4 cm / 1.5 inches wide each)
- Sewing needle and matching thread (for attaching bows securely)
Abbreviations (US Terms):
- ch: chain
- sl st: slip stitch
- st(s): stitch(es)
- sc: single crochet
- hdc: half double crochet
- dc: double crochet
- hdc2tog: half double crochet two stitches together (decrease)
- sk: skip
- rep: repeat
- BLO: back loop only
- FO: fasten off
Gauge:
16 hdc and 12 rows = 4 inches (10 cm)
(Important: Please check your gauge! Accurate gauge is crucial for baby items to ensure they fit the intended size. If your gauge is different, adjust your hook size accordingly. A slight difference can significantly impact the finished size for small projects like booties.)
Pattern Notes:
- The booties are worked in continuous rounds unless otherwise specified.
- The ch 2 at the beginning of an hdc round generally counts as an hdc.
- Join each round with a sl st to the top of the beginning ch 2 (or first stitch, as applicable) unless otherwise stated.
Pattern Instructions: Baby Booties (Make 2)
(Approximate Finished Size: 0-3 Months, Sole length approx. 9 cm / 3.5 inches)

Part 1: The Sole
- Ch 11.
- Round 1: Hdc in the 3rd ch from hook (counts as 1st hdc). Hdc in next 7 ch. Work 5 hdc in the last ch (working around the end to begin on the other side of the chain). Hdc in next 7 ch. Work 4 hdc in the last ch. Join with sl st to the top of the beginning ch 2. (24 hdc)
- Round 2: Ch 2, hdc in same st. Hdc in next 8 sts. Work 2 hdc in each of the next 3 sts. Hdc in next 8 sts. Work 2 hdc in each of the next 2 sts. Join with sl st. (30 hdc)
- Round 3: Ch 2, hdc in same st. Hdc in next 9 sts. (2 hdc in next st, hdc in next st) rep 3 times. Hdc in next 9 sts. (2 hdc in next st, hdc in next st) rep 2 times. Join with sl st. (36 hdc)
- Round 4: Ch 2, hdc in same st. Hdc in next 10 sts. (2 hdc in next st, hdc in next 2 sts) rep 3 times. Hdc in next 10 sts. (2 hdc in next st, hdc in next 2 sts) rep 2 times. Join with sl st. (42 hdc)
Part 2: Building the Sides of the Bootie
- Round 5: Ch 1, sc in the back loop only (BLO) of each st around. Join with sl st to the first sc. (42 sc) (This round creates a nice, defined edge for the sole of the bootie to turn upwards.)
- Round 6: Ch 2, hdc in each st around. Join with sl st to the top of the beginning ch 2. (42 hdc)
- Round 7: Ch 2, hdc in each st around. Join with sl st to the top of the beginning ch 2. (42 hdc)
Part 3: Shaping the Toe
- Round 8: Ch 2, hdc in next 11 sts. (Hdc2tog) rep 9 times. Hdc in next 12 sts. Join with sl st to the top of the beginning ch 2. (33 hdc)
- Round 9: Ch 2, hdc in next 9 sts. (Hdc2tog) rep 6 times. Hdc in next 12 sts. Join with sl st to the top of the beginning ch 2. (27 hdc)
Part 4: Finishing the Ankle Opening
- Round 10: Ch 2, hdc in each st around. Join with sl st to the top of the beginning ch 2. (27 hdc)
- Round 11: Ch 2, hdc in each st around. Join with sl st to the top of the beginning ch 2. (27 hdc)
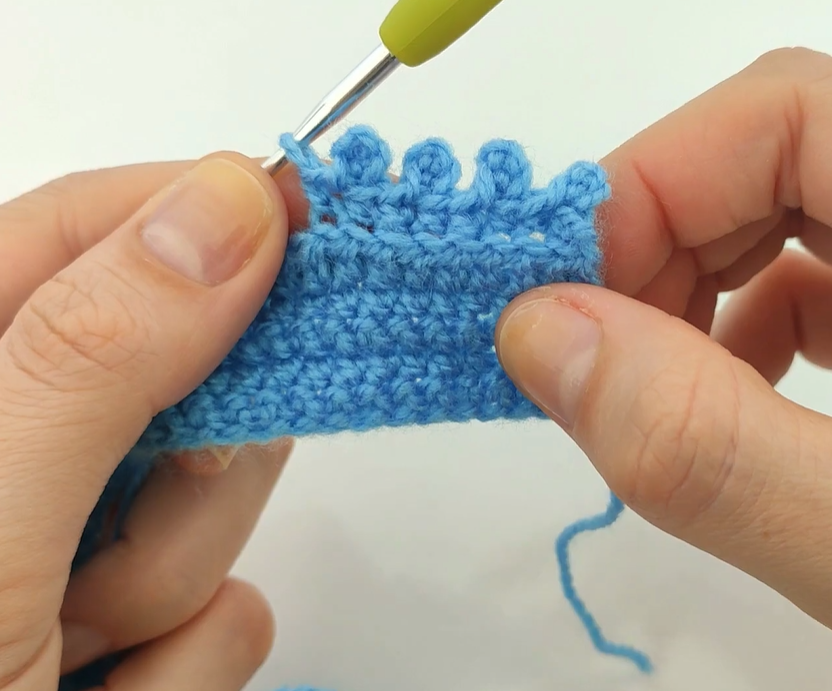
Part 5: Scalloped Edging
- Round 12 (Edging): Ch 1, sc in the first st. *Sk 2 sts, (5 dc) in the next st, sk 2 sts, sc in the next st.* Repeat from * to * around. Sl st to join in the first sc. FO.
Part 6: Finishing Booties
- Weave in all loose ends securely with your yarn needle.
- Attach one blue polka dot ribbon bow to the center front of each bootie’s instep, using a sewing needle and matching thread. Ensure it’s securely fastened to avoid a choking hazard for babies.
Video tutorial
Sizing Adjustments (Approximate Guidance):
To adjust the size, you’ll modify the initial chain and subsequent sole rounds, and potentially the number of hdc rows for the upper.
- For Newborn (approx. 8 cm / 3 inches sole):
- Start with Ch 9. Adjust hdc counts in sole rounds accordingly. Reduce 2 stitches from each toe decrease round, and adjust surrounding stitches.
- For 3-6 Months (approx. 10 cm / 4 inches sole):
- Start with Ch 13. Add an extra increase round to the sole. Increase 2 stitches to each toe decrease round, and adjust surrounding stitches. You might also add 1-2 extra hdc rows to the upper before the scalloped edging.
- For 6-12 Months (approx. 11-12 cm / 4.5 inches sole):
- Start with Ch 15. Add two extra increase rounds to the sole. Increase 4 stitches to each toe decrease round, and adjust surrounding stitches. You might also add 2-3 extra hdc rows to the upper before the scalloped edging.
(Always measure your sole against the baby’s foot or a standard size chart for best fit.)
You now have an adorable pair of handmade crochet baby booties, perfect for keeping tiny toes warm and adding a personalized touch!
Happy crocheting!