 by
by 
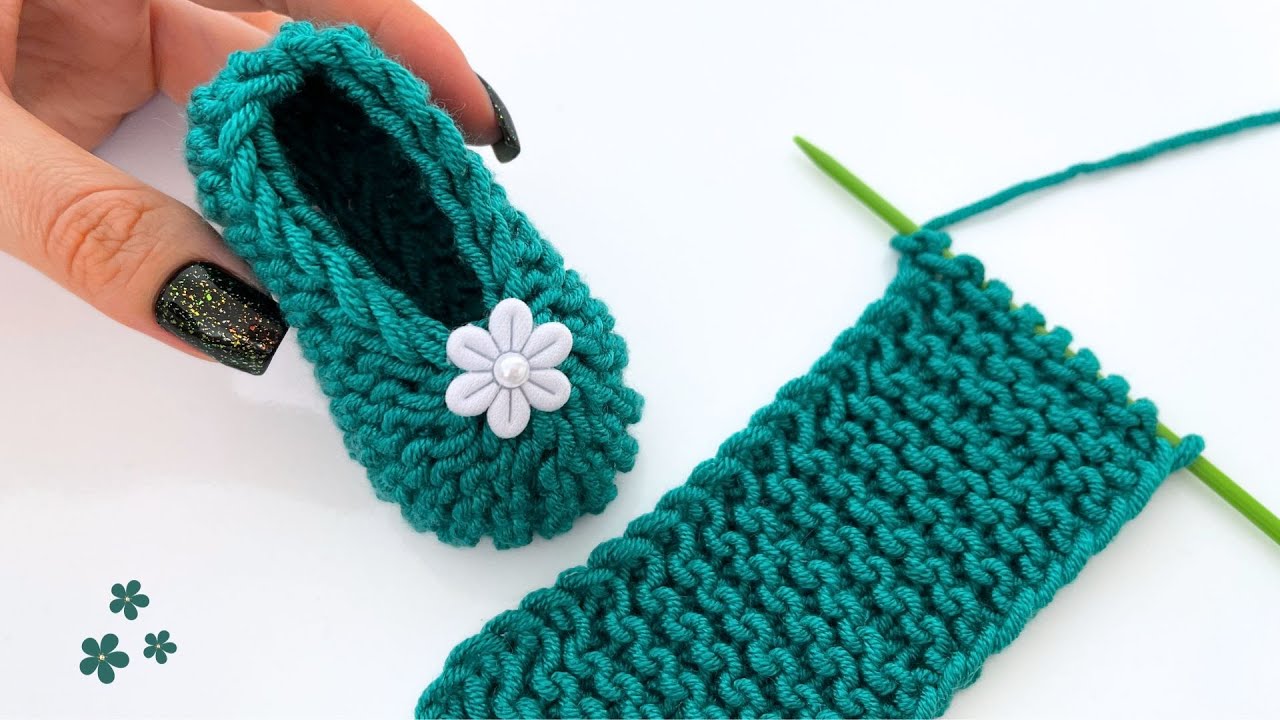
let’s get those little feet cozy! Here’s a step-by-step pattern for an easy knit baby shoe, perfect for beginners. We’ll keep it simple and sweet.
Materials You’ll Need:
- One ball of soft baby yarn (worsted weight or DK weight works well)
- A pair of straight knitting needles appropriate for your yarn weight (usually size US 6-8 or 4-5 mm)
- A tapestry needle for sewing
- Scissors
Gauge: Don’t worry too much about exact gauge for this project, as long as your knitting is fairly consistent and not too loose or too tight.
Abbreviations:
- K: Knit
- P: Purl
- St(s): Stitch(es)
- K2tog: Knit two stitches together (decreases one stitch)
- SSK: Slip, slip, knit (decreases one stitch)
- RS: Right Side
- WS: Wrong Side
Let’s Get Started!
Part 1: The Sole
This part will be a simple rectangle.
- Cast On: Cast on 31 stitches.
- Rows 1-15 (Garter Stitch): Knit every row. (This creates a bumpy texture for the sole).
- Row 1: K all sts.
- Row 2: K all sts.
- … Continue this for 15 rows.

Part 2: The Upper Part (Instep)
Now we’ll shape the top of the shoe.
- Row 16 (RS): K10, K2tog, K7, K2tog, K10. (29 sts)
- Row 17 (WS): Purl all sts.
- Row 18 (RS): K9, K2tog, K7, K2tog, K9. (27 sts)
- Row 19 (WS): Purl all sts.
- Row 20 (RS): K8, K2tog, K7, K2tog, K8. (25 sts)
- Row 21 (WS): Purl all sts.
- Row 22 (RS): K7, K2tog, K7, K2tog, K7. (23 sts)
- Row 23 (WS): Purl all sts.
Part 3: The Sides
We’ll now work on the sides of the shoe.
- Row 24 (RS): Knit all sts.
- Row 25 (WS): Purl all sts.
- Repeat Rows 24 and 25 for a total of 16 rows (ending on a WS row). This will create the depth of the shoe.
Part 4: Shaping the Ankle
Time to create the curve around the ankle.
- Row 41 (RS): K1, SSK, K to last 3 sts, K2tog, K1. (21 sts)
- Row 42 (WS): Purl all sts.
- Row 43 (RS): K1, SSK, K to last 3 sts, K2tog, K1. (19 sts)
- Row 44 (WS): Purl all sts.
- Row 45 (RS): K1, SSK, K to last 3 sts, K2tog, K1. (17 sts)
- Row 46 (WS): Purl all sts.

Part 5: The Strap (Optional)
If you’d like a little strap to help keep the shoe on, follow these steps. If not, skip to Part 6.
- Cast On: Cast on 3 stitches.
- Rows 1- Approximately 20-25 (or desired length): Knit every row (garter stitch) until the strap is long enough to comfortably go across the top of the shoe and button or tie.
- Bind Off: Bind off all stitches.
Part 6: Finishing
Now we’ll sew it all together!
- Fold and Sew the Sole: Fold the initial rectangle (Part 1) in half lengthwise. Using your tapestry needle and yarn, sew along the cast-on edge and the bound-off edge to create the bottom seam of the sole.
- Shape the Toe: Look at the upper part (Part 2). You’ll see a slightly rounded shape formed by the decreases. Gently ease the sides of this rounded section together and sew them to the front part of the sole. This will create the toe of the shoe.
- Sew the Sides: Now, sew the long sides of the upper part (Part 3) to the sides of the sole. Start at the heel and work your way around to the toe.
- Sew the Heel: Sew the remaining back edges together to form the heel of the shoe.
- Attach the Strap (if you made one): Position the strap on one side of the shoe opening and sew it securely. On the other side, you can either sew on a small button or create a knitted loop (by casting on a few stitches, knitting a short length, and binding off) to fasten the strap.
- Weave in Ends: Weave in all loose yarn ends using your tapestry needle to keep your work neat and secure.
You’ve made one adorable baby shoe! Repeat all the steps to make the second shoe.
Video tutorial
Tips for Beginners:
- Don’t be afraid to frog (unravel) your work if you make a mistake. It’s part of learning!
- Count your stitches regularly, especially after decrease rows, to make sure you’re on track.
- Practice your knit and purl stitches on a small swatch before starting the shoe to get comfortable with the movements.
- There are tons of helpful knitting videos online if you get stuck on a particular technique.