by
by 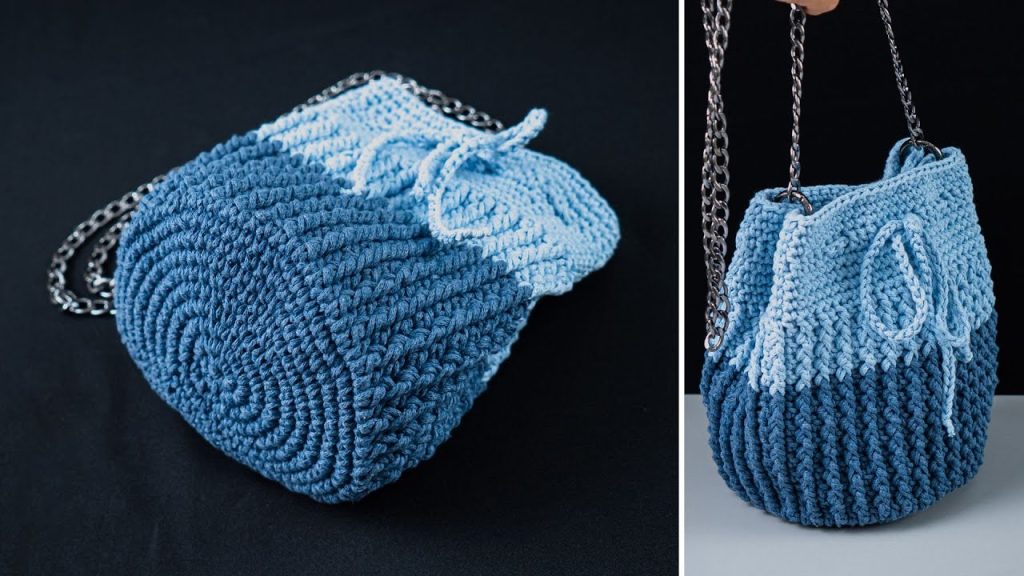
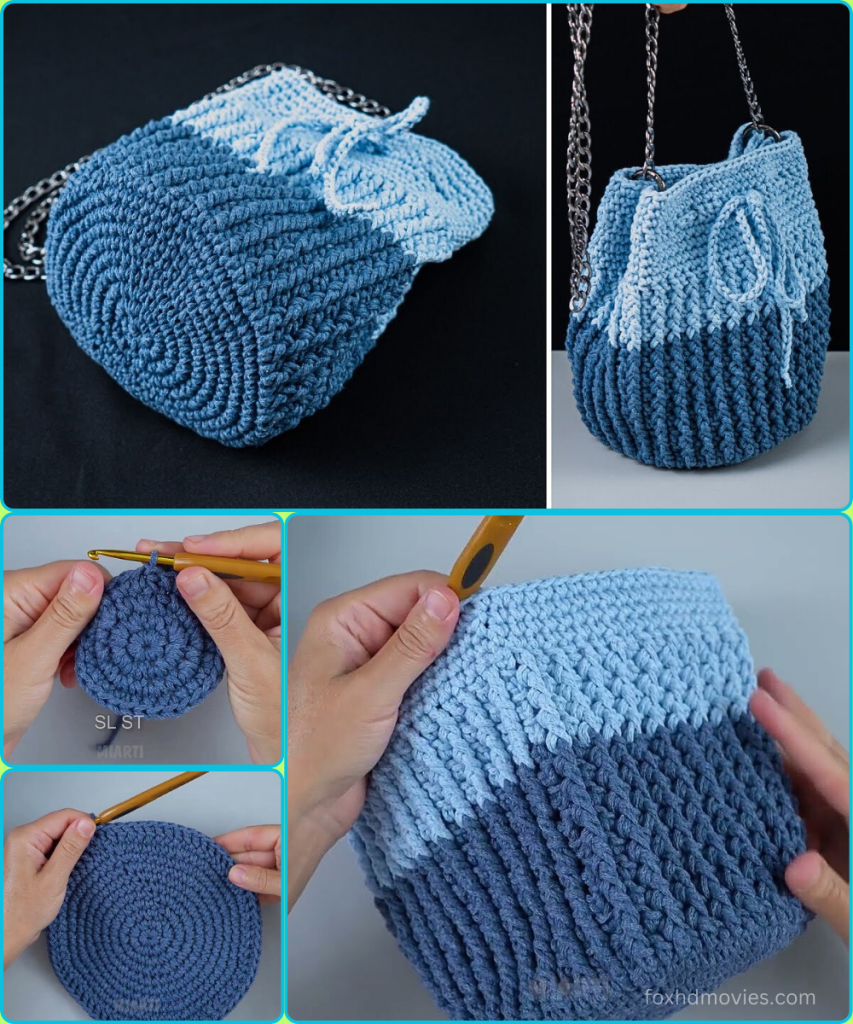
Looking for a bag that’s a little different from the rest? This crocheted bucket bag stands out with its beautiful color blocking and a unique, ridged texture created by a simple stitch. The pattern is worked from the bottom up, with a sturdy base, a flexible body, and a stylish drawstring closure. It’s a fun project that results in a gorgeous and functional accessory.
This pattern is worked in continuous rounds using a special stitch that creates horizontal ridges, giving the bag its signature look.
What You’ll Need:
- Yarn: A sturdy worsted weight (Aran/10 ply) cotton blend yarn is highly recommended for its durability and stitch definition.
- Color A (Bottom): The dark blue color in the example. Approximately 150-200 yards.
- Color B (Top): The light blue color in the example. Approximately 100-150 yards.
- Crochet Hook: Size H/5.0mm (or hook size to achieve a firm fabric that holds its shape).
- Yarn Needle: For weaving in ends.
- Scissors
- Bag Hardware (Optional): A ready-made metal chain strap and two small D-rings.
Abbreviations Used:
- ch: chain
- sl st: slip stitch
- sc: single crochet
- BLO: back loop only
- st(s): stitch(es)
- rnd: round
- FO: fasten off
- [ ]: repeat instructions in brackets
- ( ): stitch count at the end of the round
Gauge:
Your finished base should be approximately 15 cm (6 inches) in diameter. This will ensure your bag has the correct dimensions.
Part 1: The Base (in Color A)
We will create a flat, circular base by working in the round.
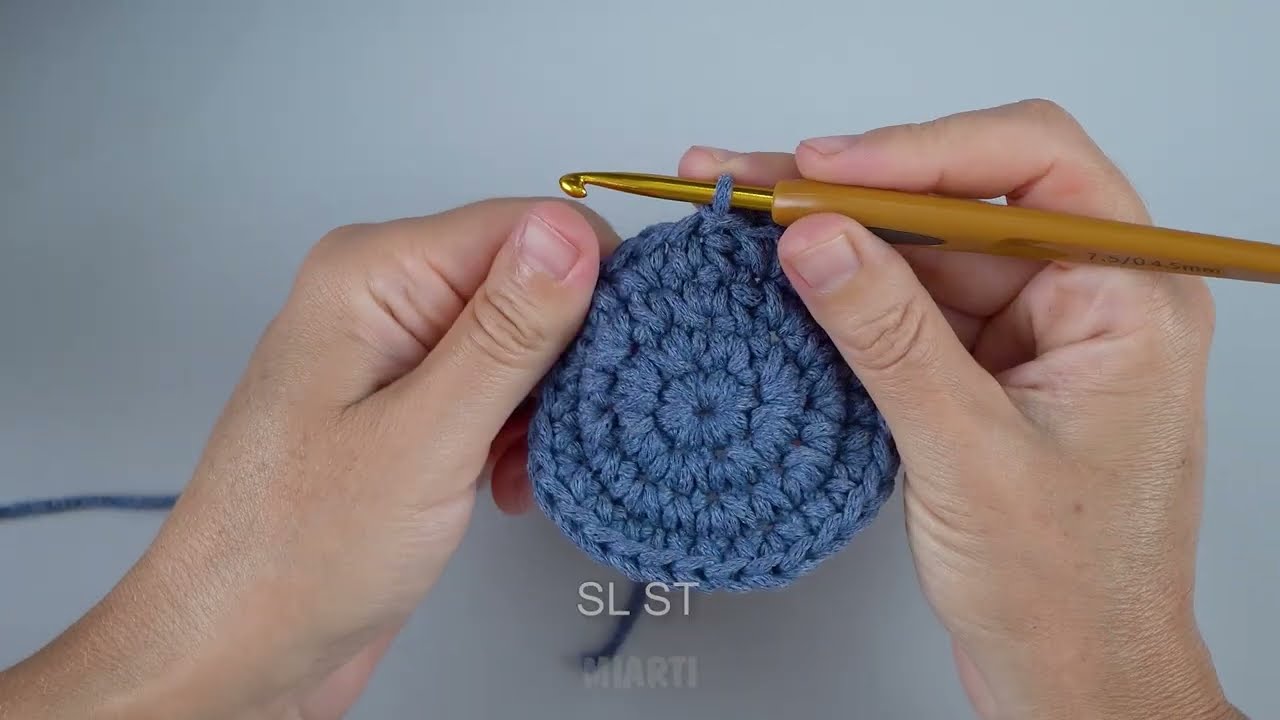
- Using Color A, make a magic ring (or ch 4 and sl st to first ch to form a ring).
- Rnd 1: Ch 1, 8 sc into the ring. Join with a sl st to the first sc. (8 sc)
- Rnd 2: Ch 1, 2 sc in each st around. Join with a sl st. (16 sc)
- Rnd 3: Ch 1, [sc in the next st, 2 sc in the next st] around. Join with a sl st. (24 sc)
- Rnd 4: Ch 1, [sc in the next 2 sts, 2 sc in the next st] around. Join with a sl st. (32 sc)
- Rnd 5: Ch 1, [sc in the next 3 sts, 2 sc in the next st] around. Join with a sl st. (40 sc)
- Rnd 6: Ch 1, [sc in the next 4 sts, 2 sc in the next st] around. Join with a sl st. (48 sc)
- Rnd 7: Ch 1, [sc in the next 5 sts, 2 sc in the next st] around. Join with a sl st. (56 sc)
- Continue increasing in this manner until your circle measures about 15 cm in diameter.
Part 2: The Body (in BLO)
We will now build the sides of the bag using the single crochet in the back loop only to create the horizontal ridges.
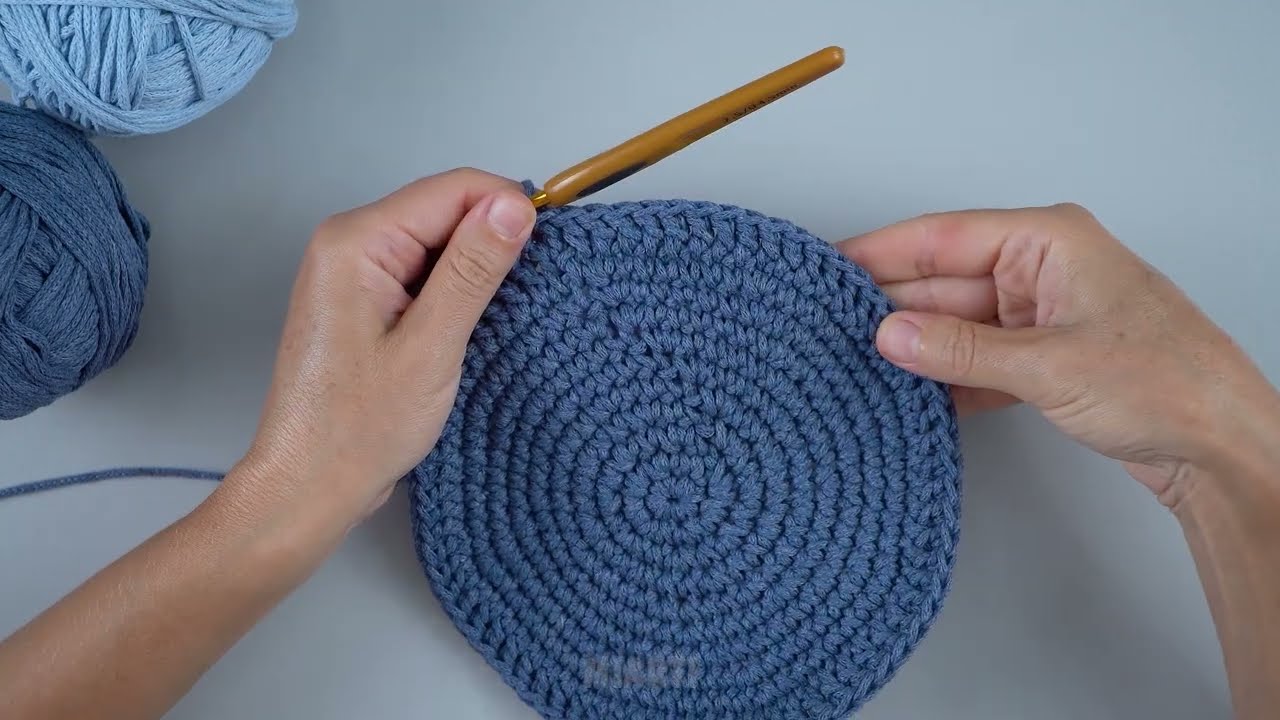
- Transition Round: Ch 1, sc in the BLO of each st around. Do not join at the end of the round. This will start your spiral. (The stitch count remains the same as your last base round).
- Body (Dark Blue): Sc in the BLO of each st around for 12-15 rounds, or until your bag is about half of the desired height.
- Change Color: At the end of the last round in Color A, switch to Color B.
- Body (Light Blue): Continue working sc in the BLO of each st around for 12-15 more rounds, or until your bag is the desired height.
Part 3: The Drawstring Channel & Drawstring
This part creates the channel for the drawstring and the cord itself.
- Drawstring Channel:
- Ch 1, sc in the BLO of the first 2 sts.
- [Ch 1, skip 1 st, sc in the next 3 sts] – Repeat this around the bag. This will create small holes for the drawstring.
- Drawstring:
- With Color B, ch 80-100 (or to your desired length).
- Sl st in the second ch from the hook and in each ch back down the chain. This creates a firm, sturdy cord. FO and weave in the ends.
- Thread: Using a yarn needle, thread your drawstring through the channel you created, starting and ending at the center front of the bag.

Part 4: The Strap
You have a few options for the strap:
- Metal Chain: Attach two D-rings to the top edge of the bag, opposite each other. Use a yarn needle and strong thread to sew them securely into place. Attach your metal chain strap to the D-rings.
- Crocheted Strap: Create a long, sturdy crocheted strap.
- Ch 1, sc in the BLO of each st around the entire bag (including the handles). Join with a sl st to the first sc.
- Ch 1, sc in each of the 50 chains. Sl st into the first sc.
- Rnd 1: Join Color B in the BLO of the last st of the previous round. Ch 1, sc in the BLO of each st around.
- Ch a long chain to your desired length (120-150 ch for a crossbody).
- Turn, and sc back down the chain. Sl st into the opposite side of the bag. FO.
Video tutorial
Finishing Touches:
- Weave in all remaining ends securely.
- Blocking (optional): Gently steam or spritz your bag with water, then stuff it with a towel and shape it as it air dries.
You’ve now created a beautiful and unique bucket bag that’s perfect for your next outing! Enjoy it.