 by
by 
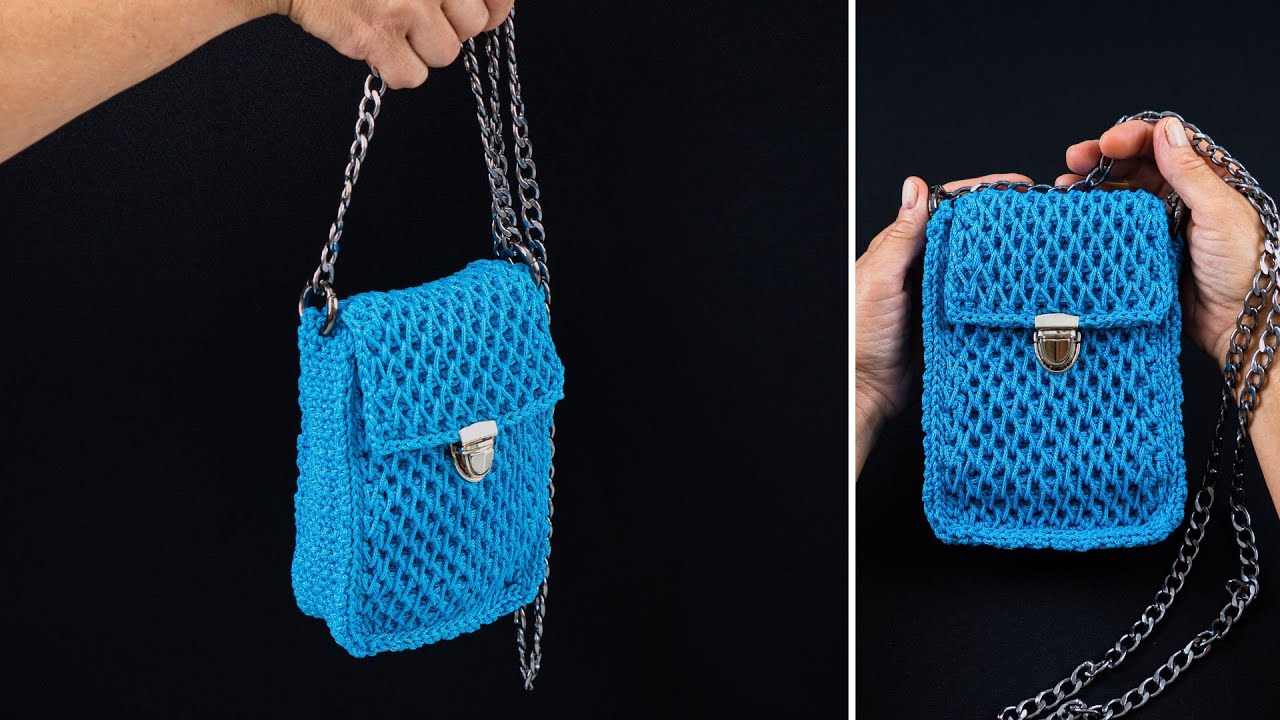
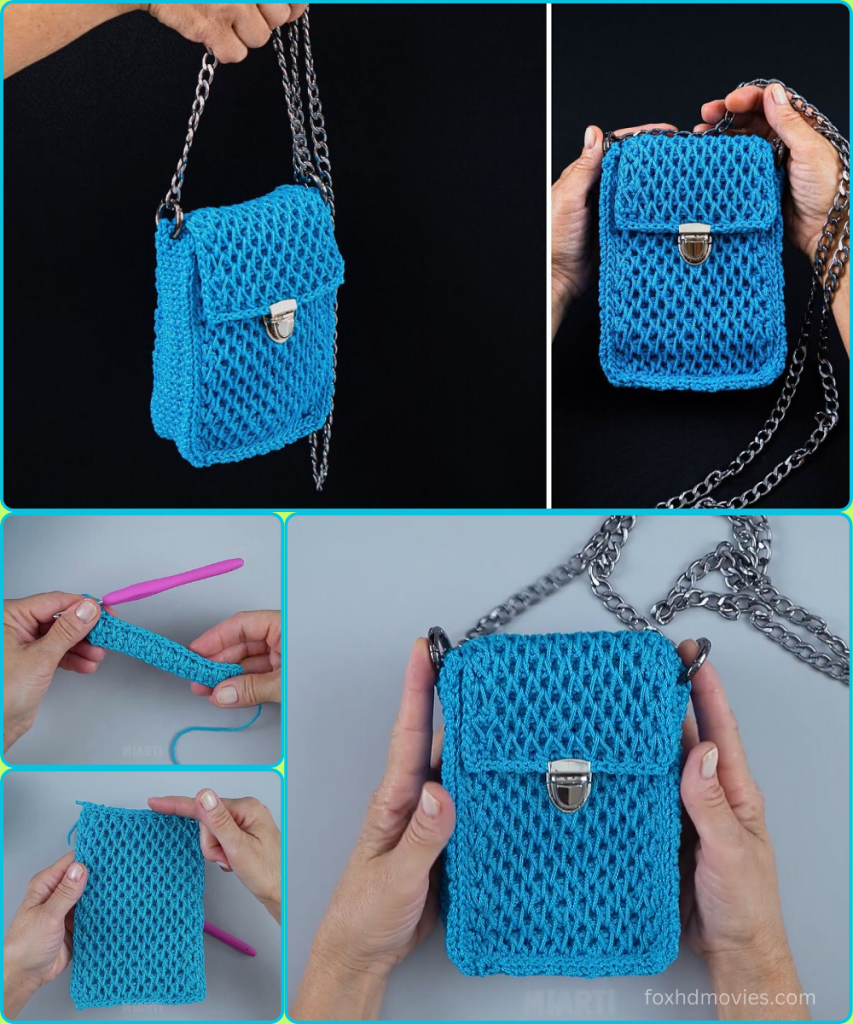
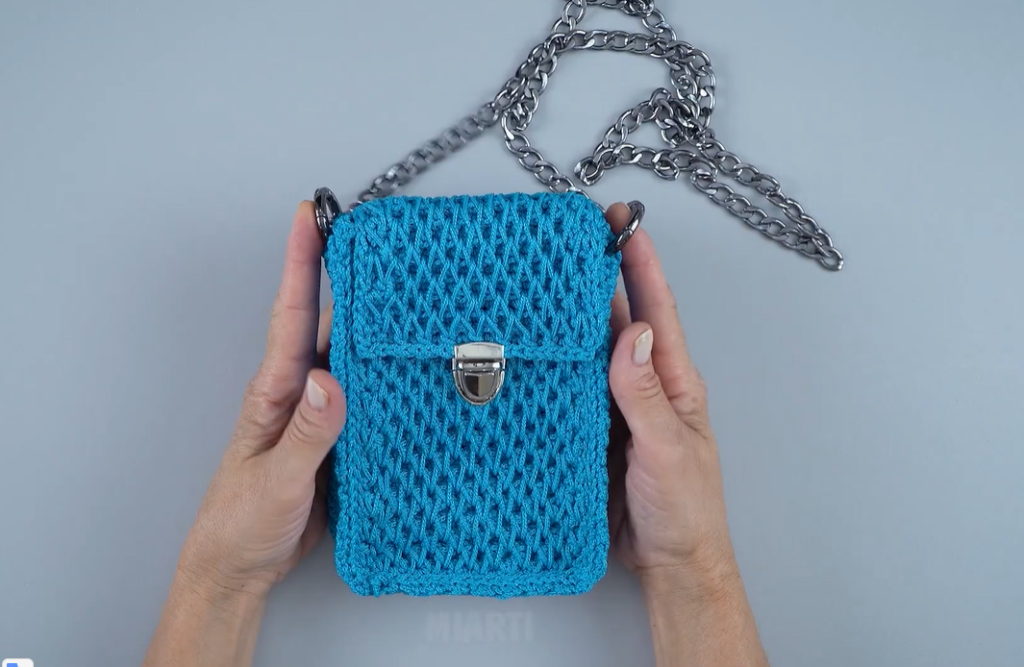
Looking for a sleek, compact bag with a unique texture? This crocheted crossbody is the perfect choice. The pattern uses a simple but elegant V-stitch to create a lightweight, lacy fabric that looks both sophisticated and modern. The design includes a secure flap and is the perfect size for carrying your essentials.
This project is worked from a single piece, starting with the back, then the bottom, then the front, and finally the flap. Once crocheted, you simply fold and seam the sides.
What You’ll Need:
- Yarn: Worsted weight (Aran/10 ply) cotton or cotton blend yarn is highly recommended for its excellent stitch definition and clean finish.
- Color: The vibrant blue shown in the example. Approximately 150-200 yards.
- Crochet Hook: Size H/5.0mm (or hook size needed to achieve a fabric with a nice drape without being too loose).
- Yarn Needle: For weaving in ends and seaming.
- Scissors
- Bag Hardware (Optional but Recommended):
- Clasp: A metal bag clasp for the flap closure.
- Chain Strap: A ready-made metal chain strap.
- D-Rings: Two small D-rings to attach the chain to the bag.
Abbreviations Used:
- ch: chain
- sl st: slip stitch
- sc: single crochet
- dc: double crochet
- V-st: V-stitch: (dc, ch 1, dc) in the same stitch or space
- st(s): stitch(es)
- sp: space
- row: row
- FO: fasten off
- [ ]: repeat instructions in brackets
- ( ): stitch count at the end of the row
Gauge:
For this pattern to work correctly, your V-stitches should be consistent. A good gauge is approximately 4 V-sts = 7.5 cm (3 inches). The finished bag should be roughly 18 cm tall x 15 cm wide (7 x 6 inches).
Part 1: The Main Body (Worked Flat)
The bag is crocheted as a long, flat rectangle that will be folded to form the bag.

- Ch 32.
- Row 1: Dc in the 4th ch from the hook. Ch 1, skip the next ch. [V-st in the next ch, ch 1, skip 1 ch] 7 times. V-st in the next ch, ch 1, skip 1 ch. Dc in the last ch. (9 V-sts, 2 dc, 10 ch-1 sps)
- Row 2: Ch 3, turn. Dc in the first ch-1 sp. [V-st in the next V-st’s ch-1 sp, ch 1, dc in the next ch-1 sp] 7 times. V-st in the last V-st’s ch-1 sp, ch 1, dc in the last ch-3 sp.
- Note: You are working your V-stitches into the center of the previous V-stitches’ ch-1 spaces.
- Repeat Row 2 for a total of 20 rows, or until your piece measures approximately 30 cm (12 inches) in length. This will form the front and back of the bag.
Part 2: The Flap
The flap is a continuation of the back panel.
- Continue the V-stitch pattern from the body for an additional 7-8 rows, or until the flap is your desired length.
- FO and weave in all ends.

Part 3: Assembly & Finishing
- Lay your crocheted piece flat with the right side facing down.
- Fold the bottom of the piece up, leaving the flap at the top. The folded section will form the pouch of the bag. The front panel should be about 15 cm (6 inches) high.
- Using a yarn needle and the same yarn, seam the two sides of the bag together using a whip stitch or slip stitch.
- Weave in all remaining ends securely.
Part 4: Attaching Hardware
This is a crucial step for the finished, professional look of the bag.
- Attaching the Clasp:
- Position the top part of the clasp on the underside of the flap, about 2.5 cm (1 inch) up from the tip.
- Mark the spot on the front of the bag where the clasp will close.
- Using a yarn needle and thread, or the hardware’s prongs if it has them, securely sew the clasp to both the flap and the front of the bag.
- Attaching the Strap:
- Place a small D-ring on each of the side seams at the top of the bag. Sew them securely into place using a yarn needle and strong thread.
- Attach the ends of your metal chain strap to the D-rings.
- Alternative Crocheted Strap: If you prefer a crocheted strap, attach yarn to one D-ring. Ch 1, sc in the first D-ring. Ch a long chain to your desired length (120-150 ch for a crossbody). Turn, sc back down the chain. Sl st into the other D-ring to secure. FO.
Video tutorial
Finishing Touches:
- Lining (Optional): To give your bag more structure and to prevent small items from slipping through the holes, you can sew in a fabric lining.
- Blocking (Optional): Gently steam or spritz your bag with water, then shape it with your hands and allow it to air dry.
You’ve now created a beautiful and unique crossbody bag! Enjoy your new accessory.