 by
by 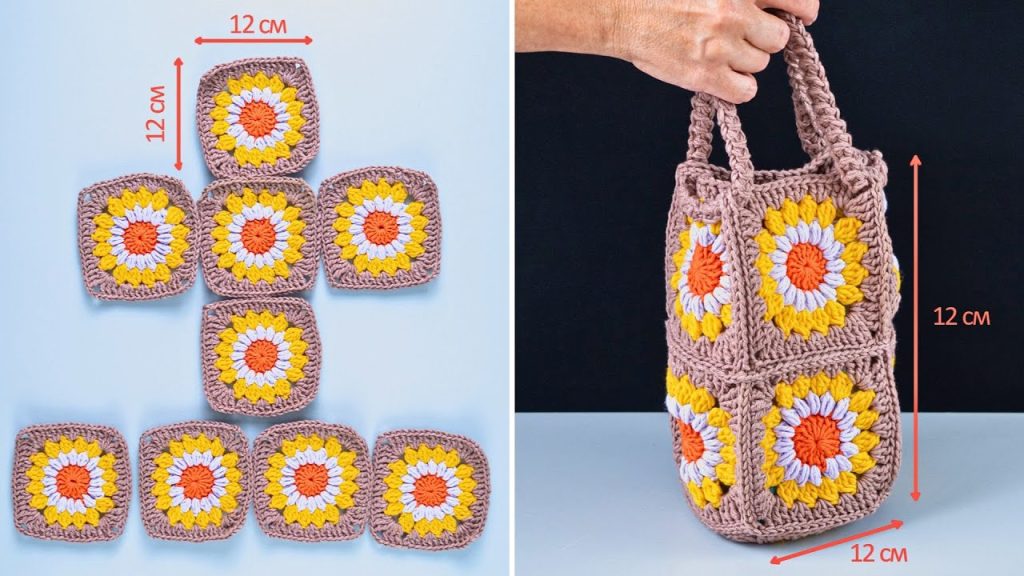
Who doesn’t love a cheerful, handmade bag? This delightful sunflower granny square bag is the perfect accessory to brighten up your day, carry your essentials, or even serve as a charming market bag. With its vibrant colors and classic granny square construction, it’s a project that’s both fun to make and wonderfully practical.
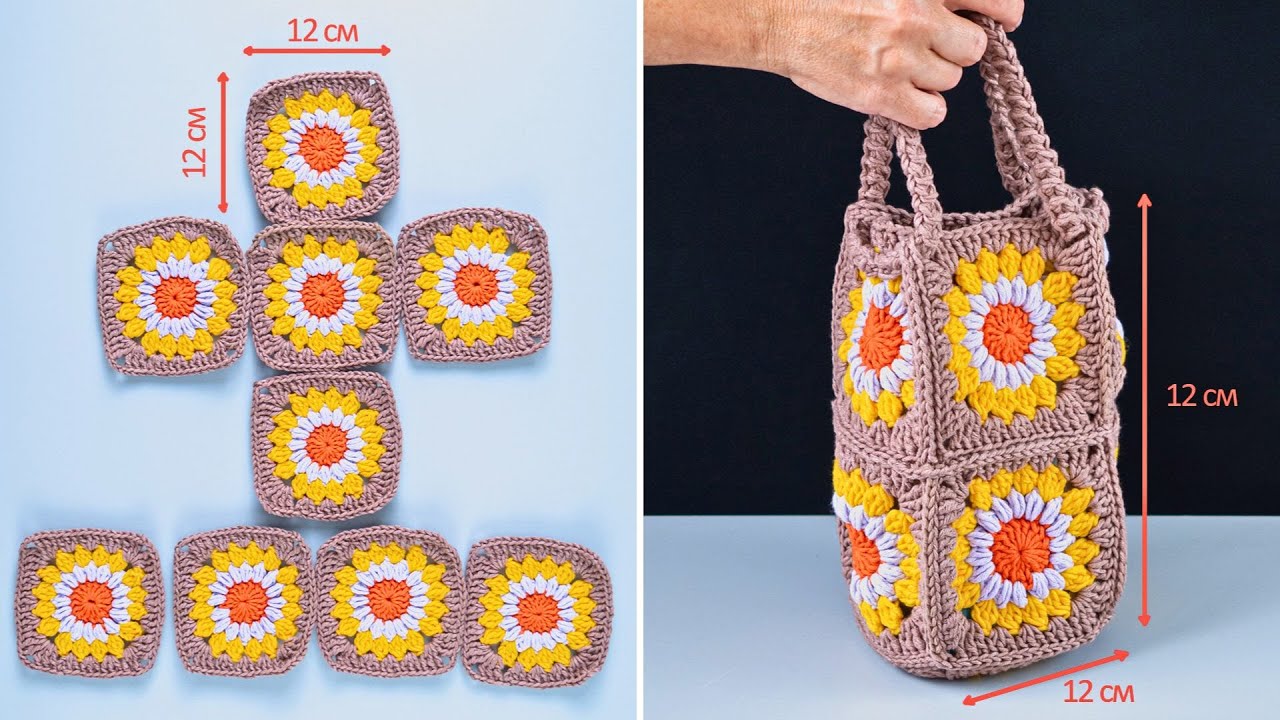
The bag in the image is constructed from individual granny squares that are then joined together. The design features a lovely sunflower motif at the center of each square, framed by a soft, neutral border. This blog post will guide you through creating each square, assembling the bag, and adding sturdy handles.
Let’s dive in and create some sunshine!
What You’ll Need:
- Yarn: Worsted weight (Aran/10 ply) cotton yarn is recommended for its durability and stitch definition. You’ll need four colors for each square and a main color for joining and handles.
- Color A (Center): Bright Orange (approx. 20-30 yards)
- Color B (Petals): Bright Yellow (approx. 40-50 yards)
- Color C (Petal Edges): Light Purple/Lilac (approx. 40-50 yards)
- Color D (Outer Border & Main Bag Color): Muted Brown/Beige (approx. 200-250 yards for squares, joining, and handles)
- Crochet Hook: Size H/5.0mm (or hook size recommended for your yarn, to achieve a firm fabric that holds its shape)
- Yarn Needle: For weaving in ends and joining.
- Scissors
- Stitch Markers (optional): Helpful for marking chain spaces or the beginning of rounds.
Abbreviations Used:
- ch: chain
- sl st: slip stitch
- sc: single crochet
- hdc: half double crochet
- dc: double crochet
- tr: treble crochet (or triple crochet)
- sp: space
- st(s): stitch(es)
- rnd: round
- FO: fasten off
- [ ]: repeat instructions in brackets
- ( ): stitch count at the end of the round
- yo: yarn over
Gauge:
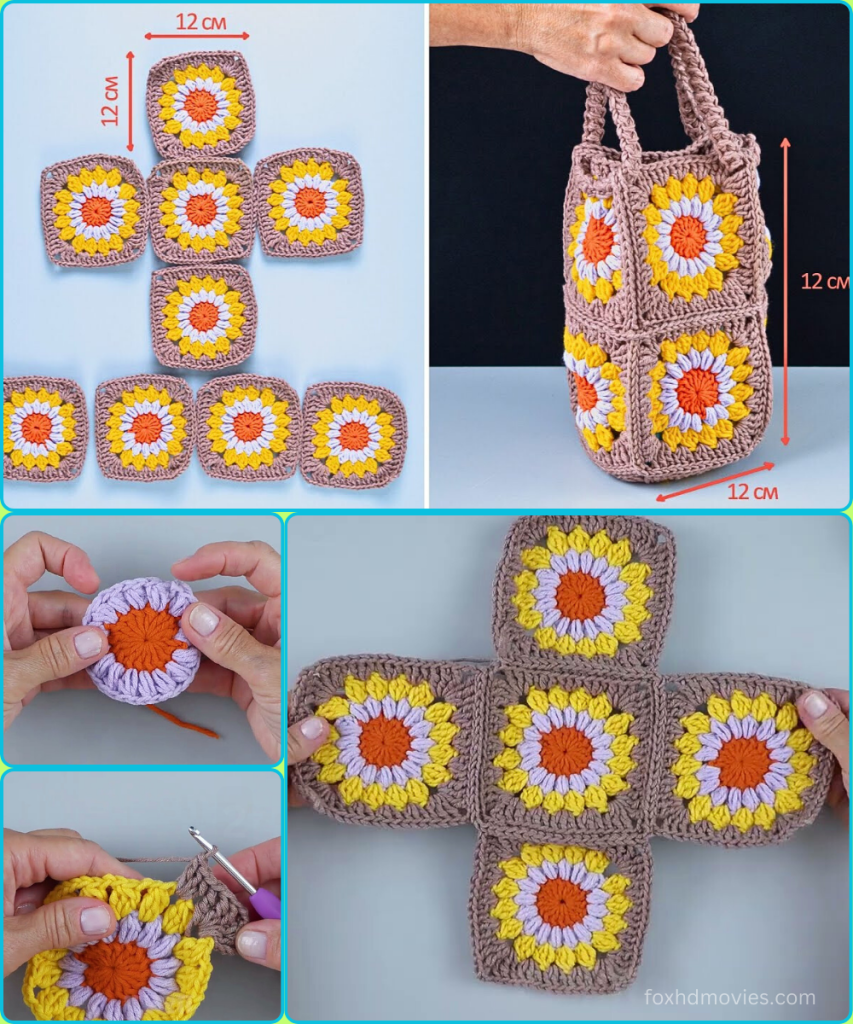
Each completed granny square should measure approximately 12 cm x 12 cm (4.7 inches x 4.7 inches). This is crucial for the bag dimensions shown in the image. If your square is significantly larger, try going down a hook size. If it’s too small, go up a hook size. A firm fabric is desired for the bag’s structure.
Pattern Notes:
- This pattern uses standard US crochet terms.
- Ch 3 at the beginning of a round counts as one double crochet. Ch 2 at the beginning of a round usually counts as a half double crochet. Ch 1 never counts as a stitch unless specified.
- We’ll be creating 9 granny squares in total: 5 for the body and 4 for the base.
- Color changes are made by dropping the old color, joining the new color with a slip stitch, and then starting the next round with the new color. Secure ends by tying small knots before weaving in.
Part 1: The Sunflower Granny Squares (Make 9)
Each square will have four rounds, building up the sunflower design.
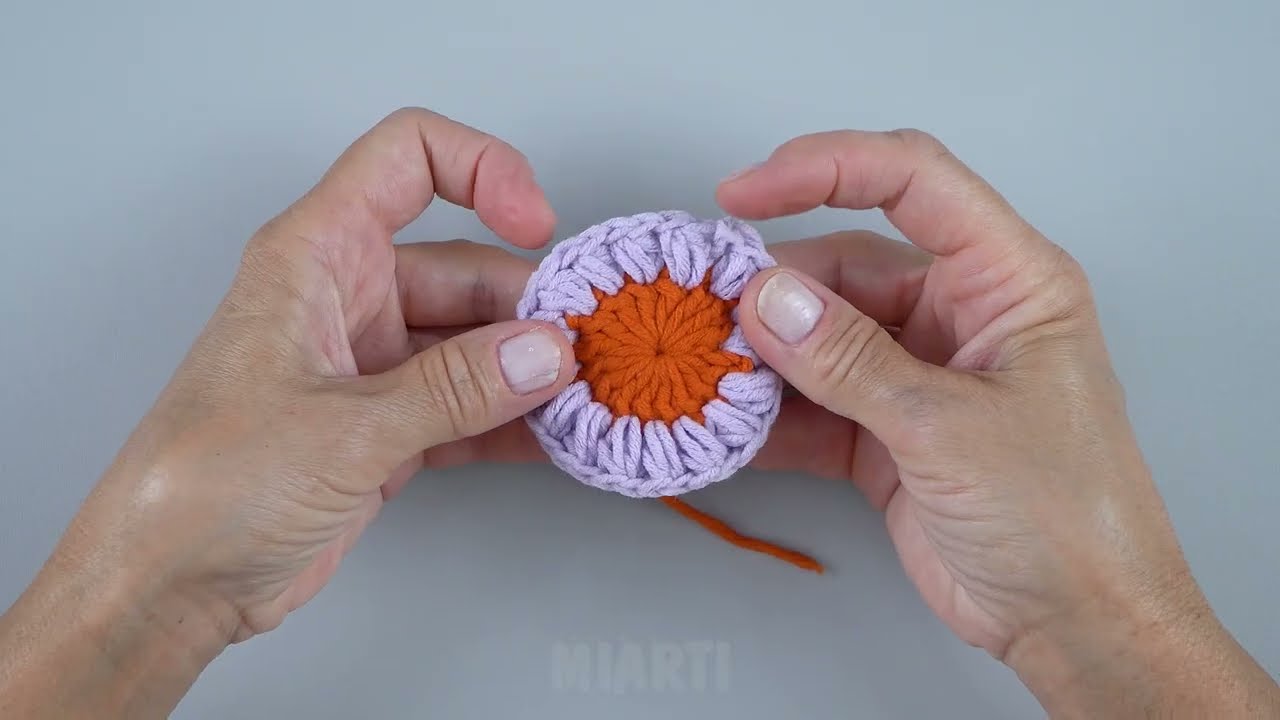
Starting with Color A (Orange)
Rnd 1 (Center of Sunflower):
- Make a magic ring (or ch 4 and sl st to first ch to form a ring).
- Ch 2 (does NOT count as hdc), work 12 hdc into the ring.
- Join with a sl st to the first hdc.
- Pull magic ring tight to close. (12 hdc)
- FO Color A.
Join Color B (Yellow) in any st.
Rnd 2 (Yellow Petals):
- Ch 3 (counts as 1st dc), work 1 dc in the same st.
- [Work 2 dc in the next st] 11 times.
- Join with a sl st to the top of the initial ch 3. (24 dc)
- Note: These stitches create the volume for the petals.
- FO Color B.
Join Color C (Light Purple/Lilac) in any st.
Rnd 3 (Purple Petal Edges & Square Foundation): This round begins to define the square shape. We’ll alternate between dc, hdc, and sc to flatten the circle into a square.
- Ch 3 (counts as 1st dc). Work 1 dc in the next st.
- Work 1 hdc in the next 2 sts.
- Work 1 sc in the next 2 sts.
- Work 1 hdc in the next 2 sts.
- Work 1 dc in the next 2 sts.
- You have now crocheted over 10 stitches from the previous round.
- Corner: [Tr in next st, ch 2, Tr in next st] (This forms your first corner).
- [Work 1 dc in the next 2 sts, 1 hdc in the next 2 sts, 1 sc in the next 2 sts, 1 hdc in the next 2 sts, 1 dc in the next 2 sts] (Side made).
- Corner: [Tr in next st, ch 2, Tr in next st].
- Repeat steps 7 and 8 two more times to complete the remaining sides and corners.
- Join with a sl st to the top of the initial ch 3.
- You should have 4 corners with ch-2 spaces and the sides should be flattening out.
- Stitch count per side (excluding corner chains): 2 dc, 2 hdc, 2 sc, 2 hdc, 2 dc = 10 stitches.
- Total stitches: 40 stitches on sides + 8 tr stitches in corners + 8 chs in corners.
- FO Color C.
Join Color D (Muted Brown/Beige) in any ch-2 corner space.
Rnd 4 (Outer Border – Granny Stitch Round): This round uses the classic “granny stitch” (3 dc clusters) to finish the square.
- Ch 3 (counts as 1st dc), 2 dc in the same ch-2 sp, ch 2, 3 dc in the same ch-2 sp (this creates your first corner).
- Ch 1.
- [Skip 3 sts, 3 dc in the next st] – Repeat this across the side until you reach the last 3 stitches before the next corner space. You should have worked 3 clusters of 3dc on each side.
- Note: You’ll be working 3 dc into the space/stitch directly above the ‘tr’ stitches from the previous round, or in the spaces created by the stitch pattern.
- Ch 1.
- Corner: [(3 dc, ch 2, 3 dc) in the next ch-2 corner sp].
- [Ch 1, skip 3 sts, 3 dc in next st (3 times), ch 1, (3 dc, ch 2, 3 dc) in next ch-2 corner sp] – Repeat around for the remaining sides and corners.
- After the last side’s clusters, ch 1.
- Join with a sl st to the top of the initial ch 3.
- You should have 4 clusters of 3dc along each side, separated by ch-1 spaces, and a (3dc, ch2, 3dc) in each corner. Your square should now measure 12 cm x 12 cm.
- FO Color D.
Repeat this entire process to make 9 identical sunflower granny squares.
- Important: Weave in all ends for each square as you finish Rnd 4. This makes the assembly process much cleaner and easier!
Part 2: Assembling the Bag Body and Base
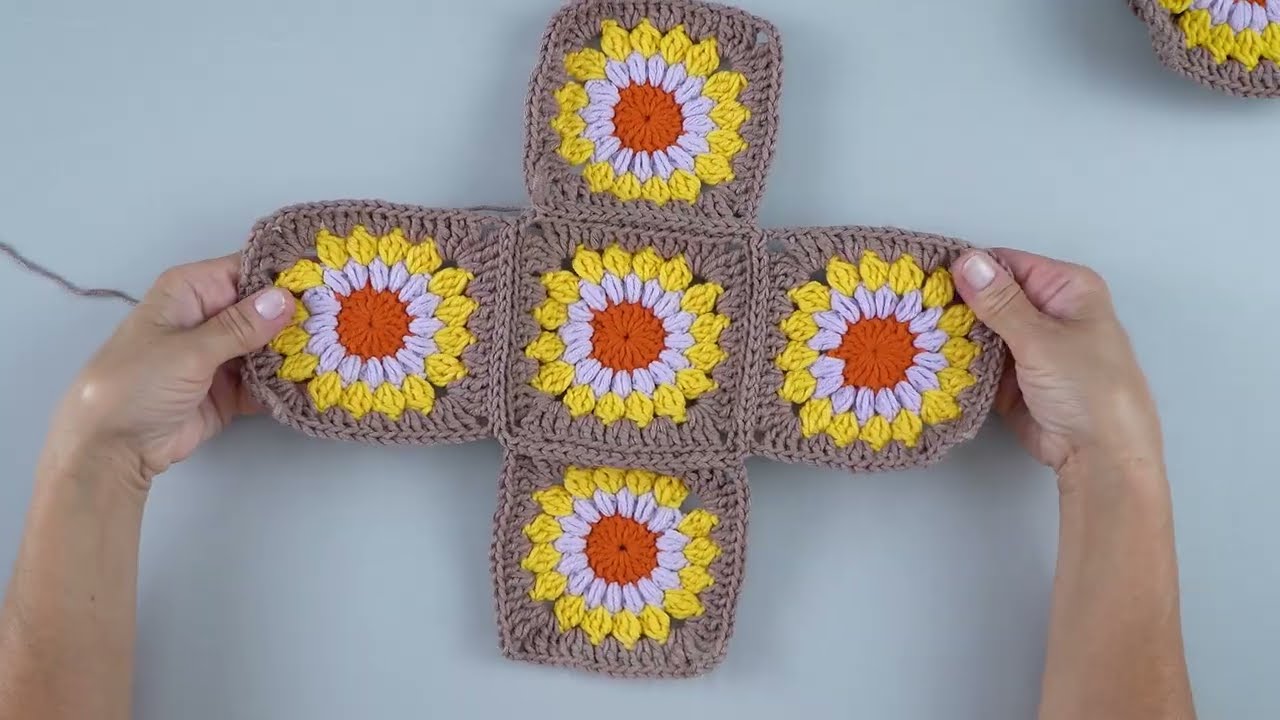
Refer to the layout in the provided image. We will be forming a “plus” sign shape first for the main body, and then adding squares for the bottom.

Layout:
- You’ll need 5 squares for the main body (forming the plus sign).
- You’ll need 4 squares for the base, attached to the bottom square of the plus sign.
Joining Method: Single Crochet Seam (Durable and Defined) This method creates a strong and slightly raised seam, perfect for a sturdy bag.
- Preparation: Take two squares. Place them with wrong sides together (right sides facing out).
- Joining: Using Color D, insert your hook into the corresponding corner ch-2 space of both squares. Ch 1.
- Working through both thicknesses (both loops of each corresponding stitch or into chain spaces), sc evenly across the edge to join the squares.
- Suggested: 1 sc into each dc, 1 sc into each ch-1 space. In corner ch-2 spaces, work 2 sc.
- Join all 5 squares in the “plus” sign configuration first. Start by joining the middle square to the top, bottom, left, and right squares.
- Once the “plus” sign is formed, join the outer edges of the side squares to the adjacent squares to start forming the “walls” of the bag.
- Forming the Tube: The 5 squares should now be joined to create an open-ended tube (the top) with a closed bottom (the center square of the plus sign). The four squares attached to the bottom square of the plus will form the base.
- Attaching Base Squares: Take the four remaining squares. One by one, join them along one edge to the outer edges of the bottom-most square of the “plus” sign, and then join their adjacent edges to each other to completely close off and form the square base of the bag. Imagine building a box – the “plus” is the sides and one part of the bottom, and the four remaining squares complete the bottom.
- Tip: When joining corners, make sure you work a sc into the corner ch-2 spaces of both squares to secure them tightly. You may need to work 2 or 3 sc into the corners of the initial corner joins, and then single crochet through the existing stitches where squares meet.
Part 3: Finishing the Top Edge
Once the bag body is fully assembled, we’ll create a neat and sturdy top edge.
Using Color D
- With the right side of your bag facing out, join Color D to any stitch at the top edge of your bag (one of the corners of the top-most granny squares).
- Ch 1, and work 1 sc into each dc and ch-1 space around the entire top opening. Aim for an even number of stitches that will form a neat edge. In the corners where squares meet, make sure to sc through the join to reinforce it.
- Join with a sl st to the first sc.
- Rnd 2: Ch 1, sc in each sc around. Join with a sl st.
- Rnd 3: Ch 1, sc in each sc around. Join with a sl st.
- (Optional) Rnd 4: Ch 1, sc in each sc around. Join with a sl st.
- This creates a firm, consistent top edge for the bag.
Part 4: Creating the Handles
The bag in the image has two sturdy, slightly narrower handles that are formed directly from the top edge.
Using Color D
- Placement: After completing the final sc round for the top edge, do NOT fasten off. You’ll need to determine where your handles will be. The image shows them attached approximately over the two outer “granny clusters” on the top-most squares. Each handle looks to be about 6-8 stitches wide.
- Count your total stitches on the top edge. Divide by 2 to find the middle. Mark the center front and center back.
- Then, count in from those center marks to find symmetrical placement for your handles, leaving space in between for the opening.
- Example: If you have 80 sc stitches around, and you want 8-stitch wide handles. You might skip 18 stitches, sc in 8 for first handle, skip 28 for opening, sc in 8 for second handle, skip 18 back to start.
- First Handle Foundation: Ch 1, sc across the number of stitches you’ve determined for the first handle (e.g., 8 sc).
- Working the Strap:
- Turn your work.
- Row 1 of Strap: Ch 1, sc in each of the sc across (e.g., 8 sc).
- Turn your work.
- Repeat Row 1 until your strap reaches the desired length. The image shows a shorter, hand-carry strap, likely around 20-30 rows. Hold it up and test the length.
- Attaching First Handle: Once your strap is the desired length, position it over the corresponding marked spot on the opposite side of the bag’s opening. Make sure it’s not twisted.
- Using sc, attach the end of the strap to the top edge of the bag. Work through both the strap’s last row and the top edge stitches of the bag (e.g., 8 sc). This creates a very strong, seamless join.
- Second Handle: Sl st or sc across the stitches of the bag’s opening until you reach the placement for your second handle.
- Repeat steps 2-4 to create and attach the second handle.
- Once both handles are securely attached, FO and weave in all remaining ends.
Video tutorial
Finishing Touches:
- Weave in all remaining ends securely: This is paramount for a professional finish and to prevent unraveling. Double-check all joins and corners for any loose ends.
- Block (optional but recommended for cotton): Gently wash your bag according to yarn instructions, then reshape it and let it air dry. This helps to even out your stitches, square up the granny squares further, and give the bag a more polished, crisp look.
- Lining (optional): For added durability and to prevent small items from slipping through stitches, consider sewing a fabric lining into your bag.
Congratulations! You’ve crocheted a beautiful, sturdy, and wonderfully cheerful Sunflower Granny Square Bag. This bag is perfect for summer outings, market trips, or as a vibrant everyday accessory. It also makes an incredible handmade gift for someone special.
Don’t forget to show off your finished creation! Happy crocheting!