by
by 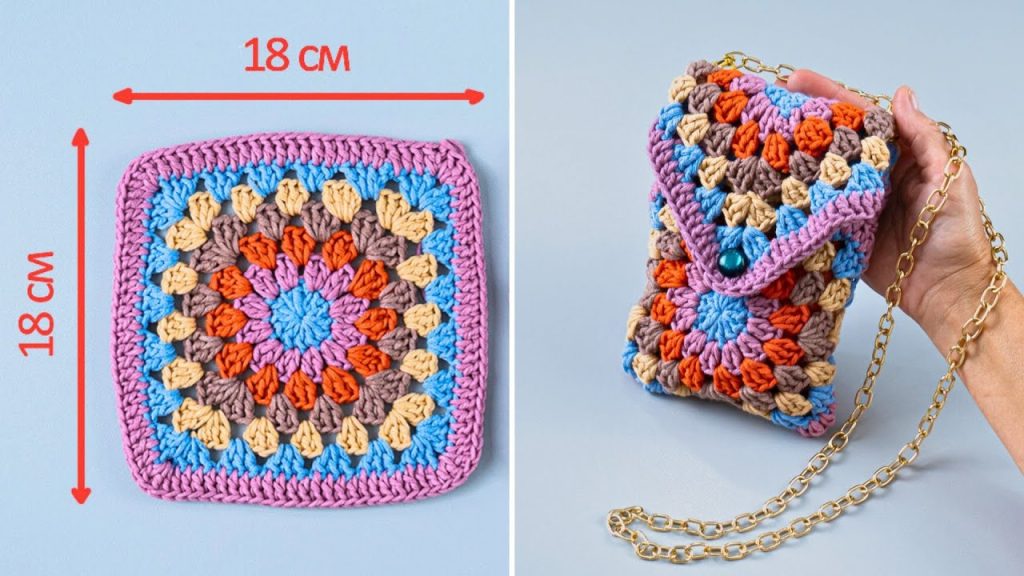
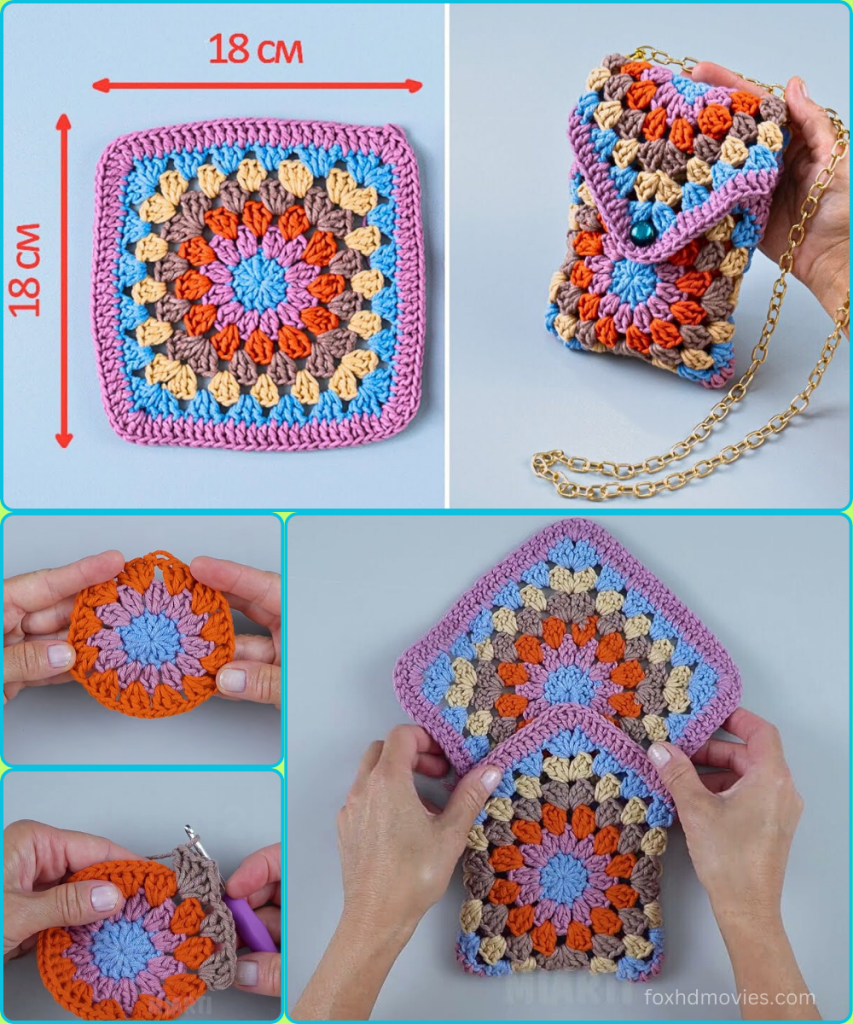
Looking for the perfect little accessory to hold your phone, keys, and cards? This small, chic crochet pouch is a fantastic solution. Made from just one large granny square, it’s a quick project that beautifully showcases your color choices and crochet skills. The construction is surprisingly simple, transforming a flat square into a three-dimensional pouch with a clever folding technique.
The pattern uses a “solid” granny square style, where stitches are worked into each stitch from the previous round, creating a dense and durable fabric. This makes it perfect for a bag that needs to hold its shape.
What You’ll Need:
- Yarn: Worsted weight (Aran/10 ply) cotton yarn is ideal for a bag that needs to be sturdy. The example uses four contrasting colors.
- Color A (Center): Blue (approx. 20 yards)
- Color B (First Border): Pink/Lilac (approx. 25 yards)
- Color C (Second Border): Orange (approx. 30 yards)
- Color D (Third Border): Light Brown/Beige (approx. 35 yards)
- Color E (Fourth Border): Blue (approx. 40 yards)
- Color F (Fifth Border): Brown (approx. 45 yards)
- Color G (Sixth Border): Light Brown/Beige (approx. 50 yards)
- Color H (Final Border): Pink/Lilac (approx. 55 yards)
- Crochet Hook: Size H/5.0mm (or hook size needed to achieve the correct gauge).
- Yarn Needle: For weaving in ends and seaming.
- Scissors
- A Button: A decorative button for the flap closure (approx. 1-2 cm in diameter).
- Strap (Optional): A ready-made purse chain or rings for a crocheted strap.
Abbreviations Used:
- ch: chain
- sl st: slip stitch
- sc: single crochet
- hdc: half double crochet
- dc: double crochet
- tr: treble crochet (or triple crochet)
- st(s): stitch(es)
- rnd: round
- FO: fasten off
- [ ]: repeat instructions in brackets
- ( ): stitch count at the end of the round
Gauge:
Your finished granny square should measure approximately 18 cm x 18 cm (7 inches x 7 inches). This is a crucial measurement for ensuring the pouch is the correct size. If your square is coming out larger or smaller, adjust your hook size accordingly.
Part 1: The Large Solid Granny Square
This pattern starts as a circle and transitions into a square, with each new color worked in a solid round of stitches.
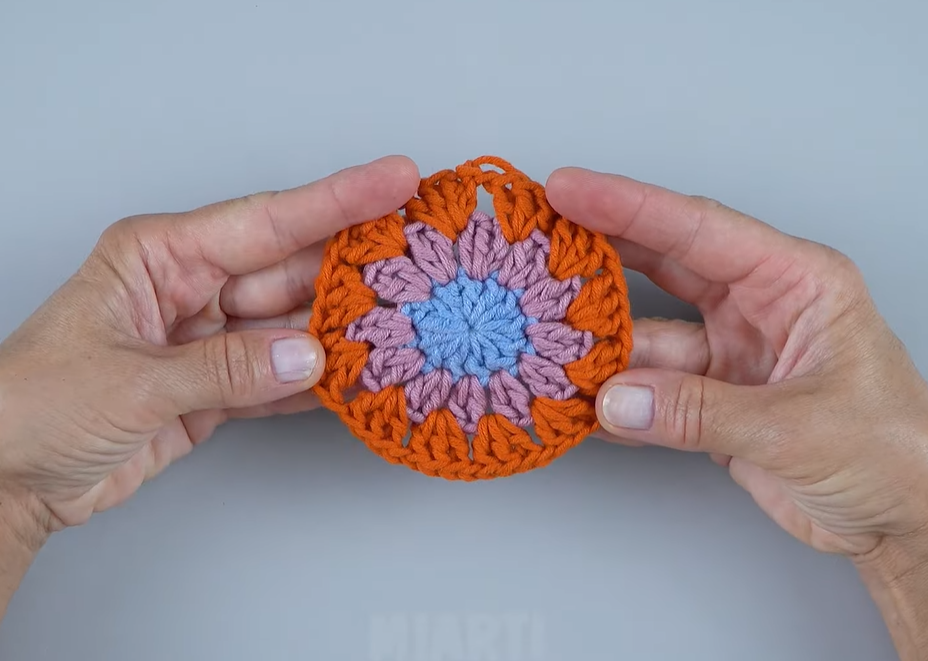
Using Color A (Blue)
Rnd 1 (Center):
- Make a magic ring (or ch 4 and sl st to first ch to form a ring).
- Ch 3 (counts as 1st dc), work 11 dc into the ring.
- Join with a sl st to the top of the initial ch 3. (12 dc)
- FO Color A.
Using Color B (Pink/Lilac)
Rnd 2:
- Join Color B in any stitch. Ch 3 (counts as 1st dc).
- Work 1 dc in the same stitch and 2 dc in each stitch around.
- Join with a sl st to the top of the initial ch 3. (24 dc)
- FO Color B.
Using Color C (Orange)
Rnd 3:
- Join Color C in any stitch. Ch 3 (counts as 1st dc).
- Work 1 dc in the same stitch.
- [Work 1 dc in the next stitch, 2 dc in the next stitch] 11 times.
- Work 1 dc in the last stitch.
- Join with a sl st to the top of the initial ch 3. (36 dc)
- FO Color C.
Using Color D (Light Brown/Beige)
Rnd 4 (Beginning the Square): This round uses taller stitches to begin shaping the corners.
- Join Color D in any stitch. Ch 1 (does NOT count as a stitch).
- Sc in the next 4 sts.
- Corner: [3 hdc in the next stitch]. Sc in the next 8 sts.
- Corner: [3 hdc in the next stitch]. Sc in the next 8 sts.
- Corner: [3 hdc in the next stitch]. Sc in the last 4 sts.
- Join with a sl st to the first sc. (32 sc, 12 hdc = 44 total stitches)
- FO Color D.
Using Color E (Blue)

Rnd 5:
- Join Color E in the center hdc of any corner. Ch 3 (counts as 1st dc).
- Work 1 dc in the same stitch, ch 2, 2 dc in the same stitch (this is your first corner).
- Work 1 dc in each stitch along the side until you reach the center hdc of the next corner.
- Repeat the corner and side instructions 3 more times.
- Join with a sl st to the top of the initial ch 3.
- FO Color E.
Using Color F (Brown)
Rnd 6:
- Join Color F in any ch-2 corner space. Ch 3 (counts as 1st dc).
- Work 2 dc in the same space, ch 2, 3 dc in the same space (first corner).
- Work 1 dc in each stitch along the side until you reach the next corner space.
- Repeat the corner and side instructions 3 more times.
- Join with a sl st to the top of the initial ch 3.
- FO Color F.
Using Color G (Light Brown/Beige)
Rnd 7:
- Join Color G in any ch-2 corner space. Ch 3 (counts as 1st dc).
- Work 2 dc in the same space, ch 2, 3 dc in the same space (first corner).
- Work 1 dc in each stitch along the side until you reach the next corner space.
- Repeat the corner and side instructions 3 more times.
- Join with a sl st to the top of the initial ch 3.
- FO Color G.
Using Color H (Pink/Lilac)
Rnd 8 (Final Border):
- Join Color H in any ch-2 corner space. Ch 3 (counts as 1st dc).
- Work 2 dc in the same space, ch 2, 3 dc in the same space (first corner).
- Work 1 dc in each stitch along the side until you reach the next corner space.
- Repeat the corner and side instructions 3 more times.
- Join with a sl st to the top of the initial ch 3.
- FO Color H.
- Weave in all your ends securely. Your square should now measure 18 cm x 18 cm.
Part 2: Assembly
Now, let’s turn your square into a bag!

- Lay your square flat, right side facing down.
- Fold up the bottom edge so that it covers about two-thirds of the square, creating the body of the pouch. The top corner will remain unfolded, forming the flap.
- Using a yarn needle and Color H, or any preferred seam color, stitch the two sides of the folded-up square together using a whip stitch or mattress stitch. This will create a clean, nearly invisible seam.
- Be sure to stitch through both layers of the fabric, going through the inner and outer loops of the corresponding stitches on each side.
- Knot your ends securely and weave them in.
Part 3: Closure and Strap
The final touches make all the difference.
- Button: Sew your decorative button onto the front of the pouch, centering it about two-thirds of the way down from the top edge.
- Button Loop: With Color H, attach yarn to the underside of the flap, right at the tip (the point of the granny square).
- Ch a small loop (about 6-8 stitches, or enough to fit over your button).
- Sl st back into the same stitch where you attached the yarn.
- FO and weave in the ends. This creates a secure loop that will close your bag.
- Strap:
- Option 1 (Chain): Attach your pre-made chain to the corners of the pouch using a pair of pliers or the attachment loops that come with the chain.
- Option 2 (Crocheted Strap):
- Attach Color H to one of the top corners of the pouch. Ch 150 (or to your desired length).
- Turn, and sc back down the chain, working 1 sc into each chain.
- Sl st into the opposite top corner of the bag to secure.
- FO and weave in ends.
Video tutorial
Finishing Touches:
- Final Weaving: Give your bag one last check for any loose ends and weave them in thoroughly.
- Blocking (Optional): Lightly steam or spritz your finished pouch with water, then gently shape it with your hands and let it dry completely. This will help the stitches and seams look crisp and even.
You’ve now created a beautiful, handmade pouch that’s perfect for a night out or just keeping your essentials organized. Enjoy your new accessory!