by
by Hello, wonderful makers!
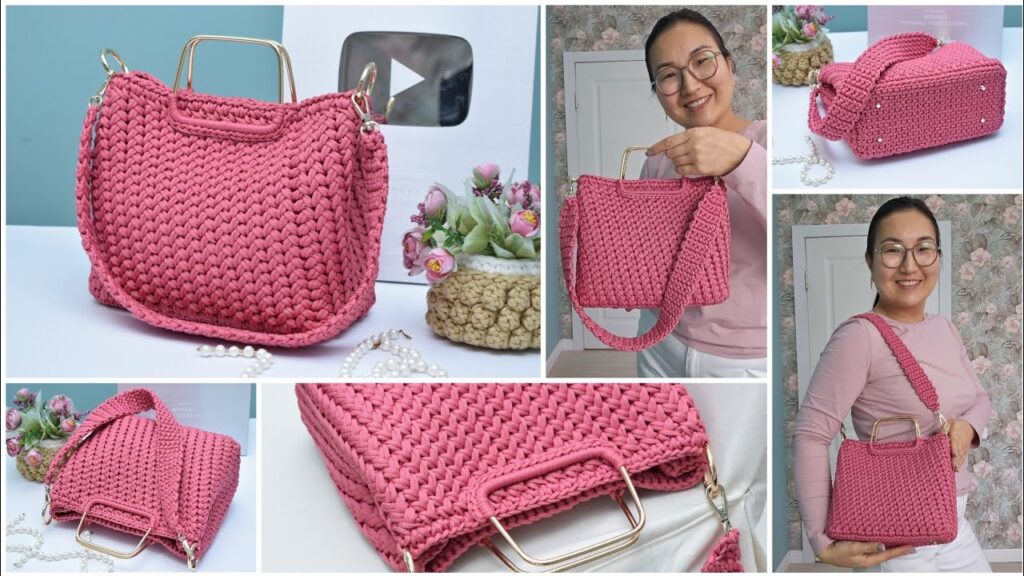
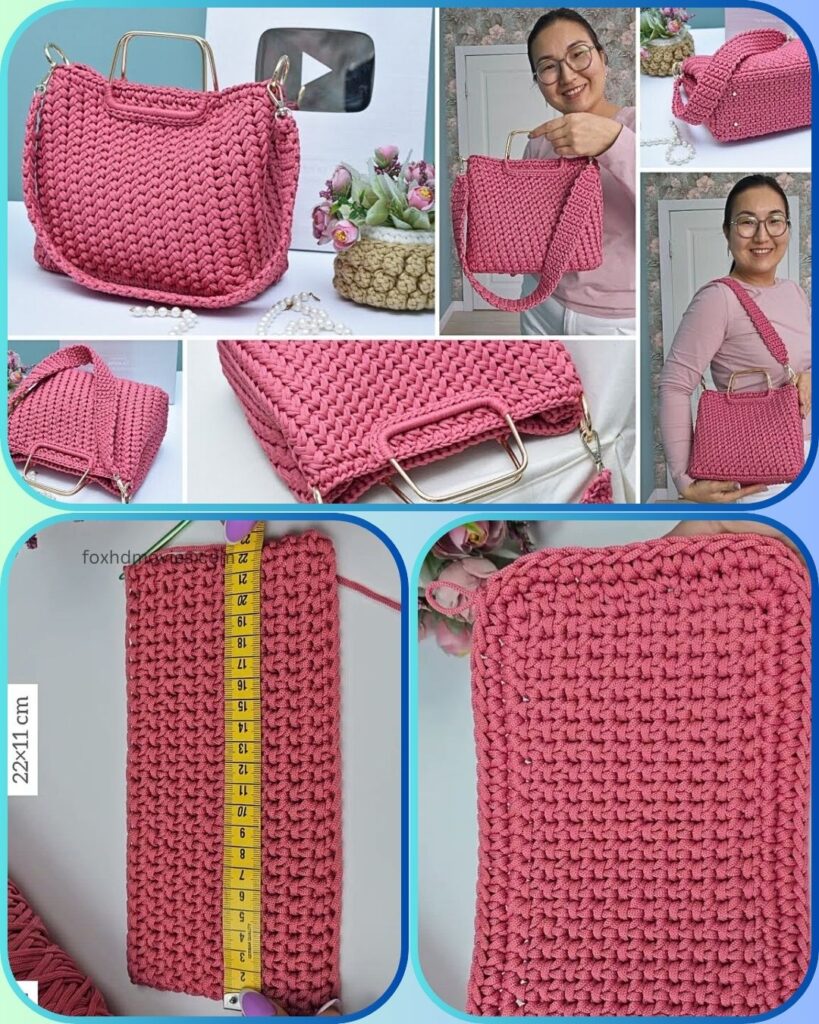
Are you ready to create a truly stunning accessory that combines handmade charm with sophisticated style? Today, we’re diving into the details of how to crochet a gorgeous structured handbag, just like the lovely dusty rose one you see pictured!
This bag is perfect for adding a touch of elegance to any outfit. It features a sturdy, dense fabric, chic metal handles, and a versatile cross-body strap, making it both beautiful and practical. The structured shape ensures it holds its form, while the intricate stitch pattern adds a touch of handmade luxury.
Before we begin, here are a few things to keep in mind:
- Skill Level: Intermediate. This pattern requires working a dense stitch and assembling hardware.
- Yarn Choice: For a bag with this kind of structure, you absolutely need a sturdy yarn. I highly recommend cotton cord, t-shirt yarn, or macrame cord. These materials will give your bag the necessary firmness and shape retention. The bag in the photo looks like it’s made with a cotton cord due to the beautiful stitch definition.
- Hook Size: This will depend heavily on your chosen yarn. Always check your yarn label for a recommended hook size, and then swatch, swatch, swatch! You want a hook that allows you to create a very tight, dense fabric, almost like knitting, to ensure your bag is sturdy. For a cord like this, a 4mm-6mm hook is common.
- Hardware: The metal handles are key to this bag’s elegance! You’ll also need D-rings or O-rings for the strap, and a magnetic snap closure.
Let’s Get Crocheting!
We’ll break this down into the Base, Body, Top Edge/Handle Attachment, Strap, and Assembly.
Materials You’ll Need:
- Approx. 300-400 grams of sturdy yarn (e.g., 5mm cotton cord, t-shirt yarn) in your desired color
- Crochet hook (size appropriate for your yarn, e.g., 4.5mm – 6mm)
- Stitch markers
- Yarn needle
- Scissors
- 2 metal bag handles (the D-shaped or U-shaped ones shown)
- 2 small D-rings or O-rings for the strap attachment
- 1 magnetic snap closure
- Optional: Fabric lining and sewing thread/needle for a polished finish.
Abbreviations:
- ch: chain
- st(s): stitch(es)
- sc: single crochet
- sl st: slip stitch
- rnd(s): round(s)
- WS: wrong side
- RS: right side
- BLO: back loop only

The Main Body Stitch (The “Knit-Look” or WaISTCOAT STITCH):
The beautiful texture on this bag strongly resembles the “waistcoat stitch” or “knit stitch” in crochet. It creates a very dense, firm fabric that looks like knitting.
How to do the Waistcoat Stitch (wst):
- Instead of inserting your hook under the top two loops of the stitch, you insert your hook into the center of the ‘V’ of the stitch below, going straight through the stitch.
- Yarn over and pull up a loop (you’ll have 2 loops on hook).
- Yarn over and pull through both loops on hook (just like a regular sc).
Important: The waistcoat stitch works best when crocheting in the round and maintaining loose tension. If you find it too difficult with your chosen yarn, a very tight single crochet worked in the BLO can provide a similar dense texture, though the “V” pattern won’t be as pronounced. For this pattern, we’ll assume you’re using the Waistcoat Stitch for the body.
Pattern Instructions:
1. The Base (Bottom of the Bag)
We’ll create an oval base to give the bag its structured bottom.
- Ch: Start with a chain of ch 25 (this will be the initial width of your bag. Adjust for wider/narrower bags).
- Rnd 1: Sc in the 2nd ch from hook. Sc in each ch across until you reach the last chain. In the last chain, work 3 sc (this forms the first turn). Now, continue working along the opposite side of your starting chain: sc in each stitch across. In the very last stitch (the one where you started your first sc), work 2 sc (to complete the turn). Join with a sl st to the first sc of the round. (You should now have an oval).
- Tip: Place stitch markers in the middle stitch of each 3-sc group on the ends – these are your corner stitches for increasing.
- Rnd 2: Ch 1 (does not count as st). Sc in each st around, working 2 sc into each of the 3 marked corner stitches on both ends of the oval (total of 6 increases per round). Join with a sl st.
- Rnd 3 (or until desired base depth): Ch 1. Sc in each st around, working 2 sc into the single sc stitch between your increases on the ends (this subtly shapes the oval). You can continue with more increase rounds if you want a wider base, making sure to maintain the oval shape by increasing consistently at the ends.
- For a bag similar to the picture, 2-3 increase rounds for the base should be sufficient.

2. The Body of the Bag (Working Upwards)
Now we transition to the main “knit-look” stitch.
- Rnd 1 (Transition Round): Ch 1. Sc in the back loop only (BLO) of each stitch around. Join with a sl st.
- This creates a defined ridge between the base and the body and sets up the next round for the waistcoat stitch.
- Rnds 2-X (Waistcoat Stitch Body): Ch 1. Work waistcoat stitch (wst) in each stitch around. Join with a sl st.
- Remember to insert your hook into the center of the ‘V’ of the previous stitch.
- Continue working in the waistcoat stitch until your bag reaches the desired height, just below where you want your metal handles to sit.
- For a bag of this size, this could be anywhere from 18-25 rounds, depending on your yarn and desired height.
3. The Top Edge & Handle Attachment Points
We need to create sturdy loops or areas to attach the metal handles.
- Rnd 1 (Reinforcement): Ch 1. Sc in each stitch around. Join with a sl st.
- Rnd 2 (Handle Attachment): This round will create the loops for your metal handles.
- Ch 1. Sc in the first few stitches (e.g., 5-7 sc, centering the first handle’s placement).
- Create the first handle loop: Ch a number of stitches (e.g., ch 8-12) that comfortably fits over one side of your metal handle. Skip the same number of stitches on the bag below (e.g., skip 8-12 sts) and sc in the next stitch.
- Continue sc across the front of the bag until you reach the position for your first D-ring for the strap.
- Attach D-ring (or create loop): Sc around one D-ring (or make a small ch loop like the handle, but smaller, e.g., ch 4-6, skip 4-6 sts). Sc past the D-ring.
- Continue sc across the side of the bag until you reach the position for the second D-ring. Attach the second D-ring similar to the first.
- Continue sc across the back of the bag until you reach the position for the second handle.
- Create the second handle loop: Ch the same number of stitches as your first handle loop (e.g., ch 8-12). Skip the same number of stitches below and sc in the next stitch.
- Sc the remaining stitches of the round. Join with a sl st.
- Adjust chain lengths and skipped stitches based on your handle size and D-ring placement.
- Rnd 3 (Finishing Edge): Ch 1. Sc in each stitch around, making sure to sc around the chain loops you created for the handles, and around the D-rings. Join with a sl st.
- Fasten off and weave in ends.

4. The Cross-Body Strap
The strap appears to be a flat, sturdy crocheted strap.
- Ch: Chain for your desired strap length. For a cross-body, this is usually between ch 100-140, depending on how long you want it. (Test the length over your shoulder).
- Row 1: Sc in the 2nd ch from hook, sc in each ch across. Ch 1, turn.
- Row 2-3 (or until desired width/thickness): Sc in the BLO of each stitch across. Ch 1, turn. (Working in BLO creates a nice ribbed texture).
- Fasten off, leaving a long tail for sewing.
5. Assembly
Now for the magic moment of putting it all together!
- Attach Metal Handles: Carefully slide your metal handles through the crocheted loops you created in the top edge of the bag.
- Attach Cross-Body Strap: Using your yarn needle and the long tails, securely sew the ends of your crocheted strap to the D-rings (or the small crocheted loops) on the sides of your bag. Ensure they are very firmly attached.
- Install Magnetic Snap Closure:
- Determine the best placement for your magnetic snap closure on the inside top edges of the bag. You’ll want it centered.
- Mark the prongs. Carefully cut small slits in the yarn where the prongs will go.
- Insert the prongs through the fabric and fold them back on the washer, securing the snap. Repeat for both sides of the snap.
- Lining (Highly Recommended for a Polished Finish!):
- Measure the inside dimensions of your bag. Cut a piece of fabric (like cotton or satin) to fit, adding a seam allowance.
- Sew the fabric into a bag shape, making sure it fits snugly inside your crocheted bag.
- Hand-stitch or machine-stitch the top edge of the lining to the inside top edge of your crocheted bag. This prevents stretching, adds durability, and gives a professional look.
Video tutorial
Your Beautiful Bag is Complete!
Stand back and admire your stunning new handmade accessory! This structured bag is not just a functional item, but a testament to your crochet skills and a stylish addition to any wardrobe.
Feel free to experiment with different yarn colors and even try adding some decorative tassels or charms. Don’t forget to share your finished project! I’d love to see your unique take on this elegant design. Tag me on social media or send a picture!
Happy crocheting!