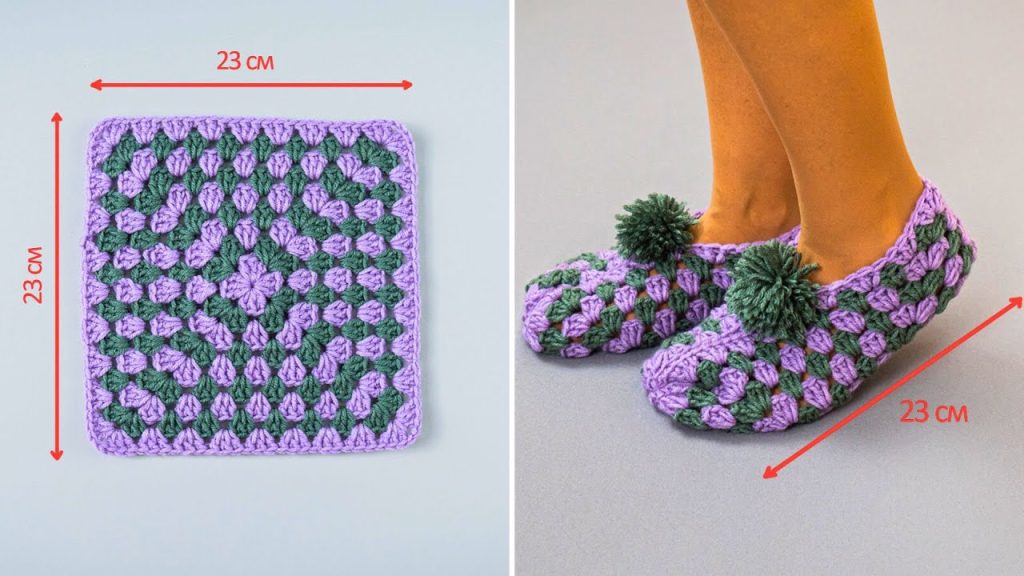
Welcome, fellow crafters, to another exciting crochet journey! Today, we’re diving into the wonderful world of granny squares to create something truly special and incredibly cozy: a pair of handmade slipper socks. These aren’t just any slippers; they’re constructed from a single, versatile granny square, making them a unique and surprisingly simple project once you get the hang of it. Imagine snuggling up on a chilly evening with your feet tucked into these warm, stylish, and self-made beauties!
This pattern is designed to be comprehensive and detailed, guiding you through each step from crocheting the perfect granny square to assembling your charming new slippers. We’ll use classic granny square techniques, a touch of seaming, and, of course, a fluffy pom-pom for that extra touch of cuteness.
Why Granny Squares for Slippers?
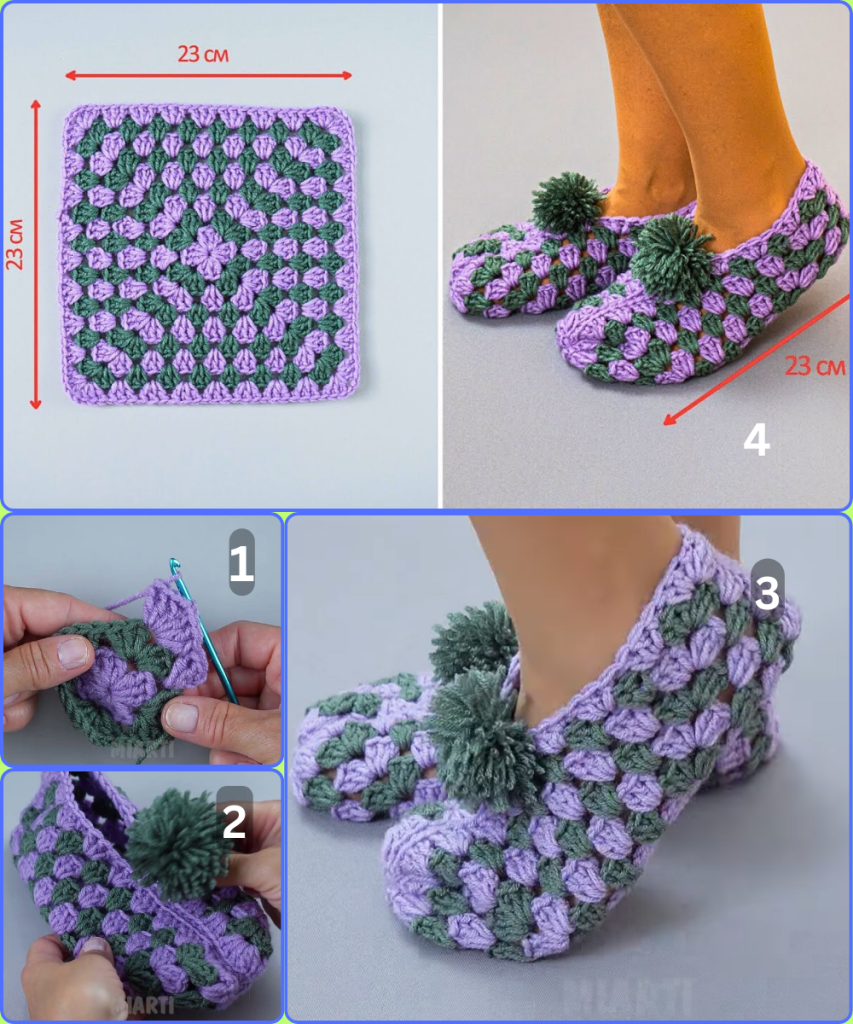
The beauty of using a granny square for slippers lies in its adaptability. A simple square, when folded and seamed correctly, magically transforms into a snug foot-covering. Plus, granny squares are inherently fun to make, allowing for endless color combinations and a meditative rhythm once you get into the groove. For this project, we’ll be making one large granny square for each slipper.
Materials You’ll Need:
- Yarn: Worsted weight (Category 4) yarn in two contrasting colors.
- Color A (e.g., Lilac/Lavender): Approximately 150-200 yards per slipper (300-400 yards total).
- Color B (e.g., Deep Green): Approximately 100-150 yards per slipper (200-300 yards total).
- Consider a wool blend or acrylic for warmth and durability.
- Crochet Hook: A size H/8 (5.00 mm) hook. Adjust hook size if necessary to achieve the correct gauge.
- Scissors
- Yarn Needle: Essential for weaving in ends and seaming the slippers.
- Pom-Pom Maker (optional): A medium-sized one for the top of the slippers. You can also make them by hand or use pre-made ones.
- Stitch Markers (optional): Handy for marking the corners of your granny square.
Abbreviations (US Terms):
- ch: chain
- sl st: slip stitch
- dc: double crochet
- sp: space
- rep: repeat
- Rnd(s): Round(s)
- sk: skip
Gauge:
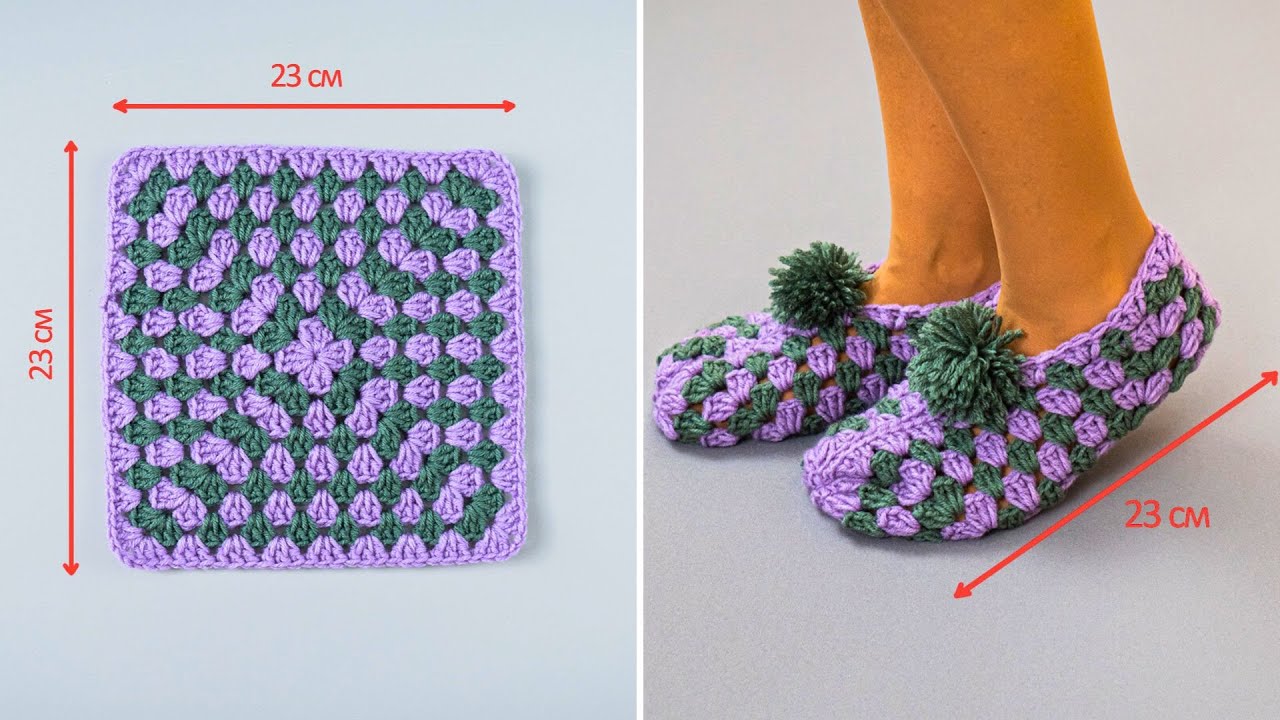
- Your finished granny square should measure approximately 23 cm x 23 cm (9 inches x 9 inches).
- The overall length of the finished slipper will also be approximately 23 cm (9 inches), which typically fits a women’s US size 6-8, or a foot length of about 23 cm.
- It’s crucial to check your gauge! If your square is too small, your slippers will be too tight; if it’s too large, they’ll be too loose. Adjust your hook size accordingly (go up a size if your square is too small, down a size if it’s too large).
Part 1: Crocheting the Granny Square (Make 2 – one for each slipper)
We will be working in rounds, changing colors to create the lovely striped effect seen in the example.

Starting with Color A (Lilac/Lavender)
Foundation:
- Rnd 1: Ch 4, sl st into the first ch to form a ring. (Alternatively, you can start with a magic ring for a tighter center.) Ch 3 (counts as 1st dc), 2 dc into the ring. (Ch 3, 3 dc) three times. Ch 3, sl st to the top of the beginning ch 3 to join. (You should have 4 clusters of 3 dc separated by ch-3 spaces, forming the corners.)
Continuing with Color A
- Rnd 2: Sl st into the first dc and into the next dc, then sl st into the first ch-3 corner space. Ch 3 (counts as 1st dc), (2 dc, ch 3, 3 dc) into the same ch-3 corner space. This forms your first corner. Ch 1, (3 dc, ch 3, 3 dc) into the next ch-3 corner space. Repeat from * to * two more times. Ch 1, sl st to the top of the beginning ch 3 to join.
- You now have 4 corners, each with (3 dc, ch 3, 3 dc), and 4 ch-1 spaces along the sides.
Changing to Color B (Deep Green)
- Rnd 3: With Color B, sl st into the first ch-1 side space (between the corners). Ch 3 (counts as 1st dc), 2 dc into the same ch-1 space. (This is your first side cluster.)
- (3 dc, ch 3, 3 dc) into the next ch-3 corner space. (This forms a corner.)
- 3 dc into the next ch-1 side space.
- Repeat from * to * two more times.
- (3 dc, ch 3, 3 dc) into the last ch-3 corner space.
- Sl st to the top of the beginning ch 3 to join.
- You now have 4 corners and 4 side clusters.
Continuing with Color B
- Rnd 4: Sl st into the first dc and into the next dc, then sl st into the first ch-3 corner space. Ch 3 (counts as 1st dc), (2 dc, ch 3, 3 dc) into the same ch-3 corner space.
- Ch 1, 3 dc into the next space (which is the space between the 3-dc clusters along the side).
- Ch 1, (3 dc, ch 3, 3 dc) into the next ch-3 corner space.
- Repeat from * to * two more times.
- Ch 1, 3 dc into the next space. Ch 1, sl st to the top of the beginning ch 3 to join.
- You now have 4 corners and 8 side clusters (two on each side, separated by ch-1 spaces).
Changing to Color A (Lilac/Lavender)
- Rnd 5: With Color A, sl st into the first ch-1 side space. Ch 3 (counts as 1st dc), 2 dc into the same ch-1 space.
- 3 dc into the next ch-1 side space.
- (3 dc, ch 3, 3 dc) into the next ch-3 corner space.
- 3 dc into the next ch-1 side space.
- 3 dc into the next ch-1 side space.
- Repeat from * to * two more times.
- (3 dc, ch 3, 3 dc) into the last ch-3 corner space.
- 3 dc into the next ch-1 side space.
- Sl st to the top of the beginning ch 3 to join.
- You now have 4 corners and 12 side clusters (three on each side).
Continuing with Color A
- Rnd 6: Sl st into the first dc and into the next dc, then sl st into the first ch-3 corner space. Ch 3 (counts as 1st dc), (2 dc, ch 3, 3 dc) into the same ch-3 corner space.
- Ch 1, 3 dc into the next space (between 3-dc clusters along the side).
- Rep from * to * three more times along this side, until you reach the next corner.
- Ch 1, (3 dc, ch 3, 3 dc) into the next ch-3 corner space.
- Repeat this pattern for the remaining sides. Ch 1, sl st to the top of the beginning ch 3 to join.
- You now have 4 corners and 16 side clusters (four on each side).
Pattern Repeat for Remaining Rounds:
From this point on, the pattern for the side clusters and corners remains consistent, simply adding one more 3-dc cluster along each side in alternating rounds.
- Odd-numbered rounds (starting with Color B on Rnd 7, then Color A on Rnd 9, etc.): Start with a sl st into the first ch-1 side space. Ch 3, 2 dc in the same space. Then work 3 dc into each ch-1 side space until you reach a corner. In each corner, work (3 dc, ch 3, 3 dc). Repeat around. Sl st to join.
- Even-numbered rounds (starting with Color A on Rnd 8, then Color B on Rnd 10, etc.): Sl st into the first dc and into the next dc, then sl st into the first ch-3 corner space. Ch 3, (2 dc, ch 3, 3 dc) in the same corner. Ch 1, 3 dc into the next space. Repeat the Ch 1, 3 dc into the next space sequence along the side until you reach the next corner. In each corner, work (3 dc, ch 3, 3 dc). Repeat around. Ch 1, sl st to join.
Continue crocheting in this manner, alternating colors every two rounds, until your granny square measures approximately 23 cm x 23 cm (9 inches x 9 inches). This should take about 12-14 rounds, depending on your tension.
- Important: End on a round where the last color used has been worked for two full rounds (like Rounds 1-2, 3-4, etc. in our initial example). This ensures a clean color transition if you continue or seam.
Once both squares are complete, fasten off and weave in all ends meticulously. This makes for a much neater finished product.
Part 2: Assembling Your Slipper Socks
Now for the magic! This is where your flat granny square transforms into a three-dimensional slipper.

Step 1: Lay Flat and Fold
- Take one granny square and lay it flat.
- Fold the square in half diagonally, creating a triangle. The corner you are folding towards will become the toe of your slipper. The open edges will be the sides and heel.
Step 2: Seaming the Toe
- Identify the corner that will be the “toe” of your slipper (where the fold meets).
- Using your yarn needle and a length of one of your yarn colors (either Color A or Color B, whichever blends best), seam up one side of the “triangle” from the toe corner towards the center for about 7-8 cm (approximately 3 inches).
- Use a whip stitch or mattress stitch for a neat and strong seam. Make sure not to pull too tightly, or it will pucker.
- Repeat the seaming on the other side of the toe, mirroring the first seam.
- You’ve essentially created a little “pocket” for the front of your foot.
Step 3: Seaming the Heel
- Now, look at the opposite end of your folded square. This will be the back (heel) of your slipper.
- You’ll see two edges that meet. Seam these two edges together from the back for about 3-4 cm (approximately 1.5 inches). This will create the back seam of your heel.
- This short seam at the back helps to shape the heel and prevents the slipper from slipping off.
Step 4: Trying On and Adjusting (Optional but Recommended!)
- Carefully slip your foot into the partially assembled slipper. This is a good time to check the fit.
- If the opening around your ankle feels too wide, you can extend the toe seams slightly or add a few more stitches to the heel seam.
- If it feels too snug, you might need to undo a few stitches from the seams.
Step 5: Finishing the Ankle Opening
- The opening around your ankle will likely have a natural, slightly squared shape from the granny square.
- You can leave it as is, or for a more finished look, you can work a round of single crochet (sc) or slip stitches around the entire ankle opening. This helps to firm up the edge and makes it look tidier.
- Attach yarn with a sl st to any point on the ankle opening. Ch 1. Work 1 sc in each dc around, and 1 sc in each ch-1 space. Sl st to the first sc to join. Fasten off.
Step 6: Repeat for the Second Slipper
- Follow all the same steps to create your second slipper. Ensure that the seaming is symmetrical so you have a left and right slipper that match!
Part 3: Adding the Pom-Poms
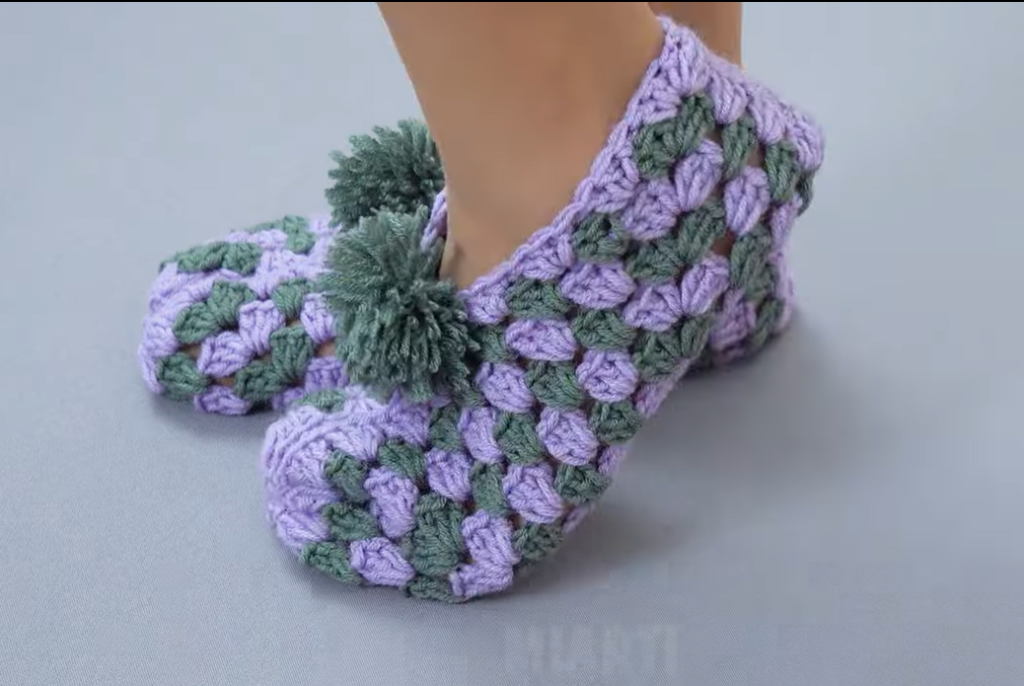
- Using either Color A or Color B (or a mix of both!), make two pom-poms. The size is up to you, but a medium-sized one looks great with these slippers.
- Once your pom-poms are fluffy and trimmed, use the two long tails from the pom-pom to securely tie one to the top of each slipper, just above the toe.
- Thread the tails through a stitch or two on the top of the slipper, bring them to the inside, and tie a secure double knot. Trim any excess yarn.
Video tutorial
Care Instructions:
- Hand wash or machine wash on a delicate cycle with cold water, using a mild detergent.
- Lay flat to dry. Do not tumble dry, as this can cause shrinking or misshaping.
Final Thoughts:
And there you have it! A pair of adorable, custom-made granny square slipper socks, crafted by your own hands. This project is not only satisfying to make but also results in a truly unique and thoughtful item, whether for yourself or as a heartfelt gift. Experiment with different color combinations to match your personality or home decor. Enjoy the warmth and comfort of your new favorite slippers!
