by
by 
Create your own stylish and distinctive bag with this unique crochet pattern! Inspired by a detailed tutorial, this design guides you through crafting a bag that features beautiful square motifs with textured stitches, a clever assembly method, and sturdy handles. Perfect for adding a handmade touch to your everyday style, this bag is a wonderful way to showcase your crochet skills.
Skill Level: Intermediate (familiarity with puff stitches, treble crochet, and joining motifs recommended)
Finished Size (Approximate):
- Individual Motif Dimensions: Approximately 5-6 inches (12.5-15 cm) square
- Bag Dimensions: Varies based on assembly, but designed to be a medium-sized tote bag.
- Size can vary based on yarn, hook, and tension.
Materials You’ll Need:
- Yarn: Approximately 160g total of DK weight (Light Worsted / 8 ply) yarn. The video specifies 80% cotton, 20% polyacryl.
- Choose a yarn that will hold its shape well and is suitable for a bag.
- Crochet Hook: 4.0 mm (G/6) crochet hook.
- Choose a hook size that creates a firm, dense fabric with no gaps. This is crucial for a durable bag.
- Tapestry Needle: For weaving in ends and seaming.
- Scissors
- Stitch Marker (Optional): To mark the beginning of rounds or specific stitches.
Gauge (Crucial for Motif Consistency!):
Achieving consistent gauge for your motifs is crucial to ensure they fit together properly during assembly. Work a swatch to ensure your stitches are tight with no visible gaps. If your fabric is too loose, go down a hook size.
Abbreviations (US Crochet Terms):
- ch: chain
- sl st: slip stitch
- sc: single crochet
- dc: double crochet
- tr: treble crochet (or triple crochet)
- Puff St: Puff Stitch (Yarn over, insert hook into stitch, yarn over, pull up a loop. Repeat 3-4 more times into the same stitch. Yarn over, pull through all loops on hook. Ch 1 to secure.)
- st(s): stitch(es)
- MR: Magic Ring
- FO: Fasten off
Let’s Crochet Your Unique Square Motif Bag!
This bag is constructed by creating multiple square motifs, then joining them in a specific pattern, and finally adding the handles. The video uses a single color for the motifs, but you could experiment with multiple colors for a vibrant look.
Part 1: The Square Motifs (Make 4 or 6, as desired for bag size)
Each motif is a textured square.

- Round 1: Create a Magic Ring (MR). Ch 3 (counts as 1 dc). Work 11 dc into the MR. Join with a sl st to the top of the initial ch 3. (12 dc)
- Pull the MR tight to close.
- Round 2: Ch 1 (does not count as a stitch). Work 1 Puff St in the first sc. Ch 1. Work 1 Puff St in the next sc. Ch 1. Repeat from * to * 11 more times around. Join with a sl st to the top of the first Puff St. (12 Puff Sts, 12 ch-1 spaces)
- Round 3: Sl st into the first ch-1 space. Ch 2 (does not count as a stitch). Work 2 dc in the same ch-1 space. Ch 2. Work 3 dc in the next ch-1 space. Repeat from * to * 11 more times around. Join with a sl st to the top of the initial ch 2. (36 dc, 12 ch-2 spaces)
- Round 4 (Creating the Square): Sl st into the next dc, then sl st into the next dc, then sl st into the next ch-2 space.
- Ch 3 (counts as 1 tr). Work 2 tr in the same ch-2 space. Ch 3. Work 3 tr in the same ch-2 space. (This is your first corner).
- Then work along the side: Work 3 dc in the next ch-2 space. Work 3 hdc in the next ch-2 space. Work 3 sc in the next ch-2 space.
- Repeat the corner and side sequence around. Join with a sl st to the top of the initial ch 3.
- This round converts the circular motif into a square. The video describes a pattern that creates a square shape with treble and other stitches.
- Round 5 (Final Square Round): Ch 1. Work 1 sc in each st and 3 sc in each corner ch-3 space around. Join with a sl st to the first sc.
- This final round of sc creates a neat, firm edge for joining.
FO, leaving a long tail for weaving in. Repeat to make 4 or 6 identical motifs.
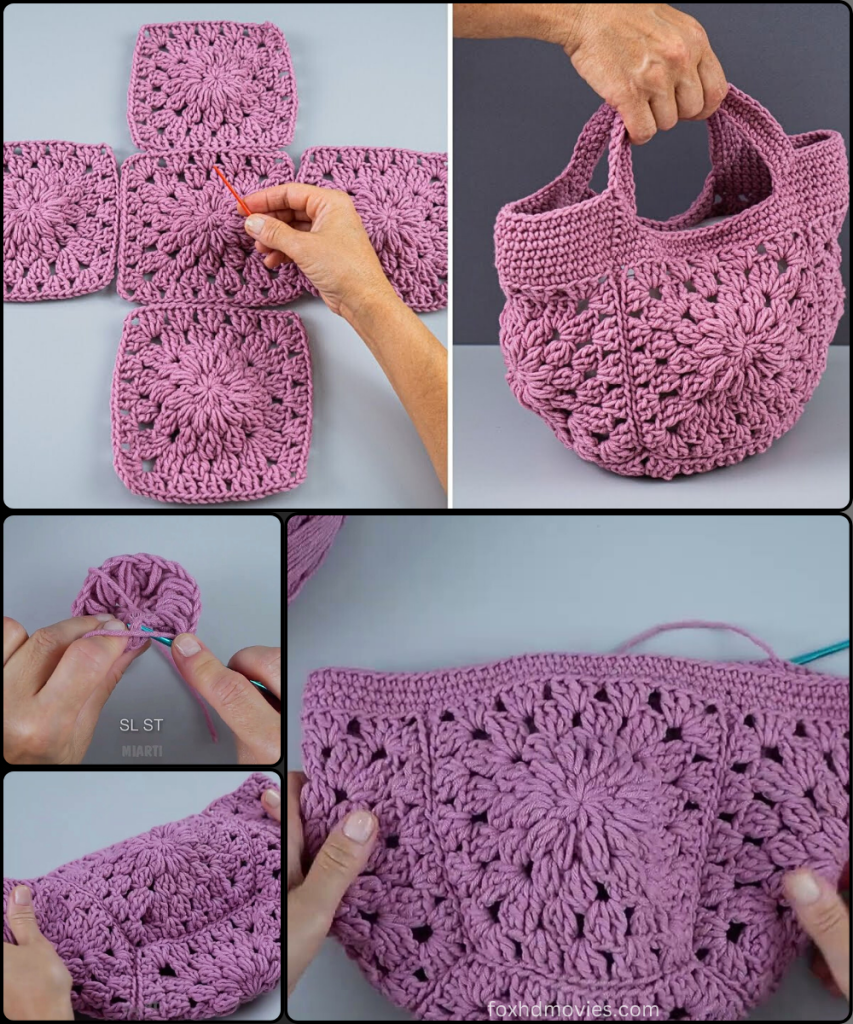
Part 2: Assembly (Joining the Motifs)
The video demonstrates arranging and joining the motifs.

- Arrange Motifs: Lay out your motifs in the desired pattern. For a tote bag, you can arrange them in a long strip (e.g., 4 motifs in a row) or two panels (e.g., two rows of two motifs each). The video appears to use a more folded approach, where squares are joined to form the sides of the bag.
- Join Motifs: Using your crochet hook (sl st join) or tapestry needle (whip stitch or mattress stitch), join the motifs together along their edges to create the bag’s body.
- For a crochet join: Place two motifs right sides together. Insert hook through corresponding stitches on both motifs and sl st across the edge to join.
- For a sewn join: Use your tapestry needle and a piece of yarn to sew the motifs together.
- Join the motifs to create a single piece that can be folded and seamed to form the bag.
Part 3: Creating the Top & Handles
Once the main body of the bag is assembled and seamed, you’ll work around the top opening to create a border and the handles.

- Top Border Rounds (Main Yarn Color):
- Attach yarn to one of the top corners of the bag opening. Ch 1.
- Work 1 sc in each stitch around the entire top opening of the bag. Join with a sl st to the first sc.
- Repeat this for 2-3 rounds to create a sturdy top border.
- Handle Round (Main Yarn Color):
- Ch 1. Sc in each stitch until you reach the desired position for your first handle.
- Ch 50-60 (or desired length for your handle). Skip the stitches across the top of the bag to the position of your second handle.
- Sc in each stitch across the back of the bag until you reach the third handle position.
- Ch 50-60 (or desired length for your handle). Skip the stitches to the position of your fourth handle.
- Sc in remaining stitches. Join with a sl st to the first sc.
- This round creates the openings for your handles and the chain loops that will form the handles themselves. The video shows this step from [08:45].
- Handle Finishing Round: Ch 1. Sc in each sc around the bag. When you reach the chain spaces for the handles, work sc stitches evenly around the chain (e.g., 50-60 sc around the ch-50 space). Continue sc around the rest of the bag. Join with a sl st to the first sc.
- This round reinforces the handles and creates a neat, finished edge.
FO, leaving a long tail for weaving in.
Part 4: Finishing Touches
- Weave in all ends: Use your tapestry needle to neatly weave in any remaining loose yarn tails. This is especially important for motifs to ensure a clean finish.
- Shape: Gently shape your bag, ensuring the seams are neat and the handles are evenly formed. The textured stitches should stand out beautifully.
- Add Closure (Optional): You can sew a magnetic snap or a button and loop closure to the top opening of the bag if desired.
- Lining (Optional): For extra durability and to prevent small items from slipping through the stitches, you can sew a fabric lining inside the bag.
Video tutorial
Versatile Uses for Your Unique Square Motif Bag:
- Everyday Tote: A stylish and unique accessory for daily use.
- Project Bag: Perfect for carrying a small crochet or knitting project.
- Gift: A thoughtful and impressive handmade gift.
Customization & Tips:
- Color Combinations: Experiment with different color palettes for your motifs. You could use a single color for a minimalist look or multiple colors for a vibrant, modern feel.
- Size Adjustment:
- Larger Bag: Make more motifs and/or increase the number of rounds in each motif.
- Smaller Bag: Make fewer motifs and/or reduce the number of rounds in each motif.
- Handle Style: Explore different handle options, such as a single long strap for a crossbody bag, or a different style of crocheted strap.
Enjoy crocheting your own beautiful, unique, and textured bag! It’s a fantastic way to create a personalized accessory that’s sure to become a favorite.