 by
by 
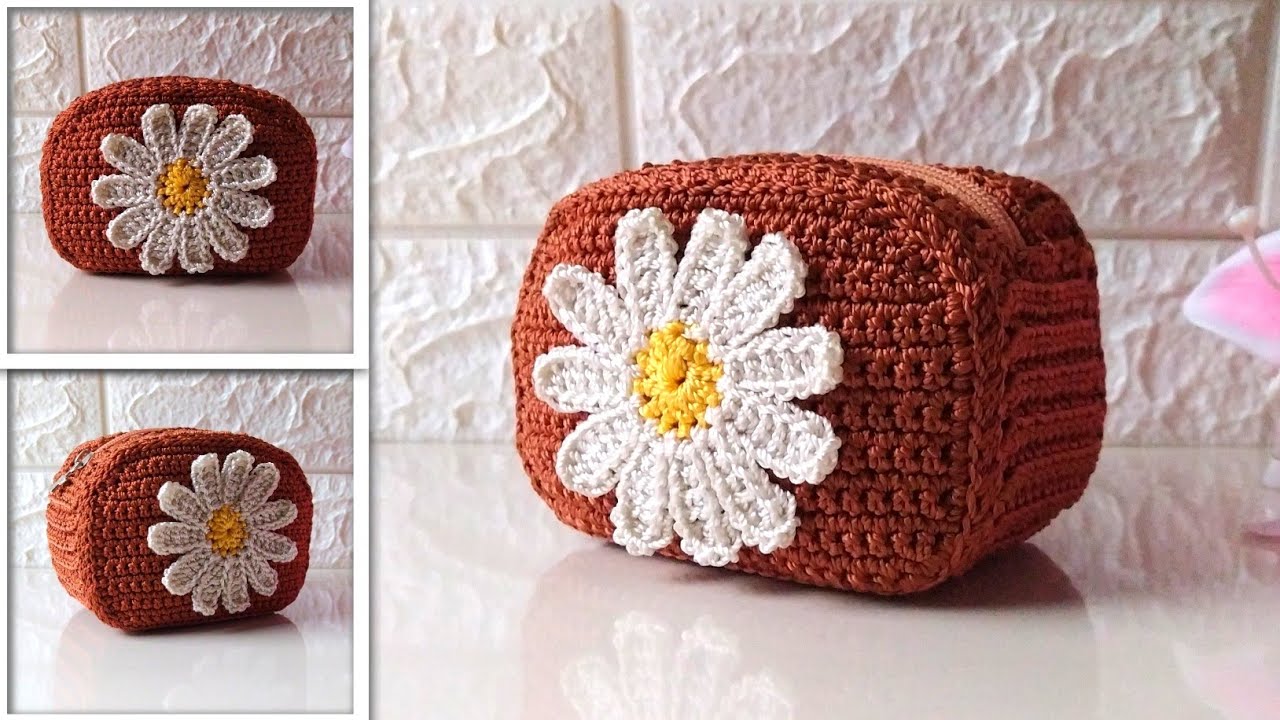
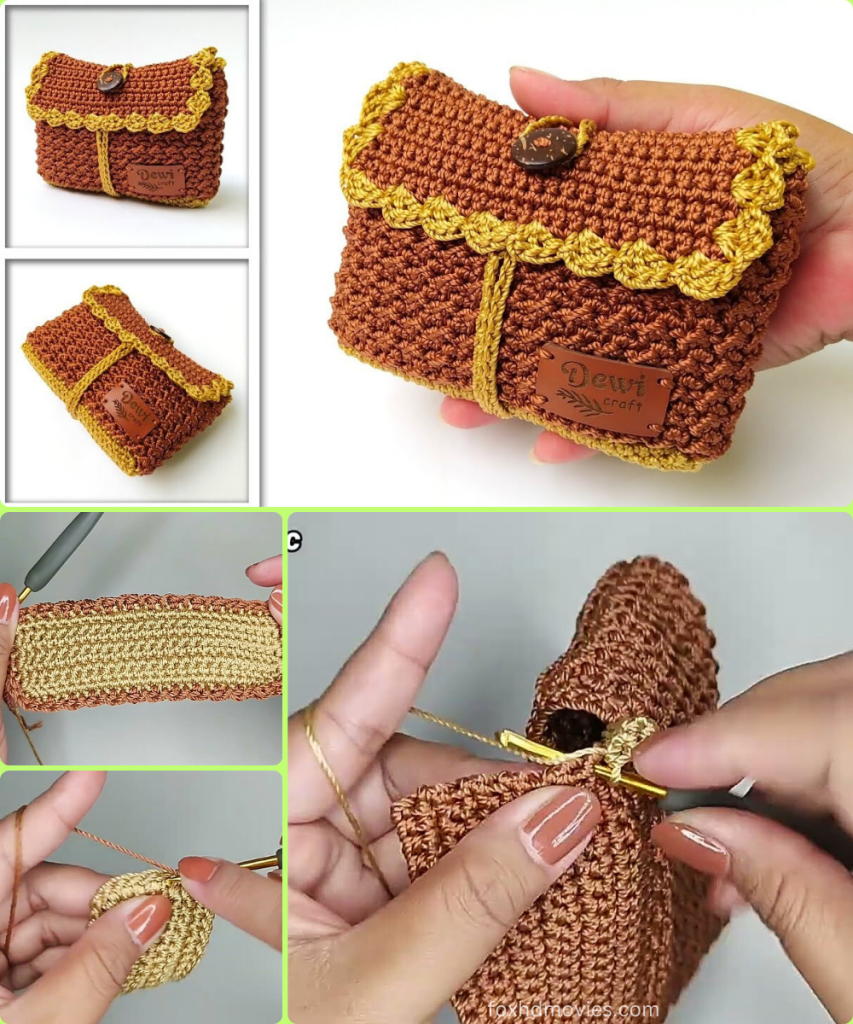
Create your own chic and functional wallet with this fantastic crochet pattern! Inspired by a detailed tutorial, this design guides you through the step-by-step process of crafting a compact yet spacious accessory, perfect for keeping your cards, cash, and small essentials organized.
Skill Level: Intermediate
Finished Size (Approximate):
- Approximately 4-5 inches (10-12.5 cm) wide x 3-4 inches (7.5-10 cm) tall (when closed)
- Size can vary based on yarn, hook, and tension.
Materials You’ll Need:
- Yarn: Approximately 50-100 grams of sturdy yarn (e.g., cotton, cotton blend, or a stiff acrylic) in your chosen color.
- The video uses a yarn that creates a firm fabric, ideal for a wallet. Choose a yarn that will hold its shape well.
- Crochet Hook: A hook size appropriate for your chosen yarn, typically 3.0 mm (D/3) to 4.0 mm (G/6).
- Choose a hook size that creates a very firm, dense fabric with no gaps. This is crucial for a durable wallet.
- Tapestry Needle: For weaving in ends and seaming.
- Scissors
- Stitch Marker (Optional): To mark the beginning of rows or specific stitches.
- Magnetic Snap, Button, or Zipper (Optional): For wallet closure.
Gauge (Crucial for Wallet Structure!):
Achieving a very firm, dense fabric is crucial for this wallet to hold its shape and be durable. Work a swatch to ensure your stitches are tight with no visible gaps. If your fabric is too loose, go down a hook size.
Abbreviations (US Crochet Terms):
- ch: chain
- sl st: slip stitch
- sc: single crochet
- st(s): stitch(es)
- FO: Fasten off
- BLO: Back Loop Only (for ribbed texture, if desired)
Let’s Crochet Your Stylish & Practical Wallet!
This wallet is typically constructed by creating a main body that folds, and then adding a flap.
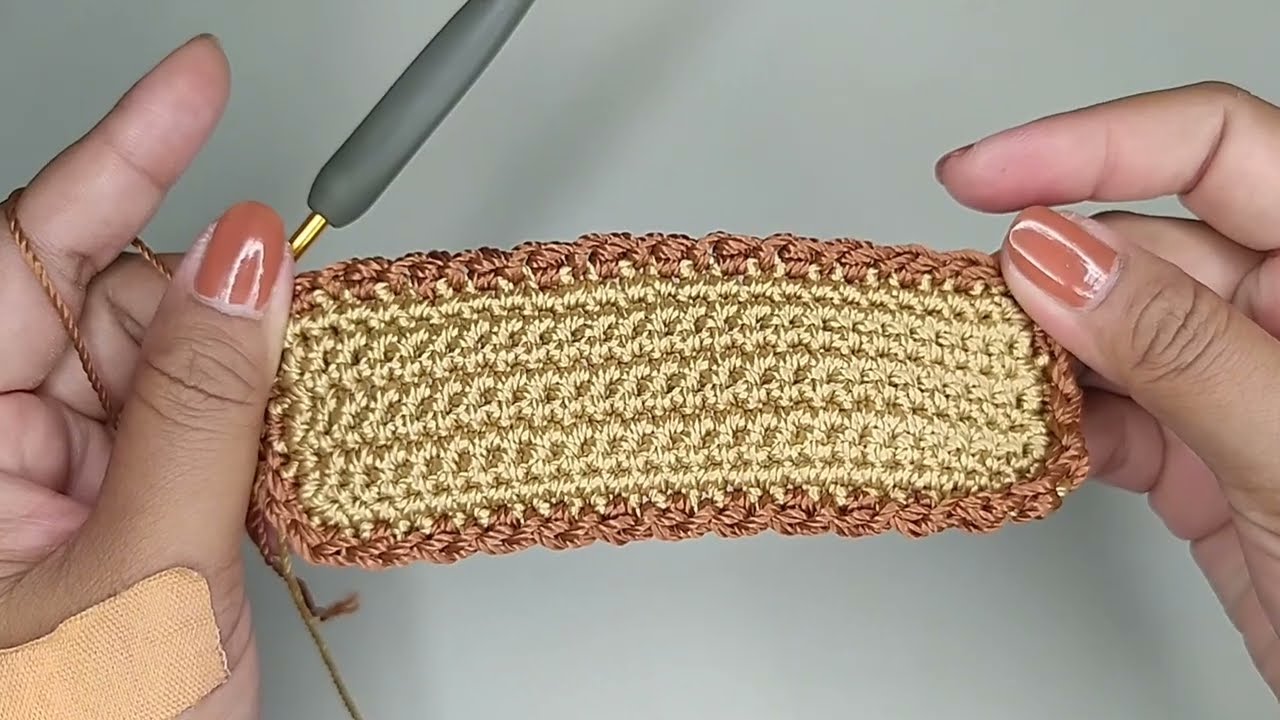
Part 1: The Main Wallet Body (Main Yarn Color)
This forms the main structure of the wallet, including the back and the inner pockets.
- Ch 25. (Adjust this chain length for a wider or narrower wallet. For a taller wallet, you’ll work more rows later).
- Row 1: Sc in 2nd ch from hook and in each ch across. Ch 1, turn. (24 sc)
- Row 2 – 30 (or until desired length): Sc in each sc across. Ch 1, turn. (24 sc)
- The video shows a rectangular piece that forms the main body. You’ll need to make this long enough to fold up into the wallet, with space for pockets. Aim for a length that’s roughly 3 times your desired wallet height (e.g., if you want a 4-inch tall wallet, make this piece about 12 inches long).
FO, leaving a long tail for weaving in.
Part 2: Inner Pocket (Main Yarn Color – Make 1 or 2)
This piece will form an inner pocket for cards or cash.
- Ch 25. (Same width as your main body).
- Row 1: Sc in 2nd ch from hook and in each ch across. Ch 1, turn. (24 sc)
- Row 2 – 10 (or desired pocket height): Sc in each sc across. Ch 1, turn. (24 sc)
- Adjust the number of rows based on how deep you want your pocket to be.
FO, leaving a long tail for seaming. Repeat to make a second pocket if desired.
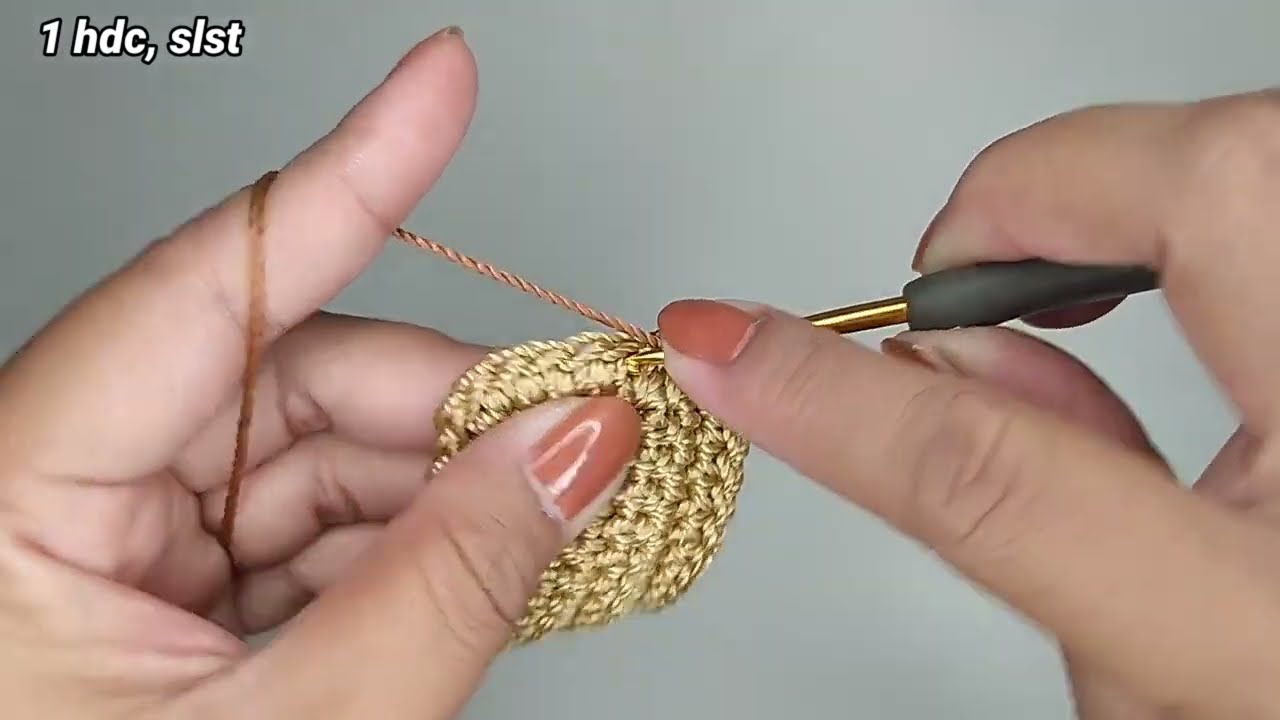
Part 3: The Flap (Main Yarn Color)
This piece will cover the opening of your wallet.
- Ch 25. (Same width as your main body).
- Row 1: Sc in 2nd ch from hook and in each ch across. Ch 1, turn. (24 sc)
- Row 2 – 15 (or desired flap length): Sc in each sc across. Ch 1, turn. (24 sc)
- Adjust the number of rows based on how long you want your flap to be. It should be long enough to cover the wallet opening when folded.
FO, leaving a long tail for seaming.
Part 4: Assembly
- Attach Inner Pocket(s):
- Lay your main wallet body flat.
- Position the inner pocket(s) on one end of the main body. Fold the main body up to determine where the pocket should sit.
- Using your tapestry needle and the long tail from the pocket, sew the pocket to the main body along the sides and bottom edge. Leave the top edge open.
- If making two pockets, place the second pocket above the first, or on the opposite end of the main body, and sew in the same manner.
- Fold and Seam Wallet Sides:
- Fold the main wallet body so that the pocket(s) are on the inside. The video demonstrates how the body folds to create the wallet structure.
- Using your tapestry needle and a new piece of yarn (or the long tail from the main body if you left it long enough), seam the side edges of the wallet together. Work through both layers of the folded wallet to create the side seams.
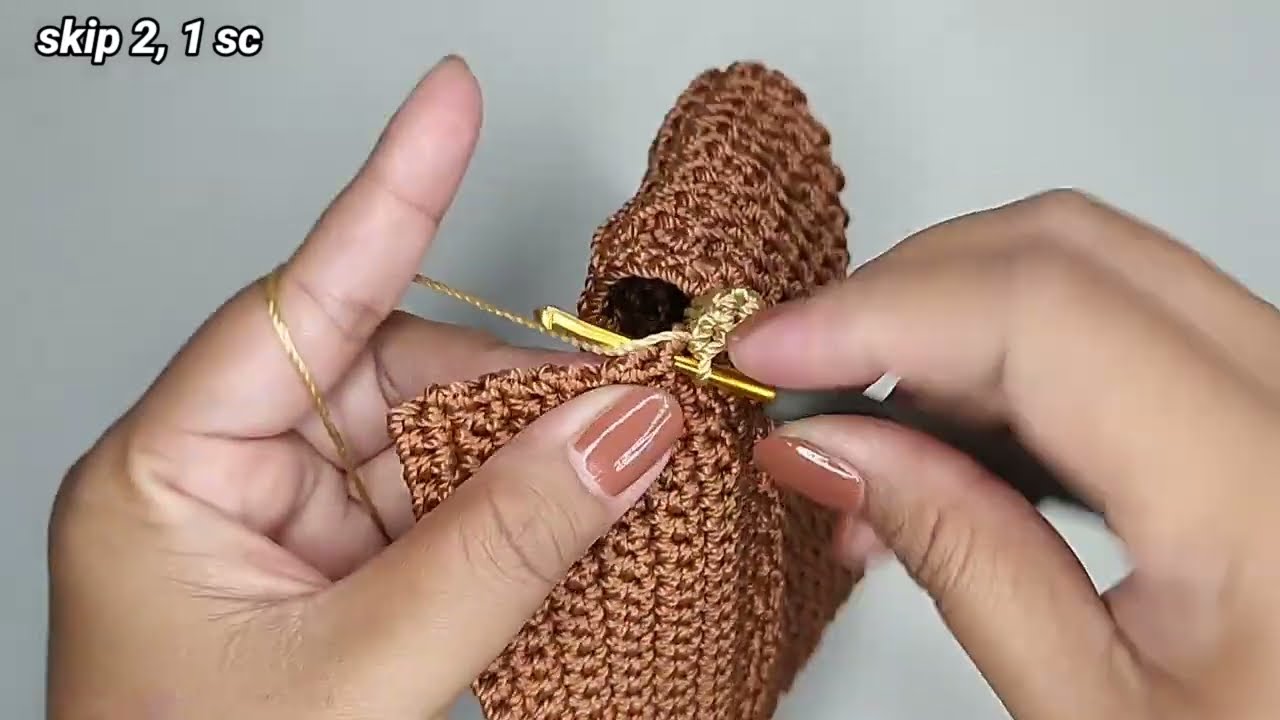
- Attach Flap:
- Position the flap on the back top edge of the wallet, ensuring it aligns with the main body.
- Using your tapestry needle and the long tail from the flap, securely sew the flap to the back of the wallet. Ensure it is centered and firmly attached.
- Add Closure (Optional):
- Magnetic Snap: Sew a magnetic snap to the underside of the flap and the corresponding position on the front of the wallet.
- Button & Loop: Sew a button to the front of the wallet. Create a small chain loop (ch 5-10) on the underside of the flap to go around the button.
- Zipper: For a more secure closure, you can hand-sew a zipper into the wallet opening before attaching the flap.
Part 5: Finishing Touches
- Weave in all ends: Use your tapestry needle to neatly weave in any remaining loose yarn tails.
- Shape: Gently shape your wallet, ensuring all seams are neat and the folds are crisp.
Video tutorial
Versatile Uses for Your Crocheted Wallet:
- Everyday Wallet: Perfect for carrying your essential cards, cash, and ID.
- Coin Purse: Ideal for loose change.
- Small Pouch: Use for earbuds, lip balm, or other small items.
- Gift: A thoughtful and impressive handmade gift for friends or family.
Customization & Tips:
- Yarn Choice: Experiment with different colors or even striped patterns for the body or flap.
- Pocket Customization: Adjust the number and size of pockets to fit your specific needs (e.g., a larger pocket for a phone, smaller slots for multiple cards).
- Stitch Variation: While single crochet creates a dense fabric, you could experiment with working in BLO for a ribbed texture, or using a different stitch for the flap for a contrasting look.
- Embellishment: Add a small embroidered initial, a button, or a small charm to the front of the wallet or flap.
Enjoy crocheting your own beautiful, practical, and unique wallet! It’s a fantastic way to create a personalized accessory that’s sure to become a favorite.