 by
by 
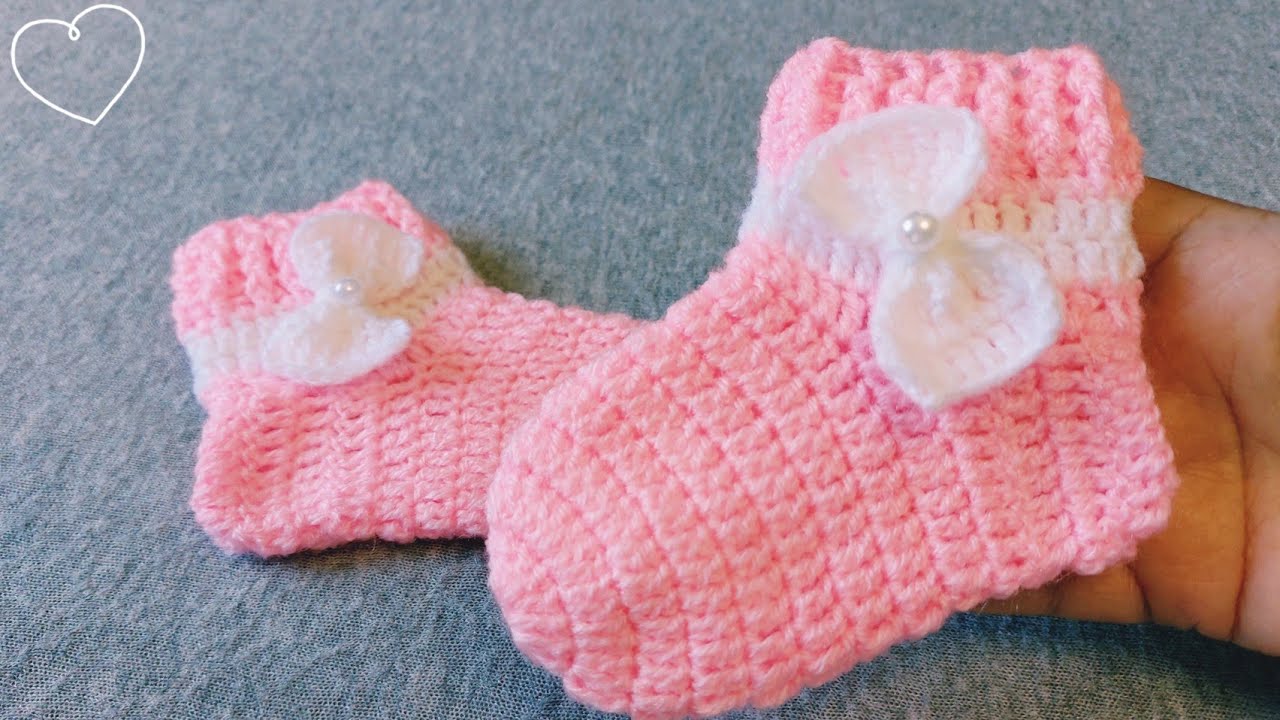
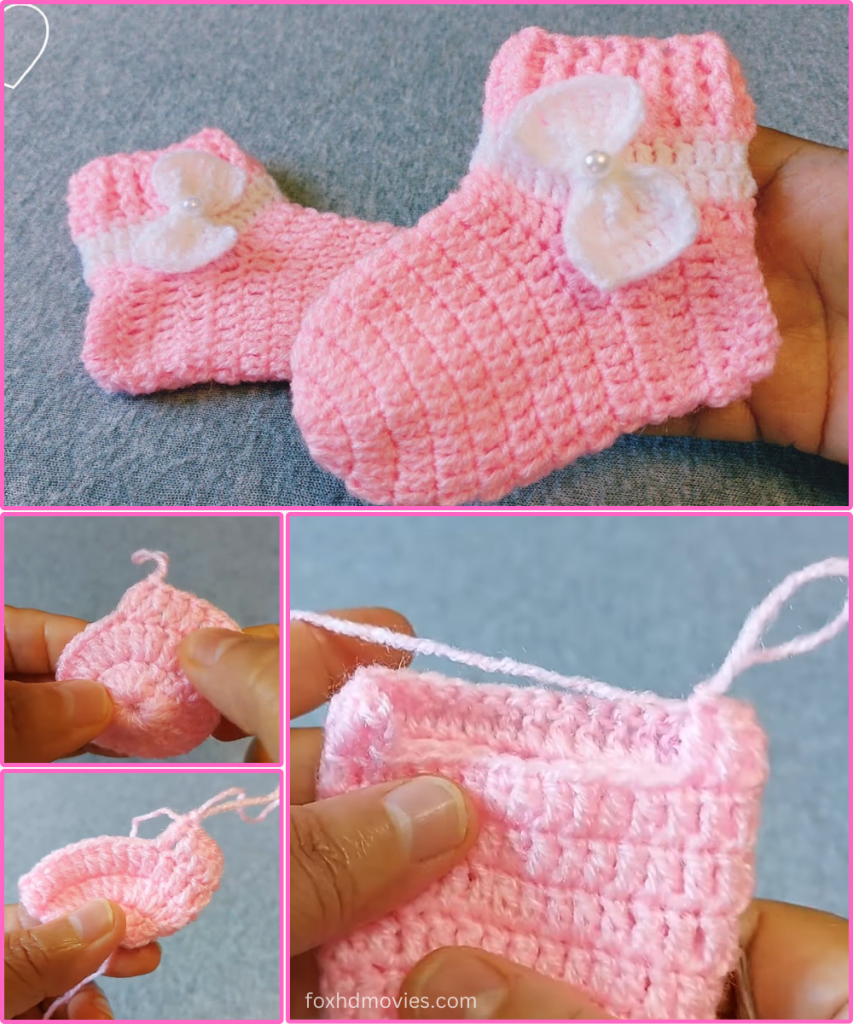
There’s something truly heartwarming about crafting tiny, delicate items for a new arrival, and these sweet baby booties are no exception! With their soft pink hue, crisp white stripe, and the charming little bows adorned with pearls, they are the epitome of baby cuteness. Perfect for a baby shower gift, a newborn photo prop, or simply to keep those tiny toes snug and warm.
What I love most about these booties is their timeless appeal and the subtle texture achieved with simple stitches. They look professional and intricate, but are surprisingly straightforward to crochet, making them a delightful project for intermediate crocheters, or even an ambitious beginner ready to learn how to build a 3D shape from a flat base.
Let’s get ready to hook up some sheer adorableness!
Materials You’ll Need:
- DK Weight (Light Worsted / 8-ply) Yarn:
- Main Color (MC): Approximately 40-50 yards (e.g., Pale Pink).
- Contrasting Color (CC): Approximately 10-15 yards (e.g., White).
- Tip: Choose a super soft, baby-friendly yarn like acrylic, cotton, or a gentle blend that’s easy to wash.
- Crochet Hook: Size D/3.25mm or E/3.5mm (or size needed to obtain gauge).
- A slightly smaller hook than you might typically use for DK yarn helps create a dense fabric that holds its shape well for booties.
- Yarn Needle: For weaving in ends and attaching bows.
- Scissors
- Small Pearl Beads: 2 beads (approx. 6mm-8mm) per bootie, with a hole large enough for your yarn needle and a thin strand of yarn/thread.
- Stitch Markers (Recommended!): Especially helpful for the sole rounds.
Gauge (Crucial for Baby Bootie Sizing!)
Achieving the correct gauge is absolutely essential for baby shoes, as even a small difference can mean they don’t fit. 20 single crochet stitches x 22 rows = 4 inches (10 cm).
Please make a quick swatch before starting! Adjust your hook size until you meet this gauge. If your swatch is larger, go down a hook size. If it’s smaller, go up.
Sizing Notes:
This pattern is written for a baby shoe size approximately 0-3 months.
- Finished Sole Length: Approximately 3.5 inches (9 cm).
To adjust for larger sizes:
- 3-6 Months (approx. 4 inches / 10 cm sole): Add 2-3 chains to the starting chain for the sole and add 1-2 more increase rounds to the sole. Consider using an E/3.5mm hook.
- 6-12 Months (approx. 4.5 inches / 11.5 cm sole): Add 4-5 chains to the starting chain for the sole and add 2-3 more increase rounds. Consider using an F/3.75mm hook.
- Always check the sole measurement against a baby’s actual foot or a reliable size chart.
Abbreviations (US Terms):
- ch: chain
- sl st: slip stitch
- sc: single crochet
- hdc: half double crochet
- dc: double crochet
- inc: increase (2 sc in the same stitch)
- sc2tog: single crochet 2 stitches together (decrease)
- fo: fasten off
- MC: Main Color (Pink)
- CC: Contrasting Color (White)
- BLO: Back Loop Only
Let’s Get Crocheting!
We’ll work these booties from the sole up, then add the body, the ribbed cuff, and finally, those sweet bows.
Part 1: The Sole (Make 2)
We’ll start with an oval base for the foot.
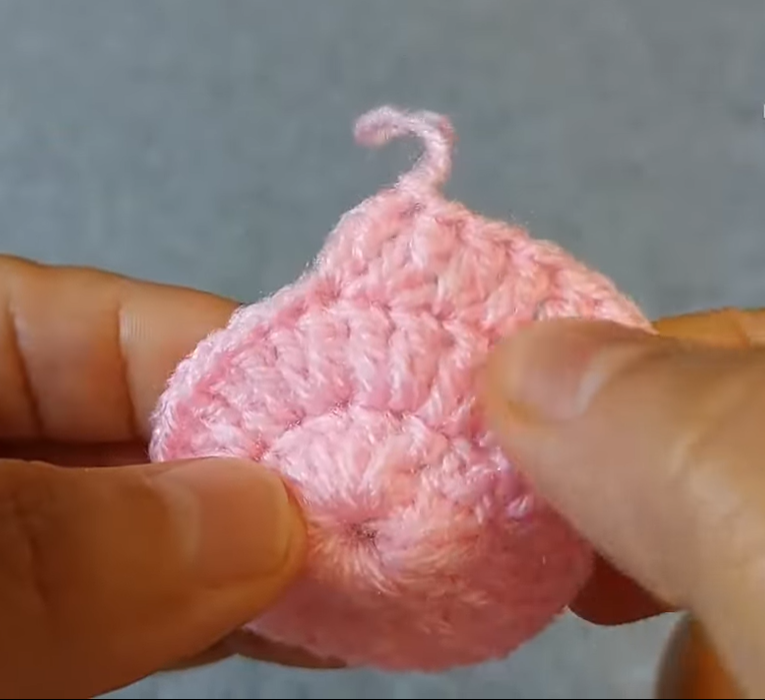
Using MC (Pink):
Ch 11. (Adjust this chain length for different sizes.)
Round 1: 2 sc in 2nd ch from hook, sc in next 8 ch, 4 sc in last ch. Working down the opposite side of the chain: sc in next 8 ch, 2 sc in last ch. Join with sl st to first sc. (24 stitches)
- Place a stitch marker in the first sc of the round if you find it helpful.
Round 2: Ch 1. Inc in next 2 sc, sc in next 8 sc, inc in next 4 sc, sc in next 8 sc, inc in next 2 sc. Join with sl st to first sc. (32 stitches)
Round 3: Ch 1. (Sc in next sc, inc in next sc) 2 times, sc in next 8 sc, (sc in next sc, inc in next sc) 4 times, sc in next 8 sc, (sc in next sc, inc in next sc) 2 times. Join with sl st to first sc. (40 stitches)
- Your sole should now be approximately 3.5 inches (9 cm) long. If you’re sizing up, add another increase round here, distributing increases evenly around the ends of the oval.
Fasten off MC. Weave in ends securely. Repeat for the second sole.
Part 2: The Bootie Body
Now we’ll build up the sides of the bootie.
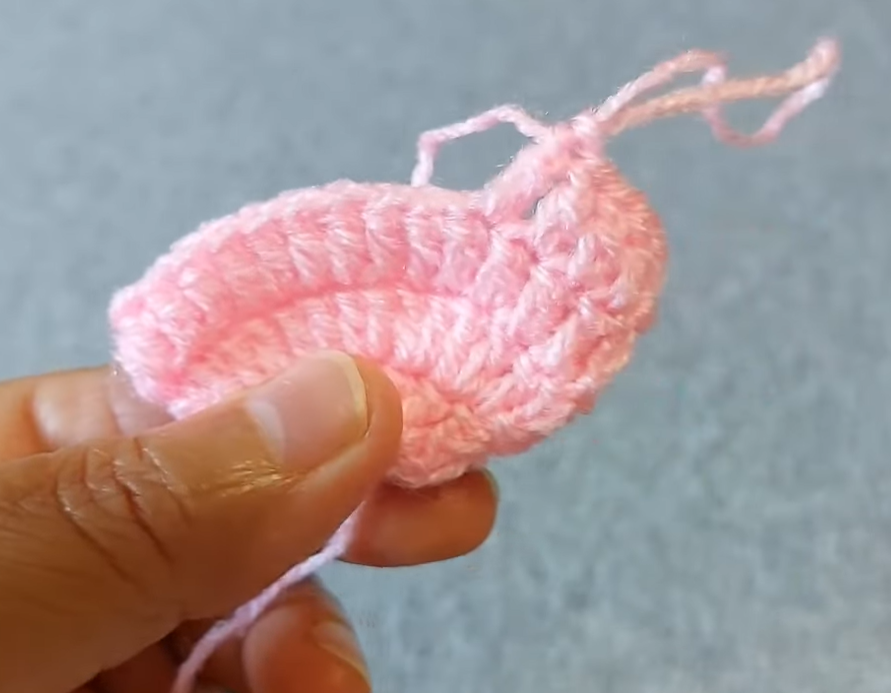
Attach MC (Pink) with a sl st in any stitch of the sole.
Round 1: Ch 1. Sc in each stitch around, working in the back loop only (BLO). Join with sl st to first sc. (This creates a neat ridge separating the sole from the body of the bootie). (40 sc)
Round 2: Ch 1. Sc in each stitch around. Join with sl st to first sc. (40 sc)
Round 3 (Toe Shaping – first decrease round): Ch 1. Sc in next 12 sc. (Sc2tog, sc in next sc) 4 times. Sc in last 12 sc. Join with sl st to first sc. (36 sc)
Round 4 (Toe Shaping – second decrease round): Ch 1. Sc in next 10 sc. (Sc2tog) 8 times. Sc in last 10 sc. Join with sl st to first sc. (28 sc)
Fasten off MC.
Part 3: The Ribbed Cuff
Time for the white stripe and lovely ribbed texture!
Attach CC (White) with a sl st in any stitch.
Round 1 (Ribbed Cuff): Ch 1. Sc in each stitch around, working in the back loop only (BLO). Join with sl st to first sc. (28 sc)
Round 2 (Ribbed Cuff): Ch 1. Sc in each stitch around, working in the back loop only (BLO). Join with sl st to first sc. (28 sc)
- This creates a neat, stretchy ribbed cuff. Add more rows if you want a taller cuff.
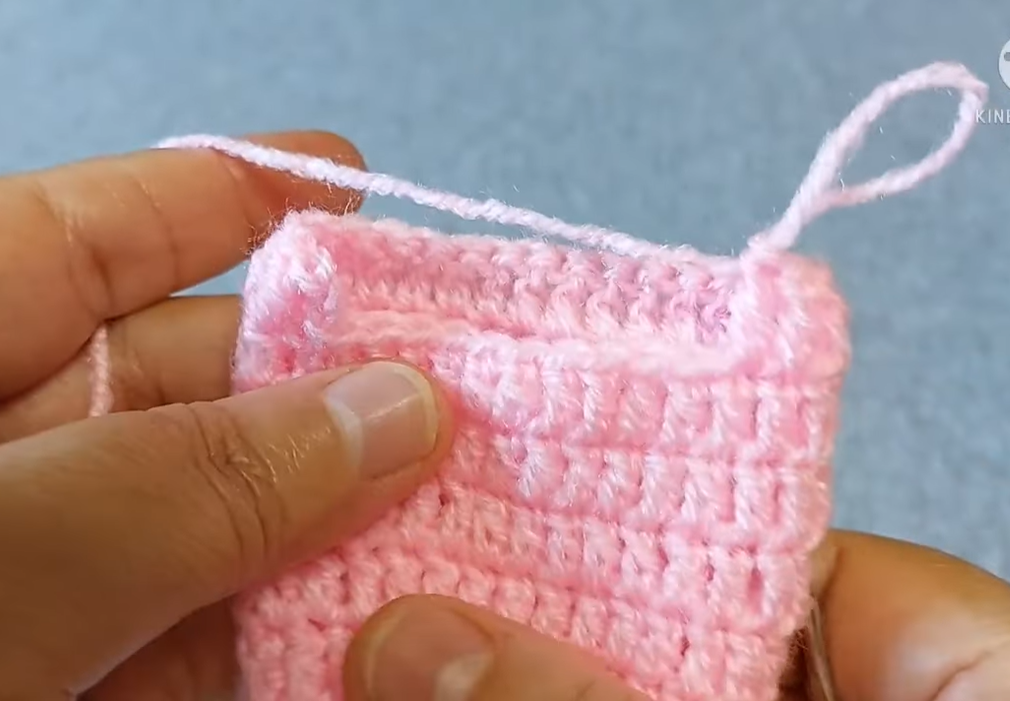
Fasten off CC, leaving a tail for weaving in. Weave in all remaining ends securely inside the bootie.
Part 4: The Cute Little Bows (Make 2 per bootie, 4 total)
These little bows add the perfect finishing touch!
Using CC (White):
Ch 7.
Row 1: Sc in 2nd ch from hook and in each ch across. Ch 1, turn. (6 sc)
Rows 2-4: Sc in each sc across. Ch 1, turn. (6 sc)
Fasten off, leaving a long tail (about 10-12 inches) for assembly and attaching the pearl.
Assembling the Bow:
- Pinch the center of the sc rectangle you just made.
- Wrap the long tail tightly around the pinched center a few times to create the bow shape. Secure with a knot on the back.
- Attach Pearl: Thread your yarn needle with a thin strand of yarn (matching CC or clear sewing thread). Pass it through the hole of one pearl bead. Position the pearl directly in the center front of the bow. Stitch through the back of the bow multiple times to secure the pearl firmly. Knot and weave in ends.
Attaching the Bows to Bootie: Carefully position each bow on the side of the bootie cuff, as shown in the image. You’ll attach two bows to each bootie, one on each side, symmetrical to each other. Using your yarn needle and a small piece of matching yarn, securely stitch the bows onto the cuff. Hide your knots and ends inside the bootie.
Video tutorial
Your Sweet Baby Booties are Complete!
Look at those adorable little creations! These handmade booties are truly special and will keep tiny toes warm and cozy. They make an incredible personal gift for a new arrival, or just a beautiful addition to a baby’s wardrobe.
I hope you enjoyed crocheting these lovely booties! If you make them, I would absolutely love to see your finished projects. Share your photos on social media and tag me (if you have an associated platform)!
Happy hooking!