by
by 
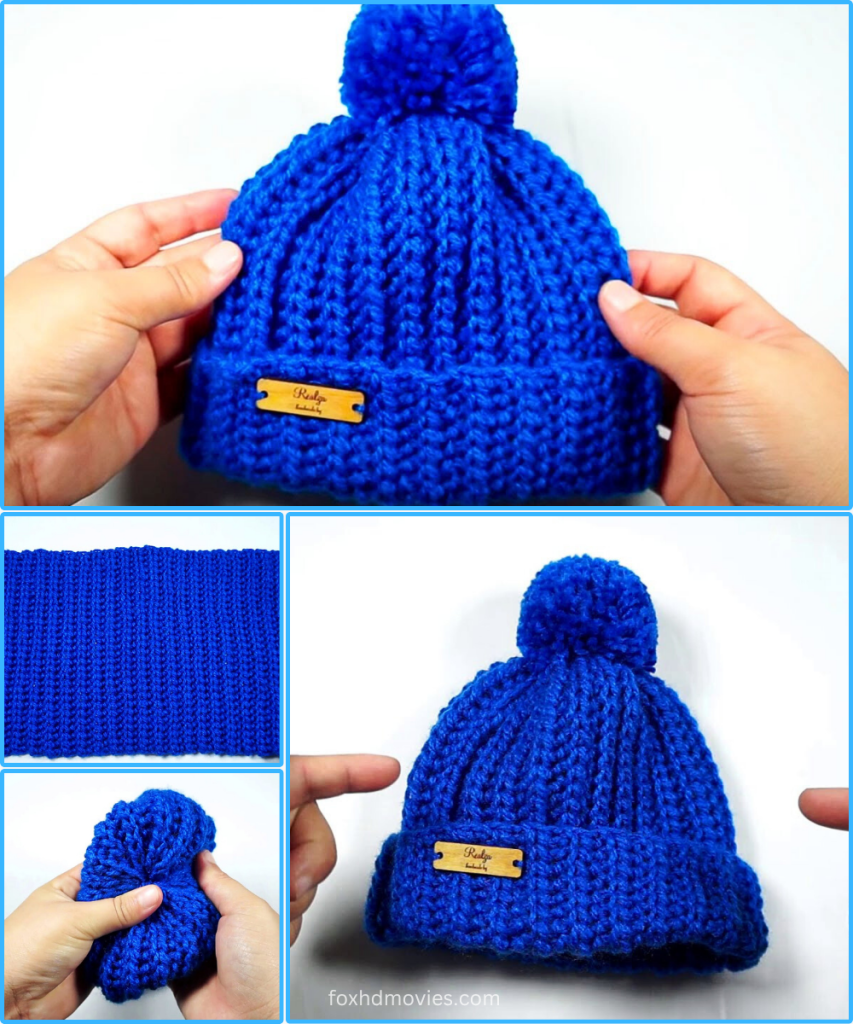
Hey there, fellow makers! Ready to add a vibrant splash of color and incredible warmth to your winter wardrobe? Today, I’m thrilled to share the pattern for this eye-catching Bright Blue Ribbed Beanie! Featuring a classic ribbed texture and a cheerful pom-pom, this hat is designed to be your new go-to accessory for those chilly days.
This pattern is perfect for crocheters of all levels, from adventurous beginners to seasoned pros. The magic lies in working simple stitches into the back loop only, which creates that lovely stretchy, knit-like ribbing. Let’s dive in and create something beautiful!
Skill Level: Easy (basic stitches, working in back loop only, simple shaping)
Materials You’ll Need:
- Yarn: Approximately 150-200 grams of Worsted Weight (Aran/10-ply) yarn in a bright blue or your favorite bold color! Acrylic or a soft wool blend will provide excellent warmth and stitch definition.
- Crochet Hook: 5.5 mm (I/9) crochet hook. (Adjust hook size if needed to meet gauge.)
- Tapestry Needle: For weaving in ends and seaming.
- Scissors
- Stitch Marker: (Optional, but helpful for marking rows)
- Pom-Pom Maker: (Optional, but recommended for a consistent, fluffy pom-pom) for a medium to large pom-pom (e.g., 3 inches / 7.5 cm).
- Small wooden or faux leather tag (Optional, as seen in the inspiration image) and a small needle/thread for attaching it.
Gauge:
- 13 stitches (in HDC BLO) x 9 rows (in HDC BLO) = 4 inches (10 cm) (Seriously, don’t skip the gauge swatch! It ensures your hat turns out the correct size.)
Abbreviations (US Terms):
- ch: chain
- sl st: slip stitch
- hdc: half double crochet
- hdc blo: half double crochet in back loop only
- st(s): stitch(es)
- fo: fasten off
Notes Before You Start:
- This beanie is constructed by crocheting a flat rectangle in rows, then seaming it together and gathering the top. This method creates beautiful vertical ribbing.
- Ch 1 at the beginning of rows does NOT count as a stitch.
- The “ribbing” effect is created by working into the back loop only (BLO) of each stitch. This is the secret sauce for that stretchy, cozy texture!
Pattern Instructions:
Part 1: The Beanie Body (The Ribbed Rectangle)
We will start by chaining the desired height of the hat, from the bottom edge (brim) to the top (crown).
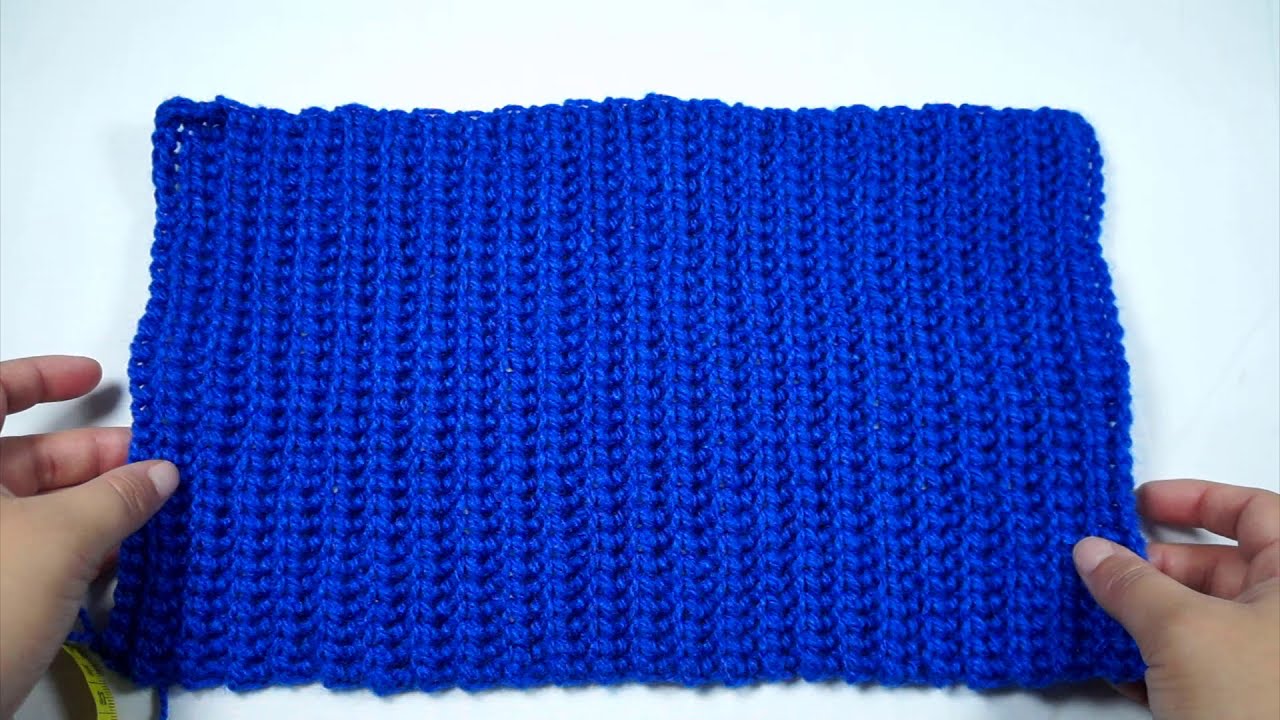
Foundation Chain: Ch 50 (for an adult Medium size, with a folded brim).
- To adjust height:
- For a shorter beanie (no fold), chain fewer stitches (e.g., Ch 40-45).
- For a slouchier beanie or a very deep brim, chain more stitches (e.g., Ch 55+).
- The first 10-12 chains will form your brim, and the remaining chains will be the body of the hat.
Row 1: Hdc in the 2nd ch from hook and in each ch across. (49 hdc) Row 2: Ch 1, turn. Hdc blo in each st across. (49 hdc blo)
Repeat Row 2 until your rectangle measures approximately 17-19 inches (43-48 cm) in length, or until it can comfortably wrap around your head with a slight stretch. For an adult Medium, this will be about 40-45 rows.
- Important Fit Tip: The rectangle should be slightly smaller than your head circumference, as the BLO stitches create a very stretchy and forgiving fabric. When stretched around your head or a head-sized object, it should fit snugly but not be too tight.
Fo, leaving a very long tail (at least 20-25 inches / 50-65 cm) for seaming and gathering the top.
Part 2: Assembly and Shaping
Now, for the magic that transforms our flat rectangle into a beautifully shaped beanie!
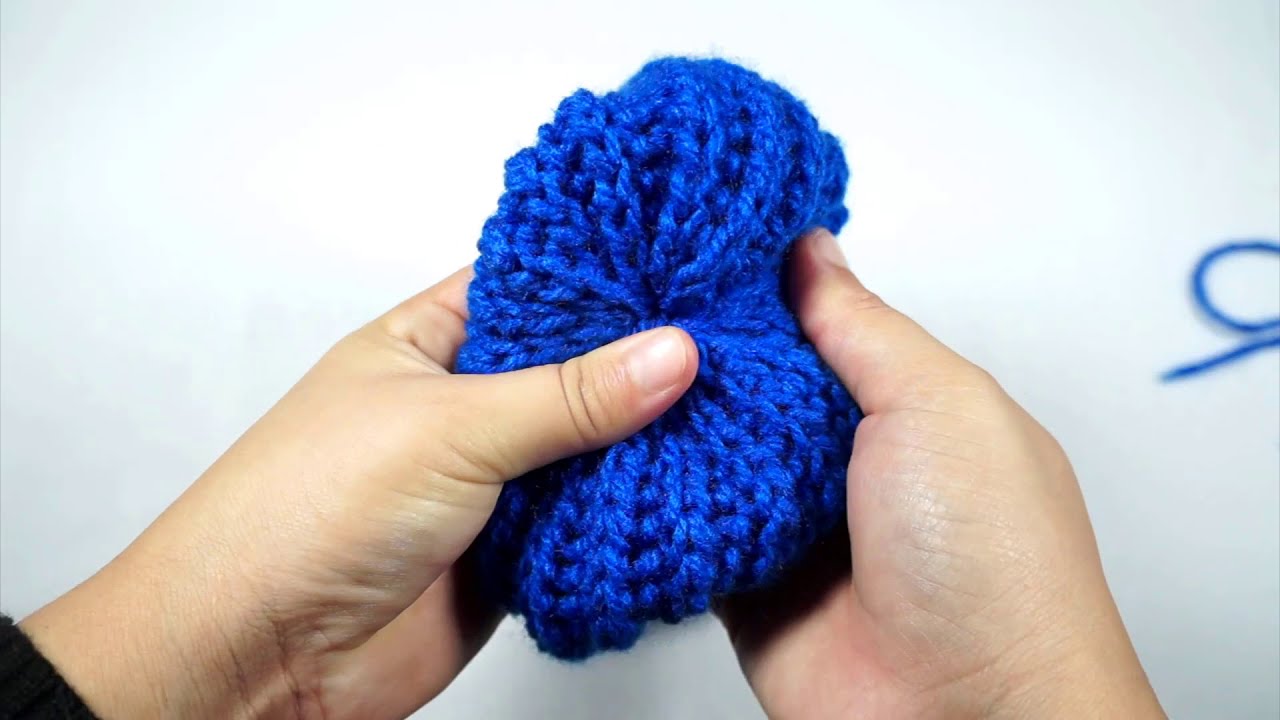
- Seam the Sides: Fold your crocheted rectangle in half lengthwise, with the right sides facing each other. Line up the starting chain edge with the last row worked. Using your tapestry needle and the long tail, whip stitch or mattress stitch the two side edges together. Work neatly to create an invisible vertical seam.
- Gather the Top (Crown): Once the side seam is complete, you’ll have a tube. Keep the seam on the inside (wrong side facing out for now). Thread your tapestry needle with the remaining long tail.
- Work a running stitch (weaving the needle in and out) all the way around the raw edge of the top opening of the tube. Pass the needle through the tops of the stitches of the last row.
- Once you’ve gone all the way around, pull the yarn tail tightly to gather the opening closed. Pull it as tight as you can, forming a small, puckered hole.
- Make several small stitches across the gathered hole to securely close it and prevent it from opening up. Pass the needle through the center of the gathered fabric a few times.
- Weave in the remaining yarn end securely on the inside of the hat.
- Weave in All Ends: Don’t forget to weave in any remaining starting tails for a super neat finish.
Part 3: The Pom-Pom!
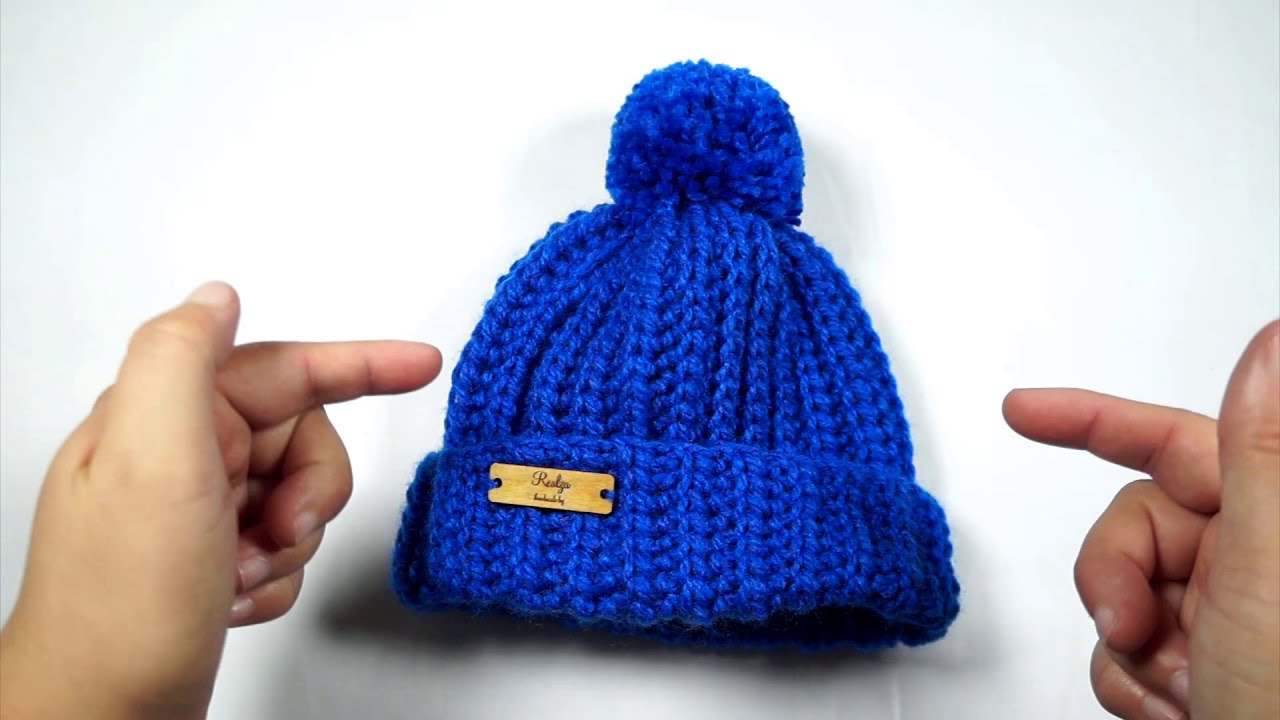
- Using your pom-pom maker (or by hand), create a generous and fluffy pom-pom using your blue yarn. Aim for a size that’s substantial enough to make a statement (e.g., 3-3.5 inches / 7.5-9 cm in diameter).
- Leave long tails when tying off your pom-pom.
- Position the pom-pom directly on top of the gathered crown of the beanie.
- Using your tapestry needle, thread the pom-pom tails through the stitches at the very top of the hat and tie them securely on the inside. Double-knot them for extra security! Trim any excess.
Part 4: Optional Tag (As Seen in Image)
If you have a small wooden, faux leather, or fabric tag, you can attach it to the brim for that professional, handmade touch.
- Decide where you want to place your tag on the brim.
- Using a small needle and matching thread, carefully sew the tag onto the brim, securing it tightly.
Video tutorial
Finishing Touches:
- Gently block your beanie if desired, to help the stitches settle and achieve an even shape. (Simply wet it, gently squeeze out excess water, shape it, and let it air dry flat).
- Fold up the bottom brim of the hat to your desired height. The ribbing will naturally hold its shape beautifully.
And there you have it! Your very own wonderfully warm and strikingly colorful Bright Blue Ribbed Beanie. This hat is perfect for adding a pop of personality to your winter outfits or making a fantastic handmade gift.
If you make one, please share your creation with me! Tag me on social media using #BrightBlueBeanie – I’d love to see your finished hats!
Happy hooking!