by
by 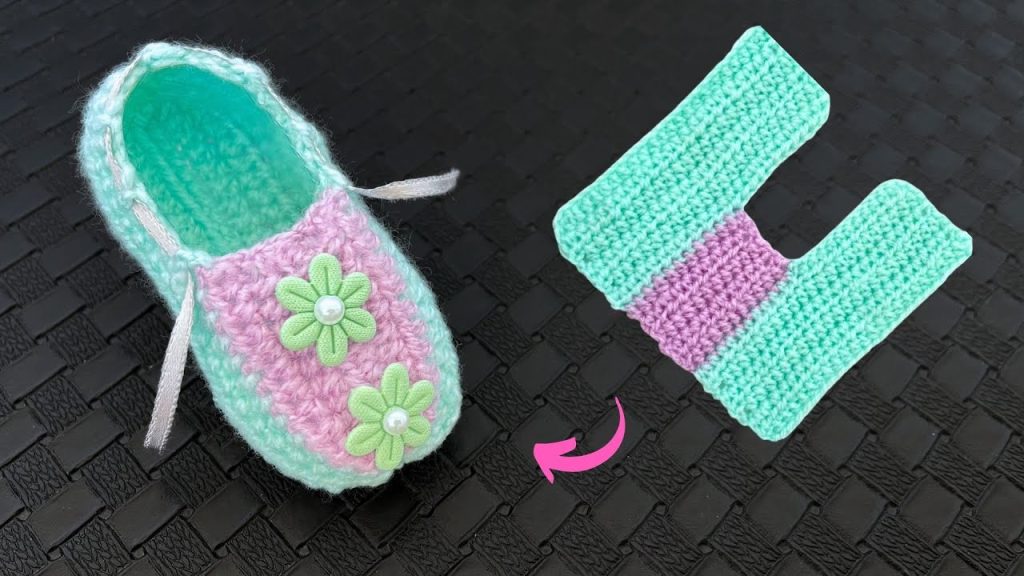
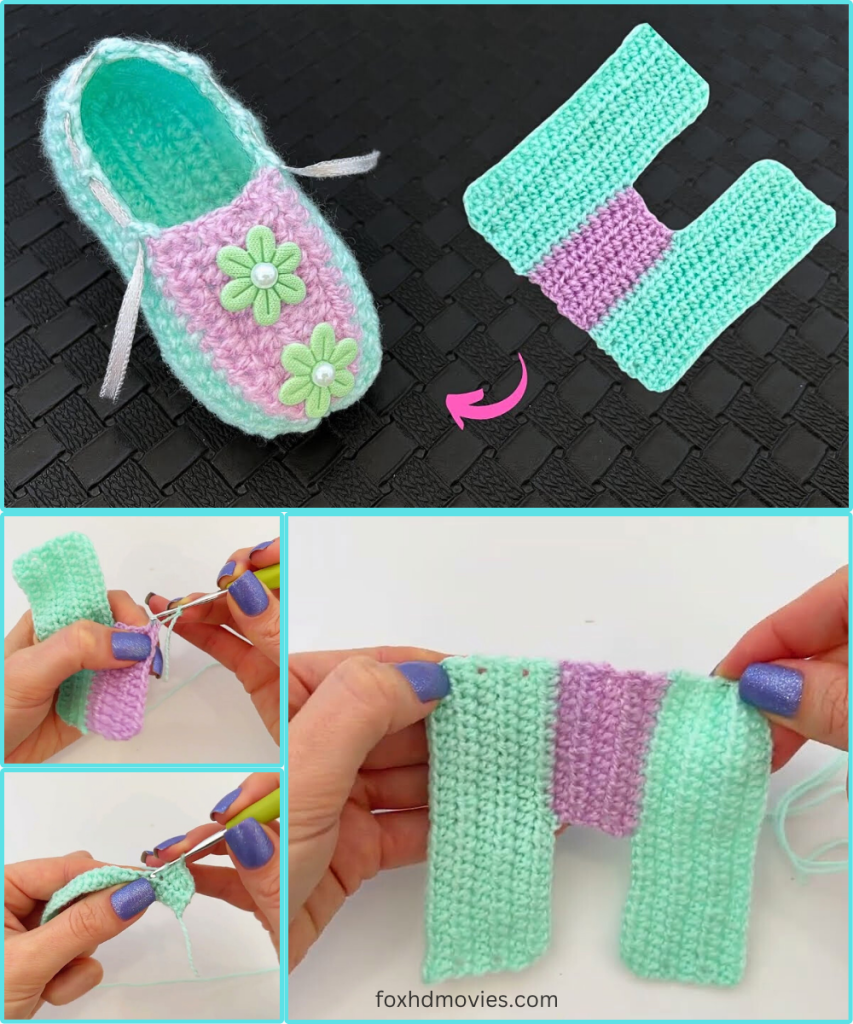
Hello, creative crafters! Today, we’re diving into a really neat crochet project that results in the most adorable baby booties. What makes this pattern unique is that the upper part of the bootie is crocheted flat, then folded and seamed to create its distinctive shape. This technique allows for beautiful color blocking and a lovely, snug fit.
The image shows a delightful combination of mint green and a soft lilac, embellished with sweet little green flowers and pearls – making them perfect for a little spring or summer baby! This pattern is suitable for confident beginners and intermediate crocheters eager to try a new construction method.
Materials You’ll Need:
- Yarn: DK weight (Light Worsted / 8 ply) yarn in two contrasting colors.
- Color A: Mint Green (main color for sole and outer parts of upper)
- Color B: Lilac (for the center band of the upper)
- (Approx. 30-40g of Color A, 10-20g of Color B per pair, depending on size).
- Crochet Hook: 3.5mm (E/4) or 4.0mm (G/6) – choose the hook size that gives you a nice, even fabric with your chosen yarn.
- Small Ribbon: Approx. 8-10 inches (20-25 cm) of thin white or cream ribbon per bootie for the lace-up detail.
- Small Felt Flowers/Crochet Appliqués: Two small green flowers (or a similar color) per bootie. These look like ready-made felt flowers or very simple crochet ones.
- Small Pearls: Two small pearls per bootie for the center of the flowers.
- Yarn Needle: For weaving in ends and seaming.
- Sewing Needle & Thread: For attaching pearls and possibly flowers securely.
- Scissors
- Stitch Markers (optional, but helpful for sole shaping)
Abbreviations Used:
- ch: chain
- sl st: slip stitch
- sc: single crochet
- hdc: half double crochet
- dc: double crochet
- inc: increase (2 stitches in the same stitch)
- hdc2tog: half double crochet 2 together (decrease)
- st(s): stitch(es)
- FO: fasten off
- RS: right side
- WS: wrong side
Gauge (Approximate):
While not strictly necessary, achieving a similar gauge will help ensure your booties are roughly the same size. 18 hdc x 13 rows = 4 inches (10 cm)
Pattern: Blossom Sweet Baby Booties
These booties are worked in two main parts: the sole and the upper. The pattern is for approximately 0-3 months, with notes on how to adjust for slightly larger sizes.
Finished Sole Length (approx): 3.5 – 4 inches (9-10 cm)
Part 1: The Sole (Make 2 – in Color A)
We’ll start by creating the oval sole, which forms the base of the bootie.

Row 1: Ch 12. Row 2: 2 sc in 2nd ch from hook, sc in next 9 ch, 6 sc in last ch. Working along the other side of the starting chain: sc in next 9 ch, 2 sc in last ch. Join with a sl st to the top of the first sc. (28 sc) Row 3: Ch 1. Inc in first 2 sc, sc in next 9 sc, inc in next 6 sc, sc in next 9 sc, inc in last 2 sc. Join with a sl st to the top of the first sc. (40 sc) Row 4: Ch 1. Sc in first 2 sc, inc in next 2 sc, sc in next 9 sc, (inc, sc) repeat 6 times, sc in next 9 sc, inc in last 2 sc. Join with a sl st to the top of the first sc. (52 sc)
- For a slightly larger sole (3-6 months): You can add an additional increase round (e.g., using hdc) after Row 4, ensuring increases are evenly distributed to maintain the oval shape.
FO and weave in ends.
Part 2: The Upper Piece (Make 2)
This unique piece is crocheted flat, then folded. The image shows a smooth texture, likely achieved with simple hdc stitches.

Start with Color A.
Row 1: Ch 21. Hdc in 2nd ch from hook and in each ch across. (20 hdc) Row 2-3: Ch 1. Turn. Hdc in each hdc across. (20 hdc)
Change to Color B.
Row 4-7: Ch 1. Turn. Hdc in each hdc across. (20 hdc)
- You should have 4 rows of Color B.
Change to Color A.
Row 8-9: Ch 1. Turn. Hdc in each hdc across. (20 hdc)
At this point, you have a rectangular piece with a strip of Color B in the middle. Now we need to create the ‘arms’ of the H-shape.
Row 10 (Creating ‘H’ Shape): Ch 1. Turn. Hdc in first 6 hdc. Ch 8 (this creates the gap for the ankle). Skip 8 hdc. Hdc in last 6 hdc. (12 hdc + 8 ch)
Row 11: Ch 1. Turn. Hdc in first 6 hdc, hdc in each of the 8 ch, hdc in last 6 hdc. (20 hdc)
Row 12-13: Ch 1. Turn. Hdc in each hdc across. (20 hdc)
FO, leaving a very long tail for seaming (approx. 24-30 inches / 60-75 cm).
Part 3: Assembly
This is where the magic happens!

- Attach Upper to Sole:
- Align the starting edge (Row 1) of the Upper Piece (Color A side) to the heel end of the Sole. The wrong side of the Upper Piece should face inwards when folded.
- Using your long tail and yarn needle, whip stitch or mattress stitch the first 20 stitches of the Upper Piece to the corresponding 20 stitches at the heel of the sole.
- Now, continue stitching along the sides of the sole. You will be attaching the long edges of the Upper Piece to the sole. The image shows the upper rising vertically from the sole.
- Stitch up the long straight sides of the upper piece until you reach the beginning of the ‘H’ shape (where the chain space was made in Row 10).
- Ensure the ‘H’ opening is centered at the top of the foot.
- Forming the Toe:
- Once the sides are attached to the sole, the remaining section of the upper piece (the last 3 rows in Color A) will be folded over the top of the foot towards the toe.
- Carefully pinch the toe end of the sole together and align it with the remaining rows of the upper piece. Stitch these together to form the enclosed toe of the bootie. You might need to gather slightly to fit.
- Lace Up the Ankle:
- Thread a length of thin ribbon through the ch-8 gap created in Row 10. This forms the decorative lace. Tie a small bow at the front.
- Embellish the Toe:
- Attach the two small green felt/crochet flowers to the toe area of the bootie, as shown in the picture, overlapping slightly.
- Using your sewing needle and thread, securely sew a small pearl into the center of each flower.
Video tutorial
Finishing Touches:
- Weave in any remaining loose ends.
- Make a matching second bootie!
- Give your finished booties a gentle block if desired to set the shape.
- Admire your unique and utterly adorable handmade baby gift!
I hope you enjoy this creative approach to making baby booties! Please share your finished Blossom Sweet Baby Booties – I’d love to see how they turn out. Happy crocheting!