by
by 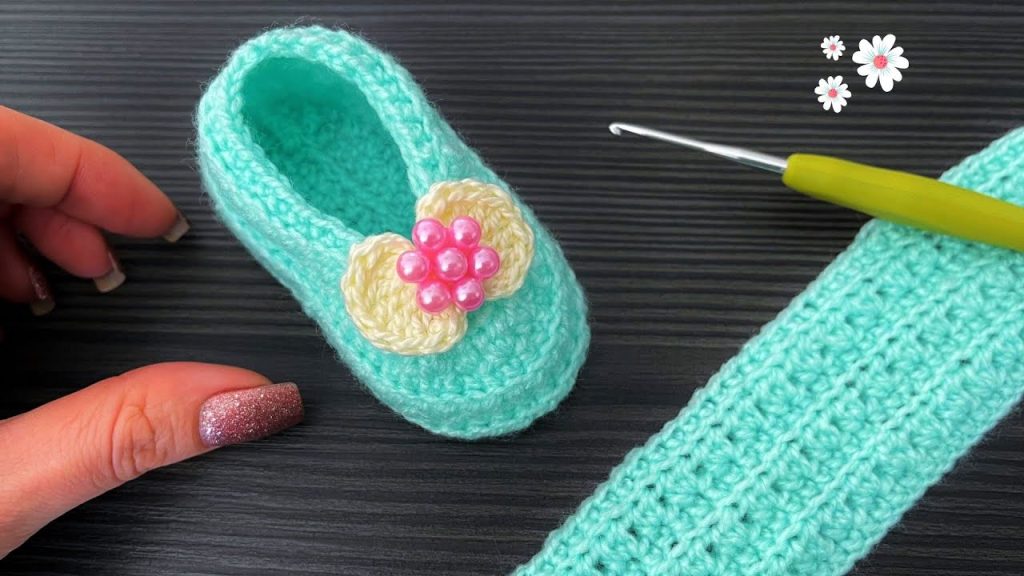
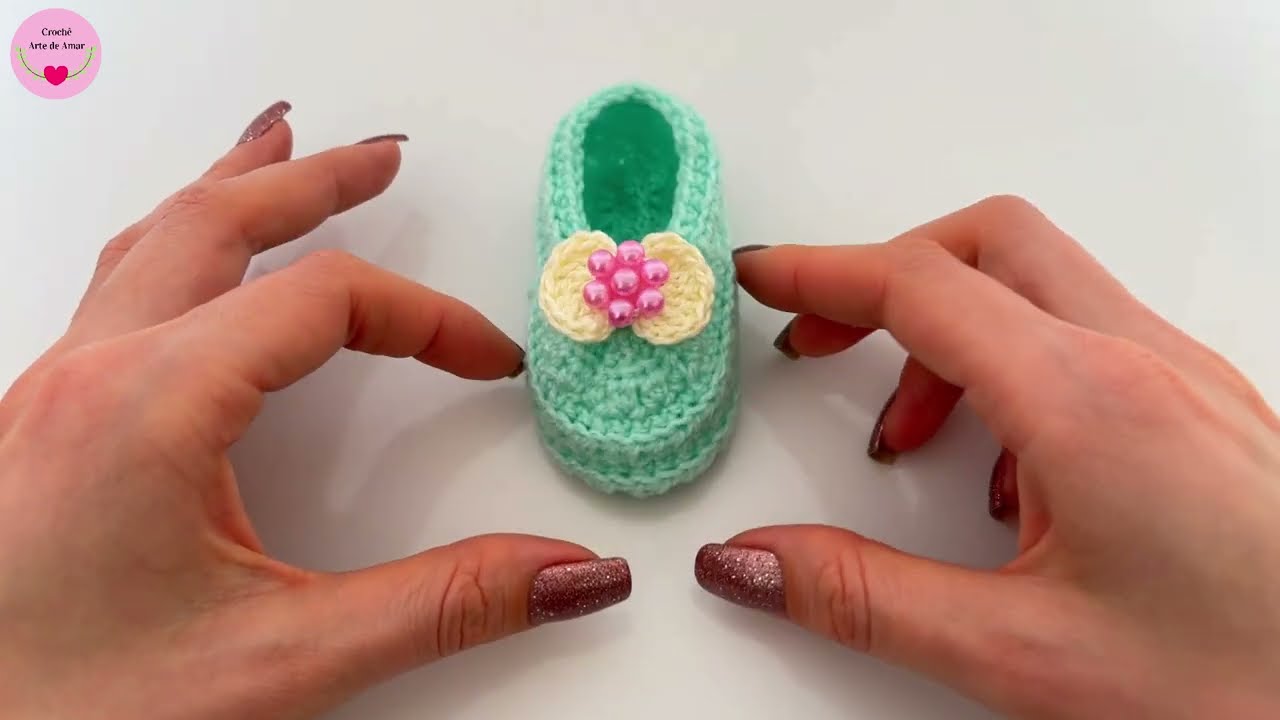
Hello, lovely crafters! Get ready to make another heartwarming project for the little ones in your life. Today, we’re focusing on these delightful baby booties in a serene mint green, adorned with a sweet cream-colored bow and pretty pink pearls. This design is perfect for adding a touch of handmade charm to a baby’s outfit, and it makes an absolutely precious gift.
This pattern uses common crochet stitches and techniques, making it enjoyable for confident beginners and intermediate crocheters. We’ll pay close attention to the sole shape, the slightly different textured body (which appears to be a clean half double crochet or similar stitch), and that adorable bow!

Materials You’ll Need:
- Yarn: DK weight (Light Worsted / 8 ply) yarn in your main color (mint green shown) and a contrasting color for the bow (cream shown). (Approx. 50-70g for the pair, depending on size).
- Crochet Hook: 3.5mm (E/4) or 4.0mm (G/6) – choose the hook size that gives you a nice, even fabric with your chosen yarn.
- Small Pearls/Beads: A handful of small pink pearls or beads for the center of the bow.
- Sewing Needle & Thread: To attach the pearls securely.
- Yarn Needle: For weaving in ends.
- Scissors
- Stitch Markers (optional, but highly recommended for working in rounds)
Abbreviations Used:
- ch: chain
- sl st: slip stitch
- sc: single crochet
- hdc: half double crochet
- dc: double crochet
- inc: increase (2 stitches in the same stitch)
- hdc2tog: half double crochet 2 together (decrease)
- st(s): stitch(es)
- FO: fasten off
Gauge (Approximate):
While not strictly necessary for this project, achieving a similar gauge will help ensure your booties are roughly the same size as the pattern. 18 hdc x 13 rows = 4 inches (10 cm)
Pattern: Sweet Baby Booties
These booties are worked from the sole up. The pattern is for approximately 0-3 months, with notes on how to adjust for slightly larger sizes.
Finished Sole Length (approx): 3.5 – 4 inches (9-10 cm)
Part 1: The Sole (Make 2)
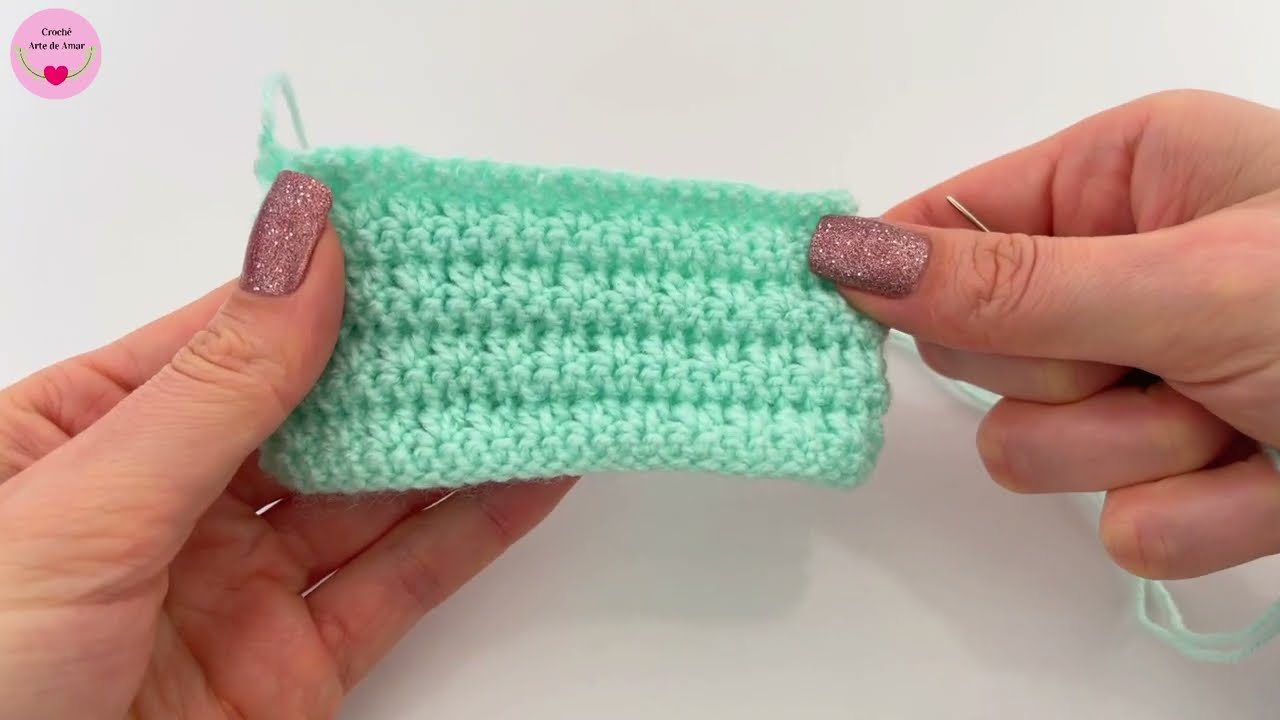
We’ll start by creating the oval sole. This time, let’s use a slightly firmer sole with single crochets for the base, then build up with half double crochets for a sturdy foundation.

Row 1: Ch 12. Row 2: 2 sc in 2nd ch from hook, sc in next 9 ch, 6 sc in last ch. Working along the other side of the starting chain: sc in next 9 ch, 2 sc in last ch. Join with a sl st to the top of the first sc. (28 sc) Row 3: Ch 1. Inc in first 2 sc, sc in next 9 sc, inc in next 6 sc, sc in next 9 sc, inc in last 2 sc. Join with a sl st to the top of the first sc. (40 sc) Row 4: Ch 1. Sc in first 2 sc, inc in next 2 sc, sc in next 9 sc, (inc, sc) repeat 6 times, sc in next 9 sc, inc in last 2 sc. Join with a sl st to the top of the first sc. (52 sc)
- For a slightly larger sole (3-6 months): You can add an additional increase round using hdc, increasing evenly around to maintain the oval shape. For an even larger size, add another round, increasing as needed.
Part 2: Building the Sides
The main body of the bootie in the image appears to be worked in simple half double crochet stitches, giving a smooth yet textured look. The long swatch also clearly shows this consistent hdc stitch.
Round 5 (Base for Sides): Ch 1. Hdc in BLO around. Join with a sl st to the top of the first hdc. (52 hdc)
- Working in the BLO for this round creates a nice, crisp edge for the sole to stand up from.
Round 6-8: Ch 1. Hdc in each hdc around. Join with a sl st to the top of the first hdc. (52 hdc)
- You should have 3 rounds of regular hdc above the sole’s initial edge.
Part 3: Shaping the Toe
Now we’ll decrease to form the toe of the bootie.
Round 9: Ch 1. Hdc in next 16 hdc. (Hdc2tog) 10 times. Hdc in next 16 hdc. Join with a sl st to the top of the first hdc. (42 hdc)
Round 10: Ch 1. Hdc in next 12 hdc. (Hdc2tog) 9 times. Hdc in next 12 hdc. Join with a sl st to the top of the first hdc. (33 hdc)
Round 11: Ch 1. Sc in next 9 sc. (Sc2tog) 7 times. Sc in next 10 sc. Join with a sl st to the top of the first sc. (26 sc)
- For a wider opening, you could do one less decrease round or adjust the number of decreases here.
Round 12: Ch 1. Sc in each sc around. Join with a sl st to the top of the first sc. (26 sc)
- This round creates a neat and firm finish for the top edge of the bootie.
FO and weave in all ends securely.
Part 4: The Sweet Bow Accent (Make 2 – in contrasting color)
This bow is made by creating a rectangle and cinching it in the middle.
Rectangle: Row 1: Ch 11. Hdc in 2nd ch from hook and in each ch across. (10 hdc) Row 2-5: Ch 1. Turn. Hdc in each hdc across. (10 hdc) FO, leaving a long tail for assembly.
Assembly:
- Take your rectangle piece. Using your yarn needle and the long tail, thread the tail through the center of the rectangle a few times, cinching it tightly to form a bow shape. Wrap the yarn around the center several times to secure the shape.
- Once the bow shape is secure, use your sewing needle and thread to carefully sew the pink pearls onto the center of the bow, creating a cluster as seen in the image. Secure them well so they don’t pose a choking hazard.
- Sew the finished bow securely onto the top of each bootie, just above the toe shaping.
Video tutorial
Finishing Touches:
- Give your finished booties a gentle block if desired to even out stitches and perfect their shape.
- Pair them together for an irresistible baby gift!
I hope you love creating these charming booties! Don’t forget to share your creations – I’d love to see them. Happy crocheting!