 by
by 
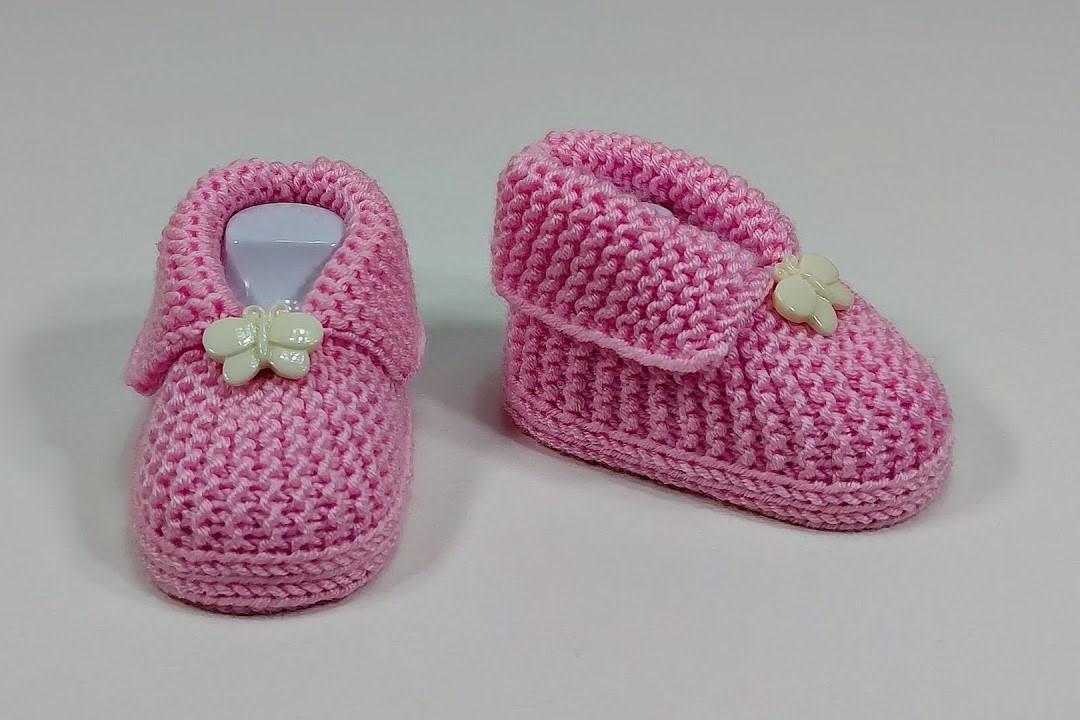
Wrap tiny feet in warmth and handmade love with these charming knitted baby booties! Featuring a beautiful garter stitch texture that’s soft and squishy, a cozy fold-over cuff, and a sweet decorative butterfly button, these booties are both adorable and practical. They make a perfect gift for a baby shower or a lovely addition to your own little one’s wardrobe.
This knitting pattern is suitable for intermediate knitters, or confident beginners comfortable with casting on, knitting, decreasing, and picking up stitches.
Yarn:
- DK (Double Knit) or Light Worsted Weight yarn in a soft pink, as pictured. Choose a baby-friendly yarn that is machine washable for easy care.
Needles:
- 3.5 mm (US 4) knitting needles (either straight needles or circular needles if you prefer to knit flat or in the round; this pattern assumes knitting flat for the sole and then knitting in the round for the upper for a seamless look).
- A spare needle or stitch holder (optional, for holding stitches while shaping).
Notions:
- Tapestry needle for seaming (if needed) and weaving in ends
- Scissors
- Stitch markers (helpful for marking beginning of rounds or decreases)
- 2 small decorative butterfly buttons or similar embellishments (one for each bootie, as shown).
Gauge (Crucial for Sizing!):
- 22 stitches and 40 rows (20 garter stitch ridges) = 4 inches (10 cm) in garter stitch.
- Always knit a small swatch to check your gauge, as it’s crucial for the finished size of the booties! Adjust needle size if necessary.
Size:
- Newborn to 3 months (approximately 3.75 – 4 inches / 9.5-10 cm sole length when finished).
- To adjust for larger sizes, you will need to increase the initial cast-on for the sole and add more rows/stitches as needed. For larger sizes, also increase the number of stitches picked up around the sole proportionally.
Abbreviations (US Knitting Terms):
- CO: Cast On
- K: Knit
- P: Purl
- St(s): Stitch(es)
- Pm: Place Marker
- Sm: Slip Marker
- K2tog: Knit 2 stitches together (single right-leaning decrease)
- SSK: Slip, slip, knit (single left-leaning decrease)
- BO: Bind Off
- WS: Wrong Side
- RS: Right Side
Pattern Instructions:
These booties are worked in sections: first the sole, then the upper body by picking up stitches around the sole, then the toe shaping, and finally the cuff.
Part 1: The Sole (Knit Flat – Garter Stitch)
The sole is worked back and forth in rows to create a flat oval shape.

- CO 10 stitches.
- Row 1 (RS): K all stitches.
- Row 2 (WS): K all stitches.
- Row 3 (Increase Row – RS): K1, M1 (make 1 stitch), K to last stitch, M1, K1. (2 stitches increased).
- Row 4 (WS): K all stitches.
- Repeat Rows 3 and 4 three more times. You will have 18 stitches.
- Next 6 Rows: K all stitches. (Work straight, without increases).
- Next Row (Decrease Row – RS): K1, K2tog, K to last 3 stitches, SSK, K1. (2 stitches decreased).
- Next Row (WS): K all stitches.
- Repeat Rows 8 and 9 three more times. You will have 10 stitches remaining.
- BO all 10 stitches.
- You have now created a flat, oval-shaped sole in garter stitch.

Part 2: The Upper Body (Knitted in the Round – Garter Stitch)
Now we will pick up stitches around the sole and knit the body of the bootie. To achieve garter stitch in the round, you knit one round and purl the next.
- Pick Up Stitches: With your knitting needle, pick up and knit stitches evenly around the entire perimeter of the sole you just made.
- Pick up approximately 10 stitches along each short end (where you increased/decreased).
- Pick up approximately 18-20 stitches along each long side.
- Aim for a total of 60 stitches picked up evenly around the sole. Place a stitch marker at the beginning of the round (center back of the heel).
- Adjust stitch count slightly to ensure it’s an even number if necessary for later shaping.
- Round 1: K all stitches.
- Round 2: P all stitches.
- Repeat Rounds 1 and 2 two more times. You will have 6 rows of garter stitch (3 ridges visible).
- This forms the base of the bootie and continues the garter stitch texture.

Part 3: Shaping the Toe (Knitted in the Round – Garter Stitch)
Now we will decrease stitches at the front of the bootie to shape the toe.
- Set up for Toe: K 20 stitches from your start marker (back and side of foot). Pm. K 10 stitches (center front of toe). Pm. K remaining 30 stitches. (Markers now divide heel/sides, toe, and other heel/sides).
- Round 7 (Knit Decrease Round): K to 2 stitches before first marker, K2tog. Sm. K1, K2tog, K to 3 stitches before next marker, SSK, K1. Sm. SSK, K to end of round. (4 stitches decreased).
- Round 8 (Purl Round): P all stitches.
- Round 9 (Knit Decrease Round): K to 2 stitches before first marker, K2tog. Sm. K1, K2tog, K to 3 stitches before next marker, SSK, K1. Sm. SSK, K to end of round. (4 stitches decreased).
- Round 10 (Purl Round): P all stitches.
- Round 11 (Knit Decrease Round): K to 2 stitches before first marker, K2tog. Sm. K1, K2tog, K to 3 stitches before next marker, SSK, K1. Sm. SSK, K to end of round. (4 stitches decreased).
- You should now have approximately 48 stitches remaining, and the toe is starting to form.
- Remove markers from the toe section as it gets smaller.
- Continue K & P rounds without further toe decreases until you have approximately 4 rounds of straight knitting after the last toe decrease.
- You should have approx. 48 stitches for the circumference of the ankle opening.
Part 4: The Fold-Over Cuff (Knitted in the Round – Garter Stitch)
This section forms the top opening and the foldable cuff of the bootie.
- Continue in Garter Stitch:
- Round 15: K all stitches.
- Round 16: P all stitches.
- Repeat Rounds 15 and 16 for 10-12 more rounds (or until the cuff measures approximately 2-2.5 inches / 5-6 cm from the ankle opening). This creates the height for the fold-over cuff.
- BO all stitches loosely on the next knit round. FO, leaving a tail for weaving in.
Video tutorial
Finishing Your Bootie:
- Weave in all loose ends neatly with your tapestry needle.
- Fold the Cuff: Gently fold the top few rounds of the cuff downwards to create the decorative fold-over look.
- Attach Embellishment: Securely stitch a small decorative butterfly button or similar embellishment to the front/side of the folded cuff, as shown in the image. This helps to keep the cuff in place.
- Make a Second Bootie: Repeat all steps to create a matching pair!
Congratulations! You’ve just created a wonderful pair of knitted baby booties, perfect for keeping tiny feet warm and cozy.
Happy knitting!