by
by 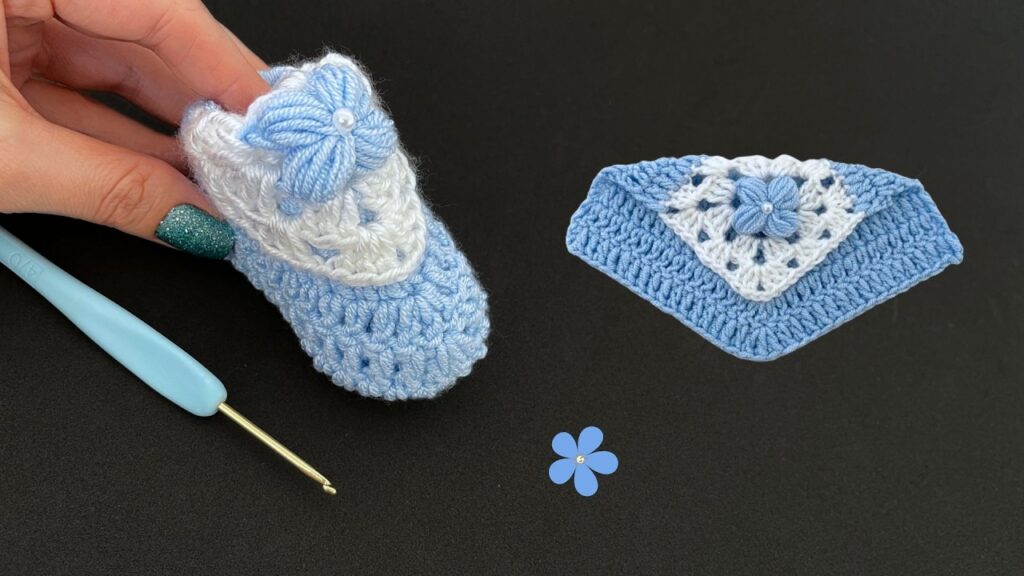
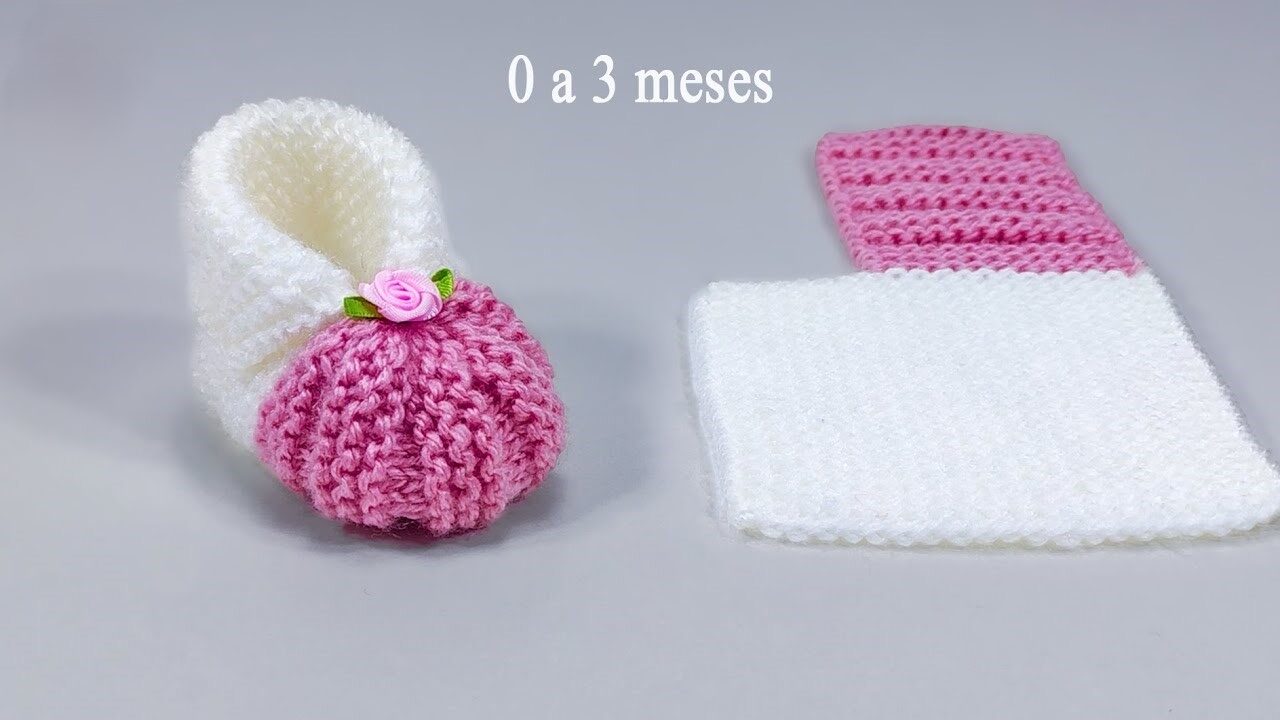
Give tiny feet the cutest handmade hug with these delightful crocheted baby booties! This charming design features a sturdy base, a lovely color-block style, and a unique square motif that forms the top of the bootie, folding over neatly to create a sweet and stylish look. Perfect for a baby shower gift or for your own little one, these booties are a joy to create!
This pattern is suitable for intermediate crocheters, or confident beginners who are comfortable with basic stitches and joining a simple motif.
Yarn:
- DK (Double Knit) or Light Worsted Weight yarn in two contrasting colors (e.g., Light Blue for Main Color, White for Contrast Color, as pictured). Choose a soft, machine-washable baby-friendly yarn like acrylic or a cotton blend.
Hook:
- 3.5 mm (US E/4) crochet hook (adjust hook size if necessary to achieve desired fabric and tension).
Notions:
- Tapestry needle for seaming and weaving in ends
- Scissors
- 2 small decorative pearls or beads (one for each bootie, as shown on the flower)
- Stitch markers (helpful for marking the beginning of rounds on the sole)
Gauge (Important for Sizing!):
- Sole (SC): 18 SC and 20 rows = 4 inches (10 cm).
- Motif (DC/Ch): One square motif (white section) should measure approximately 2 inches (5 cm) across.
- Always make a small swatch to check your gauge, as it’s crucial for the finished size of the booties!
Size:
- Newborn to 3 months (approximately 3.75 – 4 inches / 9.5-10 cm sole length when finished).
- To adjust for larger sizes, you will need to increase the starting chain for the sole and add more rounds. For the upper, you might need to adjust the starting chain to ensure the motif fits proportionally, or increase hook size slightly.
Abbreviations (US Crochet Terms):
- Ch: Chain
- Sl St: Slip Stitch
- SC: Single Crochet
- HDC: Half Double Crochet
- DC: Double Crochet
- St(s): Stitch(es)
- FO: Fasten Off
- BLO: Back Loop Only (insert hook only into the back loop of the stitch)
- V-Stitch (V-st): (DC, Ch 1, DC) in the same stitch/space.
Pattern Instructions:
These booties are made in two main parts: the sole/base and the top motif, which are then joined and seamed.
Part 1: The Sole & Base (Main Color – Light Blue)
The sole is worked in continuous rounds, then a few rounds are worked up for the base of the slipper.
- Ch 14.
- Round 1 (RS): SC in 2nd Ch from hook. SC in next 11 Ch. 3 SC in last Ch. (Work around the end of the chain). Working along the other side of the starting chain: SC in next 11 Ch. 2 SC in the very last Ch (this is the same ch as your very first SC). Sl St to first SC to join. (28 SC)
- Round 2: Ch 1 (does not count as a stitch). 2 SC in first SC. SC in next 11 SC. 2 SC in next 3 SC. SC in next 11 SC. 2 SC in last 2 SC. Sl St to first SC to join. (34 SC)
- Round 3: Ch 1. 2 SC in first SC. SC in next 13 SC. 2 SC in next 3 SC. SC in next 13 SC. 2 SC in last 2 SC. Sl St to first SC to join. (40 SC)
- This completes the flat sole.
- Round 4 (Working up the side): Ch 1. SC in BLO in each SC around. Sl St to first SC. (40 SC)
- Working in the BLO creates a distinct ridge, separating the sole from the upper body.
- Round 5 – Round 6: Ch 1. SC in each SC around. Sl St to first SC. (40 SC)
- This creates the lower blue band of the bootie. FO, leaving a long tail for sewing the sole to the upper.

Part 2: The Top Motif (Contrast Color – White & Main Color – Light Blue)
This is the triangular piece shown next to the bootie in the image. It’s a square motif worked flat and then folded.
- Start with Contrast Color (White).
- Ch 4, Sl St to first Ch to form a ring.
- Row 1 (RS): Ch 3 (counts as 1st DC). (2 DC, Ch 2, 3 DC) into the ring. (This creates the first half of a granny square motif). Ch 3, turn.
- Row 2 (WS): (2 DC, Ch 2, 3 DC) in the Ch-2 space. Ch 3, turn.
- Row 3 (RS): DC in each of the first 3 DC. (3 DC, Ch 2, 3 DC) in the Ch-2 space. DC in next 3 DC. Ch 3, turn.
- Row 4 (WS): DC in each DC until the Ch-2 space. (3 DC, Ch 2, 3 DC) in the Ch-2 space. DC in each DC to end. Ch 3, turn.
- Repeat Row 4 one more time. (You will have 5 rows in white). FO white yarn.
Adding the Blue Border to the Motif:
- Join Main Color (Light Blue) with a Sl St to the beginning of the last row of the white motif (or to one of the outside top corners).
- Row 1 (RS – Blue Border): Ch 1. SC evenly down the first side of the white motif (approx. 2 SC per DC row end, and 1 SC per Ch-3 space). When you reach the point, work (SC, Ch 1, SC) into the point. SC evenly up the other side of the motif. FO.
- This creates the triangular piece with the blue border, as shown in the image.


Part 3: Assembly
- Weave in all loose ends on both the base and the motif.
- Attach Upper to Base:
- With the RS of your base (the sole and the few blue rounds) facing out, identify the center front.
- Take your triangular motif. The “point” of the triangle will be the front toe.
- Align the bottom edge of the blue border of the motif to the top edge of your blue base (Round 6).
- Using your tapestry needle, whip stitch or mattress stitch the motif to the base, starting from the center front of the base and working outwards towards the sides. Stitch firmly.
- The two side points of the blue border on the motif should meet the sides of the base, leaving a gap at the back for the heel.
- Seam the Back:
- Fold the bootie in half, bringing the two unsewn edges of the blue base (at the heel) together.
- Using your tapestry needle, seam the back of the bootie from the bottom of the sole up to the ankle opening.
- Fold and Secure the Top Motif:
- The main feature is the motif folding over. The image shows the motif folding to the side.
- Take one side of the motif and fold it over the instep of the bootie.
- Create Flower Embellishment (White & Blue):
- Small Flower: Ch 2. 5 SC in 2nd Ch from hook. Sl St to first SC.
- Petals: Ch 2, DC in same SC, Ch 2, Sl St in same SC. Repeat 4 more times around the circle (5 petals). FO.
- Center: Use a small pearl or bead and sew it to the center of the flower.
- Attach Flower: Position the completed flower embellishment on the side of the bootie where the motif folds over, securing the flap in place. Stitch it firmly to the top layer of the motif and the bootie body.
- Make a Second Bootie: Repeat all steps to create a matching pair!
Video tutorial
And there you have it! Adorable, cozy, and handmade baby booties with a unique square motif top. These make wonderful gifts and are a joy to crochet.
Happy crocheting!