 by
by 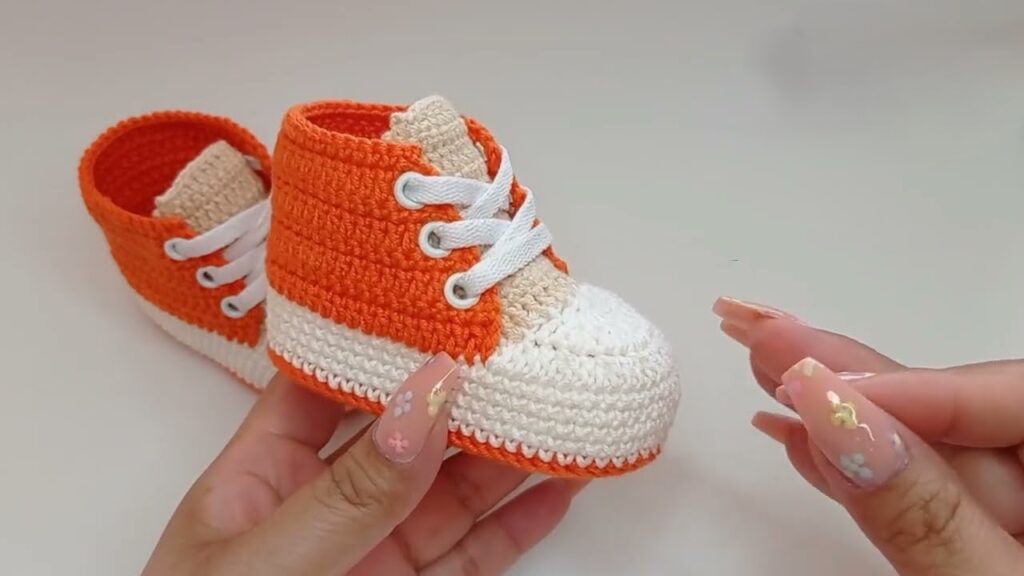
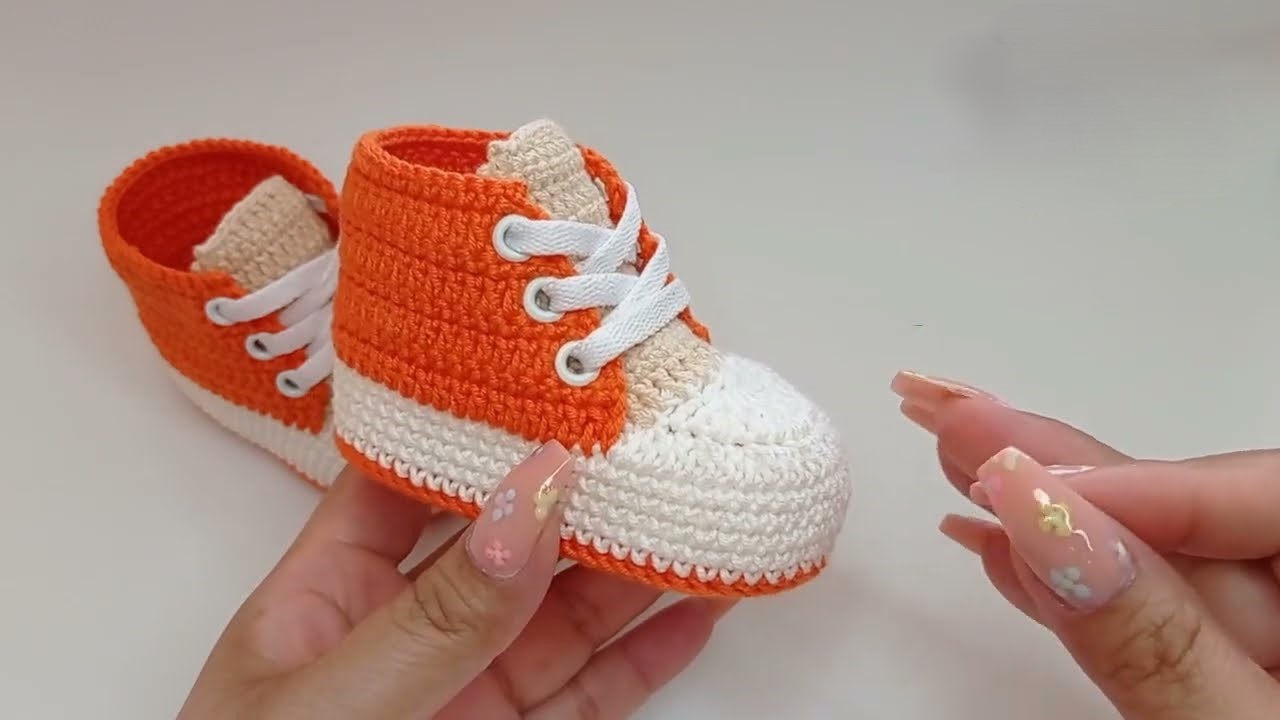
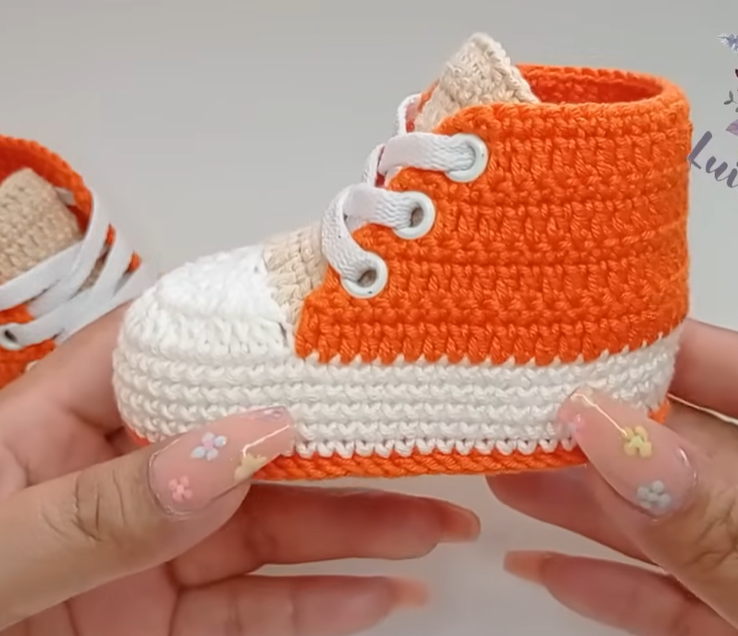
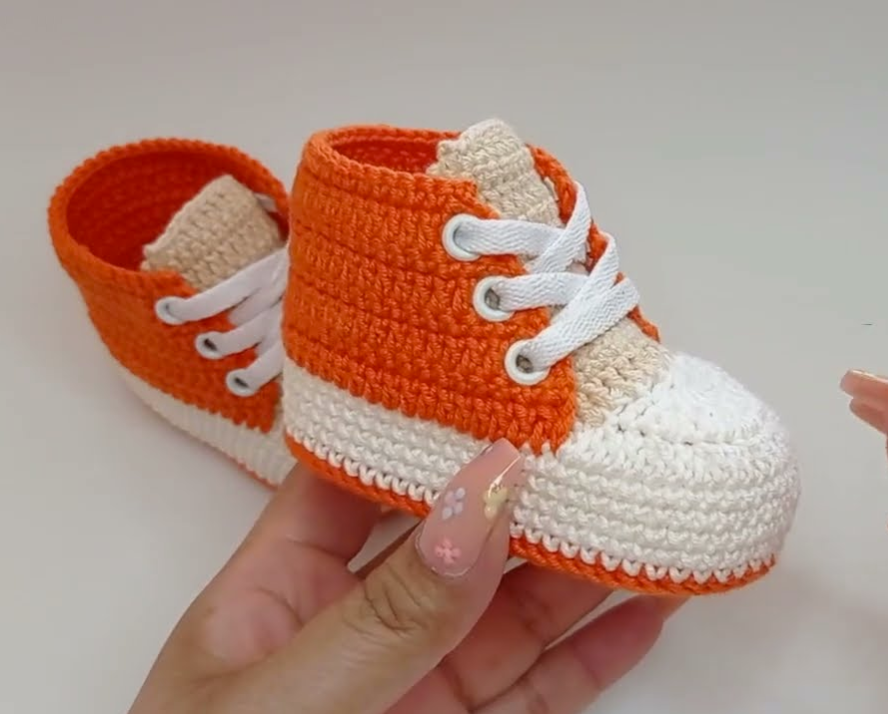
Lace up for cuteness with these adorable crochet baby tennis shoes! Inspired by classic high-top sneakers, this pattern features a contrasting toe cap, a colorful body, a snug ribbed ankle, and real laces for an authentic look. They’re perfect for photo ops, unique baby shower gifts, or simply adding a touch of sporty style to your little one’s outfit!
Skill Level: Intermediate (Familiarity with basic stitches, working in rounds, color changes, and simple shaping is helpful).
Materials:
- Yarn: DK (Light Worsted) weight yarn. A soft cotton or acrylic blend is recommended for stitch definition and baby comfort.
- Main Color (MC): Orange (for shoe body) – approx. 40-60 yards per pair.
- Contrast Color 1 (CC1): White (for toe cap, sole, and laces) – approx. 30-50 yards per pair.
- Contrast Color 2 (CC2): Beige/Cream (for inner tongue) – small amount.
- Crochet Hook: Size G/6 (4.0 mm) or size needed to obtain gauge.
- Yarn Needle: For weaving in ends and sewing parts together.
- Scissors
- Stitch Markers: Very helpful for marking the start of rounds and increase/decrease points.
- Small Eyelets (Optional): 6-8 tiny eyelets per shoe for a more professional lace look (you’ll need an eyelet setter). Alternatively, just use the crochet holes.
- Laces: White shoelaces (cut from regular laces or crocheted thin chains).
Gauge (Crucial for Sizing!):
Achieving the correct sole length is paramount for these shoes to fit properly.
- Sole Gauge: After completing the sole section, measure its length. Adjust your hook size or initial chain/increase rounds to reach the desired length from the sizing chart below.
- Example: For 0-3 months, your finished sole should measure around 3.5 inches.
Sizing Chart (Approximate Finished Sole Length):
| Size | Approx. Sole Length (inches) | Approx. Sole Length (cm) | Initial Chain (suggested) |
|---|---|---|---|
| 0-3 Months | 3.5 | 9 | Ch 10 |
| 3-6 Months | 4 | 10.5 | Ch 12 |
| 6-9 Months | 4.5 | 11.5 | Ch 14 |
- Note: If you want a larger size, increase your initial chain length by 2 stitches per size increment, and you may need to add an extra round to the sole and/or upper sections.
Abbreviations (US Crochet Terms):
- ch: chain
- sl st: slip stitch
- sc: single crochet
- hdc: half double crochet
- dc: double crochet
- sc2tog: single crochet 2 together (decrease)
- hdc2tog: half double crochet 2 together (decrease)
- BLO: back loop only
- FLO: front loop only
- st(s): stitch(es)
- inc: increase (work 2 sts in the same st)
- MC: Main Color (Orange)
- CC1: Contrast Color 1 (White)
- CC2: Contrast Color 2 (Beige/Cream)
- ( ): repeat instructions in parentheses a specified number of times
- [ ]: total stitches at the end of the round
Pattern for Tiny Tot Trainers (Make 2)
Part 1: The Sole (Make 2 per pair)
Work in continuous rounds, using a stitch marker to mark the first stitch of each round.
Using Contrast Color 1 (CC1 – White):
Round 1: Ch (refer to Sizing Chart for initial chain). Hdc in 3rd ch from hook. Hdc in next (initial chain – 3) stitches. In the last ch, work 3 hdc (this turns the corner). Now working down the other side of the chain, hdc in next (initial chain – 3) stitches. In the very last ch (where you worked your first hdc), work 2 hdc. [Total stitches will vary based on initial chain]. Place stitch marker in the first hdc of the next round.
Round 2: 2 hdc in the first st (inc). Hdc in each st along the side of the sole until you reach the 3 hdc you worked in the last chain. (2 hdc in next st) 3 times (inc for the toe end). Hdc in each st along the other side until you reach the 2 hdc at the heel end. (2 hdc in next st) 2 times (inc for the heel end). Move stitch marker to the first st of the current round.
Round 3 (Optional for larger sizes, or if you need a wider sole): (2 hdc in next st) 2 times (inc). Hdc in each st along the side. (2 hdc in next st, hdc in next st) 3 times (inc for the toe end). Hdc in each st along the other side. (2 hdc in next st, hdc in next st) 2 times (inc for the heel end). Move stitch marker to the first st of the current round.
Check your sole length against the Sizing Chart. Adjust hook size or add/remove initial chains/rounds if needed.
Sl st to the first hdc of your last sole round to join. Fasten off and weave in ends for one sole. For the second sole, do not fasten off; you’ll continue with the upper.

Part 2: Building the Shoe Body
Using Contrast Color 1 (CC1 – White), continuing from the second sole:
Round 1 (Creating the “Wall”): Ch 1. Sc in the BLO of each st around. Sl st to the first sc to join. This round creates a nice, defined edge that makes the shoe stand up.
Round 2 (Toe Cap Shaping – White): Ch 1. Sc in first (approx. 1/3 of stitches – this will be your heel and instep area). Now for the toe cap decreases: (sc2tog) 8-10 times across the front of the shoe. Sc in the remaining stitches. Sl st to the first sc to join. Fasten off CC1.
Switch to Main Color (MC – Orange):
Round 3 (Main Body – Orange): Join MC to the back center of the heel. Ch 1. Sc in each st around (including the decreased stitches from the toe cap). Sl st to join.
Round 4 (Main Body – Orange): Ch 1. Sc in each st around. Sl st to join.
Round 5 (Start of Ankle/Lace Opening): Ch 1. Sc in first (approx. 1/3 of stitches for the back of the ankle). Now, you will work in rows for the lace opening: Sc in each st across the remaining stitches until you reach the start of your round again. Turn.
Row 6 & onwards (Ankle/Lace Opening – Worked in Rows): Ch 1. Sc in each st across. Turn. Repeat this row until the ankle part reaches your desired height (similar to a high-top sneaker). The picture shows about 6-8 rows for the ankle.
Fasten off MC.
Part 3: The Tongue
The tongue is made separately and sewn in.
Using Contrast Color 2 (CC2 – Beige/Cream):
Ch 8-10 (adjust length based on shoe size and desired tongue width). Row 1: Sc in 2nd ch from hook and in each ch across. [7-9 sc] Row 2: Ch 1, turn. Sc in each st across. Repeat Row 2 until the tongue reaches a length that extends slightly above the ankle opening when placed inside the shoe.
Fasten off CC2, leaving a long tail for sewing.

Part 4: Assembly & Finishing
- Weave in Ends: Weave in all loose yarn ends securely.
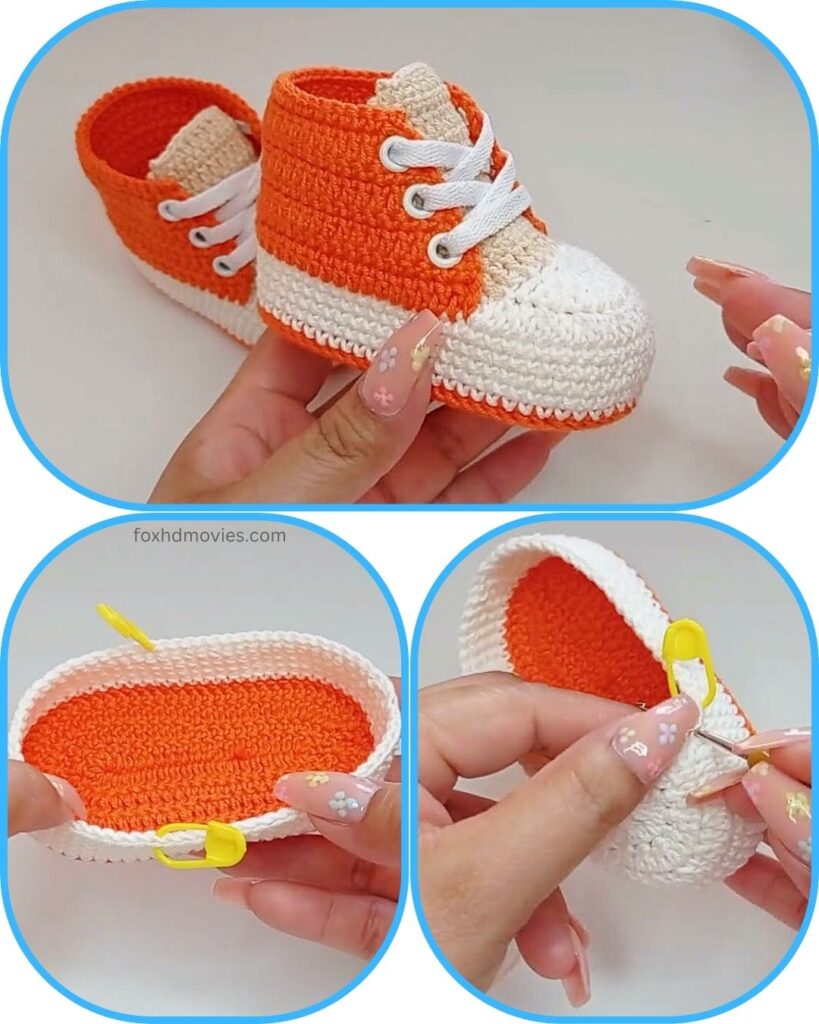
- Sew Tongue: Position the CC2 tongue inside the shoe, centered under the lace opening. Sew the bottom edge of the tongue firmly to the inside of the shoe body, where the toe cap meets the main body.
- Lace Holes (Optional Eyelets): If using eyelets, install them now along the edges of the lace opening, evenly spaced. You’ll typically need 3-4 pairs of eyelets per shoe. If not using eyelets, the crochet stitches themselves will serve as the lace holes.
- Laces: Cut white shoelaces to an appropriate length for baby shoes (approx. 15-20 inches per lace, you can trim later). Lace up the shoes as you would regular tennis shoes. Tie a small knot or bow.
- Secure Laces: For safety, you may want to stitch the laces down or use a dab of fabric glue to prevent them from coming undone.
Congratulations! You’ve just created an incredibly stylish pair of Tiny Tot Trainers! These make a fantastic gift and are sure to get lots of compliments. I can help with that! You’ve uploaded several images, and the one titled “maxresdefault (11).jpg” clearly shows a pair of crochet baby tennis shoes in orange and off-white, resembling classic high-top sneakers. They feature a solid orange body, an off-white toe cap, off-white lacing area, and white laces.
I will write a detailed pattern blog for these Tiny Tot High-Top Crochet Sneakers.
Tiny Tot Trendsetter: Crochet High-Top Baby Sneakers!
Lace up the cuteness with these absolutely adorable crochet baby sneakers! Inspired by the vibrant orange and off-white high-tops in the picture, this pattern will have your little one rocking the coolest kicks on the block. Perfect for stylish photo ops or just keeping those tiny toes cozy and chic!
Skill Level: Intermediate (Familiarity with basic stitches, working in rounds, color changes, and simple shaping is helpful).
Materials:
- Yarn: DK (Light Worsted) weight yarn. A soft baby acrylic or cotton is recommended.
- Main Color (MC): Orange (for the body) – approx. 40-60 yards per pair.
- Contrast Color 1 (CC1): Off-White/Cream (for toe cap and tongue) – approx. 20-30 yards per pair.
- Contrast Color 2 (CC2): White (for sole edge and laces) – approx. 10-20 yards per pair.
- Crochet Hook: Size G/6 (4.0 mm) or size needed to obtain gauge.
- Yarn Needle: For weaving in ends and assembling.
- Scissors
- Stitch Markers: Very helpful for marking the start of rounds and increase points on the sole.
Gauge (Crucial for Sizing!):
Achieving the correct sole length is paramount for these booties to fit properly.
- Sole Gauge: After completing the sole section, measure its length. Adjust your hook size or initial chain/increase rounds to reach the desired length from the sizing chart below.
- Example: For 0-3 months, your finished sole should measure around 3.5 inches.
Sizing Chart (Approximate Finished Sole Length):
| Size | Approx. Sole Length (inches) | Approx. Sole Length (cm) | Initial Chain (suggested) |
|---|---|---|---|
| 0-3 Months | 3.5 | 9 | Ch 10 |
| 3-6 Months | 4 | 10.5 | Ch 12 |
| 6-9 Months | 4.5 | 11.5 | Ch 14 |
- Note: If you want a larger size, increase your initial chain length by 2 stitches per size increment, and you may need to add an extra round to the sole and/or upper sections.
Abbreviations (US Crochet Terms):
- ch: chain
- sl st: slip stitch
- sc: single crochet
- hdc: half double crochet
- dc: double crochet
- sc2tog: single crochet 2 together (decrease)
- hdc2tog: half double crochet 2 together (decrease)
- BLO: back loop only
- FLO: front loop only
- st(s): stitch(es)
- inc: increase (work 2 sts in the same st)
- MC: Main Color (Orange)
- CC1: Contrast Color 1 (Off-White/Cream)
- CC2: Contrast Color 2 (White)
- ( ): repeat instructions in parentheses a specified number of times
- [ ]: total stitches at the end of the round
Pattern for Tiny Tot High-Top Crochet Sneakers (Make 2)
Part 1: The Sole (Make 2 per pair)
Work in continuous rounds, using a stitch marker to mark the first stitch of each round.
Using CC2 (White):
Round 1: Ch (refer to Sizing Chart for initial chain). Hdc in 3rd ch from hook. Hdc in next (initial chain – 3) stitches. In the last ch, work 3 hdc (this turns the corner). Now working down the other side of the chain, hdc in next (initial chain – 3) stitches. In the very last ch (where you worked your first hdc), work 2 hdc. [Total stitches will vary based on initial chain]. Place stitch marker in the first hdc of the next round.
Round 2: 2 hdc in the first st (inc). Hdc in each st along the side of the sole until you reach the 3 hdc you worked in the last chain. (2 hdc in next st) 3 times (inc for the toe end). Hdc in each st along the other side until you reach the 2 hdc at the heel end. (2 hdc in next st) 2 times (inc for the heel end). Move stitch marker to the first st of the current round.
Round 3 (Optional for larger sizes, or if you need a wider sole): (2 hdc in next st) 2 times (inc). Hdc in each st along the side. (2 hdc in next st, hdc in next st) 3 times (inc for the toe end). Hdc in each st along the other side. (2 hdc in next st, hdc in next st) 2 times (inc for the heel end). Move stitch marker to the first st of the current round.
Check your sole length against the Sizing Chart. Adjust hook size or add/remove initial chains/rounds if needed.
Sl st to the first hdc of your last sole round to join. Fasten off and weave in ends for one sole. For the second sole, do not fasten off; you’ll continue with the upper.
Part 2: Building the Shoe Body
Using MC (Orange), continuing from the second sole:
Round 1 (Creating the “Wall”): Ch 1. Sc in the BLO of each st around. Sl st to the first sc to join. This round creates a nice, defined edge that makes the shoe stand up.
Round 2 (Solid Body): Ch 1. Sc in each st around. Sl st to the first sc to join.
Round 3 (Toe Shaping – First Decrease Round): Ch 1. Sc in the first (approx. 10-12) stitches (for the heel/instep area; adjust based on your sole size). Now, for the toe decreases: (sc2tog) 5-6 times across the front of the shoe. Sc in the remaining stitches around the heel/instep. Sl st to the first sc to join. This round begins to pull the toe inwards.
Part 3: The Toe Cap (CC1 – Off-White/Cream)
Before starting this section, identify the 10-12 stitches in the very center front of the shoe where your previous decreases were concentrated. This will be your toe cap area.
Round 4: Join CC1 (Off-White/Cream) at the right side edge of your toe decrease section. Ch 1. Sc in each of the (10-12) toe stitches. Fasten off CC1.
Round 5: Join MC (Orange) at the back heel, where you typically start your rounds. Ch 1. Sc in each sc around the heel and side. When you reach the toe cap, sc into the back loop only (BLO) of each CC1 sc from Round 4. Continue sc around the other side of the shoe until you meet your beginning. Sl st to first sc to join. The BLO of the toe cap creates a nice definition.
Round 6 (Shoe Opening): Ch 1. Sc in each st around. At the front (toe cap area), leave the center 8-10 stitches unworked. This creates the opening for the laces. Sl st to join at the beginning of the round, leaving the gap open. You will now work in rows for the upper part of the shoe.
Part 4: Building the High-Top & Tongue
Using MC (Orange):
Row 1 (First Upper Row): Ch 1. Sc in each st around the open top of the shoe (excluding the unworked lace gap). Turn. The picture shows a solid sc stitch for the upper. Continue working in rows, turning at the end of each.
Repeat Row 1 for 5-7 more rows, or until the high-top reaches your desired height. The shoe in the picture has a fairly tall high-top.
Tongue (CC1 – Off-White/Cream): From the raw edge of the opening you left in Part 3, Round 6, count in about 3-4 stitches from the side. Join CC1. Ch 1. Sc in the next 8-10 stitches (this is the width of your tongue). Turn. Repeat this row for 6-8 rows, or until the tongue reaches the desired length to fold down nicely over the top of the shoe. Fasten off CC1.
Part 5: Finishing & Assembly
- Weave in all remaining yarn ends securely.
- Make sure both shoes are as identical as possible.
Shoe Laces (CC2 – White):
- Cut two lengths of CC2 yarn, approximately 18-24 inches each.
- Create Eyelets: Using your yarn needle, carefully weave your laces through the stitches on the sides of the high-top opening to create “eyelets.” Mimic the look of real shoe eyelets. You can weave directly through the fabric or create small ch-1 spaces (like buttonholes) if preferred, but weaving through existing stitches is often easier for beginners.
- Lace up the shoes as you would real sneakers, creating a criss-cross pattern. Tie a neat bow at the top.
Video Tutorial
Optional Details:
- For added grip, apply non-slip puffy paint or sew on non-slip pads to the bottom of the soles if the baby will be walking.
Congratulations! You’ve just created an incredibly cool and stylish pair of Tiny Tot High-Top Crochet Sneakers. These are sure to be a comfortable and eye-catching addition to any baby’s wardrobe