 by
by 
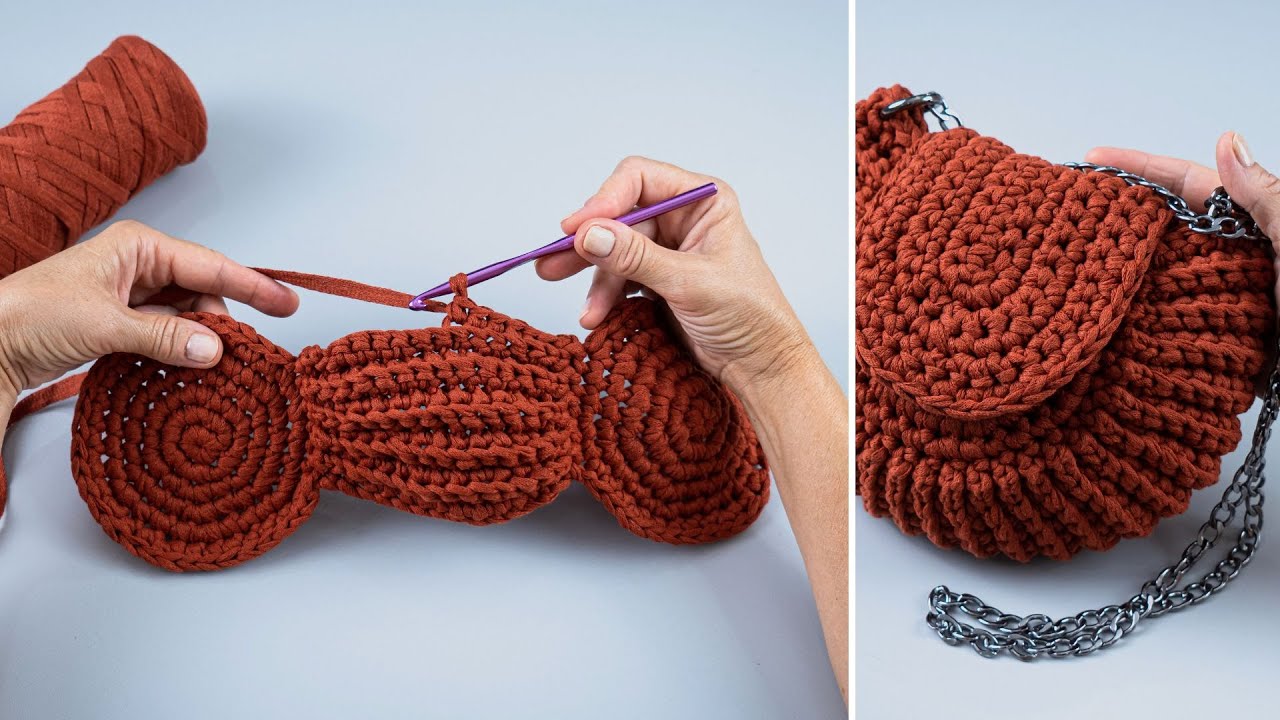
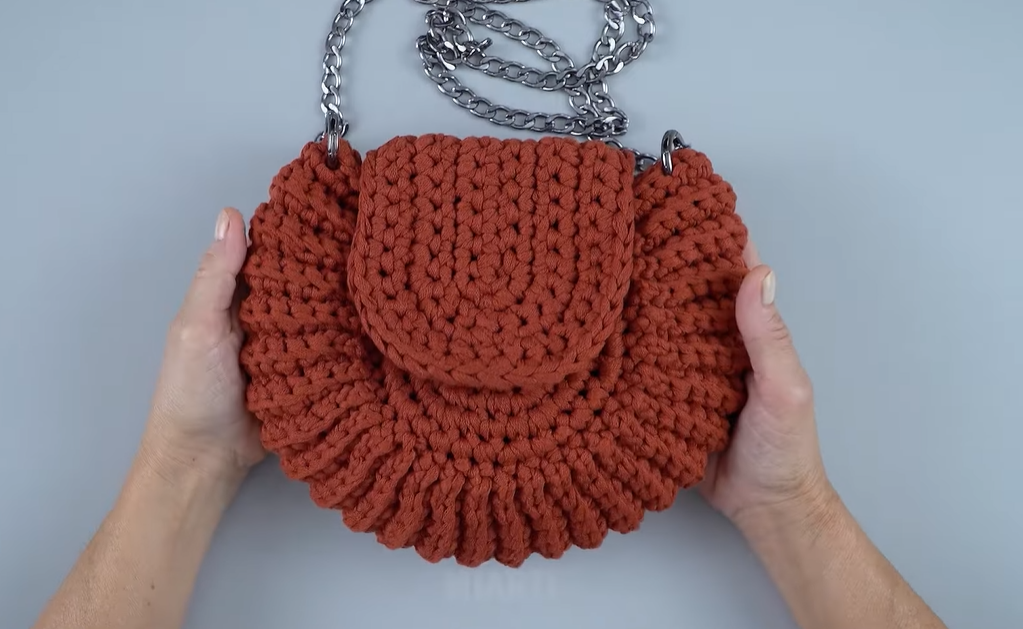
Hello, fellow yarn lovers! Remember that beautiful scallop shell bag we made? Well, it’s back, but this time in a gorgeous, earthy rust color that’s perfect for adding a pop of warmth to any outfit! This pattern remains a fantastic way to create a unique and stylish accessory that’s sure to turn heads.
If you loved the teal version, you’ll adore this one too. We’ll be using the same clever combination of stitches to create that distinctive ridged texture and a graceful, curved shape. Let’s get our hooks ready!
Skill Level: Intermediate (familiarity with basic crochet stitches is helpful)
Materials You’ll Need:
- Yarn: Approximately 200-250 yards of sport or DK weight yarn in a beautiful rust/terracotta shade. Cotton or a cotton blend would work well for a sturdy bag.
- Crochet Hook: Size 3.0mm – 4.0mm (or whatever size gives you a firm, even fabric with your chosen yarn). The sample looks like it uses a relatively small hook for tight stitches.
- Stitch Markers: Very helpful for keeping track of your rounds!
- Yarn Needle: For weaving in ends.
- Scissors
- Chain Strap: Approximately 40-48 inches (or your desired length) with lobster clasps on each end. The sample shows a silver-toned chain. You can find these at craft stores or online.
- (Optional but Recommended) Small magnetic snap or button closure: For the flap.
Abbreviations Used:
- ch: chain
- st(s): stitch(es)
- sl st: slip stitch
- sc: single crochet
- hdc: half double crochet
- dc: double crochet
- tr: treble crochet (also known as triple crochet)
- inc: increase (2 sc in the same stitch)
- BLO: back loop only
Gauge: Not critical for this project, but aim for a tight fabric to ensure your bag holds its shape.
Pattern Notes:
- This bag is worked in two main pieces: the body/flap and the side gusset/base.
- The “scallop” texture is created by working into the back loop only (BLO) for some rows, which pushes the front loop forward, creating a ridge.
- The tension should be firm so the bag keeps its shape.
The Scallop Bag Body (Make 2 identical pieces)
We’ll start by making the two “shell” halves that form the front and back of the bag.
Start with a magic ring or ch 4 and sl st to form a ring.
Round 1: Ch 2 (does not count as a st), 10 hdc in ring. Join with a sl st to the first hdc. (10 hdc) Round 2: Ch 1, 2 sc in each st around. Join with a sl st. (20 sc) Round 3: Ch 1, (sc in next st, inc) around. Join with a sl st. (30 sc) Round 4: Ch 1, (sc in next 2 sts, inc) around. Join with a sl st. (40 sc) Round 5: Ch 1, (sc in next 3 sts, inc) around. Join with a sl st. (50 sc) Round 6: Ch 1, (sc in next 4 sts, inc) around. Join with a sl st. (60 sc) Round 7: Ch 1, (sc in next 5 sts, inc) around. Join with a sl st. (70 sc) Round 8: Ch 1, (sc in next 6 sts, inc) around. Join with a sl st. (80 sc) Round 9: Ch 1, (sc in next 7 sts, inc) around. Join with a sl st. (90 sc) Round 10: Ch 1, (sc in next 8 sts, inc) around. Join with a sl st. (100 sc)

Continue increasing in this manner until your circle is the desired width for half of your bag. The sample image suggests a relatively large circle before folding. For a similar size to the photo, you might go up to Round 12 or Round 13 with 120 or 130 sc.
For the Ridges (Working in Rows):
Now we’ll stop working in the round and create the flap and ridged texture. You’ll fold the circle in half to form the shell shape. Identify what will be the top edge of your half-circle.
Row 1 (Right Side): Ch 1, sc in BLO of next st, *BLO sc in next st. Repeat from * across the desired width of your bag’s opening (this will be roughly half of your circle’s circumference). Turn. Row 2 (Wrong Side): Ch 1, sc in both loops of each st across. Turn. Row 3 (Right Side): Ch 1, sc in BLO of each st across. Turn.
Repeat Rows 2 and 3 until you have your desired number of ridges and the flap length you want. The sample looks like it has about 5-7 ridges on each side before the plain sc flap.
For the very top of the flap (the part that folds over): Continue with plain sc rows (working in both loops) for about 3-5 more rows to create a smooth edge for your closure. Fasten off on one piece, leaving a long tail for sewing. Do not fasten off on the second piece.

The Side Gusset/Base
This piece will give your bag its depth.
Chain: Ch a length that equals the circumference of your finished bag’s curved edge (the combined circumference of the two shell halves, minus the flap opening). It’s best to measure this after you’ve completed the two body pieces. Aim for a length of about 40-50 cm, but adjust as needed.
Row 1: Sc in the 2nd ch from hook and in each ch across. Ch 1, turn. Row 2: Sc in each sc across. Ch 1, turn.
Repeat Row 2 until your gusset is the desired width for the depth of your bag (e.g., 2-3 cm for a slim bag, more for a wider one). The sample looks to be quite slim.
Fasten off, leaving a very long tail for sewing.

Assembly
- Fold the Scallop Halves: Take one of your large circular pieces. Fold it roughly in half so that the “ridge” section is visible on the outside and the plain sc flap forms the top. The image clearly shows the fold line.
- Attach Gusset: Using the long tail left on your gusset piece and a yarn needle, carefully sew the gusset around the curved edge of one folded scallop piece. Work slowly and neatly, aiming to sew into the stitches of both pieces to create a strong seam.
- Join the Second Scallop Half: Now, take your second scallop piece (the one you didn’t fasten off). With the wrong sides together, crochet or sew this piece to the other side of the gusset. If crocheting, use sl st or sc for a sturdy join.
- Sew the Flap: Align the flaps of both scallop pieces. Sew them together along their edges to form one continuous flap. Make sure the ridged pattern aligns nicely.
- Attach Chain Strap: Locate where you want the strap to attach (typically on the upper sides of the bag, near the base of the flap). Use your yarn needle to securely attach the lobster clasps of your chain strap directly to the fabric, or add small D-rings before sewing for easier attachment. The sample shows the chain attached directly to the very top edge of the bag body, just under the flap.
- Add Closure (Optional): Sew a magnetic snap or button to the underside of the flap and the corresponding spot on the front of the bag body.
- Weave in all ends: Take your time with this step for a professional finish!
Video tutorial
Congratulations! You’ve just created your own unique and stylish scallop shell bag in a beautiful new color. This piece is sure to turn heads and be a cherished addition to your accessory collection.
Don’t forget to share your finished bag with me on social media! Tag me and use the hashtag #CrochetScallopBag. I can’t wait to see your beautiful creations!
Happy Crocheting!