 by
by 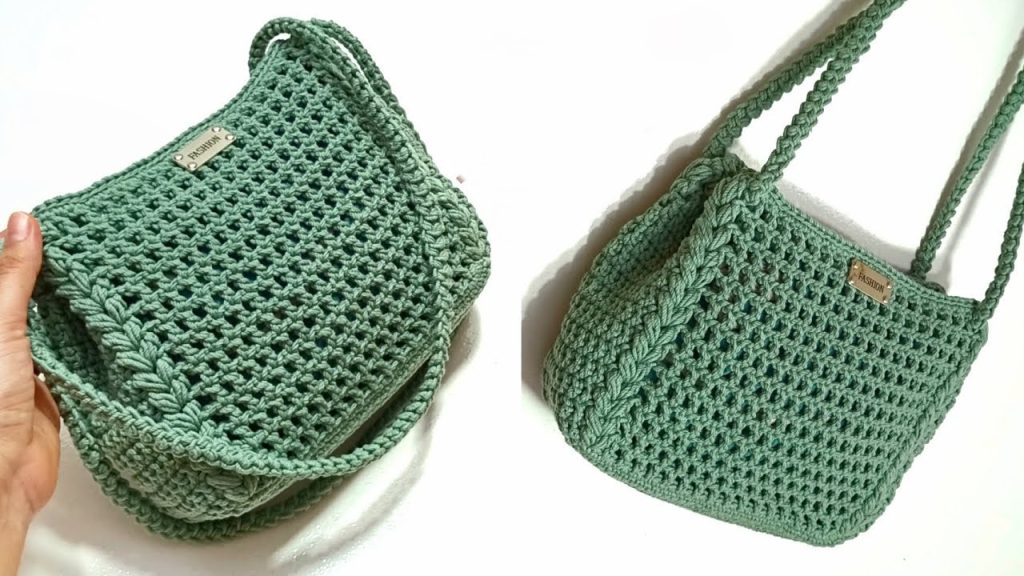
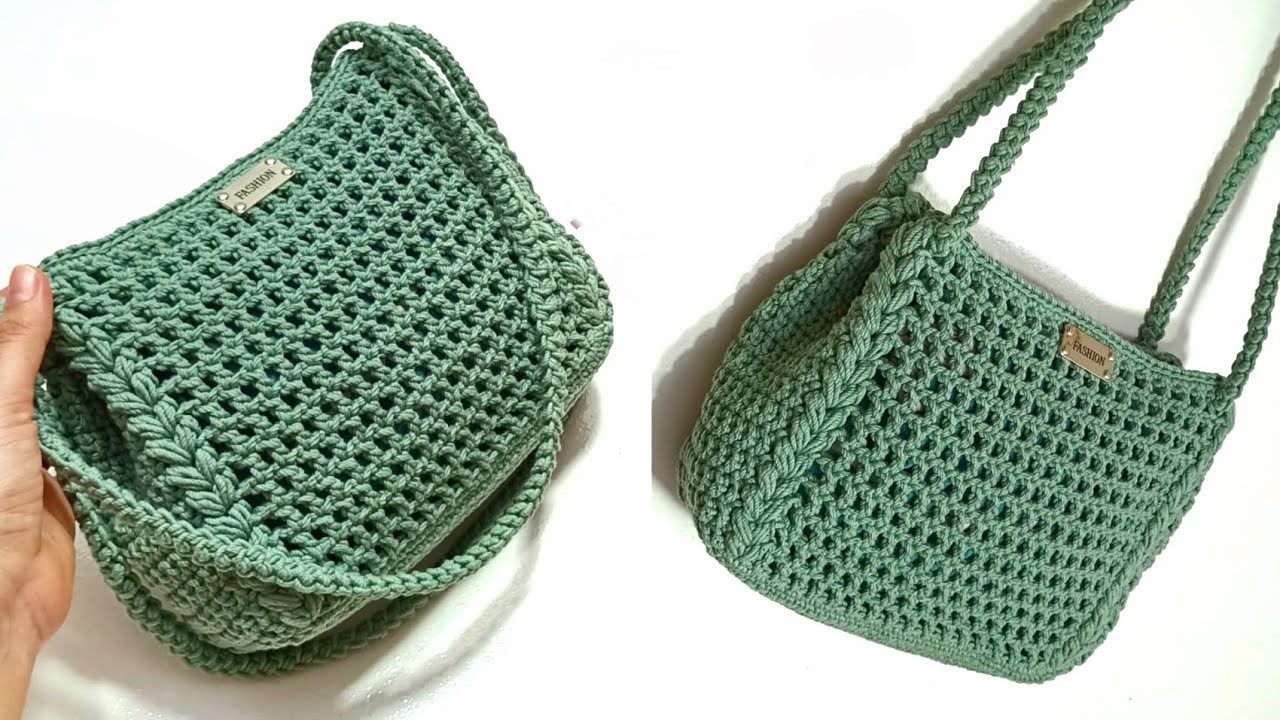
Create your own chic and practical bag with this fantastic crochet pattern! Inspired by a detailed tutorial from the Joory channel, this design guides you through crafting a spacious shoulder bag using sturdy cotton macrame thread. The bag features a unique stitch pattern, a firm base, and a long strap, making it a perfect accessory for any occasion.
Skill Level: Intermediate (familiarity with working in the round and specific stitch patterns recommended)

Finished Size (Approximate):
- Base: Approximately 7.5 inches (19 cm) long x 2.5 inches (6.5 cm) wide
- Bag Height: Varies based on the number of body rows.
- Strap Length: Approximately 47 inches (120 cm)
- Size can vary based on yarn, hook, and tension.
Materials You’ll Need:
- Yarn: Approximately 350 grams of cotton macrame thread.
- The video uses a specific type of cotton macrame thread, but you can also use other sturdy yarns that create a firm fabric, such as rope yarn or thick cotton yarn.
- Crochet Hook: 3.0 mm crochet hook.
- Using a smaller hook with a thicker yarn is crucial to create a dense, sturdy fabric that will hold its shape.
- Tapestry Needle: For weaving in ends and seaming.
- Scissors
- Stitch Marker (Optional): To mark the beginning of rounds or specific stitches.
Gauge (Crucial for Bag Structure!):
Achieving a very firm, dense fabric is crucial for this bag to hold its shape and be durable. Work a swatch to ensure your stitches are tight with no visible gaps. If your fabric is too loose, go down a hook size.
Abbreviations (US Crochet Terms):
- ch: chain
- sl st: slip stitch
- sc: single crochet
- dc: double crochet
- st(s): stitch(es)
- FO: Fasten off
Let’s Crochet Your Stylish Macrame Shoulder Bag!
This bag is constructed by first creating an oval base, then working in rounds to build up the body, and finally adding a long strap.
Part 1: The Bag Base
The base is worked in rows of single crochet stitches.

- Ch 35. (Adjust this chain length for a longer or shorter bag base).
- Row 1: Sc in 2nd ch from hook and in each ch across. Ch 1, turn. (34 sc)
- Rows 2 – 10: Sc in each sc across. Ch 1, turn. (34 sc)
- The video specifies 10 rows to create a base that is approximately 19 cm long and 6.5 cm wide.
FO, leaving a long tail for seaming.
Part 2: Bag Body – Working in Rounds
Now, we will work in rounds around the entire base to build up the sides of the bag.

- Transition Round:
- Attach yarn to one of the corners of the base with a sl st.
- Work 1 sc in each of the 34 stitches along the first long side.
- Work 3 sc in the corner.
- Work 1 sc in each of the stitches along the short side.
- Work 3 sc in the next corner.
- Work 1 sc in each of the 34 stitches along the second long side.
- Work 3 sc in the last corner.
- Work 1 sc in each of the stitches along the second short side.
- Work 3 sc in the final corner. Join with a sl st to the first sc.
- This round creates a foundation to work in the round and helps shape the oval bottom.
- Body Rounds (Specific Stitch Pattern):
- The video shows a pattern of double crochet stitches separated by chains.
- Round 1: Ch 2 (does not count as a stitch). Dc in first st, ch 1, skip 1 st. Repeat from * to * around. Join with a sl st to the first dc.
- Round 2: Ch 2 (does not count as a stitch). Dc in the ch-1 space from the previous round, ch 1. Repeat from * to * around. Join with a sl st to the first dc.
- Rounds 3 – 14: Repeat Round 2.
- Continue working rounds in this manner until the bag reaches the desired height. The video specifies 14 rows of this stitch pattern.
- Top Edge (Finishing):
- After completing the main body, work one round of single crochet around the entire top opening of the bag. Join with a sl st.
- The video then shows a row of slip stitches to create a very neat and firm top edge. Work one round of sl st in each sc around. Join and FO.
Part 3: The Strap
The video demonstrates how to create a very long strap for the bag.

- Chain: Ch 150-180 (or desired length for your strap, the video specifies 120 cm).
- Row 1: Sc in 2nd ch from hook and in each ch across. Ch 1, turn.
- Row 2 – 3 (or desired width): Sc in each sc across. Ch 1, turn.
- FO, leaving a very long tail for seaming.
Part 4: Assembly & Finishing Touches
- Weave in all ends: Use your tapestry needle to neatly weave in any remaining loose yarn tails.
- Attach Strap: Using your tapestry needle and the long tails, sew the strap securely to the two side top edges of the bag.
- Shape: Gently shape your bag, ensuring the base is flat, the sides stand upright, and the strap is evenly attached.
Video tutorial
Versatile Uses for Your Stylish Macrame Shoulder Bag:
- Everyday Carryall: Spacious enough for your essentials, a small laptop, or a tablet.
- Shopping Bag: A reusable and stylish alternative for groceries or market trips.
- Beach Bag: Perfect for towels, sunscreen, and beach reads.
- Gift: A thoughtful and impressive handmade gift.
Customization & Tips:
- Yarn Choice: Experiment with different colors of macrame thread for a fun look.
- Size Adjustment:
- Larger Tote: Increase the initial chain count for the base and the number of body rounds.
- Smaller Tote: Decrease the initial chain count and the number of body rounds.
- Handle Style: The long strap is great for a shoulder or crossbody bag, but you could also make two shorter straps for a handbag.
- Lining (Optional): For extra durability and to prevent small items from slipping through the stitches, you can sew a fabric lining inside the bag.
Enjoy crocheting your own beautiful, practical, and unique macrame shoulder bag! It’s a fantastic way to create a personalized accessory that’s sure to become a favorite.