 by
by 
Hello, crafting parents and gift-givers!
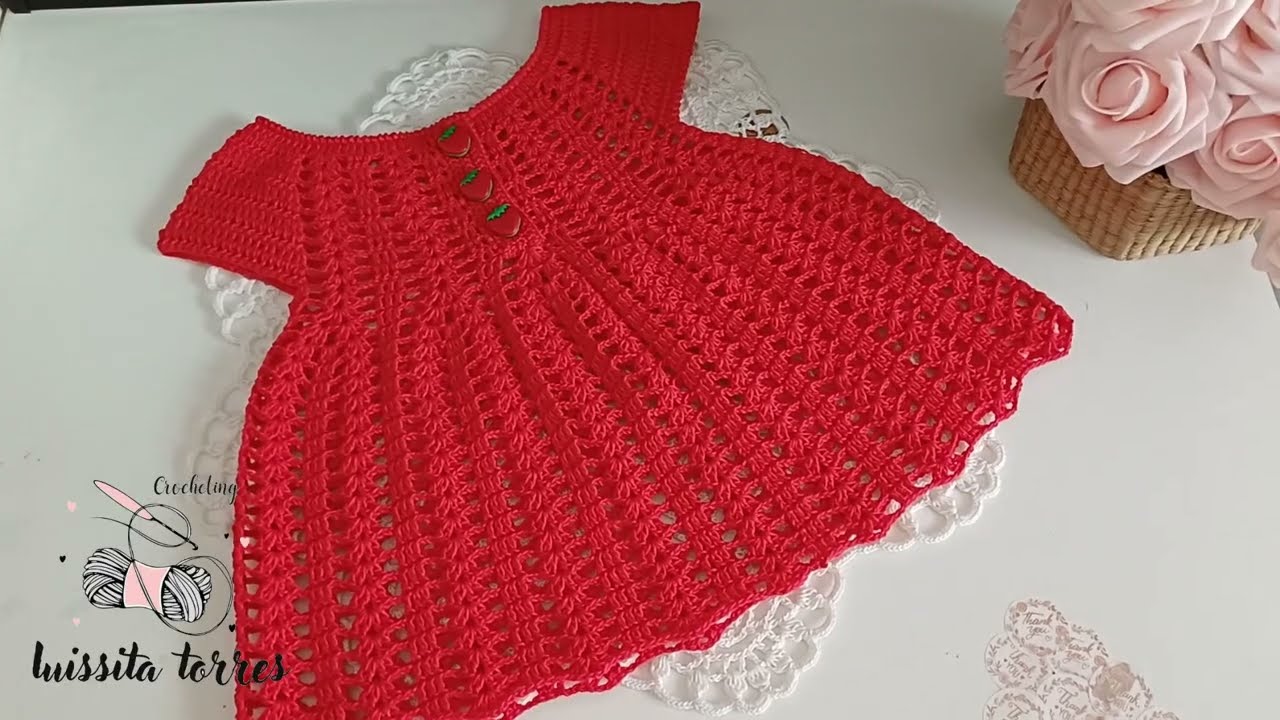
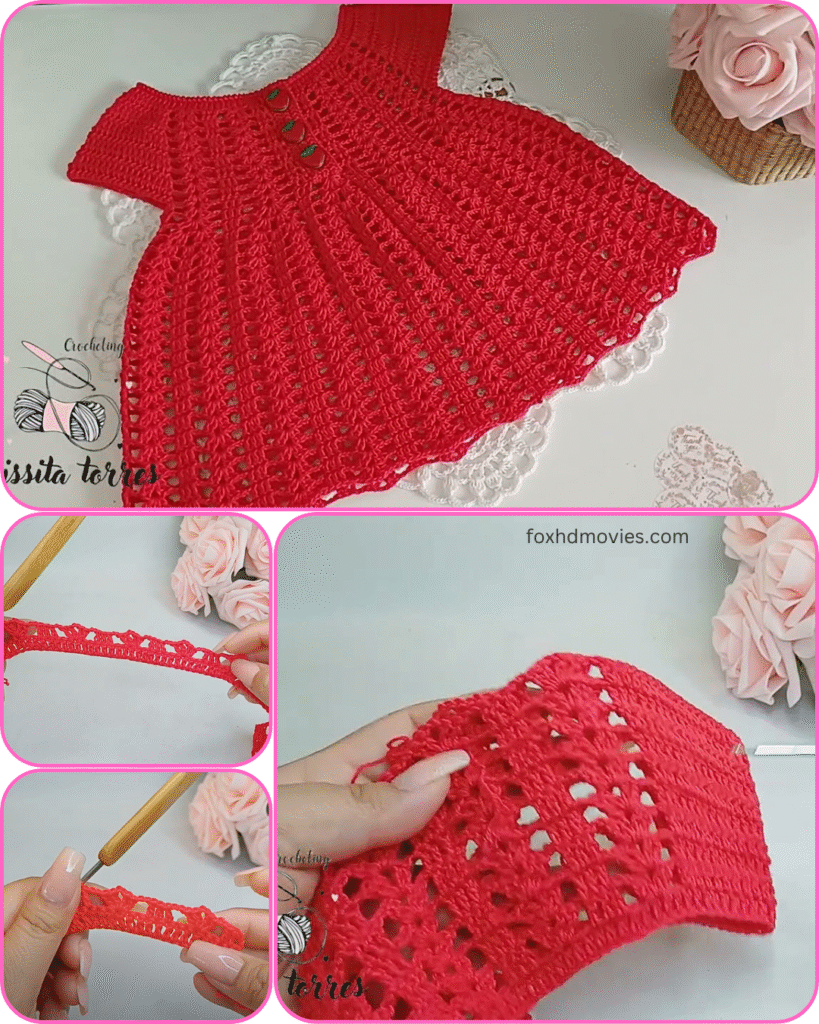
There’s nothing quite as heartwarming as a handmade garment for a little one, and this delightful red crochet baby dress is sure to melt hearts! With its pretty A-line shape, simple short sleeves, and those adorable strawberry buttons, it’s perfect for any occasion – from a special outing to a cozy day at home.
The vibrant red in the picture is classic and charming, but imagine it in a soft pastel, a cheerful yellow, or a deep navy! This pattern will guide you through creating a comfortable and stylish dress for a special baby in your life.
This pattern is written in US crochet terms.
Skill Level: Intermediate (This pattern involves working a garment, shaping, and creating buttonholes. Familiarity with basic crochet stitches and working in rows and rounds is helpful.)
Size: Approximately 6-12 months (adjust hook size and initial chain for different sizes, or follow notes for increasing/decreasing).
Finished Chest Circumference: Approx. 18-20 inches (46-51 cm) Finished Length (shoulder to hem): Approx. 14-16 inches (36-41 cm)
Materials You’ll Need:
- Yarn: Approximately 300-400 yards of DK (light worsted / 8-ply) weight yarn in a soft, baby-friendly fiber (e.g., cotton, acrylic, or a blend). The sample looks like a soft acrylic or cotton blend.
- Crochet Hook: A 4.0mm (G/6) hook, or size needed to obtain gauge.
- 3 small buttons: (Strawberry-shaped buttons, approximately 0.5 inches / 1.25 cm, would be perfect!).
- Yarn Needle: For weaving in ends and sewing buttons.
- Scissors
- Stitch Markers: Very helpful for marking armholes and placket.
Gauge: 18 dc and 10 rows = 4 inches (10 cm) in double crochet. Check your gauge carefully to ensure your dress fits the intended size!
Abbreviations (US Terms):
- ch: chain
- sl st: slip stitch
- sc: single crochet
- hdc: half double crochet
- dc: double crochet
- st(s): stitch(es)
- sp: space
- ch-sp: chain space
- rep: repeat
- inc: increase (usually 2 sts in one st)
- sk: skip
- BLO: back loop only
- FDC: foundation double crochet (optional, can substitute ch and dc rows)
Let’s Get Started!
This dress is worked top-down, starting with the yoke, then separating for the sleeves and body, and finally adding the skirt and finishing touches.
Part 1: The Yoke (Top-Down Construction)
The yoke will be worked flat, back and forth in rows, to create the back opening/button placket.

Starting Chain: Ch 62.
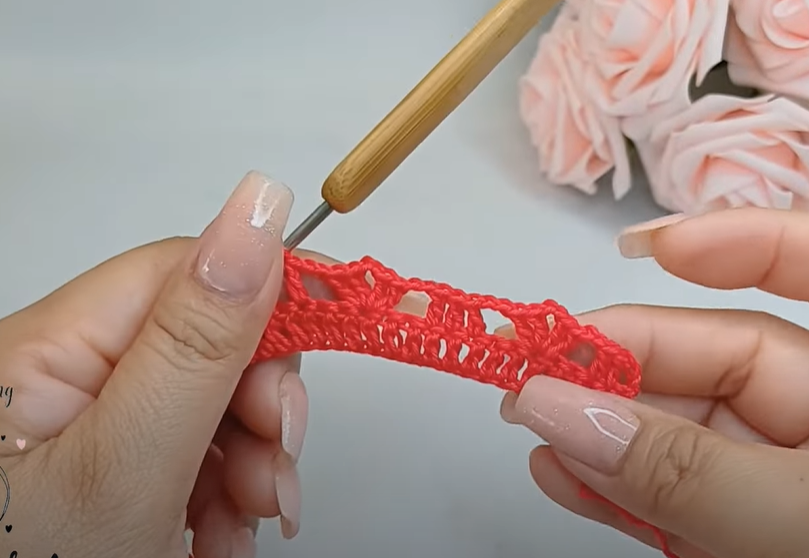
Row 1: Dc in 4th ch from hook (counts as 1st dc) and in next 8 chs. (9 dc for right back panel). (2 dc, ch 2, 2 dc) in next ch (first corner). Dc in next 10 chs (10 dc for right sleeve). (2 dc, ch 2, 2 dc) in next ch (second corner). Dc in next 18 chs (18 dc for front panel). (2 dc, ch 2, 2 dc) in next ch (third corner). Dc in next 10 chs (10 dc for left sleeve). (2 dc, ch 2, 2 dc) in next ch (fourth corner). Dc in last 9 chs (9 dc for left back panel). Ch 3 (counts as 1st dc), turn. (Total 66 dc, 4 ch-2 sps).
Row 2: Dc in each dc to first corner ch-2 sp. (2 dc, ch 2, 2 dc) in ch-2 sp. Dc in each dc to next corner ch-2 sp. Rep from * to * 2 more times. Dc in each remaining dc to end of row. Ch 3, turn. (Increases 8 dc per row).
Row 3 – Row 6: Repeat Row 2. At the end of Row 6, your yoke should be fairly flat, forming a rectangle when laid out. The number of stitches between corners will have increased significantly.
Part 2: Separating for Body and Sleeves & Buttonholes
Row 7 (Separation & Buttonhole Row): Ch 3, dc in next 2 dc. (First Buttonhole: Ch 1, sk 1 st, dc in next st). Dc in next 4 dc. (Second Buttonhole: Ch 1, sk 1 st, dc in next st). Dc in remaining dc of the back panel. Skip first corner ch-2 sp and all stitches of the first sleeve panel. Dc in first dc of the front panel. Dc in each dc across the front panel to the next corner ch-2 sp. Skip second corner ch-2 sp and all stitches of the second sleeve panel. Dc in first dc of the left back panel. Dc in next 4 dc. (Third Buttonhole: Ch 1, sk 1 st, dc in next st). Dc in next 2 dc. Dc in last dc of the left back panel. Ch 3, turn. The two sleeve openings are now formed.
Row 8 (Joining the Body): Dc in each dc and each ch-1 sp (buttonhole) across. Join with sl st to top of beg ch-3 to form a continuous round for the body. Ch 3, do not turn. (Working in rounds now).
Part 3: The Skirt (Alternating Pattern)
The skirt will be worked in continuous rounds, increasing gradually to create the A-line flare. We’ll alternate between solid rows and openwork rows.
Round 9 (Solid Round): Dc in each dc around. Join with sl st to top of beg ch-3. Ch 3.
Round 10 (Openwork Round): Sk first st, (dc, ch 1, dc) in next st (V-st). Sk 2 sts, (dc, ch 1, dc) in next st. Rep from * to * around. Join with sl st to top of beg ch-3. Ch 3.
Round 11 (Solid Round): Dc in each dc and each ch-1 sp around. Join with sl st to top of beg ch-3. Ch 3.
Round 12 (Openwork Round – Increase): (dc, ch 1, dc) in first st. Sk 2 sts, (dc, ch 1, dc) in next st. Rep from * to * around. Every 5th or 6th V-st, work (dc, ch 1, dc, ch 1, dc) in one st (or ch-1 sp from previous round) to gradually increase the flare. Join with sl st to top of beg ch-3. Ch 3.
Round 13 (Solid Round): Dc in each dc and each ch-1 sp around. Join with sl st to top of beg ch-3. Ch 3.

Repeat Rounds 10-13, continuing to strategically increase in the openwork rounds (e.g., every 4th or 5th V-st) to maintain the flare, until the skirt reaches your desired length (approx. 14-16 inches from shoulder to hem). Finish on a solid dc round for a neat edge.
Final Skirt Edge (Optional): Ch 1, sc in each dc around. Join with sl st to first sc. FO.
Part 4: The Sleeves (Make 2)
Sleeves are worked in the round, joining yarn at the center of the armhole.
Round 1: Join yarn with sl st at the bottom center of one armhole. Ch 3 (counts as 1st dc). Work 20-24 dc evenly around the armhole opening. Join with sl st to top of beg ch-3. (Adjust stitch count to fit armhole without pulling). Round 2: Ch 3, dc in each dc around. Join with sl st to top of beg ch-3. Round 3: Ch 1, sc in each dc around. Join with sl st to first sc. FO.
Repeat for the second sleeve.
Part 5: Finishing Touches
- Placket Edging: Along the edges of the back opening, work a row of sc for a neat finish if desired. (Ch 1, sc evenly up one side, around the neck, and down the other side. FO.)
- Neckline Edging: Ch 1, sc evenly around the neckline. Join with sl st. FO.
- Sew Buttons: Align the buttons with the buttonholes you created. Securely sew the three strawberry buttons onto the unbuttoned side of the back placket.
- Weave in all loose ends carefully.
Video tutorial
Your adorable Strawberry Baby Dress is now complete! This is a truly heartfelt garment that will be cherished.
Don’t forget to share your finished dress with me in the comments or by tagging me on social media! Happy crocheting!